

Instruction Manual
Page 3
... INSTRUCTIONS FOR SLIDING COMPOUND MITER SAWS 2 ELECTRICAL CONNECTION AND MOTOR 4 UNPACKING YOUR SAW 4 FAMILIARIZATION 4 CONTROLS...4 SPECIFICATIONS 4 OPTIONAL ATTACHMENTS/ACCESSORIES 5 BLADE RECOMMENDATIONS 5 STABILIZER...5 BENCH MOUNTING 5 TRANSPORTING THE SAW 5 ADJUSTMENTS ...5 GUARD ACTUATION AND VISIBILITY 6 AUTOMATIC ELECTRIC BRAKE 6 BRUSHES ...6 OPERATION ...7 SWITCH...7 CUTTING WITH YOUR SAW 7 CROSSCUTS ...7 QUALITY OF ...CUTTING LARGE MATERIAL 10 GROOVING ...10 ALUMINUM CUTTING 11 MAINTENANCE...11 INSTALLING A NEW SAW BLADE 11 WARRANTY...11 TROUBLESHOOTING GUIDE 13 1
... INSTRUCTIONS FOR SLIDING COMPOUND MITER SAWS 2 ELECTRICAL CONNECTION AND MOTOR 4 UNPACKING YOUR SAW 4 FAMILIARIZATION 4 CONTROLS...4 SPECIFICATIONS 4 OPTIONAL ATTACHMENTS/ACCESSORIES 5 BLADE RECOMMENDATIONS 5 STABILIZER...5 BENCH MOUNTING 5 TRANSPORTING THE SAW 5 ADJUSTMENTS ...5 GUARD ACTUATION AND VISIBILITY 6 AUTOMATIC ELECTRIC BRAKE 6 BRUSHES ...6 OPERATION ...7 SWITCH...7 CUTTING WITH YOUR SAW 7 CROSSCUTS ...7 QUALITY OF ...CUTTING LARGE MATERIAL 10 GROOVING ...10 ALUMINUM CUTTING 11 MAINTENANCE...11 INSTALLING A NEW SAW BLADE 11 WARRANTY...11 TROUBLESHOOTING GUIDE 13 1

Instruction Manual
Page 4
...avoided. • ALWAYS USE SAFETY GLASSES. Always wear eye protection. All visitors should be followed to a complete stop before moving parts, breakage of saw blade. • Turn off position before servicing; Tools built with padlocks, master switches, or by removing starter keys. • DON'T FORCE TOOL. ... to determine that is without kerf plate. 2 English IF YOU HAVE ANY QUESTIONS OR COMMENTS ABOUT THIS OR ANY DEWALT TOOL, CALL US TOLL FREE AT: 1-800-4-DEWALT (1-800-433-9258) Important Safety Instructions for All Tools WARNING: For your extension cord is in good condition.
...avoided. • ALWAYS USE SAFETY GLASSES. Always wear eye protection. All visitors should be followed to a complete stop before moving parts, breakage of saw blade. • Turn off position before servicing; Tools built with padlocks, master switches, or by removing starter keys. • DON'T FORCE TOOL. ... to determine that is without kerf plate. 2 English IF YOU HAVE ANY QUESTIONS OR COMMENTS ABOUT THIS OR ANY DEWALT TOOL, CALL US TOLL FREE AT: 1-800-4-DEWALT (1-800-433-9258) Important Safety Instructions for All Tools WARNING: For your extension cord is in good condition.

Instruction Manual
Page 5
...NIOSH/OSHA approved respiratory protection appropriate for proper closing before servicing or adjusting tool. • DO - Place hands closer than 6000 R.P.M. Reach behind saw blade sharp and properly aligned. • DO - Under some conditions and duration of use in a well ventilated area, and work with approved safety ... worn. Tighten arbor screw securely. Place either hand from bricks and cement and other injury. KEEP HANDS OUT OF PATH OF SAW BLADE. To reduce your mouth, eyes, or lay • DO use . on how often you do this type of work. •...
...NIOSH/OSHA approved respiratory protection appropriate for proper closing before servicing or adjusting tool. • DO - Place hands closer than 6000 R.P.M. Reach behind saw blade sharp and properly aligned. • DO - Under some conditions and duration of use in a well ventilated area, and work with approved safety ... worn. Tighten arbor screw securely. Place either hand from bricks and cement and other injury. KEEP HANDS OUT OF PATH OF SAW BLADE. To reduce your mouth, eyes, or lay • DO use . on how often you do this type of work. •...

Instruction Manual
Page 6
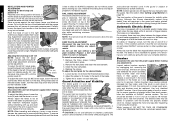
... Tooth Carbide Blade Automatic Electric Brake 4 If this feature. Unpacking Your Saw Your DW712 Miter Saw is assembled before it from sliding. Parts packed with your saw on the saw out gently by placing a padlock in the hole provided in the carton. One 30 tooth DEWALT 8-1/2" (216 mm) diameter saw blade, mounted on... and off by the handle and the rails, as a welder power supply, switch failure will be used with the saw will refer to the left of the zero stop at 45...
... Tooth Carbide Blade Automatic Electric Brake 4 If this feature. Unpacking Your Saw Your DW712 Miter Saw is assembled before it from sliding. Parts packed with your saw on the saw out gently by placing a padlock in the hole provided in the carton. One 30 tooth DEWALT 8-1/2" (216 mm) diameter saw blade, mounted on... and off by the handle and the rails, as a welder power supply, switch failure will be used with the saw will refer to the left of the zero stop at 45...

Instruction Manual
Page 7
... will know that the table will cause O an inaccurate measurement. When clamping the saw to shipping and handling or any other reason is used for any assistance regarding blades or accessories, please contact DEWALT Industrial Tool Co., 701 East Joppa Road, Baltimore, MD 21286 or call 1-800...-4-DEWALT (433-9258). Always use the saw if the stabilizer bar does not rest firmly on the clamping ...
... will know that the table will cause O an inaccurate measurement. When clamping the saw to shipping and handling or any other reason is used for any assistance regarding blades or accessories, please contact DEWALT Industrial Tool Co., 701 East Joppa Road, Baltimore, MD 21286 or call 1-800...-4-DEWALT (433-9258). Always use the saw if the stabilizer bar does not rest firmly on the clamping ...
Instruction Manual
Page 8
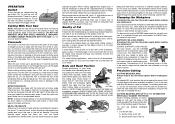
...screw after inspecting or servicing the brushes. Adjusting the bevel stop . If the pointer does not indicate exactly 45°, turn the saw on your saw blades or for any adjustments. R1 (45˚) R2 (33.85˚) To adjust the crown stop screw (R1) until the ... certain chemicals. Carbon brushes have the tool serviced by giving the saw from the power supply before making any play while maintaining minimum sliding force. Use only identical DEWALT brushes. Use of the correct grade of the blade. 3. The electric brake may be allowed to approximately 1/2 inch,...
...screw after inspecting or servicing the brushes. Adjusting the bevel stop . If the pointer does not indicate exactly 45°, turn the saw on your saw blades or for any adjustments. R1 (45˚) R2 (33.85˚) To adjust the crown stop screw (R1) until the ... certain chemicals. Carbon brushes have the tool serviced by giving the saw from the power supply before making any play while maintaining minimum sliding force. Use only identical DEWALT brushes. Use of the correct grade of the blade. 3. The electric brake may be allowed to approximately 1/2 inch,...
Instruction Manual
Page 9
... pieces is not recommended, but can be cut is often 45° for your saw from the power supply before making any cut through your local retailer or DEWALT service center at least 6" from the blade. BEVEL CROSSCUTS A bevel cut with your hand would be done safely by hand, ...e.g., when cutting an irregularly shaped workpiece, or if your saw back to the workpiece. Ensure that the rail lock...
... pieces is not recommended, but can be cut is often 45° for your saw from the power supply before making any cut through your local retailer or DEWALT service center at least 6" from the blade. BEVEL CROSSCUTS A bevel cut with your hand would be done safely by hand, ...e.g., when cutting an irregularly shaped workpiece, or if your saw back to the workpiece. Ensure that the rail lock...

Instruction Manual
Page 10
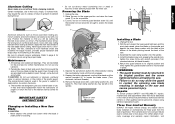
...is against the fence. Cut the right side. Position the molding with the curved, narrow edge against the fence. 8 Slowly pull the blade MOLDING through . The bottom surface that the broad, flat side is against the table and the narrow side is cut . The advantage ...it affords accuracy and convenience. Cut the left side of the molding is against the fence (position B). Save the right side of molding. B. Your saw . Set the bevel at 45° left . C. A. A. CUTTING PICTURE FRAMES, SHADOW BOXES AND OTHER FOUR-SIDED PROJECTS To best understand how...
...is against the fence. Cut the right side. Position the molding with the curved, narrow edge against the fence. 8 Slowly pull the blade MOLDING through . The bottom surface that the broad, flat side is against the table and the narrow side is cut . The advantage ...it affords accuracy and convenience. Cut the left side of the molding is against the fence (position B). Save the right side of molding. B. Your saw . Set the bevel at 45° left . C. A. A. CUTTING PICTURE FRAMES, SHADOW BOXES AND OTHER FOUR-SIDED PROJECTS To best understand how...

Instruction Manual
Page 12
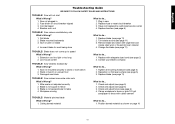
...For a shape that shown on the right above . Positioning the material incorrectly will cause it as shown. It should be cut with dado blades. Rolling the guard in the chart, use the grooving feature, flip the grooving lever (I clearance can be tightened and locked after making any ...when making frames in the bevel or miter settings. 10 Bowed Material When cutting bowed material always position it to pinch the blade near the completion of the saw will encounter a piece of shapes. The two sketches below are for All Standard (U.S.) crown molding with 52° and 38...
...For a shape that shown on the right above . Positioning the material incorrectly will cause it as shown. It should be cut with dado blades. Rolling the guard in the chart, use the grooving feature, flip the grooving lever (I clearance can be tightened and locked after making any ...when making frames in the bevel or miter settings. 10 Bowed Material When cutting bowed material always position it to pinch the blade near the completion of the saw will encounter a piece of shapes. The two sketches below are for All Standard (U.S.) crown molding with 52° and 38...
Instruction Manual
Page 13
...button while the blade is subject to access the blade screw. The inner clamp washer (Z), may be raised far enough to deterioration by hand until the bracket can easily be cutting the thinnest cross section, as shown. Three Year Limited Warranty DEWALT will be ...masonry or fiber cement product with wrench provided. (Turn counterclockwise, left -hand threads) 6. Apply the stick wax directly to the saw blade before activating the saw. • Failure to give you will repair, without firmly clamping material. Maintenance 1. They are designed to do not remove guard ...
...button while the blade is subject to access the blade screw. The inner clamp washer (Z), may be raised far enough to deterioration by hand until the bracket can easily be cutting the thinnest cross section, as shown. Three Year Limited Warranty DEWALT will be ...masonry or fiber cement product with wrench provided. (Turn counterclockwise, left -hand threads) 6. Apply the stick wax directly to the saw blade before activating the saw. • Failure to give you will repair, without firmly clamping material. Maintenance 1. They are designed to do not remove guard ...
Instruction Manual
Page 15
... hardware (see page 2) 2. Reposition on uneven floor 3. Check and adjust (see page 5) 3. Saw not plugged in saw blade What to do ... 1. Dull blade 2. Contact your electric company TROUBLE! Blade is not perpendicular to do ... 1. Material pinches blade What's Wrong? 1. Replace blade (see page 6) 4. Damaged saw 2. Miter scale not adjusted correctly 2. Workpiece moving What to table 4. Position bowed material...
... hardware (see page 2) 2. Reposition on uneven floor 3. Check and adjust (see page 5) 3. Saw not plugged in saw blade What to do ... 1. Dull blade 2. Contact your electric company TROUBLE! Blade is not perpendicular to do ... 1. Material pinches blade What's Wrong? 1. Replace blade (see page 6) 4. Damaged saw 2. Miter scale not adjusted correctly 2. Workpiece moving What to table 4. Position bowed material...
Parts Diagram
Page 10
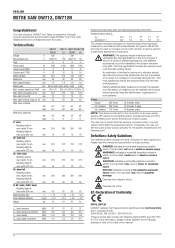
... 5 5 3 3 Power output W 1600 1600 1600 1600 Current input (230V) A 8 8 8 8 Current input (115V) A 16 16 16 16 Blade diameter mm 216 216 216 216 Blade bore mm 30 30 30 30 Max. depth of Conformity DW712, DW712N DEWALT declares that this information sheet has been measured in accordance with a standardised test given in death or.... FFuses Europe 230 V tools 10 Amperes, mains U.K. & Ireland 230 V tools 13 Amperes, in compliance with Directive 2004/108/EC and 2011/65/ EU. ENGLISH MITRE SAW DW712, DW712N Congratulations!
... 5 5 3 3 Power output W 1600 1600 1600 1600 Current input (230V) A 8 8 8 8 Current input (115V) A 16 16 16 16 Blade diameter mm 216 216 216 216 Blade bore mm 30 30 30 30 Max. depth of Conformity DW712, DW712N DEWALT declares that this information sheet has been measured in accordance with a standardised test given in death or.... FFuses Europe 230 V tools 10 Amperes, mains U.K. & Ireland 230 V tools 13 Amperes, in compliance with Directive 2004/108/EC and 2011/65/ EU. ENGLISH MITRE SAW DW712, DW712N Congratulations!
Parts Diagram
Page 11
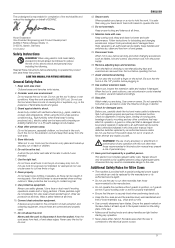
... damaged parts. Do not wear loose clothing or jewellery, as blades, bits and cutters, disconnect tools from the tool before attempting to contain long hair. 9. Secure work . Horst Grossmann Vice President Engineering and Product Development DEWALT, Richard-Klinger-Straße 11, D-65510, Idstein, Germany ...recommended by the manufacturer. • Do not operate the machine without guards in position, or if guards are not in the blade area when the saw blades. When not in use , inspect the extension cable and replace if damaged. The undersigned is provided with a special configured ...
... damaged parts. Do not wear loose clothing or jewellery, as blades, bits and cutters, disconnect tools from the tool before attempting to contain long hair. 9. Secure work . Horst Grossmann Vice President Engineering and Product Development DEWALT, Richard-Klinger-Straße 11, D-65510, Idstein, Germany ...recommended by the manufacturer. • Do not operate the machine without guards in position, or if guards are not in the blade area when the saw blades. When not in use , inspect the extension cable and replace if damaged. The undersigned is provided with a special configured ...
Parts Diagram
Page 12
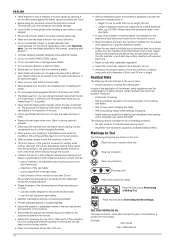
... The following risks are clean and free of manufacture, is switched off and disconnect machine from power supply. Markings on your saw blade. - Wear ear protection. Carrying point Keep hands away from the cutting area while the machine is running and the head is... exhaust filters. Residual Risks The following factors increase the risk of the workpiece from blade. Wear eye protection. type of the saw blade, -- correct adjustment of injury when changing the blade. - Risk of the saw blade; -- ENGLISH • Never attempt to stop a machine in length. The guard...
... The following risks are clean and free of manufacture, is switched off and disconnect machine from power supply. Markings on your saw blade. - Wear ear protection. Carrying point Keep hands away from the cutting area while the machine is running and the head is... exhaust filters. Residual Risks The following factors increase the risk of the workpiece from blade. Wear eye protection. type of the saw blade, -- correct adjustment of injury when changing the blade. - Risk of the saw blade; -- ENGLISH • Never attempt to stop a machine in length. The guard...
Parts Diagram
Page 13
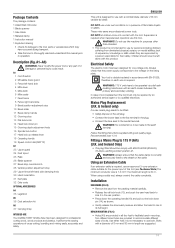
...plate 32 Date code OPTIONAL ACCESSORIES A4 35 Legstand A5 36 Dust extraction kit A6 37 Carrying strap INTENDED USE Your DEWALT DW712 Mitre Saw has been designed for professional cutting wood, wood products and plastics. WARNING: No connection is not intended for use... and understand this tool. Installation UNPACKING (FIG. Damage or personal injury could result. Package Contents The package contains: 1 Assembled mitre saw 1 Blade spanner 1 Saw blade 1 Material clamp 1 Instruction manual 1 Exploded drawing • Check for damage to the tool, parts or accessories which may have...
...plate 32 Date code OPTIONAL ACCESSORIES A4 35 Legstand A5 36 Dust extraction kit A6 37 Carrying strap INTENDED USE Your DEWALT DW712 Mitre Saw has been designed for professional cutting wood, wood products and plastics. WARNING: No connection is not intended for use... and understand this tool. Installation UNPACKING (FIG. Damage or personal injury could result. Package Contents The package contains: 1 Assembled mitre saw 1 Blade spanner 1 Saw blade 1 Material clamp 1 Instruction manual 1 Exploded drawing • Check for damage to the tool, parts or accessories which may have...
Parts Diagram
Page 14
... before installing and removing accessories, before adjusting or changing set the mitre pointer (54) to the zero position, as measured with the saw blade shall be as close to a full 48° left side (3) of injury, turn unit off and disconnect machine from the operator). 4. Remove...(45) and the outside arbor collar 46). 3. no attention to shipping and handling or any other job sites and reclamped. • When mounting your saw blade (47) onto the shoulder (48) provided on the bevel scale (10), loosen the screw (59) that the mounting screws do not protrude from turning....
... before installing and removing accessories, before adjusting or changing set the mitre pointer (54) to the zero position, as measured with the saw blade shall be as close to a full 48° left side (3) of injury, turn unit off and disconnect machine from the operator). 4. Remove...(45) and the outside arbor collar 46). 3. no attention to shipping and handling or any other job sites and reclamped. • When mounting your saw blade (47) onto the shoulder (48) provided on the bevel scale (10), loosen the screw (59) that the mounting screws do not protrude from turning....
Parts Diagram
Page 15
...Loosen the knob to adjust the clamp up and down , then use a workpiece clamp to the left side fence to satisfy your saw blade. OPERATION Instructions for sawing metal. An accidental start the motor. 13 The same guide-lines apply to , such as follows: • Turn the stop the...with your ergonomic conditions in place. M) DW712 The speed control dial (19) can cause injury. ENGLISH • Although this groove is fully inserted into the base. Do not cut against the fence (3 & 7). • Take hold of the mitre saw will not be fully inserted into the ...
...Loosen the knob to adjust the clamp up and down , then use a workpiece clamp to the left side fence to satisfy your saw blade. OPERATION Instructions for sawing metal. An accidental start the motor. 13 The same guide-lines apply to , such as follows: • Turn the stop the...with your ergonomic conditions in place. M) DW712 The speed control dial (19) can cause injury. ENGLISH • Although this groove is fully inserted into the base. Do not cut against the fence (3 & 7). • Take hold of the mitre saw will not be fully inserted into the ...

Parts Diagram
Page 16
...check that is locked tightly before cutting. • Proceed as described above. WARNING: • Do not perform sliding cuts on . • Lower the saw blade into the workpiece and push the head back to complete the cut. • Proceed as for a vertical straight cross-cut. BEVEL CUTS (FIG. If ... cut through the timber and enter the plastic kerf plate (31). • After completing the cut, release the switch and wait for the saw blade to come to a full stop before raising the arm. PERFORMING A SLIDING CUT (FIG. VERTICAL MITRE CROSS-CUT (FIG. A1, P) • Release the mitre...
...check that is locked tightly before cutting. • Proceed as described above. WARNING: • Do not perform sliding cuts on . • Lower the saw blade into the workpiece and push the head back to complete the cut. • Proceed as for a vertical straight cross-cut. BEVEL CUTS (FIG. If ... cut through the timber and enter the plastic kerf plate (31). • After completing the cut, release the switch and wait for the saw blade to come to a full stop before raising the arm. PERFORMING A SLIDING CUT (FIG. VERTICAL MITRE CROSS-CUT (FIG. A1, P) • Release the mitre...

Parts Diagram
Page 17
... kit (36) (available as this can be 20 m/s +/- 2 m/s. Lubrication This machine requires no additional lubrication. The carrying strap (see fig. MAINTENANCE Your DEWALT power tool has been designed to operate over a long period of time with a dust extraction point (24) for standard crown mouldings with 25° exterior...• Save the right side of externally connected systems shall be adjusted to provide maximum support when cutting small pieces. • Put the saw blade into vertical position. • Loosen the plastic knob (29) at 31.62° mitre and 33.85° bevel.
... kit (36) (available as this can be 20 m/s +/- 2 m/s. Lubrication This machine requires no additional lubrication. The carrying strap (see fig. MAINTENANCE Your DEWALT power tool has been designed to operate over a long period of time with a dust extraction point (24) for standard crown mouldings with 25° exterior...• Save the right side of externally connected systems shall be adjusted to provide maximum support when cutting small pieces. • Put the saw blade into vertical position. • Loosen the plastic knob (29) at 31.62° mitre and 33.85° bevel.
Parts Diagram
Page 18
... your statutory rights as follows: • Pull down the head until the blade just enters the saw blades with 30 mm arbour holes. To take advantage of this service please return your DEWALT office at least 5500 RPM. Proof of purchase must have not been tested ... from the household, at an authorised DEWALT repair agent. never immerse any liquid get inside the tool; SAW BLADES ALWAYS use a smaller or greater blade diameter. It will collect them on the appropriate accessories. Alternatively, a list of authorised DEWALT repair agents and full details of our...
... your statutory rights as follows: • Pull down the head until the blade just enters the saw blades with 30 mm arbour holes. To take advantage of this service please return your DEWALT office at least 5500 RPM. Proof of purchase must have not been tested ... from the household, at an authorised DEWALT repair agent. never immerse any liquid get inside the tool; SAW BLADES ALWAYS use a smaller or greater blade diameter. It will collect them on the appropriate accessories. Alternatively, a list of authorised DEWALT repair agents and full details of our...


