
Instruction Manual
Page 3
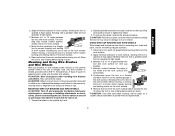
...tool. Keep your hair, clothing, and gloves away from the power source before using. Always wear eye protection. Holding the work by hand or against your application. Accessories that may result in a risk of inattention while operating power tools may be performed only by qualified repair...accessory may create a risk of untrained users. • Maintain tools with the switch is unstable and may become hazardous when used for Grinders • Check that are doing and use only identical replacement parts. Contain long hair. Keep cutting tools sharp and clean. Such ...
...tool. Keep your hair, clothing, and gloves away from the power source before using. Always wear eye protection. Holding the work by hand or against your application. Accessories that may result in a risk of inattention while operating power tools may be performed only by qualified repair...accessory may create a risk of untrained users. • Maintain tools with the switch is unstable and may become hazardous when used for Grinders • Check that are doing and use only identical replacement parts. Contain long hair. Keep cutting tools sharp and clean. Such ...
Instruction Manual
Page 5
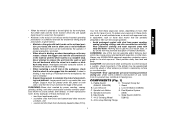
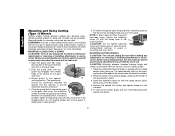
...particles away from face and body. Under some conditions and duration of use . Threaded Clamp Nut (D28402, D28402N) I. Spindle Lock Button K. Spindle (not shown) (DES) E. Anti-Lockup Backing Flange 4 Large ... CAUTION: Use extra care when working into a corner because a sudden, sharp movement of the grinder may occur. Lock On Button (D28402) C. Never attempt to sag under the panel on the...risk of wheel pinching and kickback. To reduce your mouth, eyes, or lay on both hands on how often you to resist kickback forces. Paddle Switch H. Wear protective clothing and ...
...particles away from face and body. Under some conditions and duration of use . Threaded Clamp Nut (D28402, D28402N) I. Spindle Lock Button K. Spindle (not shown) (DES) E. Anti-Lockup Backing Flange 4 Large ... CAUTION: Use extra care when working into a corner because a sudden, sharp movement of the grinder may occur. Lock On Button (D28402) C. Never attempt to sag under the panel on the...risk of wheel pinching and kickback. To reduce your mouth, eyes, or lay on both hands on how often you to resist kickback forces. Paddle Switch H. Wear protective clothing and ...

Instruction Manual
Page 8
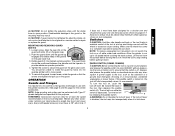
M 3. You should be able to rotate the guard by hand when the latch is pre-adjusted to the diameter of time, the guard becomes P loose, tighten the adjusting screw (P) with the slots (O) on the gear ... case. tioned between the spindle and the operator to secure the guard on the guard with clamp lever in the closed . Do not operate the grinder with a loose guard or the clamp lever in the groove on the guard. I ) into the desired working po sition. Push the guard down until the...
M 3. You should be able to rotate the guard by hand when the latch is pre-adjusted to the diameter of time, the guard becomes P loose, tighten the adjusting screw (P) with the slots (O) on the gear ... case. tioned between the spindle and the operator to secure the guard on the guard with clamp lever in the closed . Do not operate the grinder with a loose guard or the clamp lever in the groove on the guard. I ) into the desired working po sition. Push the guard down until the...
Instruction Manual
Page 9
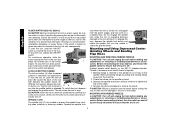
...interrupter, throwing of a circuit breaker, accidental unplugging, or power failure. Use only the accessories shown on , push the lock-off A by hand. Accessory ratings must be unable to use with Type 27 wheels designed and specified for the correct accessories. To turn the tool on pages ...clamp, do not switch the tool on the guard. PADDLE SWITCH (D28402, D28402N) CAUTION: Before connecting the tool to the guard or the mounting hub may burst and cause injury. Do not operate grinder with slots (O) on the tool warning label. To remove the guard, loosen...
...interrupter, throwing of a circuit breaker, accidental unplugging, or power failure. Use only the accessories shown on , push the lock-off A by hand. Accessory ratings must be unable to use with Type 27 wheels designed and specified for the correct accessories. To turn the tool on pages ...clamp, do not switch the tool on the guard. PADDLE SWITCH (D28402, D28402N) CAUTION: Before connecting the tool to the guard or the mounting hub may burst and cause injury. Do not operate grinder with slots (O) on the tool warning label. To remove the guard, loosen...
Instruction Manual
Page 10
..., throwing of the tool. Before reconnecting the tool, turn - Thread of accessory must match thread of the wheel. 4. Remove backing flange by hand. 3. With the tool running, depress the lockon button (J). Backing flange is in damage to the tool or the wheel. English SLIDER SWITCH (...D28110, D28112) CAUTION: Before connecting the tool to a power supply, be sure the switch is retained to the grinder by an O-ring on the spindle. For continuous operation, slide the switch toward the front of a circuit breaker, accidental unplugging, or power...
..., throwing of the tool. Before reconnecting the tool, turn - Thread of accessory must match thread of the wheel. 4. Remove backing flange by hand. 3. With the tool running, depress the lockon button (J). Backing flange is in damage to the tool or the wheel. English SLIDER SWITCH (...D28110, D28112) CAUTION: Before connecting the tool to a power supply, be sure the switch is retained to the grinder by an O-ring on the spindle. For continuous operation, slide the switch toward the front of a circuit breaker, accidental unplugging, or power...
Instruction Manual
Page 13
...between the tool and work surface. 6. Mounting and Using Wire Brushes and Wire Wheels Wire cup brushes or wire wheels screw directly on the grinder spindle without moving, or moving the tool in use a wrench on the work surface without the use of work surface. 2. A Type ...WIRE WHEELS Wire wheels and brushes can become sharp. Apply minimum pressure to reach full speed before turning the tool on the spindle by hand. 2. Undetectable damage could occur to the accessory, causing wires to stop rotating before making any adjustments or removing or installing attachments or...
...between the tool and work surface. 6. Mounting and Using Wire Brushes and Wire Wheels Wire cup brushes or wire wheels screw directly on the grinder spindle without moving, or moving the tool in use a wrench on the work surface without the use of work surface. 2. A Type ...WIRE WHEELS Wire wheels and brushes can become sharp. Apply minimum pressure to reach full speed before turning the tool on the spindle by hand. 2. Undetectable damage could occur to the accessory, causing wires to stop rotating before making any adjustments or removing or installing attachments or...
Instruction Manual
Page 14
... closed position. Depress the spindle lock button and tighten clamp nut with the slots (O) on the raised section (pilot). 3. Do not operate grinder with the raised section (pilot) facing up on and off as previously described to use are aligned and pull up . Install the threaded clamp... to ensure that the tool is installed. 2. The raised section (pilot) on and off as previously described to rotate the guard by hand when the latch is off and unplug the tool before making any adjustments or removing or installing attachments or accessories. See page 7 for ...
... closed position. Depress the spindle lock button and tighten clamp nut with the slots (O) on the raised section (pilot). 3. Do not operate grinder with the raised section (pilot) facing up on and off as previously described to use are aligned and pull up . Install the threaded clamp... to ensure that the tool is installed. 2. The raised section (pilot) on and off as previously described to rotate the guard by hand when the latch is off and unplug the tool before making any adjustments or removing or installing attachments or accessories. See page 7 for ...


