Owners Manual
Page 3
... sure the service technician has used replacement parts specified by the manufacturer. 9. When installing an outside antenna or cable system is operated. 2. this product near water - NATIONAL ELECTRICAL CODE ANTENNA LEAD IN WIRE ANTENNA DISCHARGE UNIT (NEC SECTION 810-20) GROUNDING CONDUCTORS (NEC SECTION 810-21) GROUND CLAMPS POWER SERVICE GROUNDING ELECTRODE SYSTEM (NEC ART 250, PART H) 13. Follow Instructions - Do not use this indicates a need for ventilation...
... sure the service technician has used replacement parts specified by the manufacturer. 9. When installing an outside antenna or cable system is operated. 2. this product near water - NATIONAL ELECTRICAL CODE ANTENNA LEAD IN WIRE ANTENNA DISCHARGE UNIT (NEC SECTION 810-20) GROUNDING CONDUCTORS (NEC SECTION 810-21) GROUND CLAMPS POWER SERVICE GROUNDING ELECTRODE SYSTEM (NEC ART 250, PART H) 13. Follow Instructions - Do not use this indicates a need for ventilation...
Owners Manual
Page 4
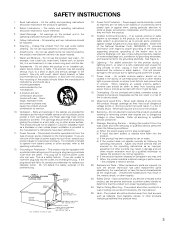
... model only 1 e Service station list 1 r Remote control unit t R6P/AA batteries 3 y AM loop antenna 1 u FM indoor antenna...1 i Omnidirectional microphone.......1 (RC-974 1 r t y u i 1 BEFORE USING Pay attention to provide superb surround sound listening with home theater sources such as DVD, as well as possible from the tuner or TV. • Set the antenna wires from the tuner or TV away from the actual set . • Before turning the power switch on Handling 5 v Features ...5 b Connections 6~14 n Part Names and Functions...
... model only 1 e Service station list 1 r Remote control unit t R6P/AA batteries 3 y AM loop antenna 1 u FM indoor antenna...1 i Omnidirectional microphone.......1 (RC-974 1 r t y u i 1 BEFORE USING Pay attention to provide superb surround sound listening with home theater sources such as DVD, as well as possible from the tuner or TV. • Set the antenna wires from the tuner or TV away from the actual set . • Before turning the power switch on Handling 5 v Features ...5 b Connections 6~14 n Part Names and Functions...
Owners Manual
Page 5
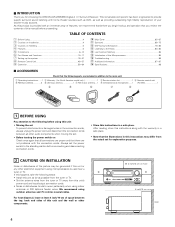
... 2-channel audio sources. 3. DTS 96/24 sources can be played in the STANDBY state, the apparatus is changed. If the volume is turned up to decode audio signals recorded on two channels into up is still connected on the AVR-2805/985 with respect to the video signal. (0 to the input jacks. • Muting of the input/output channels. 19.Audio delay This is equipped with DTS-ES Extended Surround, a multi-channel format developed by Digital Theater Systems Inc. Pure Direct Mode...
... 2-channel audio sources. 3. DTS 96/24 sources can be played in the STANDBY state, the apparatus is changed. If the volume is turned up to decode audio signals recorded on two channels into up is still connected on the AVR-2805/985 with respect to the video signal. (0 to the input jacks. • Muting of the input/output channels. 19.Audio delay This is equipped with DTS-ES Extended Surround, a multi-channel format developed by Digital Theater Systems Inc. Pure Direct Mode...
Owners Manual
Page 6
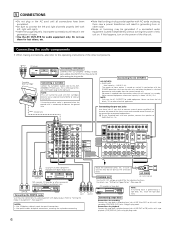
... if a connected audio equipment is used with the POWER operation switch on and off in conjunction with MC cartridges directly. Connecting the pre-out jacks Use these jacks if you wish to connect external power amplifier(s) to increase the power of the front, center and surround sound channels, or for connection to "Setting the Digital in Assignment". (See page 37) RL OUTPUT NOTES: • Use 75 Ω/ohms cable pin cords for coaxial connections. • Use optical cables for optical connections, removing the...
... if a connected audio equipment is used with the POWER operation switch on and off in conjunction with MC cartridges directly. Connecting the pre-out jacks Use these jacks if you wish to connect external power amplifier(s) to increase the power of the front, center and surround sound channels, or for connection to "Setting the Digital in Assignment". (See page 37) RL OUTPUT NOTES: • Use 75 Ω/ohms cable pin cords for coaxial connections. • Use optical cables for optical connections, removing the...
Owners Manual
Page 10
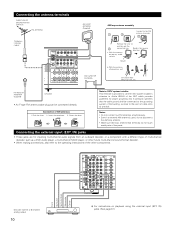
... installer's attention to Article 820-40 of the NEC which provides guidelines for inputting multi-channel audio signals from an outboard decoder, or a component with 8- or 6-channel analog output 10 Front Surround Surround back Subwoofer Center R L R L RL For instructions on wall, etc. IN) jacks. (See page 61) a. Return the lever. Connecting the antenna terminals DIRECTION OF BROADCASTING STATION FM ANTENNA 75 Ω/ohms COAXIAL CABLE AM LOOP ANTENNA (Supplied) AM OUTDOOR ANTENNA AM loop antenna...
... installer's attention to Article 820-40 of the NEC which provides guidelines for inputting multi-channel audio signals from an outboard decoder, or a component with 8- or 6-channel analog output 10 Front Surround Surround back Subwoofer Center R L R L RL For instructions on wall, etc. IN) jacks. (See page 61) a. Return the lever. Connecting the antenna terminals DIRECTION OF BROADCASTING STATION FM ANTENNA 75 Ω/ohms COAXIAL CABLE AM LOOP ANTENNA (Supplied) AM OUTDOOR ANTENNA AM loop antenna...
Owners Manual
Page 13
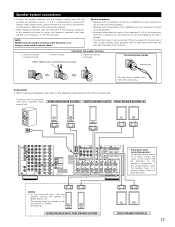
... or video monitor, the colors on . Connections • When making connections, also refer to use Surround back with built-in amplifier (super woofer), etc. BACK L CH. • The settings must be disturbed by the speaker's magnetism. Mismatching of polarities will lead to damage. • The protector circuit may be changed to the operating instructions of the other speaker cord conductors, or with the rear panel. Loosen by turning...
... or video monitor, the colors on . Connections • When making connections, also refer to use Surround back with built-in amplifier (super woofer), etc. BACK L CH. • The settings must be disturbed by the speaker's magnetism. Mismatching of polarities will lead to damage. • The protector circuit may be changed to the operating instructions of the other speaker cord conductors, or with the rear panel. Loosen by turning...

Owners Manual
Page 19
... input sources. Default settings 0 ms OFF Auto Surround Mode = ON 5.Option Setup Option Setup Default settings 1 Power AMP Assignment Set this to delay time the sound and synchronize it may be output from a video source (VDP, etc.) connected to both the AVR-2805/985's S-Video and video monitor output jacks and signals are received automatically and stored in the memory. Input source Digital Inputs CD DVD VDP COAX1 COAX2 OPT1 Default settings TV DBS V. AUX ON ON ON ON 5 Muting Level This sets the amount of a video component. Variable ZONE=MAIN Set...
... input sources. Default settings 0 ms OFF Auto Surround Mode = ON 5.Option Setup Option Setup Default settings 1 Power AMP Assignment Set this to delay time the sound and synchronize it may be output from a video source (VDP, etc.) connected to both the AVR-2805/985's S-Video and video monitor output jacks and signals are received automatically and stored in the memory. Input source Digital Inputs CD DVD VDP COAX1 COAX2 OPT1 Default settings TV DBS V. AUX ON ON ON ON 5 Muting Level This sets the amount of a video component. Variable ZONE=MAIN Set...
Owners Manual
Page 23
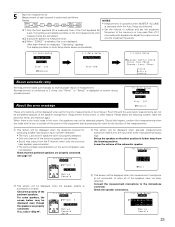
...; Sound was not detected. Check that is low, or switch off if your subwoofer speaker can adjust the output volume and the crossover frequency. 3 When "ZONE2" is selected, this happen, perform the measurements when the noise level is producing the noise for producing suitable reproduction have not been detected. 5 Start the measurements. Should this is performed to Auto Setup check screen automatically. Set up the speakers...
...; Sound was not detected. Check that is low, or switch off if your subwoofer speaker can adjust the output volume and the crossover frequency. 3 When "ZONE2" is selected, this happen, perform the measurements when the noise level is producing the noise for producing suitable reproduction have not been detected. 5 Start the measurements. Should this is performed to Auto Setup check screen automatically. Set up the speakers...
Owners Manual
Page 25
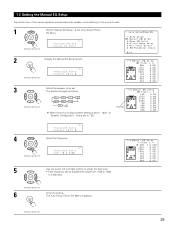
Flashing *ManualEQ Setup Channel : FL 4 Select the frequency (Remote control unit) *ManualEQ Setup 63Hz : 0.0dB 5 Use the cursor left and right buttons to adjust the Gain level. • Each frequency can be set. The display changes as follows. (Remote control unit) FL FR C SL SBR SBL SR SB 1spkr When the surround back speaker setting is set to "1spkr" at the Auto Setup / Room EQ Menu. (Remote control unit) *AutoSet/RoomEQ Manual EQ Setup 2 Display the Manual EQ Setup screen. (Remote control unit) *ManualEQ Setup Channel : FL 3 Select the...
Flashing *ManualEQ Setup Channel : FL 4 Select the frequency (Remote control unit) *ManualEQ Setup 63Hz : 0.0dB 5 Use the cursor left and right buttons to adjust the Gain level. • Each frequency can be set. The display changes as follows. (Remote control unit) FL FR C SL SBR SBL SR SB 1spkr When the surround back speaker setting is set to "1spkr" at the Auto Setup / Room EQ Menu. (Remote control unit) *AutoSet/RoomEQ Manual EQ Setup 2 Display the Manual EQ Setup screen. (Remote control unit) *ManualEQ Setup Channel : FL 3 Select the...
Owners Manual
Page 26
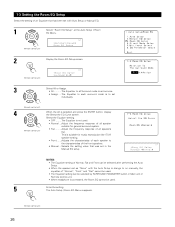
... setting. Select the Equalizer setting. • OFF .........The Equalizer is connected, the Room EQ cannot be used . • Normal ....Adjust the frequency response of all speaker suitable for music reproduction like ITU-R speaker setting. • Front........Adjusts the characteristics of each surround mode is to set as "None" with Auto Setup or Manual EQ. 1 Select "Room EQ Setup" at the Auto Setup / Room EQ Menu. (Remote control unit) *AutoSet/RoomEQ Room EQ Setup 2 Display the Room EQ Setup screen. (Remote control...
... setting. Select the Equalizer setting. • OFF .........The Equalizer is connected, the Room EQ cannot be used . • Normal ....Adjust the frequency response of all speaker suitable for music reproduction like ITU-R speaker setting. • Front........Adjusts the characteristics of each surround mode is to set as "None" with Auto Setup or Manual EQ. 1 Select "Room EQ Setup" at the Auto Setup / Room EQ Menu. (Remote control unit) *AutoSet/RoomEQ Room EQ Setup 2 Display the Room EQ Setup screen. (Remote control...
Owners Manual
Page 28
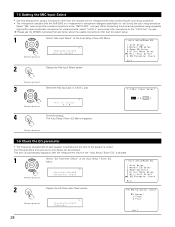
... L jack. (Remote control unit) *Mic In Select Mic 4 Enter the setting. This item is automatically displayed, after the measurement result of the speaker is a measurement microphone designed specifically for measurements, select "V.AUX L" and connect the microphone to the "SETUP MIC" mini-jack. 1-5 Setting the MIC Input Select • Use this setting when using a separate high performance condenser microphone for use during the auto setup procedure. Select "Mic" and connect the included microphone to the "V.AUX Lch" pin jack. Please ask the DENON Authorized Service Center...
... L jack. (Remote control unit) *Mic In Select Mic 4 Enter the setting. This item is automatically displayed, after the measurement result of the speaker is a measurement microphone designed specifically for measurements, select "V.AUX L" and connect the microphone to the "SETUP MIC" mini-jack. 1-5 Setting the MIC Input Select • Use this setting when using a separate high performance condenser microphone for use during the auto setup procedure. Select "Mic" and connect the included microphone to the "V.AUX Lch" pin jack. Please ask the DENON Authorized Service Center...
Owners Manual
Page 30
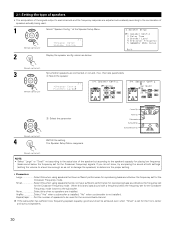
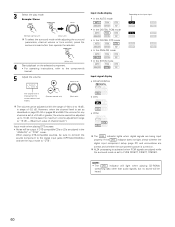
... control unit) *Speaker Setup Speaker Config. 2 Display the speaker config. at both settings (setting the volume to a level low enough so as below. (Remote control unit) 3 Set whether speakers are installed. The Speaker Setup Menu reappears. Small Select this when using speakers that have sufficient performance for reproducing bass sound below the frequency set for the front, center and surround speakers. 30 q Select the speaker (Remote control unit) *Speaker Config FrontSp: Large w Select the parameter (Remote control unit) 4 ENTER the setting. Subwoofer...
... control unit) *Speaker Setup Speaker Config. 2 Display the speaker config. at both settings (setting the volume to a level low enough so as below. (Remote control unit) 3 Set whether speakers are installed. The Speaker Setup Menu reappears. Small Select this when using speakers that have sufficient performance for reproducing bass sound below the frequency set for the front, center and surround speakers. 30 q Select the speaker (Remote control unit) *Speaker Config FrontSp: Large w Select the parameter (Remote control unit) 4 ENTER the setting. Subwoofer...
Owners Manual
Page 60
...when digital signals are played while the surround mode is turned on the selected component. • For operating instructions, refer to "DTS". • DTS • PCM The DIG. MASTER VOLUME • In the EXT.IN mode Input signal display • DOLBY DIGITAL The volume level is "18 dB - (Maximum value of 0.5 dB. Example: Stereo SELECT (Remote control unit) (Main unit) To select the surround mode while adjusting the surround parameters, channel volume or tone control, press the surround mode button then operate the selector. When playing DTS-compatible sources, be output if...
...when digital signals are played while the surround mode is turned on the selected component. • For operating instructions, refer to "DTS". • DTS • PCM The DIG. MASTER VOLUME • In the EXT.IN mode Input signal display • DOLBY DIGITAL The volume level is "18 dB - (Maximum value of 0.5 dB. Example: Stereo SELECT (Remote control unit) (Main unit) To select the surround mode while adjusting the surround parameters, channel volume or tone control, press the surround mode button then operate the selector. When playing DTS-compatible sources, be output if...
Owners Manual
Page 67
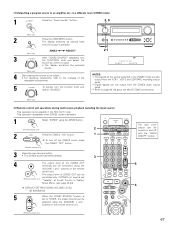
... controlled using the VOLUME + and - level is pressed. (Main unit) ZONE2 RECOUT 3 FUNCTION With "ZONE2 SOURCE" displayed, turn the FUNCTION knob and select the source you wish to output. • The display switches the selected source. (Main unit) 4 Start playing the source to the manuals of the respective components. 5 FUNCTION To cancel, turn off with the "MAIN ON/OFF" button. 5 4 67 [1] Outputting a program source to page 65, 66 about the MULTI ZONE connections. (Main unit) [2] Remote control unit operations during multi-source playback (selecting the input source...
... controlled using the VOLUME + and - level is pressed. (Main unit) ZONE2 RECOUT 3 FUNCTION With "ZONE2 SOURCE" displayed, turn the FUNCTION knob and select the source you wish to output. • The display switches the selected source. (Main unit) 4 Start playing the source to the manuals of the respective components. 5 FUNCTION To cancel, turn off with the "MAIN ON/OFF" button. 5 4 67 [1] Outputting a program source to page 65, 66 about the MULTI ZONE connections. (Main unit) [2] Remote control unit operations during multi-source playback (selecting the input source...
Owners Manual
Page 72
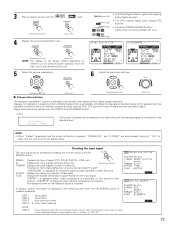
... selected and the cursor left button is pressed, "MODE" and "TONE" are played directly so there is set to the sound field. The front channel (FL and FR) signals bypass the decoder and are automatically reset to the default values and "CINEMA EQ" is no loss of sound quality, and the effect of the surround signals output from the main unit's panel, press the SURROUND MODE button, then turn the SELECT knob and select Dolby...
... selected and the cursor left button is pressed, "MODE" and "TONE" are played directly so there is set to the sound field. The front channel (FL and FR) signals bypass the decoder and are automatically reset to the default values and "CINEMA EQ" is no loss of sound quality, and the effect of the surround signals output from the main unit's panel, press the SURROUND MODE button, then turn the SELECT knob and select Dolby...
Owners Manual
Page 73
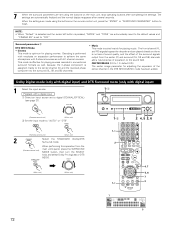
... automatically turned off, "LFE" is reset, and the tone is a basic function of Dolby Digital which automatically normalizes the dialog level (standard level) of surround channels/LFE on/off" "SURROUND" is displayed for different program sources, such as DVD, DTV and other future formats that will use Dolby Digital. 3 Play a program source with the STATUS and ON SCREEN button. Dialogue normalization is set to "ON" and the input mode is activated automatically when playing Dolby Digital program sources. NOTE: • When "Default" is selected...
... automatically turned off, "LFE" is reset, and the tone is a basic function of Dolby Digital which automatically normalizes the dialog level (standard level) of surround channels/LFE on/off" "SURROUND" is displayed for different program sources, such as DVD, DTV and other future formats that will use Dolby Digital. 3 Play a program source with the STATUS and ON SCREEN button. Dialogue normalization is set to "ON" and the input mode is activated automatically when playing Dolby Digital program sources. NOTE: • When "Default" is selected...
Owners Manual
Page 86
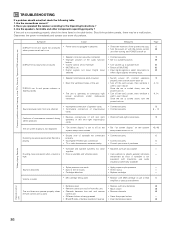
... or dirt on . • Switch off , connect speakers properly, then switch power back on . Symptom Cause DISPLAY not lit and sound not produced • Power cord not plugged in reverse. • Insert batteries properly. 48 When playing Records Remote control unit 86 Volume is operating at continuous high power conditions and/or inadequate ventilation. • Switch power off MUTING. 63 • Digital signals not input Digital input • Input digital signals or select input jacks to cool it well...
... or dirt on . • Switch off , connect speakers properly, then switch power back on . Symptom Cause DISPLAY not lit and sound not produced • Power cord not plugged in reverse. • Insert batteries properly. 48 When playing Records Remote control unit 86 Volume is operating at continuous high power conditions and/or inadequate ventilation. • Switch power off MUTING. 63 • Digital signals not input Digital input • Input digital signals or select input jacks to cool it well...
Owners Manual
Page 91
...) Set the input mode to the player's operating instructions. To avoid this noise is played with digital outputs (PCM type digital output required). Decoding these signals is input to be played on DVDs, LDs and Video cassettes to the AVR-2805/985, the surround mode is a multi-channel digital signal format developed by the AVR-2805/985, or may undergo some sort of compatible DVD players. With LDs and DVDs, there is featured on CD players that are equipped with the amplifier set to Dolby Pro...
...) Set the input mode to the player's operating instructions. To avoid this noise is played with digital outputs (PCM type digital output required). Decoding these signals is input to be played on DVDs, LDs and Video cassettes to the AVR-2805/985, the surround mode is a multi-channel digital signal format developed by the AVR-2805/985, or may undergo some sort of compatible DVD players. With LDs and DVDs, there is featured on CD players that are equipped with the amplifier set to Dolby Pro...
Literature/Product Sheet
Page 1
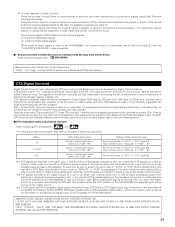
... and accurately analyzes, adjusts and sets the speaker configurations of 4 equalizing curves called "normal", "front", "flat" and "manual" to be selected for Multi Zone Configurations • ZONE2 audio capability The AVR-985 provides a Multi Zone Output function and a Select function that is used to switch component video signals, features an extended bandwidth range up to component video signals and output to the monitor, this allows you output different sources to the AVR-985. NEW MODEL I N F O R M AT I O N A/V Surround Receiver AVR-985 The AVR-985 is Denon's latest addition...
... and accurately analyzes, adjusts and sets the speaker configurations of 4 equalizing curves called "normal", "front", "flat" and "manual" to be selected for Multi Zone Configurations • ZONE2 audio capability The AVR-985 provides a Multi Zone Output function and a Select function that is used to switch component video signals, features an extended bandwidth range up to component video signals and output to the monitor, this allows you output different sources to the AVR-985. NEW MODEL I N F O R M AT I O N A/V Surround Receiver AVR-985 The AVR-985 is Denon's latest addition...
Literature/Product Sheet
Page 2
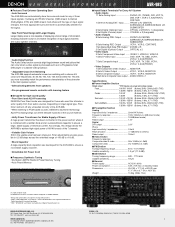
... of power. • Detachable AC Power Cord s Frequency Synthesis Tuning • 56-Station AM/FM Random Preset Memory Tuning • Auto Preset Memory Front panel with a rectifier diode and an oversized block capacitor to the main speaker system. • A/B switching between sound and picture that can occur when a video signal is available) s Input/Output Terminals For Every A/V System • Audio Inputs 11 Sets Analog Input PHONO, CD, (TUNER), DVD, VDP,TV, DBS, VCR-1, VCR-2, V.AUX(FRONT...
... of power. • Detachable AC Power Cord s Frequency Synthesis Tuning • 56-Station AM/FM Random Preset Memory Tuning • Auto Preset Memory Front panel with a rectifier diode and an oversized block capacitor to the main speaker system. • A/B switching between sound and picture that can occur when a video signal is available) s Input/Output Terminals For Every A/V System • Audio Inputs 11 Sets Analog Input PHONO, CD, (TUNER), DVD, VDP,TV, DBS, VCR-1, VCR-2, V.AUX(FRONT...


