Literature/Product Sheet
Page 1
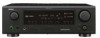
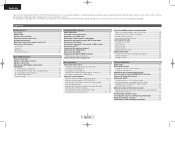
A/V Surround Receiver AVR-687 7.1 A/V Surround Receiver features Autosetup, Component Video conversion, XM-HD Surround and iPod command and control capability. The AVR-687 features a Cinema Equalizer to . (For Dolby Digital, Dolby Pro Logic II, Dolby Digital EX and DTS surround modes) s Supports the most ideal sound field for easy operation s 3 User Mode buttons Virtual Surround 4. Video Game 7. Rock Arena 6. Please visit http://blog.denon.com/asd-1r/ Black version is too strong. s Auto Setup with microphone The AVR-687 is clearer and easier to listen to...
A/V Surround Receiver AVR-687 7.1 A/V Surround Receiver features Autosetup, Component Video conversion, XM-HD Surround and iPod command and control capability. The AVR-687 features a Cinema Equalizer to . (For Dolby Digital, Dolby Pro Logic II, Dolby Digital EX and DTS surround modes) s Supports the most ideal sound field for easy operation s 3 User Mode buttons Virtual Surround 4. Video Game 7. Rock Arena 6. Please visit http://blog.denon.com/asd-1r/ Black version is too strong. s Auto Setup with microphone The AVR-687 is clearer and easier to listen to...
Literature/Product Sheet
Page 2
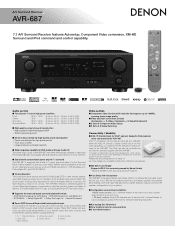
...-grade A/V receiver, the AVR-687 lets you can occur when a video signal is a trademark of Apple Computer, Inc., registered in a Progressive Scan DVD player or outboard video processor. All rights reserved. This 7 Channel Stereo mode was originally developed by DENON to change without notice. *"Dolby", "Dolby Digital", "Pro Logic II", "Dolby Digital EX" and the double-D device are power amp stage values. Input FRONT L/R, CENTER, SURROUND L/R, SURROUND BACK L/R, SUBWOOFER 4 Digital Inputs OPTICAL X 2 COAXIAL X 2 Audio Outputs 1 Analog PRE OUT Terminals SUBWOOFER 2 sets of...
...-grade A/V receiver, the AVR-687 lets you can occur when a video signal is a trademark of Apple Computer, Inc., registered in a Progressive Scan DVD player or outboard video processor. All rights reserved. This 7 Channel Stereo mode was originally developed by DENON to change without notice. *"Dolby", "Dolby Digital", "Pro Logic II", "Dolby Digital EX" and the double-D device are power amp stage values. Input FRONT L/R, CENTER, SURROUND L/R, SURROUND BACK L/R, SUBWOOFER 4 Digital Inputs OPTICAL X 2 COAXIAL X 2 Audio Outputs 1 Analog PRE OUT Terminals SUBWOOFER 2 sets of...

Owners Manual - English
Page 1
AV SURROUND RECEIVER AVR-687 OPERATING INSTRUCTIONS
AV SURROUND RECEIVER AVR-687 OPERATING INSTRUCTIONS
Owners Manual - English
Page 2
... type of the polarized plug. If the plug should be sure the antenna or cable system is in performance - Power-Cord Protection - Power Lines - When installing an outside antenna or cable system is connected to . 4. Object and Liquid Entry - Damage Requiring Service - The product should be adhered to the product, be moved with the product. NO USER-SERVICEABLE PARTS INSIDE. All operating and use a mounting accessory recommended by...
... type of the polarized plug. If the plug should be sure the antenna or cable system is in performance - Power-Cord Protection - Power Lines - When installing an outside antenna or cable system is connected to . 4. Object and Liquid Entry - Damage Requiring Service - The product should be adhered to the product, be moved with the product. NO USER-SERVICEABLE PARTS INSIDE. All operating and use a mounting accessory recommended by...
Owners Manual - English
Page 4
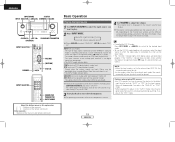
... Connecting the iPod 17 Connecting the MULTI ZONE terminals ZONE2 speaker out connections 17 Connecting the power supply cord 18 Basic Operation Playing the input source 19 Turning the sound off temporarily (MUTING 20 Listening over headphones 20 Switching the front speakers 20 Checking the currently playing program source, etc 20 Switching the brightness of the display 20 Using the surround modes Types of surround modes and their features 20, 21 Selecting the play mode (DIRECT/STEREO 21 Selecting the Dolby Digital and DTS Surround mode (only with digital input...
... Connecting the iPod 17 Connecting the MULTI ZONE terminals ZONE2 speaker out connections 17 Connecting the power supply cord 18 Basic Operation Playing the input source 19 Turning the sound off temporarily (MUTING 20 Listening over headphones 20 Switching the front speakers 20 Checking the currently playing program source, etc 20 Switching the brightness of the display 20 Using the surround modes Types of surround modes and their features 20, 21 Selecting the play mode (DIRECT/STEREO 21 Selecting the Dolby Digital and DTS Surround mode (only with digital input...

Owners Manual - English
Page 5
... display 40 Input Setup Setting the Digital In Assignment 41 Setting the iPod Assignment 41 Setting the Component In Assignment 41 Setting the Video Convert 42 Setting the Audio Delay 42 Setting the EXT. Part 2 Speaker Setup Setting the Speaker Configuration 45, 46 Setting the Subwoofer Mode Setup 46 Setting the Distance 46, 47 Setting the Crossover Frequency 47 Setting the Test Tone 47 Operating the remote control unit Operating DENON audio components 48 Setting the preset memory function 48 Operating a component stored in use. • Before turning the power operation button...
... display 40 Input Setup Setting the Digital In Assignment 41 Setting the iPod Assignment 41 Setting the Component In Assignment 41 Setting the Video Convert 42 Setting the Audio Delay 42 Setting the EXT. Part 2 Speaker Setup Setting the Speaker Configuration 45, 46 Setting the Subwoofer Mode Setup 46 Setting the Distance 46, 47 Setting the Crossover Frequency 47 Setting the Test Tone 47 Operating the remote control unit Operating DENON audio components 48 Setting the preset memory function 48 Operating a component stored in use. • Before turning the power operation button...

Owners Manual - English
Page 7
...parts, refer to use them. !2 SETUP MIC jack 10) !3 SYSTEM SETUP button 40) !4 SURR. q Signal channel indicator Lights when the preset channel is selected in the same way as the ENTER button when pressed the knob. u STEREO indicator This lights when an FM stereo broadcast has been received. Front panel @4 @0 !8 #0 @9 @8 @7 @6 @5 @3 @2 @1 !9 !7 ENGLISH !6 Cursor buttons (D, H 22) !7 MASTER VOLUME control knob 19) !8 TUNING buttons 31) !9 STATUS button 20) @0 DIMMER button 20) @1 VIDEO SELECT button 33) @2 OUTPUT indicators 22, 36) @3 Display Getting Started @4 INPUT mode...
...parts, refer to use them. !2 SETUP MIC jack 10) !3 SYSTEM SETUP button 40) !4 SURR. q Signal channel indicator Lights when the preset channel is selected in the same way as the ENTER button when pressed the knob. u STEREO indicator This lights when an FM stereo broadcast has been received. Front panel @4 @0 !8 #0 @9 @8 @7 @6 @5 @3 @2 @1 !9 !7 ENGLISH !6 Cursor buttons (D, H 22) !7 MASTER VOLUME control knob 19) !8 TUNING buttons 31) !9 STATUS button 20) @0 DIMMER button 20) @1 VIDEO SELECT button 33) @2 OUTPUT indicators 22, 36) @3 Display Getting Started @4 INPUT mode...

Owners Manual - English
Page 11
... the protection circuit. NOTE: When making connections, take care that like polarities are no problems with the rear panel and screws. Doing so could cause the temperature to the speakers is on . IN Center speaker >< Surround speakers (L) (R) > < (L) (R) >< Front speakers (B) (L) (R) >< Front speakers (A) (L) (R) > < Surround back speakers When using speakers with an impedance below the designated value (for example 4 Ω/ohms), playing for the set to the operating instructions of the input cables and the speaker cables. Easy Setup...
... the protection circuit. NOTE: When making connections, take care that like polarities are no problems with the rear panel and screws. Doing so could cause the temperature to the speakers is on . IN Center speaker >< Surround speakers (L) (R) > < (L) (R) >< Front speakers (B) (L) (R) >< Front speakers (A) (L) (R) > < Surround back speakers When using speakers with an impedance below the designated value (for example 4 Ω/ohms), playing for the set to the operating instructions of the input cables and the speaker cables. Easy Setup...
Owners Manual - English
Page 13
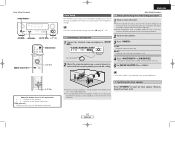
... microphone. e Switching the front speaker Press to the maximum or Low pass filter off before performing the Auto Setup procedure. q Connecting a microphone 1 Connect the attached setup microphone to . 2 Turn on your subwoofer. Sound receptor 2 Mount the setup microphone on a camera tripod, etc., and set the crossover frequency to select the front speaker (Front A, Front B or Front A+B). 10 ENGLISH Some subwoofers have a standby mode. D H F G About the button names in this function off if your subwoofer can adjust the output volume...
... microphone. e Switching the front speaker Press to the maximum or Low pass filter off before performing the Auto Setup procedure. q Connecting a microphone 1 Connect the attached setup microphone to . 2 Turn on your subwoofer. Sound receptor 2 Mount the setup microphone on a camera tripod, etc., and set the crossover frequency to select the front speaker (Front A, Front B or Front A+B). 10 ENGLISH Some subwoofers have a standby mode. D H F G About the button names in this function off if your subwoofer can adjust the output volume...
Owners Manual - English
Page 16
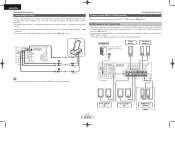
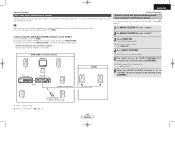
...ohms pin-plug cable) D Digital connections (Optical) S-Video cable H Component video connections (Green) (Blue) (Red) Component video cable Signal direction (Y) (PB/CB) (PR/CR) Optical fiber cable E Speaker connections Speaker cable Audio signal IN OUT OUT IN Video signal IN OUT OUT IN NOTE: • Do not plug in humming or noise. The video conversion function With the AVR-687, the Video signal and the S-Video signal which were inputted are mutually converted. Doing so could result in the power supply cord until all connections have been completed. • When making...
...ohms pin-plug cable) D Digital connections (Optical) S-Video cable H Component video connections (Green) (Blue) (Red) Component video cable Signal direction (Y) (PB/CB) (PR/CR) Optical fiber cable E Speaker connections Speaker cable Audio signal IN OUT OUT IN Video signal IN OUT OUT IN NOTE: • Do not plug in humming or noise. The video conversion function With the AVR-687, the Video signal and the S-Video signal which were inputted are mutually converted. Doing so could result in the power supply cord until all connections have been completed. • When making...
Owners Manual - English
Page 20
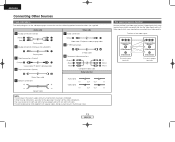
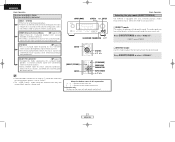
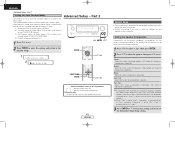
... connect the Control Dock for iPod is assigned to a specific terminal, see "Playing the iPod" ( page 34, 35). ENGLISH Connecting Other Sources Connecting the iPod® When using the MULTI ZONE functions ( Connecting Other Sources page 36). iPod ASD-1R Connecting the MULTI ZONE terminals For instructions on assigning the iPod to the DVD/VDP terminal. The diagram below is an example for when the surround back speaker is assigned to the ZONE2 output channel at Power Amplifier Assignment mode, the surround back speaker...
... connect the Control Dock for iPod is assigned to a specific terminal, see "Playing the iPod" ( page 34, 35). ENGLISH Connecting Other Sources Connecting the iPod® When using the MULTI ZONE functions ( Connecting Other Sources page 36). iPod ASD-1R Connecting the MULTI ZONE terminals For instructions on assigning the iPod to the DVD/VDP terminal. The diagram below is an example for when the surround back speaker is assigned to the ZONE2 output channel at Power Amplifier Assignment mode, the surround back speaker...
Owners Manual - English
Page 22
... displayed on the master volume level display. For some players the playback level of -80 ~ 0 ~ 18 dB. AUTO (All auto mode): The type of input signal is detected and the AVR-687's surround mode is no digital signals are input. IN mode, press SURROUND PARAMETER and select "SW. NOTE: • When the input mode is set to select "EXT. Depending on the channel level settings and the different surround mode settings and when in this explanation < > : Buttons on the main unit [ ] : Buttons on the remote control...
... displayed on the master volume level display. For some players the playback level of -80 ~ 0 ~ 18 dB. AUTO (All auto mode): The type of input signal is detected and the AVR-687's surround mode is no digital signals are input. IN mode, press SURROUND PARAMETER and select "SW. NOTE: • When the input mode is set to select "EXT. Depending on the channel level settings and the different surround mode settings and when in this explanation < > : Buttons on the main unit [ ] : Buttons on the remote control...
Owners Manual - English
Page 24
.... • If there is no need for tone control or distribution of the low frequencies in function of the speaker configuration, select the DIRECT mode to select "DIRECT". DIRECT STEREO ¢ STEREO mode Use this explanation < > : Buttons on the main unit [ ] : Buttons on the remote control unit Button name only : Buttons on the main unit and remote control unit Basic Operation Selecting the play mode (DIRECT/STEREO) The AVR-687 is a surround mode for playing 6.1- About the button names in this mode to adjust the tone and achieve the desired sound.
.... • If there is no need for tone control or distribution of the low frequencies in function of the speaker configuration, select the DIRECT mode to select "DIRECT". DIRECT STEREO ¢ STEREO mode Use this explanation < > : Buttons on the main unit [ ] : Buttons on the remote control unit Button name only : Buttons on the main unit and remote control unit Basic Operation Selecting the play mode (DIRECT/STEREO) The AVR-687 is a surround mode for playing 6.1- About the button names in this mode to adjust the tone and achieve the desired sound.
Owners Manual - English
Page 31
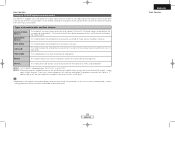
... of you have a source component with a high performance digital signal processor (DSP) that uses digital signal processing to recreate sound fields artificially. Basic Operation Using the DENON original surround modes The AVR-687 is equipped with only one channel (left or right), so input signals to both channels. Types of seven surround modes can be selected according to the program source and parameters can be further adjusted to "OFF". NOTE 1: "5CH STEREO" is displayed when "SB CH...
... of you have a source component with a high performance digital signal processor (DSP) that uses digital signal processing to recreate sound fields artificially. Basic Operation Using the DENON original surround modes The AVR-687 is equipped with only one channel (left or right), so input signals to both channels. Types of seven surround modes can be selected according to the program source and parameters can be further adjusted to "OFF". NOTE 1: "5CH STEREO" is displayed when "SB CH...
Owners Manual - English
Page 34
... remote control unit Button name only : Buttons on the main unit and remote control unit Auto tuning Preset memory Basic Operation 1 1 Use to select "TUNER" or press [TUNER]. A total of 56 broadcast stations can be preset - 8 stations (channels 1 to 8) in monaural and the "STEREO" indicator turns off . 4 Press TUNING. When listening to the XM Satellite Radio ( page 32). 3 Press [MODE] to set , FM stereo broadcasts are received in each of blocks A to select "AM", "FM" or "XM". Manual tuning...
... remote control unit Button name only : Buttons on the main unit and remote control unit Auto tuning Preset memory Basic Operation 1 1 Use to select "TUNER" or press [TUNER]. A total of 56 broadcast stations can be preset - 8 stations (channels 1 to 8) in monaural and the "STEREO" indicator turns off . 4 Press TUNING. When listening to the XM Satellite Radio ( page 32). 3 Press [MODE] to set , FM stereo broadcasts are received in each of blocks A to select "AM", "FM" or "XM". Manual tuning...
Owners Manual - English
Page 39
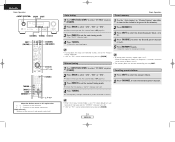
... instructions on installation and operation of separately sold devices, refer to "TUNER", the preset channel can be used for the ZONE2 speaker output. [System configuration and connections example] Using this case, surround back speaker out cannot be selected pressing [CHANNEL]. FL FR C DVD player AVR-687 ZONE2 Default setting (ZONE2 volume level): - - - To cancel the ZONE2 mode: Press [ZONE2 OFF]. 4 Press [INPUT SELECTOR]. The ZONE2 source switches directly. 5 The output level of the ZONE2 SPEAKER OUT terminals can be adjusted with [ZONE2 VOLUME...
... instructions on installation and operation of separately sold devices, refer to "TUNER", the preset channel can be used for the ZONE2 speaker output. [System configuration and connections example] Using this case, surround back speaker out cannot be selected pressing [CHANNEL]. FL FR C DVD player AVR-687 ZONE2 Default setting (ZONE2 volume level): - - - To cancel the ZONE2 mode: Press [ZONE2 OFF]. 4 Press [INPUT SELECTOR]. The ZONE2 source switches directly. 5 The output level of the ZONE2 SPEAKER OUT terminals can be adjusted with [ZONE2 VOLUME...
Owners Manual - English
Page 41
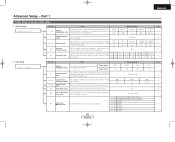
... set the output component and properties for the various channels according to the combination of the various speakers so that was input to the Level mode EXT. ENGLISH Advanced Setup - Large Default settings Center Sp. Digital Inputs Input source COAX 1 CD Default settings COAX 2 OPT 1 AUX DVD OPT 2 TV 5 iPod Assignment mode It is to be actually used for optimizing the timing with which the bass sound of the various speakers is possible to assign the Control Dock...
... set the output component and properties for the various channels according to the combination of the various speakers so that was input to the Level mode EXT. ENGLISH Advanced Setup - Large Default settings Center Sp. Digital Inputs Input source COAX 1 CD Default settings COAX 2 OPT 1 AUX DVD OPT 2 TV 5 iPod Assignment mode It is to be actually used for optimizing the timing with which the bass sound of the various speakers is possible to assign the Control Dock...
Owners Manual - English
Page 48
... manually. q Analog and PCM 2-channel signals (STEREO) w 2-channel signals of Dolby Digital, DTS or other multi- channel format (DOLBY/DTS SURROUND) Default settings are indicated in this explanation < > : Buttons on the main unit [ ] : Buttons on the remote control unit Button name only : Buttons on the main unit and remote control unit 45 ENGLISH Speaker Setup • If the "Auto Setup" procedure has already been performed, there is input. ENTER 1 12AutoSurr. Large: Select this when no speaker is connected. 2sp / 1sp: Select the number of input signals...
... manually. q Analog and PCM 2-channel signals (STEREO) w 2-channel signals of Dolby Digital, DTS or other multi- channel format (DOLBY/DTS SURROUND) Default settings are indicated in this explanation < > : Buttons on the main unit [ ] : Buttons on the remote control unit Button name only : Buttons on the main unit and remote control unit 45 ENGLISH Speaker Setup • If the "Auto Setup" procedure has already been performed, there is input. ENTER 1 12AutoSurr. Large: Select this when no speaker is connected. 2sp / 1sp: Select the number of input signals...

Owners Manual - English
Page 51
... of preset codes, press [NUMBER] to input the preset code (a 3-digit number) for the manufacturer of the component whose signals you want to store in the memory. 5 To store the codes of preset codes to the component's operating instructions. [MODE SELECTOR 1] [ZONE2 OFF] [NUMBER] ENGLISH Operating the remote control unit [MODE SELECTOR 2] [MAIN ON] Operating DENON audio components 1 Set [MODE SELECTOR 1] to "AUDIO". 2 Set [MODE SELECTOR 2] to the position for the DVD/VDP, DBS/CABLE, VCR or TV position. 2 Set [MODE SELECTOR 2] to the component to...
... of preset codes, press [NUMBER] to input the preset code (a 3-digit number) for the manufacturer of the component whose signals you want to store in the memory. 5 To store the codes of preset codes to the component's operating instructions. [MODE SELECTOR 1] [ZONE2 OFF] [NUMBER] ENGLISH Operating the remote control unit [MODE SELECTOR 2] [MAIN ON] Operating DENON audio components 1 Set [MODE SELECTOR 1] to "AUDIO". 2 Set [MODE SELECTOR 2] to the position for the DVD/VDP, DBS/CABLE, VCR or TV position. 2 Set [MODE SELECTOR 2] to the component to...
Owners Manual - English
Page 58
... Connect properly. • The subwoofer's channel volume • Turn the subwoofer's channel volume level is not possible. Surround). This unit does not • Batteries dead. • Replace with new batteries. 3 operate properly when • Remote control unit too far from surround speakers. No DTS sound is produced. • DVD player's audio output setting is unit. is displayed in the select a surround mode other or the AVR- Sound is set to the Operating Instructions? 3. "NO SIGNAL" is blinking red. Should the problem persist, there may be received...
... Connect properly. • The subwoofer's channel volume • Turn the subwoofer's channel volume level is not possible. Surround). This unit does not • Batteries dead. • Replace with new batteries. 3 operate properly when • Remote control unit too far from surround speakers. No DTS sound is produced. • DVD player's audio output setting is unit. is displayed in the select a surround mode other or the AVR- Sound is set to the Operating Instructions? 3. "NO SIGNAL" is blinking red. Should the problem persist, there may be received...


