Firmware Update Instructions
Page 9
.../or other countries. • No signals are using the digital rights management technology for Windows Media contained in upgrade costs. COMPLIANCE INFORMATION Product Name: AV Surround Receiver Model Number: AVR-5805/4806 This product complies with Windows Media Player Ver. 10. Operation is optimum with Part 15 of Nothing Else Matters Software and BridgeCo. Download Windows Media Connect (usable since October 2004. Denon Electronics (USA), LLC 19C Chapin...
.../or other countries. • No signals are using the digital rights management technology for Windows Media contained in upgrade costs. COMPLIANCE INFORMATION Product Name: AV Surround Receiver Model Number: AVR-5805/4806 This product complies with Windows Media Player Ver. 10. Operation is optimum with Part 15 of Nothing Else Matters Software and BridgeCo. Download Windows Media Connect (usable since October 2004. Denon Electronics (USA), LLC 19C Chapin...
Literature/Product Sheet
Page 1
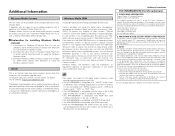
... be changed each circuit I Chassis construction to suppress internal/external vibration I Video Up/Down Conversion capable of output to HDMI port The AVR-4806 includes a video up to any previously released Denon receivers. Video Section I Pure Direct mode, for the New DDSC-Digital in which allows all video sources input through the AVR-4806 to HDMI (*1), composite video (*2), & S-video (*2). *1. Audio Section I Stabilized, independent power supplies for all channels are used in converting composite video & S-video signals to component video to XM services...
... be changed each circuit I Chassis construction to suppress internal/external vibration I Video Up/Down Conversion capable of output to HDMI port The AVR-4806 includes a video up to any previously released Denon receivers. Video Section I Pure Direct mode, for the New DDSC-Digital in which allows all video sources input through the AVR-4806 to HDMI (*1), composite video (*2), & S-video (*2). *1. Audio Section I Stabilized, independent power supplies for all channels are used in converting composite video & S-video signals to component video to XM services...
Literature/Product Sheet
Page 2
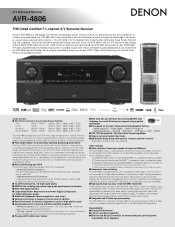
AVR-4806 Other Functions I Auto Surround Back Channels ON function, for auto-detection of supporting sources I Auto Surround mode I New design and ease-of-use • Front panel's large display. • A cursor key and Buttons on the front panel I EL remote controller for easy operation I On-screen display, for easier, error-free operation I Variable subwoofer crossover switching (40/60/80/90/100/110/120/150/200/250 Hz) I Muting level settings (∞/-40dB/-20db) I Audio Delay function (max. 6 frames or 200 msec) I 3 User Mode Buttons Inside of...
AVR-4806 Other Functions I Auto Surround Back Channels ON function, for auto-detection of supporting sources I Auto Surround mode I New design and ease-of-use • Front panel's large display. • A cursor key and Buttons on the front panel I EL remote controller for easy operation I On-screen display, for easier, error-free operation I Variable subwoofer crossover switching (40/60/80/90/100/110/120/150/200/250 Hz) I Muting level settings (∞/-40dB/-20db) I Audio Delay function (max. 6 frames or 200 msec) I 3 User Mode Buttons Inside of...
Owners Manual
Page 1
AV SURROUND RECEIVER AVR-4806 OPERATING INSTRUCTIONS
AV SURROUND RECEIVER AVR-4806 OPERATING INSTRUCTIONS
Owners Manual
Page 4
.... FIGURE A EXAMPLE OF ANTENNA GROUNDING AS PER NATIONAL ELECTRICAL CODE GROUND CLAMP ELECTRIC SERVICE EQUIPMENT NEC - When installing an outside antenna or cable system is connected to the product, be taken to its normal operation, e) If the product has been dropped or damaged in a risk of antenna-discharge unit, connection to the operating instructions. 12. Accessories - Adjust only those controls that could result in...
.... FIGURE A EXAMPLE OF ANTENNA GROUNDING AS PER NATIONAL ELECTRICAL CODE GROUND CLAMP ELECTRIC SERVICE EQUIPMENT NEC - When installing an outside antenna or cable system is connected to the product, be taken to its normal operation, e) If the product has been dropped or damaged in a risk of antenna-discharge unit, connection to the operating instructions. 12. Accessories - Adjust only those controls that could result in...
Owners Manual
Page 5
... 8 Operating range of the remote control unit 9 Part names and functions Front panel 9, 10 Display 11 Remote control unit 12 Easy Setup and Operation Easy to HDMI signals 28 Connecting a TV tuner 29 Connecting a DBS tuner 29 Connecting the external inputs (EXT. IN) terminals 44 Turning the sound off temporarily (MUTING 44 Listening over headphone 44 Combining the currently playing sound with the desired image (VIDEO SELECT 44 Switching the surround speakers 45 Checking the currently playing program source, etc 45 Input mode...
... 8 Operating range of the remote control unit 9 Part names and functions Front panel 9, 10 Display 11 Remote control unit 12 Easy Setup and Operation Easy to HDMI signals 28 Connecting a TV tuner 29 Connecting a DBS tuner 29 Connecting the external inputs (EXT. IN) terminals 44 Turning the sound off temporarily (MUTING 44 Listening over headphone 44 Combining the currently playing sound with the desired image (VIDEO SELECT 44 Switching the surround speakers 45 Checking the currently playing program source, etc 45 Input mode...
Owners Manual
Page 6
... Video Convert Mode 97, 98 Setting the HDMI Out Setup 98, 99 Setting the Audio Delay 99 Setting the On Screen Display (OSD 100 Advanced Playback Setting the 2ch Direct / Stereo 101 Setting the Dolby Digital Setup 102 Setting the Auto Surround Mode 102 Setting the Manual EQ Setup 103, 104 Procedure for copying the "Flat" correction curve 104 Option Setup Setting the Channel Setup 105 Setting the Power Amplifier Assignment 106, 107 Setting the Volume Control 108 Setting the Trigger Out 109 ZONE2 and ZONE3 tone control...
... Video Convert Mode 97, 98 Setting the HDMI Out Setup 98, 99 Setting the Audio Delay 99 Setting the On Screen Display (OSD 100 Advanced Playback Setting the 2ch Direct / Stereo 101 Setting the Dolby Digital Setup 102 Setting the Auto Surround Mode 102 Setting the Manual EQ Setup 103, 104 Procedure for copying the "Flat" correction curve 104 Option Setup Setting the Channel Setup 105 Setting the Power Amplifier Assignment 106, 107 Setting the Volume Control 108 Setting the Trigger Out 109 ZONE2 and ZONE3 tone control...
Owners Manual
Page 8
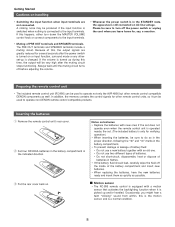
... to turn down the MASTER VOLUME control knob or connect components to the input terminals. • Muting of this, the output signals are not connected. In addition, the memory contains the control signals for several seconds after the muting circuit stops functioning. w Set four R03/AAA batteries in the battery compartment in the STANDBY state, the apparatus is connected to operate not only the AVR-4806 but other remote control units...
... to turn down the MASTER VOLUME control knob or connect components to the input terminals. • Muting of this, the output signals are not connected. In addition, the memory contains the control signals for several seconds after the muting circuit stops functioning. w Set four R03/AAA batteries in the battery compartment in the STANDBY state, the apparatus is connected to operate not only the AVR-4806 but other remote control units...
Owners Manual
Page 13
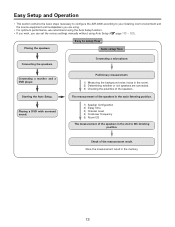
... using the Auto Setup function. • If you wish, you are connected. 3) Checking the polarities of the speakers. Playing a DVD with surround sound. Check of the speakers in the main listening position. 1) Speaker Configuration 2) Delay Time 3) Channel Level 4) Crossover Frequency 5) Room EQ The measurement of the measurement result. Connecting a monitor and a DVD player. Starting the Auto Setup. Preliminary measurement. 1) Measuring the background noise (noise in the memory. 13 Connecting a microphone. Easy to setup flow Auto setup...
... using the Auto Setup function. • If you wish, you are connected. 3) Checking the polarities of the speakers. Playing a DVD with surround sound. Check of the speakers in the main listening position. 1) Speaker Configuration 2) Delay Time 3) Channel Level 4) Crossover Frequency 5) Room EQ The measurement of the measurement result. Connecting a monitor and a DVD player. Starting the Auto Setup. Preliminary measurement. 1) Measuring the background noise (noise in the memory. 13 Connecting a microphone. Easy to setup flow Auto setup...
Owners Manual
Page 25
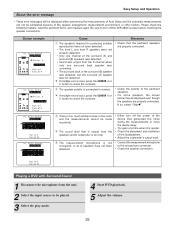
... the loudspeakers. • Adjust the subwoofer's output level. • Connect the measurement microphone to turn off the AVR-4806's power before checking the speaker connections. If so, select "Skip0". If multiple errors occur, press the CURSOR F or G button to check the contents. Playing a DVD with Surround Sound 1 Disconnect the microphone from the speakers and/or subwoofer is connected in the room and the measurements cannot be played. 3 Select the play mode. 4 Start DVD playback. 5 Adjust the volume. 25 Please check...
... the loudspeakers. • Adjust the subwoofer's output level. • Connect the measurement microphone to turn off the AVR-4806's power before checking the speaker connections. If so, select "Skip0". If multiple errors occur, press the CURSOR F or G button to check the contents. Playing a DVD with Surround Sound 1 Disconnect the microphone from the speakers and/or subwoofer is connected in the room and the measurements cannot be played. 3 Select the play mode. 4 Start DVD playback. 5 Adjust the volume. 25 Please check...
Owners Manual
Page 44
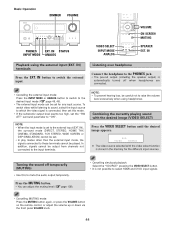
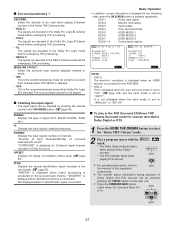
... output (including the speaker output) is automatically turned off temporarily (MUTING) • Use this mode. • If the subwoofer output level seems too high, set . • In play modes other than the external input mode, the signals connected to select HDMI and DVI-D input signals. • Cancelling MUTING mode: Press the MUTING button again, or press the VOLUME button on the remote control, or adjust the volume up or down via the front panel VOLUME knob. 44 IN), the surround mode (DIRECT, STEREO, HOME THX CINEMA...
... output (including the speaker output) is automatically turned off temporarily (MUTING) • Use this mode. • If the subwoofer output level seems too high, set . • In play modes other than the external input mode, the signals connected to select HDMI and DVI-D input signals. • Cancelling MUTING mode: Press the MUTING button again, or press the VOLUME button on the remote control, or adjust the volume up or down via the front panel VOLUME knob. 44 IN), the surround mode (DIRECT, STEREO, HOME THX CINEMA...
Owners Manual
Page 51
... is set to lights the manuals of surround channels/LFE on the main unit. Basic Operation • In addition, screen information is displayed in the following order when the ON SCREEN button is pressed repeatedly: OSD-1 Audio input signal OSD-2 Monitor information OSD-3 Input/output OSD-4 Auto surround mode OSD-5 USER MODE 1 OSD-6 USER MODE 2 OSD-7 USER MODE 3 OSD-8~14 Tuner preset stations NOTE: • OSD-2: The monitor's resolution is displayed when an HDMI monitor is connected to the AVR-4806. •...
... is set to lights the manuals of surround channels/LFE on the main unit. Basic Operation • In addition, screen information is displayed in the following order when the ON SCREEN button is pressed repeatedly: OSD-1 Audio input signal OSD-2 Monitor information OSD-3 Input/output OSD-4 Auto surround mode OSD-5 USER MODE 1 OSD-6 USER MODE 2 OSD-7 USER MODE 3 OSD-8~14 Tuner preset stations NOTE: • OSD-2: The monitor's resolution is displayed when an HDMI monitor is connected to the AVR-4806. •...
Owners Manual
Page 65
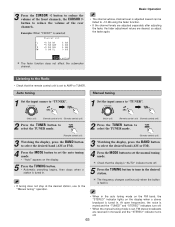
... desired station, use to the "Manual tuning" operation. (Remote control unit) 3 Watching the display, press the BAND button to select the desired band (AM or FM). 4 Press the MODE button to set to tune in the desired station. Listening to reduce the volume of the rear channels. Example: When "FRONT" is selected Basic Operation • The channel whose channel level is tuned in monaural and the "STEREO" indicator turns off . 5 Press the TUNING button to AMP or TUNER. The fader function...
... desired station, use to the "Manual tuning" operation. (Remote control unit) 3 Watching the display, press the BAND button to select the desired band (AM or FM). 4 Press the MODE button to set to tune in the desired station. Listening to reduce the volume of the rear channels. Example: When "FRONT" is selected Basic Operation • The channel whose channel level is tuned in monaural and the "STEREO" indicator turns off . 5 Press the TUNING button to AMP or TUNER. The fader function...
Owners Manual
Page 67
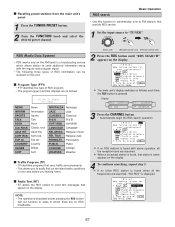
... the RDS button is found, that provide RDS service. 1 Set the input source to "TUNER". Display RDS SEARCH RT ON PTY SEARCH TP SEARCH 3 Press the CHANNEL button. • Automatically begin the RDS search operation. If no other RDS station is found with the regular radio program signal. • The following three types of RDS information can be received on this function to automatically tune to easily...
... the RDS button is found, that provide RDS service. 1 Set the input source to "TUNER". Display RDS SEARCH RT ON PTY SEARCH TP SEARCH 3 Press the CHANNEL button. • Automatically begin the RDS search operation. If no other RDS station is found with the regular radio program signal. • The following three types of RDS information can be received on this function to automatically tune to easily...
Owners Manual
Page 113
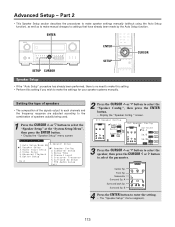
...; Display the "Speaker Setup" menu screen. 3 Press the CURSOR D or H button to select the speaker, then press the CURSOR F or G button to make the settings for your speaker systems manually. ENTER ENTER SETUP SETUP CURSOR Speaker Setup • If the "Auto Setup" procedure has already been performed, there is no need to make this setting. • Perform this setting if you wish to make manual changes to settings that have already been made by the Auto Setup function. Center Sp. Subwoofer Surround Sp. Part...
...; Display the "Speaker Setup" menu screen. 3 Press the CURSOR D or H button to select the speaker, then press the CURSOR F or G button to make the settings for your speaker systems manually. ENTER ENTER SETUP SETUP CURSOR Speaker Setup • If the "Auto Setup" procedure has already been performed, there is no need to make this setting. • Perform this setting if you wish to make manual changes to settings that have already been made by the Auto Setup function. Center Sp. Subwoofer Surround Sp. Part...
Owners Manual
Page 129
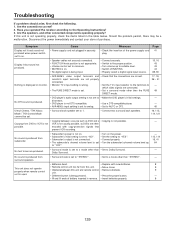
... No test tones are connected. • The PURE DIRECT mode is not set to "STEREO". • Set to AUTO or DTS. 45 Ultra2 Cinema / THX Music Mode / THX Games Mode cannnot be a malfunction. Dolby Surround. - surround speakers. • Batteries dead. • Replace with copy-protection signals that the connections are often possible. Copying from this unit and remote control • Remove obstacle. Symptom Cause Measures Page Display not lit and sound not • Power supply cord not plugged in...
... No test tones are connected. • The PURE DIRECT mode is not set to "STEREO". • Set to AUTO or DTS. 45 Ultra2 Cinema / THX Music Mode / THX Games Mode cannnot be a malfunction. Dolby Surround. - surround speakers. • Batteries dead. • Replace with copy-protection signals that the connections are often possible. Copying from this unit and remote control • Remove obstacle. Symptom Cause Measures Page Display not lit and sound not • Power supply cord not plugged in...

Owners Manual
Page 130
..." settings to "AMP". • The HDMI audio signals are not output from the center speaker. • You are playing a monaural source (TV, AM • When playing monaural sources, select a radio broadcast, etc.) in a well-ventilated place. panel, activating the protection circuit. • AVR-4806 is malfunctioning. • Turn off and the power indicator is flashing red. • The set to fully cool off before turning the power back on. • The core wires of the speaker cables are...
..." settings to "AMP". • The HDMI audio signals are not output from the center speaker. • You are playing a monaural source (TV, AM • When playing monaural sources, select a radio broadcast, etc.) in a well-ventilated place. panel, activating the protection circuit. • AVR-4806 is malfunctioning. • Turn off and the power indicator is flashing red. • The set to fully cool off before turning the power back on. • The core wires of the speaker cables are...
Owners Manual
Page 137
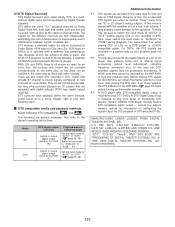
... as discs with digital outputs (PCM type digital output required). For DVDs, the DTS signals are output as the stereo 2-channel mode. [2] DTS Digital Surround DTS Digital Surround (also called simply DTS) is of course no need for an extra disc; With LDs and DVDs, there is a multichannel digital signal format developed by the AVR-4806, or may possibly cause damage to the speakers. Media CD DVD DTS Digital output terminals Optical or coaxial digital output (same as compared to the player's operating instructions...
... as discs with digital outputs (PCM type digital output required). For DVDs, the DTS signals are output as the stereo 2-channel mode. [2] DTS Digital Surround DTS Digital Surround (also called simply DTS) is of course no need for an extra disc; With LDs and DVDs, there is a multichannel digital signal format developed by the AVR-4806, or may possibly cause damage to the speakers. Media CD DVD DTS Digital output terminals Optical or coaxial digital output (same as compared to the player's operating instructions...
Owners Manual
Page 143
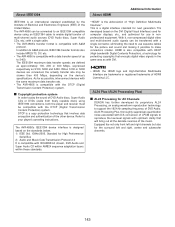
... discs) using an IEEE1394 cable to enable digital transfer of multi-channel audio sources (DVD Audio discs, Super Audio CDs, etc.) with a single cable. • The AVR-4806's transfer format is a digital interface standard for next generation TVs developed based on the DVI (Digital Visual Interface) used for computer displays, etc., and optimized for All Channels DENON has further developed its proprietary AL24 Processing, an analog waveform reproduction technology, to reproduce the low-level signals...
... discs) using an IEEE1394 cable to enable digital transfer of multi-channel audio sources (DVD Audio discs, Super Audio CDs, etc.) with a single cable. • The AVR-4806's transfer format is a digital interface standard for next generation TVs developed based on the DVI (Digital Visual Interface) used for computer displays, etc., and optimized for All Channels DENON has further developed its proprietary AL24 Processing, an analog waveform reproduction technology, to reproduce the low-level signals...
Owners Manual
Page 4
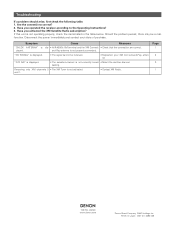
... XM Satellite Radio subscription? Troubleshooting If a problem should arise, first check the following table. 1. Are the connections correct? 2. Should the problem persist, there may be received. • Reposition your store of purchase. "OFF AIR" is displayed. • The selected channel is dis- • AVR-4806's XM terminal and the XM Connect- • Check that the connection are correct. and-Play antenna is displayed. • The signal cannot...
... XM Satellite Radio subscription? Troubleshooting If a problem should arise, first check the following table. 1. Are the connections correct? 2. Should the problem persist, there may be received. • Reposition your store of purchase. "OFF AIR" is displayed. • The selected channel is dis- • AVR-4806's XM terminal and the XM Connect- • Check that the connection are correct. and-Play antenna is displayed. • The signal cannot...


