Literature/Product Sheet
Page 2
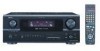
... M A T I O N AVR-2805 s Features That Enhance Operating Ease • Auto Surround The AVR-2805 can automatically store the surround mode for any unneeded circuitry of the AVR-2805. • When listening to PCM based sources, DENON's waveform technology AL24 Processing brings out ...DENON A/V receivers, this design allows the AVR-2805 to achieve high output power of 100 W for an intuitive recognition of input signal channels and output speaker channels. • Audio Delay Function The Audio Delay function corrects slight lags between front speakers • Pre-programmed remote controller...
... M A T I O N AVR-2805 s Features That Enhance Operating Ease • Auto Surround The AVR-2805 can automatically store the surround mode for any unneeded circuitry of the AVR-2805. • When listening to PCM based sources, DENON's waveform technology AL24 Processing brings out ...DENON A/V receivers, this design allows the AVR-2805 to achieve high output power of 100 W for an intuitive recognition of input signal channels and output speaker channels. • Audio Delay Function The Audio Delay function corrects slight lags between front speakers • Pre-programmed remote controller...
Owners Manual
Page 4
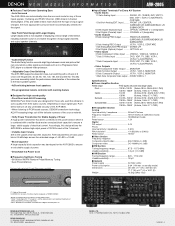
...⁄4 Last Function Memory 85 ⁄5 Initialization of your favorite music sources. Always set for North America model only 1 e Service station list 1 r Remote control unit t R6P/AA batteries 3 y AM loop antenna 1 u FM indoor antenna...1 i Omnidirectional microphone.......1 (RC-974 1 r t y u i ...system 18~47 , Remote Control Unit 48~57 . TABLE OF CONTENTS z Before Using 4 x Cautions on Installation 4 c Cautions on Check once again that all connections are proper and that you for choosing the DENON AVR-2805/985 Digital A / V Surround Receiver. We recommend using ...
...⁄4 Last Function Memory 85 ⁄5 Initialization of your favorite music sources. Always set for North America model only 1 e Service station list 1 r Remote control unit t R6P/AA batteries 3 y AM loop antenna 1 u FM indoor antenna...1 i Omnidirectional microphone.......1 (RC-974 1 r t y u i ...system 18~47 , Remote Control Unit 48~57 . TABLE OF CONTENTS z Before Using 4 x Cautions on Installation 4 c Cautions on Check once again that all connections are proper and that you for choosing the DENON AVR-2805/985 Digital A / V Surround Receiver. We recommend using ...
Owners Manual
Page 6
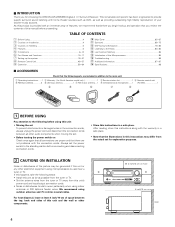
... with digital output. Do not use Surround back with the POWER operation switch on the main unit, and when the power is supplied from the remote control unit. Connecting the audio components • When making connections, also refer to these outlets is turned on and standby from these outlets when this unit...
... with digital output. Do not use Surround back with the POWER operation switch on the main unit, and when the power is supplied from the remote control unit. Connecting the audio components • When making connections, also refer to these outlets is turned on and standby from these outlets when this unit...

Owners Manual
Page 15
... 78) !6 SURROUND PARAMETER button 70 ~ 80) !7 SELECT knob 60, 63, 69 ~ 74, 78, 80) !8 TONE DEFEAT button 63) !9 TONE CONTROL button 63, 80) @0 MASTER VOLUME control 60) @1 MASTER VOLUME indicator 60) @2 Display @3 Remote control sensor (REMOTE SENSOR 48) @4 FUNCTION knob 59, 67, 72, 74, 83, 85) @5 VIDEO SELECT button 63) @6 ZONE2/REC SELECT button 64...
... 78) !6 SURROUND PARAMETER button 70 ~ 80) !7 SELECT knob 60, 63, 69 ~ 74, 78, 80) !8 TONE DEFEAT button 63) !9 TONE CONTROL button 63, 80) @0 MASTER VOLUME control 60) @1 MASTER VOLUME indicator 60) @2 Display @3 Remote control sensor (REMOTE SENSOR 48) @4 FUNCTION knob 59, 67, 72, 74, 83, 85) @5 VIDEO SELECT button 63) @6 ZONE2/REC SELECT button 64...
Owners Manual
Page 17
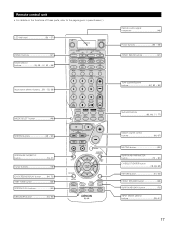
... ). LED (indicator 50 ~ 57) ZONE 2 buttons 67) Mode selector buttons 18, 49 ~ 51, 53 ~ 58) Input source selector buttons....(50 ~ 52, 59) Remote control signal transmitter 48) Power buttons 50 ~ 58) ZONE1 (MAIN) buttons 67) Tuner system/System buttons 67, 83 ~ 85) MODE SELECT button 49) SYSTEM buttons 49...64, 73) TEST TONE button 68) SYSTEM CALL buttons 54) USE/LEARN button 53, 56) Surround buttons 62, 69, ,71, 77) Master volume control buttons 60, 67) MUTING button 63) SURROUND PARAMETER button 70 ~ 80) CH SELECT/ENTER button 18, 68, 69) RETURN button 51, 52) FRONT ...
... ). LED (indicator 50 ~ 57) ZONE 2 buttons 67) Mode selector buttons 18, 49 ~ 51, 53 ~ 58) Input source selector buttons....(50 ~ 52, 59) Remote control signal transmitter 48) Power buttons 50 ~ 58) ZONE1 (MAIN) buttons 67) Tuner system/System buttons 67, 83 ~ 85) MODE SELECT button 49) SYSTEM buttons 49...64, 73) TEST TONE button 68) SYSTEM CALL buttons 54) USE/LEARN button 53, 56) Surround buttons 62, 69, ,71, 77) Master volume control buttons 60, 67) MUTING button 63) SURROUND PARAMETER button 70 ~ 80) CH SELECT/ENTER button 18, 68, 69) RETURN button 51, 52) FRONT ...
Owners Manual
Page 18
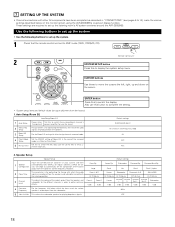
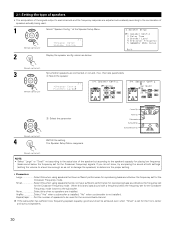
.... CURSOR buttons Use these to move the cursors the left, right, up the system. 1 Check that the remote control unit set up the listening room's AV system centered around the AVR-2805/985. Surround Back Sp. Auto Setup/Room EQ Auto Setup/Room EQ 1 Auto Setup Power Amp Set this ...SYSTEM • Once all connections with other AV components have been completed as described in "CONNECTIONS" (see pages 6 to 14), make the various settings described below which the audio signals are required to set to AMP mode.(TAPE, CDR/MD, CD) (Remote control unit) 2 SYSTEM SETUP button Press this...
.... CURSOR buttons Use these to move the cursors the left, right, up the system. 1 Check that the remote control unit set up the listening room's AV system centered around the AVR-2805/985. Surround Back Sp. Auto Setup/Room EQ Auto Setup/Room EQ 1 Auto Setup Power Amp Set this ...SYSTEM • Once all connections with other AV components have been completed as described in "CONNECTIONS" (see pages 6 to 14), make the various settings described below which the audio signals are required to set to AMP mode.(TAPE, CDR/MD, CD) (Remote control unit) 2 SYSTEM SETUP button Press this...

Owners Manual
Page 19
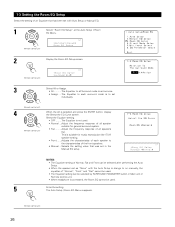
...Mode 5 Auto Tuner Presets Set the input signal to be difficult to read small characters on the remote control unit or main unit are operated. Default settings 0 ms OFF Auto Surround Mode = ON 5....with small screens or low resolutions. • The setup menu is connected to both the AVR-2805/985's S-Video and video monitor output jacks and signals are output with priority to delay... are being used. 19 For example, if the TV monitor is not displayed when headphone are received automatically and stored in the memory. Subwoofer = +15 dB DVD VDP TV DBS VCR-1 VCR...
...Mode 5 Auto Tuner Presets Set the input signal to be difficult to read small characters on the remote control unit or main unit are operated. Default settings 0 ms OFF Auto Surround Mode = ON 5....with small screens or low resolutions. • The setup menu is connected to both the AVR-2805/985's S-Video and video monitor output jacks and signals are output with priority to delay... are being used. 19 For example, if the TV monitor is not displayed when headphone are received automatically and stored in the memory. Subwoofer = +15 dB DVD VDP TV DBS VCR-1 VCR...

Owners Manual
Page 20
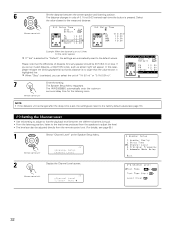
... press of a layered design that all the connections are plugged in. Therefore, please cancel the mode or reverse the condition. 2 Display the System Setup Menu. (Remote control unit) *System Setup Auto Set/RoomEQ NOTES: • The System Setup menu composition is set to one level higher. 20 Setup will not be possible...
... press of a layered design that all the connections are plugged in. Therefore, please cancel the mode or reverse the condition. 2 Display the System Setup Menu. (Remote control unit) *System Setup Auto Set/RoomEQ NOTES: • The System Setup menu composition is set to one level higher. 20 Setup will not be possible...

Owners Manual
Page 21
... same height as your room to the listening position. Use a tripod or level surface at the System Setup Menu. (Remote control unit) *System Setup Auto Set/RoomEQ 2 Display the Auto Setup / Room EQ menu. (Remote control unit) 21 When performing Auto Setup, an optional microphone is output from each speaker. NOTE: • A loud test...
... same height as your room to the listening position. Use a tripod or level surface at the System Setup Menu. (Remote control unit) *System Setup Auto Set/RoomEQ 2 Display the Auto Setup / Room EQ menu. (Remote control unit) 21 When performing Auto Setup, an optional microphone is output from each speaker. NOTE: • A loud test...

Owners Manual
Page 22
... Power Amp Assign setting. w Select "Surround Back" or "ZONE2". (Remote control unit) *Auto Setup P.Amp: SB 4 q Select the "Start". (Remote control unit) *Auto Setup Start w Press the Cursor left button. (Remote control unit) (Remote control unit) NOTE: • When "ZONE2" is selected at the Auto Setup / Room EQ Menu. (Remote control unit) *AutoSet/RoomEQ Auto Setup 2 Display the Auto Setup...
... Power Amp Assign setting. w Select "Surround Back" or "ZONE2". (Remote control unit) *Auto Setup P.Amp: SB 4 q Select the "Start". (Remote control unit) *Auto Setup Start w Press the Cursor left button. (Remote control unit) (Remote control unit) NOTE: • When "ZONE2" is selected at the Auto Setup / Room EQ Menu. (Remote control unit) *AutoSet/RoomEQ Auto Setup 2 Display the Auto Setup...

Owners Manual
Page 24
... [Speaker Config. When the "Retry" is selected, all parameters are stored up . in filter such as subwoofers might be checked here. (Remote control unit) *Auto Setup Sp Config.Check 2 Press the ENTER button and display the verification screen. Check] [Delay Time Check] [Channel Level Check...] 3 If the check ends, press the ENTER button again. (Remote control unit) 4 Select from the physical distance (Remote control unit) because of each item can be set with a value that differs from the following three items based on the...
... [Speaker Config. When the "Retry" is selected, all parameters are stored up . in filter such as subwoofers might be checked here. (Remote control unit) *Auto Setup Sp Config.Check 2 Press the ENTER button and display the verification screen. Check] [Delay Time Check] [Channel Level Check...] 3 If the check ends, press the ENTER button again. (Remote control unit) 4 Select from the physical distance (Remote control unit) because of each item can be set with a value that differs from the following three items based on the...
Owners Manual
Page 25
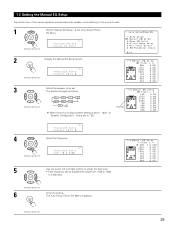
...adjust the Gain level. • Each frequency can be adjusted the range from -6dB to be set. The Auto Setup / Room EQ Menu reappears. (Remote control unit) 25 1-2 Setting the Manual EQ Setup Adjust the tone of the various speakers except subwoofer speaker while listening to the sound (music). 1 Select ..."Manual EQ Setup" at "Speaker Configuration", this is set to "SB". The display changes as follows. (Remote control unit) FL FR C SL SBR SBL SR SB 1spkr When the surround back speaker setting is set to "1spkr" at the Auto Setup / Room EQ...
...adjust the Gain level. • Each frequency can be adjusted the range from -6dB to be set. The Auto Setup / Room EQ Menu reappears. (Remote control unit) 25 1-2 Setting the Manual EQ Setup Adjust the tone of the various speakers except subwoofer speaker while listening to the sound (music). 1 Select ..."Manual EQ Setup" at "Speaker Configuration", this is set to "SB". The display changes as follows. (Remote control unit) FL FR C SL SBR SBL SR SB 1spkr When the surround back speaker setting is set to "1spkr" at the Auto Setup / Room EQ...
Owners Manual
Page 26
... the Auto Setup. • When the speaker set as once. • Assign .....The Equalizer to each surround mode is to set individually. (Remote control unit) 4 When the All is selected and press the ENTER button, display the Select the EQ Curve screen. The Auto Setup / Room EQ ...the Room EQ cannot be used . • The Equalizer setting can be used . 5 Enter the setting. This is suitable for general surround system. (Remote control unit) • Flat ..........Adjust the frequency response of all Surround mode is set as "None" with Auto Setup or Manual EQ. 1 Select "Room EQ...
... the Auto Setup. • When the speaker set as once. • Assign .....The Equalizer to each surround mode is to set individually. (Remote control unit) 4 When the All is selected and press the ENTER button, display the Select the EQ Curve screen. The Auto Setup / Room EQ ...the Room EQ cannot be used . • The Equalizer setting can be used . 5 Enter the setting. This is suitable for general surround system. (Remote control unit) • Flat ..........Adjust the frequency response of all Surround mode is set as "None" with Auto Setup or Manual EQ. 1 Select "Room EQ...

Owners Manual
Page 27
The Auto Setup / Room EQ Menu reappears. (Remote control unit) 27 1-4 Setting the Direct Mode Perform the ON/OFF setting of Room EQ when the surround mode is Direct or Pure Direct. 1 Select "Direct Mode Setup" at the Auto Setup / Room EQ Menu. (Remote control unit) *AutoSet/RoomEQ Direct Mode 2 Display the Direct Mode Setup screen. (Remote control unit) *Direct Mode Room EQ : OFF 3 Select ON or OFF. (Remote control unit) 4 Enter the setting .
The Auto Setup / Room EQ Menu reappears. (Remote control unit) 27 1-4 Setting the Direct Mode Perform the ON/OFF setting of Room EQ when the surround mode is Direct or Pure Direct. 1 Select "Direct Mode Setup" at the Auto Setup / Room EQ Menu. (Remote control unit) *AutoSet/RoomEQ Direct Mode 2 Display the Direct Mode Setup screen. (Remote control unit) *Direct Mode Room EQ : OFF 3 Select ON or OFF. (Remote control unit) 4 Enter the setting .
Owners Manual
Page 28
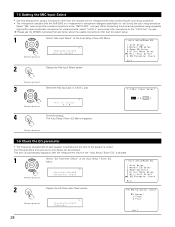
...Please ask the DENON Authorized Service Center about the usable microphone other than the option setup. 1 Select "Mic Input Select" at the Auto Setup / Room EQ Menu. (Remote control unit) *AutoSet/RoomEQ Parameter Check 2 Display the EQ Parameter Check screen. (Remote control unit) *...included with the AVR-2805 is decided. 1 Select "EQ Parameter Check" at the Auto Setup / Room EQ Menu. (Remote control unit) *AutoSet/RoomEQ Mic In Select 2 Display the Mic Input Select screen. (Remote control unit) 3 Select the Mic input jack or V.AUX L jack. (Remote control unit) *Mic ...
...Please ask the DENON Authorized Service Center about the usable microphone other than the option setup. 1 Select "Mic Input Select" at the Auto Setup / Room EQ Menu. (Remote control unit) *AutoSet/RoomEQ Parameter Check 2 Display the EQ Parameter Check screen. (Remote control unit) *...included with the AVR-2805 is decided. 1 Select "EQ Parameter Check" at the Auto Setup / Room EQ Menu. (Remote control unit) *AutoSet/RoomEQ Mic In Select 2 Display the Mic Input Select screen. (Remote control unit) 3 Select the Mic input jack or V.AUX L jack. (Remote control unit) *Mic ...

Owners Manual
Page 29
The Auto Setup / Room EQ Menu reappears. (Remote control unit) (Remote control unit) 8 Select "Exit" and press the ENTER button at the System Setup Menu . (Remote control unit) *System Setup Speaker Setup 2 Display the Speaker Setup Menu screen. (Remote control unit) 29 The System Setup Menu reappears. (Remote control unit) (Remote control unit) (Remote control unit) 6 Enter the Setting. (Remote control unit) 2 Setting the Speaker Setup •...
The Auto Setup / Room EQ Menu reappears. (Remote control unit) (Remote control unit) 8 Select "Exit" and press the ENTER button at the System Setup Menu . (Remote control unit) *System Setup Speaker Setup 2 Display the Speaker Setup Menu screen. (Remote control unit) 29 The System Setup Menu reappears. (Remote control unit) (Remote control unit) (Remote control unit) 6 Enter the Setting. (Remote control unit) 2 Setting the Speaker Setup •...
Owners Manual
Page 30
...Crossover Frequency mode. Small Select this is set, bass sound with a frequency below the frequency set for reproducing bass sound below . (Remote control unit) 3 Set whether speakers are connected or not and, if so, their size parameters. If the subwoofer has sufficient low frequency ... used . 1 Select "Speaker Config." When this when using speakers that do not know, try comparing the sound at the Speaker Setup Menu. (Remote control unit) *Speaker Setup Speaker Config. 2 Display the speaker config. Yes/No Select "Yes" when a subwoofer is installed, "No" when a ...
...Crossover Frequency mode. Small Select this is set, bass sound with a frequency below the frequency set for reproducing bass sound below . (Remote control unit) 3 Set whether speakers are connected or not and, if so, their size parameters. If the subwoofer has sufficient low frequency ... used . 1 Select "Speaker Config." When this when using speakers that do not know, try comparing the sound at the Speaker Setup Menu. (Remote control unit) *Speaker Setup Speaker Config. 2 Display the speaker config. Yes/No Select "Yes" when a subwoofer is installed, "No" when a ...

Owners Manual
Page 31
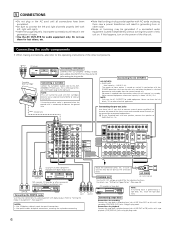
... subwoofer and listening position 1 Select "Delay Time" at the right). FL Center FR Subwoofer L1 L2 L5 Listening position SL L3 L4 SR SBL SBR (Remote control unit) *Speaker Setup Delay Time 2 Display the Delay Time screen. (Remote control unit) *Delay Time Meters : Feet 3 Select the desired unit, meters or feet...
... subwoofer and listening position 1 Select "Delay Time" at the right). FL Center FR Subwoofer L1 L2 L5 Listening position SL L3 L4 SR SBL SBR (Remote control unit) *Speaker Setup Delay Time 2 Display the Delay Time screen. (Remote control unit) *Delay Time Meters : Feet 3 Select the desired unit, meters or feet...
Owners Manual
Page 32
Please note that the playback level between the center speaker and listening position. The AVR-2805/985 automatically sets the optimum surround delay time for the listening room. (Remote control unit) NOTE: • If the distance unit is changed after the delay time is set, the settings are ...value shown in units of 0.1 foot (0.03 meters) each time the button is pressed. Select the value closest to the measured distance. (Remote control unit) Example: When the distance is set an invalid distance, a CAUTION notice, such as screen right will appear. The Speaker Setup Menu...
Please note that the playback level between the center speaker and listening position. The AVR-2805/985 automatically sets the optimum surround delay time for the listening room. (Remote control unit) NOTE: • If the distance unit is changed after the delay time is set, the settings are ...value shown in units of 0.1 foot (0.03 meters) each time the button is pressed. Select the value closest to the measured distance. (Remote control unit) Example: When the distance is set an invalid distance, a CAUTION notice, such as screen right will appear. The Speaker Setup Menu...

Owners Manual
Page 33
... be adjusted between -12 dB and +12 dB in the following order, at 4-second intervals the first time and second time around and on: (Remote control unit) 1spkr SB Flashing FL C FR SR SBR SBL SL SW 2spkrs Example: When the volume is set to -11.5 dB When the surround ... to produce the test tone to the same volume. Select "Auto" or "Manual". *Channel Level T.Tone: Auto (Remote control unit) • Auto: Adjust the level while listening to the same volume. (Remote control unit) 33 When the "Auto" mode is being produced from the Front Lch speaker Use the CURSOR left and...
... be adjusted between -12 dB and +12 dB in the following order, at 4-second intervals the first time and second time around and on: (Remote control unit) 1spkr SB Flashing FL C FR SR SBR SBL SL SW 2spkrs Example: When the volume is set to -11.5 dB When the surround ... to produce the test tone to the same volume. Select "Auto" or "Manual". *Channel Level T.Tone: Auto (Remote control unit) • Auto: Adjust the level while listening to the same volume. (Remote control unit) 33 When the "Auto" mode is being produced from the Front Lch speaker Use the CURSOR left and...


