Literature/Product Sheet
Page 1
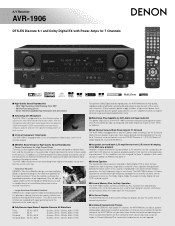
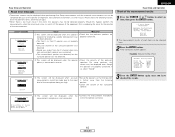
...home theater without correction, the high-frequency range is too strong. Or the amplifiers can customize the performance of DENON's high-grade A/V receiver, the AVR-1906 lets you adjust speaker configuration, delay times and other formats emphasizes high-frequency range due to achieve the most ... DSP • 96 kHz Processing Circuit • 24 bit, 192 kHz Capability High Resolution D/A Conversion s Auto Setup with Microphone The AVR-1906 is equipped with an Auto Setup function, to a theater's front speakers being placed behind the movie screen. s Wide-Range Play Capability for DVD...
...home theater without correction, the high-frequency range is too strong. Or the amplifiers can customize the performance of DENON's high-grade A/V receiver, the AVR-1906 lets you adjust speaker configuration, delay times and other formats emphasizes high-frequency range due to achieve the most ... DSP • 96 kHz Processing Circuit • 24 bit, 192 kHz Capability High Resolution D/A Conversion s Auto Setup with Microphone The AVR-1906 is equipped with an Auto Setup function, to a theater's front speakers being placed behind the movie screen. s Wide-Range Play Capability for DVD...
Owners Manual
Page 4
...Setting the SW Mode Setup 48 System setup items and default values 49, 50 Troubleshooting 51 Additional information 52~57 Specifications 58 List of preset codes End of this manual before you begin hookup and operation that you for choosing the DENON AVR-1906 A/V Surround Receiver. Part 1 Navigating...Started Advanced Operation Remote control unit Operating DENON audio components 31 Preset memory 32 Operating a component stored in the preset memory 32~34 Punch through the System Setup Menu 39 On-screen display and front display 39 Input Setup Setting the Digital In Assign 40 ...
...Setting the SW Mode Setup 48 System setup items and default values 49, 50 Troubleshooting 51 Additional information 52~57 Specifications 58 List of preset codes End of this manual before you begin hookup and operation that you for choosing the DENON AVR-1906 A/V Surround Receiver. Part 1 Navigating...Started Advanced Operation Remote control unit Operating DENON audio components 31 Preset memory 32 Operating a component stored in the preset memory 32~34 Punch through the System Setup Menu 39 On-screen display and front display 39 Input Setup Setting the Digital In Assign 40 ...
Owners Manual
Page 6
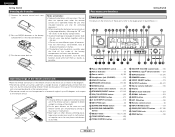
AUX INPUT terminals 13) !3 SETUP MIC jack 8) !4 SURROUND MODE button 18) !5 SURROUND PARAMETER button 21) !6 SELECT knob 18, 21, 28) !7 TONE DEFEAT button 28) !8 TONE CONTROL button 28) !9 MASTER VOLUME ...
AUX INPUT terminals 13) !3 SETUP MIC jack 8) !4 SURROUND MODE button 18) !5 SURROUND PARAMETER button 21) !6 SELECT knob 18, 21, 28) !7 TONE DEFEAT button 28) !8 TONE CONTROL button 28) !9 MASTER VOLUME ...
Owners Manual
Page 7
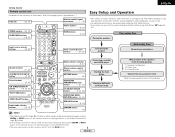
... Connecting a monitor and a DVD player. System buttons 31~33) SYSTEM SETUP/SETUP button 9, 32) Master volume control buttons 18, 37) MUTING button 18) Starting the Auto Setup. Store the measurement result in parentheses ( ). Auto setup flow Connecting a microphone. Placing the speakers. MEMO • The Dolby ...32) MAIN buttons 4, 34) Input source selector buttons 18, 32) Tuner system/System buttons 29, 33) ENGLISH Easy Setup and Operation • This section contains the basic steps necessary to configure the AVR-1906 according to the pages given in the memory. Easy...
... Connecting a monitor and a DVD player. System buttons 31~33) SYSTEM SETUP/SETUP button 9, 32) Master volume control buttons 18, 37) MUTING button 18) Starting the Auto Setup. Store the measurement result in parentheses ( ). Auto setup flow Connecting a microphone. Placing the speakers. MEMO • The Dolby ...32) MAIN buttons 4, 34) Input source selector buttons 18, 32) Tuner system/System buttons 29, 33) ENGLISH Easy Setup and Operation • This section contains the basic steps necessary to configure the AVR-1906 according to the pages given in the memory. Easy...
Owners Manual
Page 8
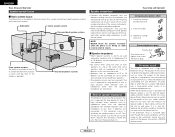
...speaker output is cut off . Tighten by turning counterclockwise. 2. Improve the ventilation condition around the unit, switch off the power and contact a DENON service center. 5 ENGLISH Turn off the unit's power, wait for the unit to cool down if it is very hot. When the protection...specified impedance (for example speakers with >). Connecting banana plugs Banana plug Turn clockwise to tighten, then insert the banana plug. ENGLISH Easy Setup and Operation Speaker system layout 2 Basic system layout The following is an example of the basic layout for a system consisting of eight ...
...speaker output is cut off . Tighten by turning counterclockwise. 2. Improve the ventilation condition around the unit, switch off the power and contact a DENON service center. 5 ENGLISH Turn off the unit's power, wait for the unit to cool down if it is very hot. When the protection...specified impedance (for example speakers with >). Connecting banana plugs Banana plug Turn clockwise to tighten, then insert the banana plug. ENGLISH Easy Setup and Operation Speaker system layout 2 Basic system layout The following is an example of the basic layout for a system consisting of eight ...
Owners Manual
Page 9
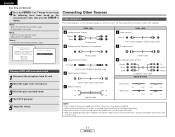
If this effect. AVR-1906 SPEAKER SPEAKER (L) (R) >< (L) (R) >< (L) (R) > < Front speaker systems (B) Front speaker systems (A) Surround back speaker systems Precautions when connecting speakers: If a speaker is placed near a ... channels ( page 44). Center speaker Subwoofer Surround speaker systems >< IN Connection terminal for a subwoofer with built-in amplifier. (L) (R) > < ENGLISH Easy Setup and Operation 2 Bi-Amp connections Certain loudspeakers are equipped with two sets of input terminals, for further information before proceeding. The AVR1906 Power Amp Assign...
If this effect. AVR-1906 SPEAKER SPEAKER (L) (R) >< (L) (R) >< (L) (R) > < Front speaker systems (B) Front speaker systems (A) Surround back speaker systems Precautions when connecting speakers: If a speaker is placed near a ... channels ( page 44). Center speaker Subwoofer Surround speaker systems >< IN Connection terminal for a subwoofer with built-in amplifier. (L) (R) > < ENGLISH Easy Setup and Operation 2 Bi-Amp connections Certain loudspeakers are equipped with two sets of input terminals, for further information before proceeding. The AVR1906 Power Amp Assign...
Owners Manual
Page 10
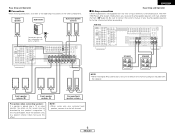
... page 12). • To connect the digital audio output from the DVD player, you can choose from the DVD player to the AVR-1906, you choose to use the coaxial connection, it needs to your TV does not have component video inputs. For more information about Digital ... the same way. DVD player H COMPONENT VIDEO OUT Y PB PR G S VIDEO OUT F VIDEO OUT D OPTICAL OUT A AUDIO OUT L L L R R R Easy Setup and Operation • For best picture quality (especially with progressive DVD and other components for progressive DVD playback), followed by S-Video, while composite video offers...
... page 12). • To connect the digital audio output from the DVD player, you can choose from the DVD player to the AVR-1906, you choose to use the coaxial connection, it needs to your TV does not have component video inputs. For more information about Digital ... the same way. DVD player H COMPONENT VIDEO OUT Y PB PR G S VIDEO OUT F VIDEO OUT D OPTICAL OUT A AUDIO OUT L L L R R R Easy Setup and Operation • For best picture quality (especially with progressive DVD and other components for progressive DVD playback), followed by S-Video, while composite video offers...

Owners Manual
Page 11
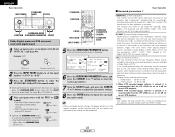
...when operating with the remote control unit). Also, be sure to point the speakers towards the listening position. 2 Place the microphone for Auto Setup to turn the power on and off from the included remote control unit. £ OFF: The power turns off and the indicator is recommended...TV). 3 Press the POWER switch. ¢ ON: The power turns on and the indicator lights. ON/STANDBY SETUP MIC SETUP ENTER CURSOR SPEAKER Auto Setup The Auto Setup function of this position to the SETUP MIC jack on a tripod or level surface. 8 ENGLISH e: This sets the volume that may produce noise. &#...
...when operating with the remote control unit). Also, be sure to point the speakers towards the listening position. 2 Place the microphone for Auto Setup to turn the power on and off from the included remote control unit. £ OFF: The power turns off and the indicator is recommended...TV). 3 Press the POWER switch. ¢ ON: The power turns on and the indicator lights. ON/STANDBY SETUP MIC SETUP ENTER CURSOR SPEAKER Auto Setup The Auto Setup function of this position to the SETUP MIC jack on a tripod or level surface. 8 ENGLISH e: This sets the volume that may produce noise. &#...

Owners Manual
Page 12
...switches to ZONE2 (Another room). Measurement of your subwoofer speaker can be output from the Bi-Amp speaker. 9 ENGLISH The test tone during Auto Setup is performed as a subwoofer, might be output from the surround back speaker. Even if the front speakers (B) are set so that differs from the... physical distance because of the measurements, remeasurement is performed up to "ZONE2". The test tone during Auto Setup will be changed, then set to "BiAmp". After each channel is set so that it will be set the volume to halfway and the ...
...switches to ZONE2 (Another room). Measurement of your subwoofer speaker can be output from the Bi-Amp speaker. 9 ENGLISH The test tone during Auto Setup is performed as a subwoofer, might be output from the surround back speaker. Even if the front speakers (B) are set so that differs from the... physical distance because of the measurements, remeasurement is performed up to "ZONE2". The test tone during Auto Setup will be changed, then set to "BiAmp". After each channel is set so that it will be set the volume to halfway and the ...
Owners Manual
Page 13
...results 1 Press the CURSOR D or H button to the microphone connector. 10 ENGLISH to select an item, then press the ENTER button. Easy Setup and Operation Check of the subwoofer speaker. 3 Press the ENTER button again once you have properly connected. If so, select "Skip0". Screen ... is connected in the room, the speakers may not be detected properly. Should this screen may be displayed when performing Auto Setup measurement and the automatic measurements can be checked here. 2 Press the ENTER button. • The verification screen appears. Example: Speaker Config...
...results 1 Press the CURSOR D or H button to the microphone connector. 10 ENGLISH to select an item, then press the ENTER button. Easy Setup and Operation Check of the subwoofer speaker. 3 Press the ENTER button again once you have properly connected. If so, select "Skip0". Screen ... is connected in the room, the speakers may not be detected properly. Should this screen may be displayed when performing Auto Setup measurement and the automatic measurements can be checked here. 2 Press the ENTER button. • The verification screen appears. Example: Speaker Config...
Owners Manual
Page 14
...) G S-Video terminal Playing a DVD with power supply cords or placing them near a power transformer will result in hum or other noise. 11 ENGLISH ENGLISH Easy Setup and Operation 4 Press the CURSOR D or H button to be played. 3 Select the play (surround) mode. 4 Start DVD playback. 5 Adjust the volume...
...) G S-Video terminal Playing a DVD with power supply cords or placing them near a power transformer will result in hum or other noise. 11 ENGLISH ENGLISH Easy Setup and Operation 4 Press the CURSOR D or H button to be played. 3 Select the play (surround) mode. 4 Start DVD playback. 5 Adjust the volume...
Owners Manual
Page 19
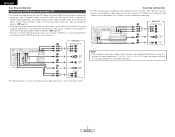
... Connecting the MULTI ZONE terminals For instructions on installation and operation of separately sold separately room-to the ZONE2 stereo 2 channel. in the "System Setup" menu, the surround back speaker terminals can be used as the ZONE2 speaker out terminals ( page 36). • The connections diagram below is... an example for when the surround back speaker is assigned to -room remote control unit (DENON RC-616, 617 or 618) is connected, the ZONE2 out (variable/fixed level) terminals can not be used to play a different program source ...
... Connecting the MULTI ZONE terminals For instructions on installation and operation of separately sold separately room-to the ZONE2 stereo 2 channel. in the "System Setup" menu, the surround back speaker terminals can be used as the ZONE2 speaker out terminals ( page 36). • The connections diagram below is... an example for when the surround back speaker is assigned to -room remote control unit (DENON RC-616, 617 or 618) is connected, the ZONE2 out (variable/fixed level) terminals can not be used to play a different program source ...

Owners Manual
Page 23
... in the "ANALOG" or "PCM" mode. ANALOG (exclusive analog audio signal playback mode): The signals input to the analog input terminals are being input properly. setup ( page 40) and connections are correct and whether the component's power is turned on the input signal. 2 Input signal display • DOLBY DIGITAL Basic Operation...
... in the "ANALOG" or "PCM" mode. ANALOG (exclusive analog audio signal playback mode): The signals input to the analog input terminals are being input properly. setup ( page 40) and connections are correct and whether the component's power is turned on the input signal. 2 Input signal display • DOLBY DIGITAL Basic Operation...
Owners Manual
Page 24
...button to suit your tastes. ENTER SURROUND PARAMETER CURSOR SURROUND PARAMETER SELECT Surround Playing audio sources (CDs and DVDs) 2-channel playback modes • The AVR-1906 is set to "ON". (Set "S. When the "SB CH OUT" parameter is equipped with 2-channel playback modes exclusively for music. • ... the SURROUND PARAMETER button, and press the CURSOR D or H button to the manuals of the various parameters. 21 ENGLISH BACK" at system setup to "NONE".) Display (Pro Logic II Cinema mode) 2 DIRECT mode Use this mode to select the DIRECT mode. In this mode to ...
...button to suit your tastes. ENTER SURROUND PARAMETER CURSOR SURROUND PARAMETER SELECT Surround Playing audio sources (CDs and DVDs) 2-channel playback modes • The AVR-1906 is set to "ON". (Set "S. When the "SB CH OUT" parameter is equipped with 2-channel playback modes exclusively for music. • ... the SURROUND PARAMETER button, and press the CURSOR D or H button to the manuals of the various parameters. 21 ENGLISH BACK" at system setup to "NONE".) Display (Pro Logic II Cinema mode) 2 DIRECT mode Use this mode to select the DIRECT mode. In this mode to ...
Owners Manual
Page 26
... to -10 dB for correct DTS playback. Select this operation from the front speakers is turned off with the subwoofer peak limit level setting (system setup menu), adjust the level as necessary. This can be set to digital (COAXIAL/ OPTICAL) ( page 40). When performing this function if the sound from the...
... to -10 dB for correct DTS playback. Select this operation from the front speakers is turned off with the subwoofer peak limit level setting (system setup menu), adjust the level as necessary. This can be set to digital (COAXIAL/ OPTICAL) ( page 40). When performing this function if the sound from the...
Owners Manual
Page 28
..., adjust so that the movement of the actors' lips is stored separately for each input source. • This adjustment can be performed with the system setup ( page 43) or from the remote control unit, as described below. 1 Select the input source. IN mode or in the EXT. In this case, adjust...
..., adjust so that the movement of the actors' lips is stored separately for each input source. • This adjustment can be performed with the system setup ( page 43) or from the remote control unit, as described below. 1 Select the input source. IN mode or in the EXT. In this case, adjust...

Owners Manual
Page 32
..." indicator lights on the main unit. • The unit automatically begins searching for FM broadcast stations. Subsequent stations are automatically stored in order at "System setup" ( page 42). Hold the PRESET • button and press the POWER switch on the display when a stereo broadcast is tuned in. At open frequencies, the...
..." indicator lights on the main unit. • The unit automatically begins searching for FM broadcast stations. Subsequent stations are automatically stored in order at "System setup" ( page 42). Hold the PRESET • button and press the POWER switch on the display when a stereo broadcast is tuned in. At open frequencies, the...
Owners Manual
Page 35
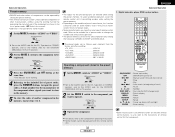
...the preset memory. • This remote control unit can be set for DVD changer only) DISPLAY : Switch display MENU : Menu RETURN : Return SETUP : Setup •, ª, 0, 1 : Cursor up, down, left and right ENTER : Enter setting 3 Operate the component. ENGLISH Advanced Operation 1.... manual). • Operation is not possible for some models, even if they are emitted while setting the preset memory. ON/SOURCE : Power on/standby OFF : DENON DVD power off 6, 7 : Manual search (forward and reverse) 2 : Stop 1 : Play 8, 9 : Auto search (to beginning of track) 3 : Pause 0 ~...
...the preset memory. • This remote control unit can be set for DVD changer only) DISPLAY : Switch display MENU : Menu RETURN : Return SETUP : Setup •, ª, 0, 1 : Cursor up, down, left and right ENTER : Enter setting 3 Operate the component. ENGLISH Advanced Operation 1.... manual). • Operation is not possible for some models, even if they are emitted while setting the preset memory. ON/SOURCE : Power on/standby OFF : DENON DVD power off 6, 7 : Manual search (forward and reverse) 2 : Stop 1 : Play 8, 9 : Auto search (to beginning of track) 3 : Pause 0 ~...
Owners Manual
Page 38
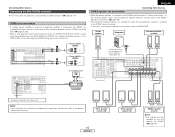
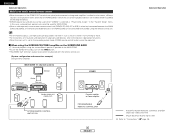
... wired and connected to integrated amplifiers installed in other rooms, different sources can be played in rooms other than the MAIN ZONE in the "System Setup" menu. MAIN ZONE 7.1-channel systems Monitor ZONE2 FL Center FR DVD player This unit B SW Input SL ZONE2 AUDIO OUT (FIXED OUT) SR B Premain amplifier...] Using external amplifier. ENGLISH Advanced Operation Multi zone music entertainment system • When the outputs of separately sold separately room-to-room remote control unit (DENON RC-616, 617 or 618) is set to "Connections" ( page 16). 35 ENGLISH
... wired and connected to integrated amplifiers installed in other rooms, different sources can be played in rooms other than the MAIN ZONE in the "System Setup" menu. MAIN ZONE 7.1-channel systems Monitor ZONE2 FL Center FR DVD player This unit B SW Input SL ZONE2 AUDIO OUT (FIXED OUT) SR B Premain amplifier...] Using external amplifier. ENGLISH Advanced Operation Multi zone music entertainment system • When the outputs of separately sold separately room-to-room remote control unit (DENON RC-616, 617 or 618) is set to "Connections" ( page 16). 35 ENGLISH
Owners Manual
Page 42
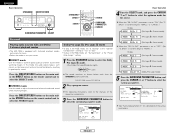
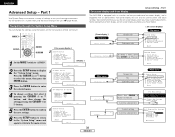
... front display The AVR-1906 is equipped with an intuitive and easy-to-understand on-screen display, and is equipped with an alphanumeric front panel display that you use the on-screen display when you make system adjustments. Navigating through the System Setup Menu You can... On-screen display ] 2 1 Set the MODE 1 switch to "AUDIO". [ Display ] *Input Setup *Auto Setup *Speaker Setup Sub-menu title To select a menu, press the CURSOR D or H button. 2 Press the SETUP button to display the "System Setup" menu. 3 Press the CURSOR D or H button to select the menu, then press the ENTER ...
... front display The AVR-1906 is equipped with an intuitive and easy-to-understand on-screen display, and is equipped with an alphanumeric front panel display that you use the on-screen display when you make system adjustments. Navigating through the System Setup Menu You can... On-screen display ] 2 1 Set the MODE 1 switch to "AUDIO". [ Display ] *Input Setup *Auto Setup *Speaker Setup Sub-menu title To select a menu, press the CURSOR D or H button. 2 Press the SETUP button to display the "System Setup" menu. 3 Press the CURSOR D or H button to select the menu, then press the ENTER ...

