
Literature/Product Sheet
Page 1
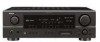
A/V Receiver AVR-1507 DTS-ES Discrete 6.1 and Dolby Digital EX with Power Amps for 7 Channels Audio section s Fully Discrete, Equal Power 7 Amplifier Channels, 75 Watts Each Front 75 W + ... is too strong. s New simple remote for 7.1 Surround The AVR-1507 is equipped with a total of Black version is connected to reproduce the exceptionally high sound quality with DENON's DSP acoustic environment simulation modes. s Cinema Equalizer The sound from 10 Hz to a theater's front speakers being placed behind the movie screen. These DSP modes...
A/V Receiver AVR-1507 DTS-ES Discrete 6.1 and Dolby Digital EX with Power Amps for 7 Channels Audio section s Fully Discrete, Equal Power 7 Amplifier Channels, 75 Watts Each Front 75 W + ... is too strong. s New simple remote for 7.1 Surround The AVR-1507 is equipped with a total of Black version is connected to reproduce the exceptionally high sound quality with DENON's DSP acoustic environment simulation modes. s Cinema Equalizer The sound from 10 Hz to a theater's front speakers being placed behind the movie screen. These DSP modes...
Literature/Product Sheet
Page 2
...are power amp stage values. The adjustments are easy to enhance music lovers' enjoyment with all of DENON's high-grade A/V receiver, the AVR-1507 lets you can customize the performance of the AVR-1507 to change without notice. *"Dolby", "Dolby Digital", "Pro Logic I", "Dolby Digital EX" and ... trademarks of DTS Technology. *iPod is a trademark of delay effects and unnatural artifacts, from all 7 speakers. s Personal Memory Plus, for Easy Operation The AVR-1507 includes the Personal Memory Plus function that automatically remembers the surround mode you last used for each source input...
...are power amp stage values. The adjustments are easy to enhance music lovers' enjoyment with all of DENON's high-grade A/V receiver, the AVR-1507 lets you can customize the performance of the AVR-1507 to change without notice. *"Dolby", "Dolby Digital", "Pro Logic I", "Dolby Digital EX" and ... trademarks of DTS Technology. *iPod is a trademark of delay effects and unnatural artifacts, from all 7 speakers. s Personal Memory Plus, for Easy Operation The AVR-1507 includes the Personal Memory Plus function that automatically remembers the surround mode you last used for each source input...
Owners Manual - English
Page 4
... control unit 3 Part names and functions Front panel 4 Display 4 Rear panel 5 Remote control unit 5, 6 Easy Operation Speaker layout [Basic layout 6 Speaker connections 7 Connecting a DVD player and monitor 8 Before operating 9 Playing the input source 9 Connecting Other Sources Cable indications...iPod Assignment 22 Setting the EXT. As this manual before you begin hookup and operation that you for choosing the DENON AVR-1507 AV Surround Receiver. Contents Getting Started Accessories 2 Before using 2 Cautions on installation 3 About the remote control unit 3 Inserting the...
... control unit 3 Part names and functions Front panel 4 Display 4 Rear panel 5 Remote control unit 5, 6 Easy Operation Speaker layout [Basic layout 6 Speaker connections 7 Connecting a DVD player and monitor 8 Before operating 9 Playing the input source 9 Connecting Other Sources Cable indications...iPod Assignment 22 Setting the EXT. As this manual before you begin hookup and operation that you for choosing the DENON AVR-1507 AV Surround Receiver. Contents Getting Started Accessories 2 Before using 2 Cautions on installation 3 About the remote control unit 3 Inserting the...

Owners Manual - English
Page 7
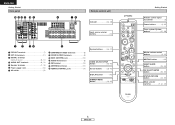
...e r y u i o !0 !1 !3 !4 !5 q w e q Power operation button (ON/STANDBY 9) w Power indicator 9) e Power switch 9, 43) r Headphones jack (PHONES 26) t ANALOG button 25) y SPEAKER buttons 9, 43) u ZONE2 button 42) i SHIFT button 37) o USER MODE buttons 39) !0 PRESET buttons 36, 37) !1 V. q Signal channel indicator Lights when the preset channel is...mode. t STEREO indicator This lights when an FM stereo broadcast has been received. u TUNED indicator This lights when an FM/AM broadcast has been received. 4 ENGLISH Getting Started Part names and functions For details on the remote ...
...e r y u i o !0 !1 !3 !4 !5 q w e q Power operation button (ON/STANDBY 9) w Power indicator 9) e Power switch 9, 43) r Headphones jack (PHONES 26) t ANALOG button 25) y SPEAKER buttons 9, 43) u ZONE2 button 42) i SHIFT button 37) o USER MODE buttons 39) !0 PRESET buttons 36, 37) !1 V. q Signal channel indicator Lights when the preset channel is...mode. t STEREO indicator This lights when an FM stereo broadcast has been received. u TUNED indicator This lights when an FM/AM broadcast has been received. 4 ENGLISH Getting Started Part names and functions For details on the remote ...
Owners Manual - English
Page 8
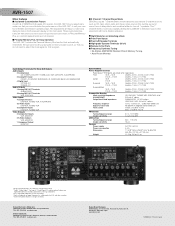
IN terminals 11) e DIGITAL terminals (Optical/Coaxial 8, 12) r AUDIO OUT terminals 8, 12) t Speaker terminals 7, 15) y Power supply cord 15) u AC outlets 15) i COMPONENT VIDEO terminals 8) o VIDEO/S-VIDEO terminals 8) !0 DOCK CONTROL jack 14) !1 AUDIO IN terminals 8) !2 XM terminal 13) !3 ...
IN terminals 11) e DIGITAL terminals (Optical/Coaxial 8, 12) r AUDIO OUT terminals 8, 12) t Speaker terminals 7, 15) y Power supply cord 15) u AC outlets 15) i COMPONENT VIDEO terminals 8) o VIDEO/S-VIDEO terminals 8) !0 DOCK CONTROL jack 14) !1 AUDIO IN terminals 8) !2 XM terminal 13) !3 ...
Owners Manual - English
Page 9
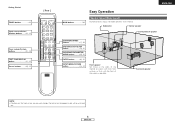
.../System buttons 37, 47) TEST TONE/DISPLAY button 21, 47) Cursor buttons 28, 47) [ Rear ] ENGLISH Easy Operation MAIN buttons 42) Speaker layout [Basic layout] Example of the screen as flush with the front of basic layout with their front surfaces as possible. Subwoofer Center... speaker Surround back speaker SURROUND MODE buttons 27, 35) SYSTEM SETUP/SETUP button 18, 47) SURROUND PARAMETER/ AUDIO button 28, 47) ENTER button 36, 47)...
.../System buttons 37, 47) TEST TONE/DISPLAY button 21, 47) Cursor buttons 28, 47) [ Rear ] ENGLISH Easy Operation MAIN buttons 42) Speaker layout [Basic layout] Example of the screen as flush with the front of basic layout with their front surfaces as possible. Subwoofer Center... speaker Surround back speaker SURROUND MODE buttons 27, 35) SYSTEM SETUP/SETUP button 18, 47) SURROUND PARAMETER/ AUDIO button 28, 47) ENTER button 36, 47)...
Owners Manual - English
Page 10
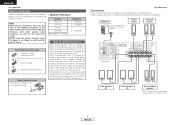
... with adjacent terminals, with other components. NOTE: When making connections, also refer to cool off the power and contact a DENON service center. Connecting the speaker cables 1. Easy Operation ¢ Connections • With the AVR-1507, up to ten speakers can be connected for the set to the operating instructions of the input cables and the...
... with adjacent terminals, with other components. NOTE: When making connections, also refer to cool off the power and contact a DENON service center. Connecting the speaker cables 1. Easy Operation ¢ Connections • With the AVR-1507, up to ten speakers can be connected for the set to the operating instructions of the input cables and the...

Owners Manual - English
Page 12
... on the main unit [ ] : Buttons on the remote control unit Button name only : Buttons on the master volume level display. 5 Press to select the front speaker (Front A, Front B or Front A+B). 6 Set [MODE SELECTOR 1] to adjust the volume. • The volume level is off if your monitor. 3 Press . ¢ ON: The power...
... on the main unit [ ] : Buttons on the remote control unit Button name only : Buttons on the master volume level display. 5 Press to select the front speaker (Front A, Front B or Front A+B). 6 Set [MODE SELECTOR 1] to adjust the volume. • The volume level is off if your monitor. 3 Press . ¢ ON: The power...
Owners Manual - English
Page 13
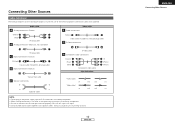
...) D Digital connections (Optical) S-Video cable H Component video connections (Green) (Blue) (Red) Component video cable Signal direction Optical fiber cable E Speaker connections Speaker cable Audio signal IN Video signal IN OUT OUT OUT OUT NOTE: • Do not plug in humming or noise. (Y) (PB/CB) (PR...connect the left and right channels properly (left with left, right with right). • Do not bundle power cords together with speaker cables. Connecting Other Sources Cable indications The hookup diagrams on the subsequent pages assume the use of the other components. • Be...
...) D Digital connections (Optical) S-Video cable H Component video connections (Green) (Blue) (Red) Component video cable Signal direction Optical fiber cable E Speaker connections Speaker cable Audio signal IN Video signal IN OUT OUT OUT OUT NOTE: • Do not plug in humming or noise. (Y) (PB/CB) (PR...connect the left and right channels properly (left with left, right with right). • Do not bundle power cords together with speaker cables. Connecting Other Sources Cable indications The hookup diagrams on the subsequent pages assume the use of the other components. • Be...
Owners Manual - English
Page 18
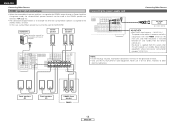
... (total capacity - 120 W (1A.)) The power to the outlet is turned on and standby from this outlet when this case, surround back speaker out can be used as the ZONE2 speaker out terminals ( page 42). • The connections diagram below is an example for when the surround back...audio equipment. Incomplete connections will result in the generation of noise. • Only use it for MAIN ZONE. ENGLISH Connecting Other Sources ZONE2 speaker out connections • When the surround back's power amplifier is assigned to the ZONE2 output channel at standby. No power is assigned to ...
... (total capacity - 120 W (1A.)) The power to the outlet is turned on and standby from this outlet when this case, surround back speaker out can be used as the ZONE2 speaker out terminals ( page 42). • The connections diagram below is an example for when the surround back...audio equipment. Incomplete connections will result in the generation of noise. • Only use it for MAIN ZONE. ENGLISH Connecting Other Sources ZONE2 speaker out connections • When the surround back's power amplifier is assigned to the ZONE2 output channel at standby. No power is assigned to ...
Owners Manual - English
Page 19
...Default settings AUX DVD COAX 2 OPT 1 5 iPod Assignment mode It is possible to any input terminals on the AVR-1507 and play them. Items 1 ~ 6 Speaker Configuration mode Automatically set the output component and properties for the various channels according to the combination of the subwoofer ...for optimizing the timing with which the bass sound of the various speakers is for playing the low bass signals. This parameter is to be preset automatically. Front L & R 12 ft LFE (Normal) ...
...Default settings AUX DVD COAX 2 OPT 1 5 iPod Assignment mode It is possible to any input terminals on the AVR-1507 and play them. Items 1 ~ 6 Speaker Configuration mode Automatically set the output component and properties for the various channels according to the combination of the subwoofer ...for optimizing the timing with which the bass sound of the various speakers is for playing the low bass signals. This parameter is to be preset automatically. Front L & R 12 ft LFE (Normal) ...
Owners Manual - English
Page 21
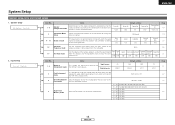
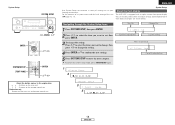
... unit ENGLISH Use System Setup to customize a variety of settings to move the next category. System Setup About the front display The AVR-1507 is equipped with an alpha numeric front panel display that can also be used to confirm the new settings. System Setup SYSTEM SETUP ... this unit ( page 16, 17). Navigating through the System Setup items Item No. To cancel the system setup mode, press SYSTEM SETUP again. 1 *System Setup 2 Speaker Setup 3 1 Front L a r g e 5 18 ENGLISH Category No. 1 Press SYSTEM SETUP, then press ENTER. 1 COAX1 CD 2 Press F G to select the item...
... unit ENGLISH Use System Setup to customize a variety of settings to move the next category. System Setup About the front display The AVR-1507 is equipped with an alpha numeric front panel display that can also be used to confirm the new settings. System Setup SYSTEM SETUP ... this unit ( page 16, 17). Navigating through the System Setup items Item No. To cancel the system setup mode, press SYSTEM SETUP again. 1 *System Setup 2 Speaker Setup 3 1 Front L a r g e 5 18 ENGLISH Category No. 1 Press SYSTEM SETUP, then press ENTER. 1 COAX1 CD 2 Press F G to select the item...

Owners Manual - English
Page 22
... when and "Yes" is set for the subwoofer in that channel's corresponding source are set to "Large", low frequencies in the "Setting the Speaker Configuration". • Select the "LFE+Main" mode if you want low frequency signals to always be played from the subwoofer channel. • ... automatically set to "Yes", and when "Subwoofer" is set to "No", "Front" is connected. None: Select this when no subwoofer is automatically set to "Large". 1 Speaker Setup 2 1 Front L a r g e 6 Subwoofer Yes 3 7 SW Mode Norm • Select "Large" or "Small" not according to the actual size of the ...
... when and "Yes" is set for the subwoofer in that channel's corresponding source are set to "Large", low frequencies in the "Setting the Speaker Configuration". • Select the "LFE+Main" mode if you want low frequency signals to always be played from the subwoofer channel. • ... automatically set to "Yes", and when "Subwoofer" is set to "No", "Front" is connected. None: Select this when no subwoofer is automatically set to "Large". 1 Speaker Setup 2 1 Front L a r g e 6 Subwoofer Yes 3 7 SW Mode Norm • Select "Large" or "Small" not according to the actual size of the ...
Owners Manual - English
Page 23
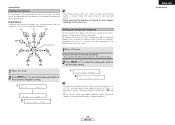
..., 120, 150, 200, 250 Hz: Set as described in units of 1 foot (0.1 meters) each time the button is to be 20 ft (6.0 m) or less. For speakers that are set to "Small", frequencies under the crossover frequency are cut before the signal is output, and the low frequency SW L1 L3 L2... component that was cut is output from the speakers and subwoofer according to the listening position. L4 Listening position L5 L6 1 Press F G to L8 on the diagram at the below which the bass sound...
..., 120, 150, 200, 250 Hz: Set as described in units of 1 foot (0.1 meters) each time the button is to be 20 ft (6.0 m) or less. For speakers that are set to "Small", frequencies under the crossover frequency are cut before the signal is output, and the low frequency SW L1 L3 L2... component that was cut is output from the speakers and subwoofer according to the listening position. L4 Listening position L5 L6 1 Press F G to L8 on the diagram at the below which the bass sound...
Owners Manual - English
Page 24
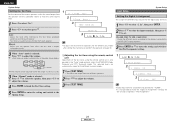
...TONE Yes< 2 T.Tone Auto > 3 TEST TONE ON A U T O - Auto: Adjust the level while listening to adjust the volume. -1 • Test tones are automatically emitted from each speaker. Input Setup System Setup Setting the Digital In Assignment This assigns the different input sources for the different play modes after setting the channel level...the input terminals, then press F G to set . CD, AUX, DVD, TV, VCR, V.AUX, CD-R: Assign the different source according to the devices connected to the AVR-1507's input terminals. 3 Press ENTER or H to enter the setting and switch to select "2.
...TONE Yes< 2 T.Tone Auto > 3 TEST TONE ON A U T O - Auto: Adjust the level while listening to adjust the volume. -1 • Test tones are automatically emitted from each speaker. Input Setup System Setup Setting the Digital In Assignment This assigns the different input sources for the different play modes after setting the channel level...the input terminals, then press F G to set . CD, AUX, DVD, TV, VCR, V.AUX, CD-R: Assign the different source according to the devices connected to the AVR-1507's input terminals. 3 Press ENTER or H to enter the setting and switch to select "2.
Owners Manual - English
Page 26
... S.Back: The surround back speakers are used is extremely loud. In this case, the volume can adjust the MAIN ZONE volume level within the range of -80 to +18 dB (and ZONE2 volume level within the range of -70 to +18 dB). You can be set to the AVR-1507's maximum volume (output...) level of +18 dB, which is stored in the memory and set a volume limit, select "OFF". ZONE2: This mode assigns the surround back amplifier channels to provide ZONE2 speaker-level outputs from the current level. 1 P.Amp ZONE2 2 ...
... S.Back: The surround back speakers are used is extremely loud. In this case, the volume can adjust the MAIN ZONE volume level within the range of -80 to +18 dB (and ZONE2 volume level within the range of -70 to +18 dB). You can be set to the AVR-1507's maximum volume (output...) level of +18 dB, which is stored in the memory and set a volume limit, select "OFF". ZONE2: This mode assigns the surround back amplifier channels to provide ZONE2 speaker-level outputs from the current level. 1 P.Amp ZONE2 2 ...
Owners Manual - English
Page 27
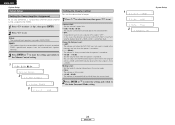
System Setup Setting the Auto Surround Mode Set whether or not to the Speaker Setup. 1 5 AutoSurr. The surround mode used at last for the input signal. channel format (DOLBY/DTS SURROUND) Default settings are indicated in the memory, and ...
System Setup Setting the Auto Surround Mode Set whether or not to the Speaker Setup. 1 5 AutoSurr. The surround mode used at last for the input signal. channel format (DOLBY/DTS SURROUND) Default settings are indicated in the memory, and ...
Owners Manual - English
Page 28
... possible to adjust the volume to 18 dB. • Canceling the EXT. For some players the playback level of input signal is detected and the AVR-1507's surround mode is no digital signals are input. Noise will be generated when you first start playing and during searching. The input switches to the...
... possible to adjust the volume to 18 dB. • Canceling the EXT. For some players the playback level of input signal is detected and the AVR-1507's surround mode is no digital signals are input. Noise will be generated when you first start playing and during searching. The input switches to the...

Owners Manual - English
Page 29
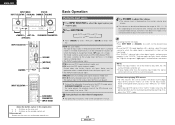
... Digital EX. Using the surround modes Basic Operation Types of surround modes and their features The AVR-1507 is equipped with . is optimized for playing sources recorded in 3 steps. The front speaker A, B setting can be changed with many surround modes. ENGLISH Basic Operation Turning the sound ...off . The brightness of the display Press DIMMER. You can also be careful not to turn the corresponding speaker pair on the display. Press STATUS. • The current program source and various settings are indicated on . Sources recorded in DTS...
... Digital EX. Using the surround modes Basic Operation Types of surround modes and their features The AVR-1507 is equipped with . is optimized for playing sources recorded in 3 steps. The front speaker A, B setting can be changed with many surround modes. ENGLISH Basic Operation Turning the sound ...off . The brightness of the display Press DIMMER. You can also be careful not to turn the corresponding speaker pair on the display. Press STATUS. • The current program source and various settings are indicated on . Sources recorded in DTS...
Owners Manual - English
Page 30
... being used when the surround back speaker is set to adjust the tone and achieve the desired sound. Select the mode to achieve the best sound quality. The audio signals are different for music. INPUT MODE STATUS F G, ENTER DENON Original Surround Modes ( page 34, 35) ... the remote control unit Button name only : Buttons on the main unit and remote control unit Basic Operation Selecting the play mode (DIRECT/STEREO) The AVR-1507 is equipped with high quality sound. ENTER STATUS D H F G DOLBY PRO LOGIC IIx* ( page 29) • Developed by Digital Theater Systems...
... being used when the surround back speaker is set to adjust the tone and achieve the desired sound. Select the mode to achieve the best sound quality. The audio signals are different for music. INPUT MODE STATUS F G, ENTER DENON Original Surround Modes ( page 34, 35) ... the remote control unit Button name only : Buttons on the main unit and remote control unit Basic Operation Selecting the play mode (DIRECT/STEREO) The AVR-1507 is equipped with high quality sound. ENTER STATUS D H F G DOLBY PRO LOGIC IIx* ( page 29) • Developed by Digital Theater Systems...


