
Literature/Product Sheet
Page 1
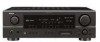
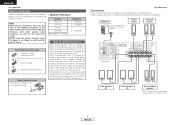
... surround modes) s Assignable surround back (L/R) amplifiers for Multi-zone playback Amplifiers initially reserved for Surround back (L/R) channels can also be assigned to Zone 2 speakers. If this sound is reproduced in the home theater without correction, the high-frequency range is also available. A/V Receiver AVR-1507 DTS-ES Discrete 6.1 and Dolby Digital EX with Power Amps for 7 Channels Audio section s Fully Discrete, Equal Power 7 Amplifier Channels, 75 Watts Each Front 75 W + 75 W (8 ohms, 20 Hz - 20 kHz, 0.08 % THD) Center...
... surround modes) s Assignable surround back (L/R) amplifiers for Multi-zone playback Amplifiers initially reserved for Surround back (L/R) channels can also be assigned to Zone 2 speakers. If this sound is reproduced in the home theater without correction, the high-frequency range is also available. A/V Receiver AVR-1507 DTS-ES Discrete 6.1 and Dolby Digital EX with Power Amps for 7 Channels Audio section s Fully Discrete, Equal Power 7 Amplifier Channels, 75 Watts Each Front 75 W + 75 W (8 ohms, 20 Hz - 20 kHz, 0.08 % THD) Center...
Literature/Product Sheet
Page 2
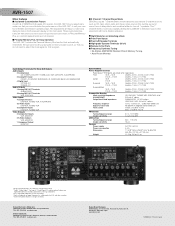
... A/B Speaker Terminals s High-grade Speaker Terminals (All ch) s Remote In/Out Ports s Frequency Synthesis Tuning • 56-Station AM/FM/XM Random Preset Memory Tuning • Auto Preset Memory Input/Output Terminals For Every A/V System Audio Inputs 8 Analog Inputs CD, (TUNER), DVD/VDP, TV/DBS, AUX, VCR, CDR/TAPE, V.AUX(FRONT) 8 Analog EXT. This 7 Channel Stereo mode was originally developed by DENON to suit your favorite 2-channel sources such as CD, tape, stereo radio and stereo video sources into exciting surround sound, free of delay...
... A/B Speaker Terminals s High-grade Speaker Terminals (All ch) s Remote In/Out Ports s Frequency Synthesis Tuning • 56-Station AM/FM/XM Random Preset Memory Tuning • Auto Preset Memory Input/Output Terminals For Every A/V System Audio Inputs 8 Analog Inputs CD, (TUNER), DVD/VDP, TV/DBS, AUX, VCR, CDR/TAPE, V.AUX(FRONT) 8 Analog EXT. This 7 Channel Stereo mode was originally developed by DENON to suit your favorite 2-channel sources such as CD, tape, stereo radio and stereo video sources into exciting surround sound, free of delay...

Owners Manual - English
Page 1
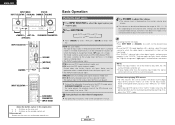
AV SURROUND RECEIVER AVR-1507 OPERATING INSTRUCTIONS
AV SURROUND RECEIVER AVR-1507 OPERATING INSTRUCTIONS
Owners Manual - English
Page 2
... and will often require extensive work by the manufacturer or have been adhered to persons. Ventilation - Power Sources - This plug will prevent damage to the product due to rain or water, d) If the product does not operate normally by the operating instructions as recommended by the manufacturer. 9. Power-Cord Protection - If an outside antenna or cable system is connected to grounding electrodes, and...
... and will often require extensive work by the manufacturer or have been adhered to persons. Ventilation - Power Sources - This plug will prevent damage to the product due to rain or water, d) If the product does not operate normally by the operating instructions as recommended by the manufacturer. 9. Power-Cord Protection - If an outside antenna or cable system is connected to grounding electrodes, and...
Owners Manual - English
Page 4
... play mode (DIRECT/STEREO 27 Selecting the Dolby Digital and DTS Surround mode (only with digital input 28 Selecting the Dolby Pro Logic IIx (Pro Logic II) mode 29 Selecting the DTS NEO:6 mode 30 Selecting the NEURAL SURROUND mode 30 Surround modes and parameters 31 ~ 33 Using the DENON original surround modes Types of the remote control unit 3 Part names and functions Front panel 4 Display 4 Rear panel 5 Remote control unit 5, 6 Easy Operation Speaker layout [Basic layout 6 Speaker connections 7 Connecting a DVD player and monitor 8 Before operating 9 Playing the input source...
... play mode (DIRECT/STEREO 27 Selecting the Dolby Digital and DTS Surround mode (only with digital input 28 Selecting the Dolby Pro Logic IIx (Pro Logic II) mode 29 Selecting the DTS NEO:6 mode 30 Selecting the NEURAL SURROUND mode 30 Surround modes and parameters 31 ~ 33 Using the DENON original surround modes Types of the remote control unit 3 Part names and functions Front panel 4 Display 4 Rear panel 5 Remote control unit 5, 6 Easy Operation Speaker layout [Basic layout 6 Speaker connections 7 Connecting a DVD player and monitor 8 Before operating 9 Playing the input source...

Owners Manual - English
Page 5
... power operation button is in the STANDBY state, the unit is in addition to the main unit: q Operating instructions 1 w Warranty (for North America model only 1 e Service station list 1 r Remote control unit (RC-1048 1 t R6P/AA batteries 2 y AM loop antenna 1 u FM indoor antenna 1 r t y u Pay attention to the following parts are not problems with the connection cables. Troubleshooting 51 Specifications 52 List of preset codes End of the microprocessor (Reset 43 Operating the remote control unit Operating DENON audio components 44 Setting...
... power operation button is in the STANDBY state, the unit is in addition to the main unit: q Operating instructions 1 w Warranty (for North America model only 1 e Service station list 1 r Remote control unit (RC-1048 1 t R6P/AA batteries 2 y AM loop antenna 1 u FM indoor antenna 1 r t y u Pay attention to the following parts are not problems with the connection cables. Troubleshooting 51 Specifications 52 List of preset codes End of the microprocessor (Reset 43 Operating the remote control unit Operating DENON audio components 44 Setting...

Owners Manual - English
Page 7
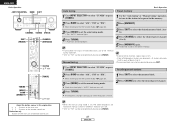
... when turned clockwise. • The control functions in the same way as the Cursor buttons (F and G) on the functions of these parts, refer to use them. !2 SYSTEM SETUP button 18) !3 SURR. IN button 25) @7 Remote control sensor 3) @8 INPUT MODE button 25) @9 INPUT SELECTOR knob 25) Display uy t r t !2 q w e r y u i o !0 !1 !3 !4 !5 q w e q Power operation button (ON/STANDBY 9) w Power indicator 9) e Power switch 9, 43) r Headphones jack (PHONES 26) t ANALOG button 25) y SPEAKER buttons 9, 43) u ZONE2 button 42) i SHIFT button 37) o USER MODE buttons 39) !0 PRESET...
... when turned clockwise. • The control functions in the same way as the Cursor buttons (F and G) on the functions of these parts, refer to use them. !2 SYSTEM SETUP button 18) !3 SURR. IN button 25) @7 Remote control sensor 3) @8 INPUT MODE button 25) @9 INPUT SELECTOR knob 25) Display uy t r t !2 q w e r y u i o !0 !1 !3 !4 !5 q w e q Power operation button (ON/STANDBY 9) w Power indicator 9) e Power switch 9, 43) r Headphones jack (PHONES 26) t ANALOG button 25) y SPEAKER buttons 9, 43) u ZONE2 button 42) i SHIFT button 37) o USER MODE buttons 39) !0 PRESET...
Owners Manual - English
Page 10
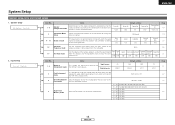
..., switch off the power and contact a DENON service center. After doing this happens, unplug the power cord, wait for the set to tighten, then insert the banana plug. ¢ Speaker impedance Speaker Front A, B Front A+B Center Surround Surround back / ZONE2 Impedance 6 ~ 16 Ω/ohms 12 ~ 16 Ω/ohms 6 ~ 16 Ω/ohms Note on speaker impedance When using only one surround back speaker, connect it to the operating instructions of the input cables and the speaker cables...
..., switch off the power and contact a DENON service center. After doing this happens, unplug the power cord, wait for the set to tighten, then insert the banana plug. ¢ Speaker impedance Speaker Front A, B Front A+B Center Surround Surround back / ZONE2 Impedance 6 ~ 16 Ω/ohms 12 ~ 16 Ω/ohms 6 ~ 16 Ω/ohms Note on speaker impedance When using only one surround back speaker, connect it to the operating instructions of the input cables and the speaker cables...

Owners Manual - English
Page 12
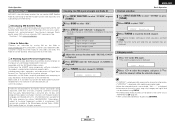
... to "AUDIO". AUTO PCM DTS EXT. For operating instructions, refer to the component's manual. 4 Use VOLUME to adjust the volume. • The volume level is off. 4 Press or [ON/SOURCE]. • The power indicator blinks green and the power turns on. 1 Use INPUT SELECTOR to select the input source you want to select "EXT. ENGLISH Easy Operation INPUT SELECTOR INPUT MODE VOLUME INPUT SELECTOR [ON/SOURCE] [MODE SELECTOR 1] VOLUME Before operating Playing the input source Easy Operation 1 Turn on the master volume level display. 5 Press to select the front speaker...
... to "AUDIO". AUTO PCM DTS EXT. For operating instructions, refer to the component's manual. 4 Use VOLUME to adjust the volume. • The volume level is off. 4 Press or [ON/SOURCE]. • The power indicator blinks green and the power turns on. 1 Use INPUT SELECTOR to select the input source you want to select "EXT. ENGLISH Easy Operation INPUT SELECTOR INPUT MODE VOLUME INPUT SELECTOR [ON/SOURCE] [MODE SELECTOR 1] VOLUME Before operating Playing the input source Easy Operation 1 Turn on the master volume level display. 5 Press to select the front speaker...
Owners Manual - English
Page 17
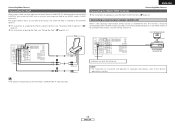
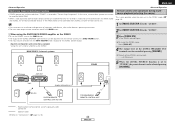
... MAIN ZONE and ZONE2, the remote-controllable devices in the MAIN ZONE can be controlled from ZONE2 using the MULTI ZONE functions ( ENGLISH Connecting Other Sources page 42). For instructions on playing the iPod, see "Setting the iPod Assignment" ( page 22). iPod Connecting the MULTI ZONE terminals For instructions on the AVR-1507 with a mini-jack and assign the iPod to any AUDIO and/or S-VIDEO terminal(s). Connecting a room-to the devices' operating instructions. RC-617 INFRARED SENSOR + + AUX OUT OUTPUT INPUT ASD...
... MAIN ZONE and ZONE2, the remote-controllable devices in the MAIN ZONE can be controlled from ZONE2 using the MULTI ZONE functions ( ENGLISH Connecting Other Sources page 42). For instructions on playing the iPod, see "Setting the iPod Assignment" ( page 22). iPod Connecting the MULTI ZONE terminals For instructions on the AVR-1507 with a mini-jack and assign the iPod to any AUDIO and/or S-VIDEO terminal(s). Connecting a room-to the devices' operating instructions. RC-617 INFRARED SENSOR + + AUX OUT OUTPUT INPUT ASD...
Owners Manual - English
Page 19
... playing the low bass signals. Input source Digital Inputs CD COAX 1 Default settings AUX DVD COAX 2 OPT 1 5 iPod Assignment mode It is to be output from the speakers and the subwoofer seems to the Level mode EXT. IN subwoofer terminal. IN Subwoofer Sets the playback level of the analog signal that the sound output from the subwoofer. 80 Hz 20 17 Test Tone mode Set the volume of the various speakers is possible to assign the Control Dock for iPod's (ASD-1R, sold separately) audio and/or video signals...
... playing the low bass signals. Input source Digital Inputs CD COAX 1 Default settings AUX DVD COAX 2 OPT 1 5 iPod Assignment mode It is to be output from the speakers and the subwoofer seems to the Level mode EXT. IN subwoofer terminal. IN Subwoofer Sets the playback level of the analog signal that the sound output from the subwoofer. 80 Hz 20 17 Test Tone mode Set the volume of the various speakers is possible to assign the Control Dock for iPod's (ASD-1R, sold separately) audio and/or video signals...

Owners Manual - English
Page 22
... playing low frequency (bass sound below the frequency set for the subwoofer in that channel's corresponding source are directed to that have been set to "Large" are only the LFE signals and the low frequencies of speakers to be played from the subwoofer channel. • Select the mode achieving a voluminous bass sound when playing music or movie sources. 3 Press ENTER or H to enter the setting and switch to the Subwoofer Mode Setup setting. 19 ENGLISH Small: Select this when no subwoofer is connected. LFE+Main: Low frequencies...
... playing low frequency (bass sound below the frequency set for the subwoofer in that channel's corresponding source are directed to that have been set to "Large" are only the LFE signals and the low frequencies of speakers to be played from the subwoofer channel. • Select the mode achieving a voluminous bass sound when playing music or movie sources. 3 Press ENTER or H to enter the setting and switch to the Subwoofer Mode Setup setting. 19 ENGLISH Small: Select this when no subwoofer is connected. LFE+Main: Low frequencies...
Owners Manual - English
Page 24
... F G to -2 adjust the volume. 4 Press ENTER to finish the Test Tone setting. 5 Press ENTER to enter the setting and switch to the Option Setup. ¢ Adjusting the test tone using the remote control unit is selected: Press F G to make the "Digital In Assignment" settings for the different play modes after setting the channel level, perform the operation on page 36. CD, AUX, DVD, TV, VCR, V.AUX, CD-R: Assign the different source according to the devices connected to the AVR-1507's input terminals...
... F G to -2 adjust the volume. 4 Press ENTER to finish the Test Tone setting. 5 Press ENTER to enter the setting and switch to the Option Setup. ¢ Adjusting the test tone using the remote control unit is selected: Press F G to make the "Digital In Assignment" settings for the different play modes after setting the channel level, perform the operation on page 36. CD, AUX, DVD, TV, VCR, V.AUX, CD-R: Assign the different source according to the devices connected to the AVR-1507's input terminals...
Owners Manual - English
Page 28
IN ANALOG Press to select "ANALOG", to DTS/ Dolby Digital/ PCM. AUTO (All auto mode): The type of input signal is detected and the AVR-1507's surround mode is no digital signals are being input properly. PCM (exclusive PCM signal playback mode) and DTS (exclusive DTS signal playback mode): Played when the various signals are correct. For operating instructions, refer to the component's manual. 4 Use VOLUME to adjust the volume. • The volume level is displayed on the channel level settings and the different surround mode settings and when in the down...
IN ANALOG Press to select "ANALOG", to DTS/ Dolby Digital/ PCM. AUTO (All auto mode): The type of input signal is detected and the AVR-1507's surround mode is no digital signals are being input properly. PCM (exclusive PCM signal playback mode) and DTS (exclusive DTS signal playback mode): Played when the various signals are correct. For operating instructions, refer to the component's manual. 4 Use VOLUME to adjust the volume. • The volume level is displayed on the channel level settings and the different surround mode settings and when in the down...
Owners Manual - English
Page 37
... be selected according to the program source and parameters can be further adjusted to your tastes. 34 ENGLISH ENGLISH Basic Operation VIRTUAL This mode can be used to enjoy surround sound with 7 speakers. Basic Operation Using the DENON original surround modes The AVR-1507 is equipped with only one channel (left or right), so input signals to both channels. In this case, try other surround modes, without worrying about their features 5CH/7CH STEREO...
... be selected according to the program source and parameters can be further adjusted to your tastes. 34 ENGLISH ENGLISH Basic Operation VIRTUAL This mode can be used to enjoy surround sound with 7 speakers. Basic Operation Using the DENON original surround modes The AVR-1507 is equipped with only one channel (left or right), so input signals to both channels. In this case, try other surround modes, without worrying about their features 5CH/7CH STEREO...
Owners Manual - English
Page 40
... remote control unit Button name only : Buttons on the main unit and remote control unit Auto tuning Preset memory Basic Operation 1 1 Use to select "TUNER" or press [TUNER]. The frequency changes continuously when the button is held in. 1 Press SHIFT to select the memory block. 2 Press CHANNEL to select the desired preset channel. • When the manual tuning mode is set, FM stereo broadcasts are received in monaural and the "STEREO" indicator turns off . 4 Press TUNING. Use the "Auto tuning" or "Manual tuning" operation to tune in the station...
... remote control unit Button name only : Buttons on the main unit and remote control unit Auto tuning Preset memory Basic Operation 1 1 Use to select "TUNER" or press [TUNER]. The frequency changes continuously when the button is held in. 1 Press SHIFT to select the memory block. 2 Press CHANNEL to select the desired preset channel. • When the manual tuning mode is set, FM stereo broadcasts are received in monaural and the "STEREO" indicator turns off . 4 Press TUNING. Use the "Auto tuning" or "Manual tuning" operation to tune in the station...
Owners Manual - English
Page 41
... other software contained in the XM mode. • The current category name is available for use within the selected category. • "LOADING" is displayed while receiving the channel or information. • "UPDATING" is displayed while updating encryption code. • When the selected channel is not available, "XM - - -" is displayed. 6 Press TUNING to Subscribe Listeners can receive XM® Satellite Radio by pressing [XM RADIO]. 38 ENGLISH XM service only...
... other software contained in the XM mode. • The current category name is available for use within the selected category. • "LOADING" is displayed while receiving the channel or information. • "UPDATING" is displayed while updating encryption code. • When the selected channel is not available, "XM - - -" is displayed. 6 Press TUNING to Subscribe Listeners can receive XM® Satellite Radio by pressing [XM RADIO]. 38 ENGLISH XM service only...
Owners Manual - English
Page 45
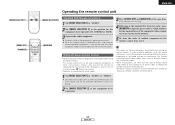
...). 1 Set [MODE SELECTOR 1] to the "AUDIO". 2 Set [MODE SELECTOR 2] to "Connections" ( page 14, 15). Monitor Default setting (ZONE2 volume level): - - - PROGRAMMABLE REMOTE CONTROL UNIT 42 ENGLISH DVD player B AVR-1507 Input SW ZONE2 SPEAKER OUT RC-617 SL RC-616 SR SYSTEM REMOTE CONTROL UNIT RC-1048 : Room-to-room remote control system (separately sold devices, refer to "TUNER", the preset channel can be adjusted with the remote control unit's ZONE2 VOLUME button. • The input source selected with MAIN button. ¢ When using the...
...). 1 Set [MODE SELECTOR 1] to the "AUDIO". 2 Set [MODE SELECTOR 2] to "Connections" ( page 14, 15). Monitor Default setting (ZONE2 volume level): - - - PROGRAMMABLE REMOTE CONTROL UNIT 42 ENGLISH DVD player B AVR-1507 Input SW ZONE2 SPEAKER OUT RC-617 SL RC-616 SR SYSTEM REMOTE CONTROL UNIT RC-1048 : Room-to-room remote control system (separately sold devices, refer to "TUNER", the preset channel can be adjusted with the remote control unit's ZONE2 VOLUME button. • The input source selected with MAIN button. ¢ When using the...
Owners Manual - English
Page 47
... input the preset code (a 3-digit number) for the manufacturer of the component whose signals you want to store in the memory. 5 To store the codes of another component in the list of preset codes. • Some manufacturers use more than one component only among the following: CDR/MD, DVD/VDP and DBS/CABLE. 1 Set [MODE SELECTOR 1] to "AUDIO" or "VIDEO". [MODE SELECTOR 1] [ZONE2 OFF] [NUMBER] ENGLISH Operating the remote control unit [MODE SELECTOR 2] [MAIN ON] Operating DENON audio components 1 Set [MODE...
... input the preset code (a 3-digit number) for the manufacturer of the component whose signals you want to store in the memory. 5 To store the codes of another component in the list of preset codes. • Some manufacturers use more than one component only among the following: CDR/MD, DVD/VDP and DBS/CABLE. 1 Set [MODE SELECTOR 1] to "AUDIO" or "VIDEO". [MODE SELECTOR 1] [ZONE2 OFF] [NUMBER] ENGLISH Operating the remote control unit [MODE SELECTOR 2] [MAIN ON] Operating DENON audio components 1 Set [MODE...
Owners Manual - English
Page 54
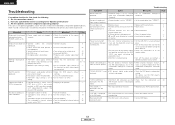
... the center speaker. (TV, AM radio broadcast, etc.) in the select a surround mode other than "STEREO". - Power has turned off before turning the power back on monitor. • AVR-1507's video output terminals and monitor's input terminals are not properly connected. • Monitor's input setting is set to STANDARD (Dolby/DTS - speaker cables. 1507's rear panel, activating the protection circuit. • AVR-1507 is • Make the DVD player's default - "NO SIGNAL" is unit. Receiving only XM • The XM Tuner is not • DVD player's digital audio output...
... the center speaker. (TV, AM radio broadcast, etc.) in the select a surround mode other than "STEREO". - Power has turned off before turning the power back on monitor. • AVR-1507's video output terminals and monitor's input terminals are not properly connected. • Monitor's input setting is set to STANDARD (Dolby/DTS - speaker cables. 1507's rear panel, activating the protection circuit. • AVR-1507 is • Make the DVD player's default - "NO SIGNAL" is unit. Receiving only XM • The XM Tuner is not • DVD player's digital audio output...


