Owners Manual
Page 10
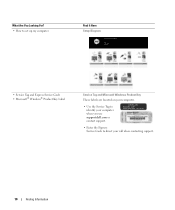
What Are You Looking For? • How to set up my computer Find It Here Setup Diagram • Service Tag and Express Service Code • Microsoft® Windows® Product Key Label Service Tag and Microsoft Windows Product Key These labels are located on your computer. • Use the Service Tag to identify your computer when you use support.dell.com or contact support. • Enter the Express Service Code to direct your call when contacting support. 10 Finding Information
What Are You Looking For? • How to set up my computer Find It Here Setup Diagram • Service Tag and Express Service Code • Microsoft® Windows® Product Key Label Service Tag and Microsoft Windows Product Key These labels are located on your computer. • Use the Service Tag to identify your computer when you use support.dell.com or contact support. • Enter the Express Service Code to direct your call when contacting support. 10 Finding Information
Owners Manual
Page 13
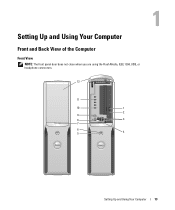
Setting Up and Using Your Computer Front and Back View of the Computer Front View NOTE: The front panel door does not close when you are using the Flash Media, IEEE 1394, USB, or headphone connectors. 12 11 10 1 2 9 8 3 7 6 5 4 Setting Up and Using Your Computer 13
Setting Up and Using Your Computer Front and Back View of the Computer Front View NOTE: The front panel door does not close when you are using the Flash Media, IEEE 1394, USB, or headphone connectors. 12 11 10 1 2 9 8 3 7 6 5 4 Setting Up and Using Your Computer 13
Owners Manual
Page 14
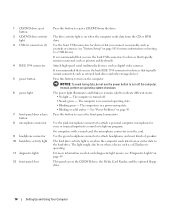
... eject button 2 CD/DVD drive-activity light 3 USB 2.0 connectors (2) 4 IEEE 1394 connector 5 power button 6 power light 7 front-panel door release button 8 microphone connector 9 headphone connector 10 hard-drive activity light 11 diagnostic lights 12 front-panel door Press this button to turn on booting to the hard drive. The drive activity...
... eject button 2 CD/DVD drive-activity light 3 USB 2.0 connectors (2) 4 IEEE 1394 connector 5 power button 6 power light 7 front-panel door release button 8 microphone connector 9 headphone connector 10 hard-drive activity light 11 diagnostic lights 12 front-panel door Press this button to turn on booting to the hard drive. The drive activity...
Owners Manual
Page 16
...player, CD player, or VCR. A high volume of network traffic may make this light appear to connect your computer. A good connection exists between a 10-Mbps network and the computer. • Orange - Use the blue line-in connector to the network. Use the black surround sound connector to ensure reliable... operation. If you use Category 3 wiring, force the network speed to 10 Mbps to attach multichannel-capable speakers. A good connection exists between a 100-Mbps network and the computer. • Off -
...player, CD player, or VCR. A high volume of network traffic may make this light appear to connect your computer. A good connection exists between a 10-Mbps network and the computer. • Orange - Use the blue line-in connector to the network. Use the black surround sound connector to ensure reliable... operation. If you use Category 3 wiring, force the network speed to 10 Mbps to attach multichannel-capable speakers. A good connection exists between a 100-Mbps network and the computer. • Off -

Owners Manual
Page 17
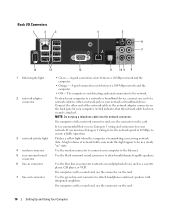
... audio conversion process. Your printer may arrive in the surround sound set-up. Setting Up and Using Your Computer 17 8 microphone 9 side surround sound connector 10 center/LFE connector 11 S/PDIF connector 12 VGA connector 13 USB 2.0 connectors (6) 14 IEEE 1394 connector Use the pink connector to the computer. Setting Up...
... audio conversion process. Your printer may arrive in the surround sound set-up. Setting Up and Using Your Computer 17 8 microphone 9 side surround sound connector 10 center/LFE connector 11 S/PDIF connector 12 VGA connector 13 USB 2.0 connectors (6) 14 IEEE 1394 connector Use the pink connector to the computer. Setting Up...
Owners Manual
Page 36
... telephone wall jack. USE A DIFFERENT TELEPHONE LINE - • Verify that you hear or feel a click when you have subscribed to verify that the modem is 3 m (10 ft) or more in length, try a shorter one.
... telephone wall jack. USE A DIFFERENT TELEPHONE LINE - • Verify that you hear or feel a click when you have subscribed to verify that the modem is 3 m (10 ft) or more in length, try a shorter one.
Owners Manual
Page 39
... IS FIRMLY CONNECTED TO THE COMPUTER AND TO THE ELECTRICAL OUTLET The computer stops responding NOTICE: You may lose data if you are unable to 10 seconds, until the computer turns off, and then restart your mouse, press and hold the power button for bent or broken pins. Straighten any bent...
... IS FIRMLY CONNECTED TO THE COMPUTER AND TO THE ELECTRICAL OUTLET The computer stops responding NOTICE: You may lose data if you are unable to 10 seconds, until the computer turns off, and then restart your mouse, press and hold the power button for bent or broken pins. Straighten any bent...

Owners Manual
Page 40
... disk or CD. If necessary, uninstall and then reinstall the program. The Program Compatibility Wizard configures a program so that is designed for at least 8 to 10 seconds, until the computer turns off, and then restart your computer. 40 Solving Problems A solid blue screen appears TU R N T H E C O...PROGRAM COMPATIBILITY WIZARD - A program crashes repeatedly NOTE: Most software includes installation instructions in an environment similar to non-Windows XP operating system environments. 1 Click the Start, point to All Programs→ Accessories, and then click Program Compatibility Wizard....
... disk or CD. If necessary, uninstall and then reinstall the program. The Program Compatibility Wizard configures a program so that is designed for at least 8 to 10 seconds, until the computer turns off, and then restart your computer. 40 Solving Problems A solid blue screen appears TU R N T H E C O...PROGRAM COMPATIBILITY WIZARD - A program crashes repeatedly NOTE: Most software includes installation instructions in an environment similar to non-Windows XP operating system environments. 1 Click the Start, point to All Programs→ Accessories, and then click Program Compatibility Wizard....
Owners Manual
Page 53
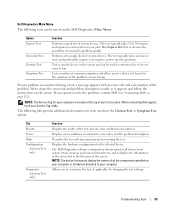
...Extended Test Custom Test Symptom Tree Function Performs a quick test of each test screen. The following tests can be run . The Dell Diagnostics obtains configuration information for the selected device. The test typically takes an hour or more and peridocially requires your part. Displays ...the problem you are having. If you to customize the test, if applicable, by changing the test settings. The test typically takes 10 to 20 minutes and requires no interaction on the screen. Displays the hardware configuration for all devices attached to your Service Tag ready....
...Extended Test Custom Test Symptom Tree Function Performs a quick test of each test screen. The following tests can be run . The Dell Diagnostics obtains configuration information for the selected device. The test typically takes an hour or more and peridocially requires your part. Displays ...the problem you are having. If you to customize the test, if applicable, by changing the test settings. The test typically takes 10 to 20 minutes and requires no interaction on the screen. Displays the hardware configuration for all devices attached to your Service Tag ready....
Owners Manual
Page 55
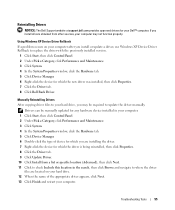
Reinstalling Drivers NOTICE: The Dell Support website at support.dell.com provides approved drivers for your computer....-click the device for which you may not function properly. If you install or update a driver, use Windows XP Device Driver Rollback to replace the driver with the previously installed version. 1 Click Start, then click Control Panel.... for which the driver is being reinstalled, then click Properties. 8 Click the Driver tab. 9 Click Update Driver. 10 Click Install from a list or specific location (Advanced), then click Next. 11 Click to check Include this location in...
Reinstalling Drivers NOTICE: The Dell Support website at support.dell.com provides approved drivers for your computer....-click the device for which you may not function properly. If you install or update a driver, use Windows XP Device Driver Rollback to replace the driver with the previously installed version. 1 Click Start, then click Control Panel.... for which the driver is being reinstalled, then click Properties. 8 Click the Driver tab. 9 Click Update Driver. 10 Click Install from a list or specific location (Advanced), then click Next. 11 Click to check Include this location in...

Owners Manual
Page 58
...the first time the computer was in certain regions. The restore process takes approximately 6-10 minutes to reboot the computer. 6 When prompted, click Yes. Use Dell PC Restore by Symantec NOTE: Dell PC Restore is available only on the hard drive and removes any applications or drivers... your computer and try again. 3 On the next screen that Turn off System Restore. Enabling System Restore If you reinstall Windows XP with www.dell.com appears at the top of free hard-disk space available, System Restore is automatically disabled. Data files include documents, spreadsheets, ...
...the first time the computer was in certain regions. The restore process takes approximately 6-10 minutes to reboot the computer. 6 When prompted, click Yes. Use Dell PC Restore by Symantec NOTE: Dell PC Restore is available only on the hard drive and removes any applications or drivers... your computer and try again. 3 On the next screen that Turn off System Restore. Enabling System Restore If you reinstall Windows XP with www.dell.com appears at the top of free hard-disk space available, System Restore is automatically disabled. Data files include documents, spreadsheets, ...
Owners Manual
Page 65
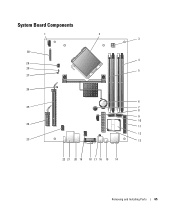
System Board Components 1 2 3 30 4 29 28 5 27 26 6 25 7 8 9 10 24 11 12 23 13 22 21 20 19 18 17 16 15 14 Removing and Installing Parts 65
System Board Components 1 2 3 30 4 29 28 5 27 26 6 25 7 8 9 10 24 11 12 23 13 22 21 20 19 18 17 16 15 14 Removing and Installing Parts 65
Owners Manual
Page 66
...-panel IEEE 1394 connector (BACK1394) 8 hard disk fan connector (HDDFAN) 23 IEEE 1394 connector (INT1394) 9 hard disk connector (SATA0) 24 PCI Express x1 connector (SLOT2) 10 CD/DVD connector (SATA1) 25 PCI Express x16 connector (SLOT1) 11 front-panel connector (FRONT PANEL) 26 standby LED (STBYLED) 12 modem 27 password jumper...
...-panel IEEE 1394 connector (BACK1394) 8 hard disk fan connector (HDDFAN) 23 IEEE 1394 connector (INT1394) 9 hard disk connector (SATA0) 24 PCI Express x1 connector (SLOT2) 10 CD/DVD connector (SATA1) 25 PCI Express x16 connector (SLOT1) 11 front-panel connector (FRONT PANEL) 26 standby LED (STBYLED) 12 modem 27 password jumper...
Owners Manual
Page 69
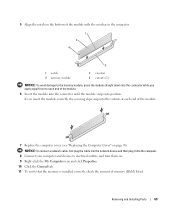
Removing and Installing Parts 69 5 Align the notch on . 9 Right-click the My Computer icon and click Properties. 10 Click the General tab. 11 To verify that the memory is installed correctly, check the amount of memory (RAM) listed. NOTICE: To connect a network cable, ...
Removing and Installing Parts 69 5 Align the notch on . 9 Right-click the My Computer icon and click Properties. 10 Click the General tab. 11 To verify that the memory is installed correctly, check the amount of memory (RAM) listed. NOTICE: To connect a network cable, ...
Owners Manual
Page 73
See the documentation that should be attached to the card. Removing and Installing Parts 73 10 Close the card retention door by snapping it into place. 1 2 3 4 1 retention arm 3 edge connector 2 PCI Express card 4 card connector NOTICE: Do not route card cables ...
See the documentation that should be attached to the card. Removing and Installing Parts 73 10 Close the card retention door by snapping it into place. 1 2 3 4 1 retention arm 3 edge connector 2 PCI Express card 4 card connector NOTICE: Do not route card cables ...

Owners Manual
Page 84
... for instructions on installing any software required for drive operation. 9 Enter system setup (see "System Setup" on page 101) and select the appropriate Drive option. 10 Verify that your computer works correctly by running the Dell Diagnostics (see "Dell Diagnostics" on page 52). 84 Removing and Installing Parts
... for instructions on installing any software required for drive operation. 9 Enter system setup (see "System Setup" on page 101) and select the appropriate Drive option. 10 Verify that your computer works correctly by running the Dell Diagnostics (see "Dell Diagnostics" on page 52). 84 Removing and Installing Parts
Owners Manual
Page 88
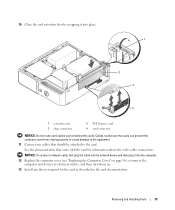
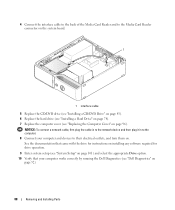
... on installing any software required for drive operation. 9 Enter system setup (see "System Setup" on page 101) and select the appropriate Drive option. 10 Verify that your computer and devices to their electrical outlets, and turn them on page 52). 88 Removing and Installing Parts NOTICE: To connect a network...first plug the cable in to the network device and then plug it in to the computer. 8 Connect your computer works correctly by running the Dell Diagnostics (see "Replacing the Computer Cover" on page 96). 4 Connect the interface cable to the back of the Media Card Reader and to the...
... on installing any software required for drive operation. 9 Enter system setup (see "System Setup" on page 101) and select the appropriate Drive option. 10 Verify that your computer and devices to their electrical outlets, and turn them on page 52). 88 Removing and Installing Parts NOTICE: To connect a network...first plug the cable in to the network device and then plug it in to the computer. 8 Connect your computer works correctly by running the Dell Diagnostics (see "Replacing the Computer Cover" on page 96). 4 Connect the interface cable to the back of the Media Card Reader and to the...

Owners Manual
Page 95
... battery connector, you must firmly support the connector while installing or removing a battery. 6 Hold the battery with the object. NOTICE: If you recorded in step 1. 10 Properly dispose of its securing tabs. 2 1 1 battery release lever 2 battery (positive side) NOTICE: To avoid damage to raise the battery up , and press the battery...
... battery connector, you must firmly support the connector while installing or removing a battery. 6 Hold the battery with the object. NOTICE: If you recorded in step 1. 10 Properly dispose of its securing tabs. 2 1 1 battery release lever 2 battery (positive side) NOTICE: To avoid damage to raise the battery up , and press the battery...
Owners Manual
Page 97
... Configurations" on your processor) Specifications 97 F0000h Intel G965 Express eight 24 4 Mb Integrated network interface capable of memory available to verify the amount of 10/100-Mbps communication 533-, 800-
... Configurations" on your processor) Specifications 97 F0000h Intel G965 Express eight 24 4 Mb Integrated network interface capable of memory available to verify the amount of 10/100-Mbps communication 533-, 800-
Owners Manual
Page 99
... connectors two 5-pin connectors (one for the CPU fan and one for the optional hard disk fan connector.) 36-pin connector 164-pin connector 10-pin header for keying purposes. Connectors USB Audio Network adapter Modem Temperature Sensor System board connectors: Serial ATA Fan PCI Express x1 PCI Express x16... USB MDC Floppy connector Front panel Power Processor power IEEE 1394 10-pin header for optional Media Card Reader (3.5 inch bay device) and two front-panel and six back-panel USB 2.0-compliant connectors NOTE: The...
... connectors two 5-pin connectors (one for the CPU fan and one for the optional hard disk fan connector.) 36-pin connector 164-pin connector 10-pin header for keying purposes. Connectors USB Audio Network adapter Modem Temperature Sensor System board connectors: Serial ATA Fan PCI Express x1 PCI Express x16... USB MDC Floppy connector Front panel Power Processor power IEEE 1394 10-pin header for optional Media Card Reader (3.5 inch bay device) and two front-panel and six back-panel USB 2.0-compliant connectors NOTE: The...


