Owner's Manual
Page 97
... the cable connection. Restart the computer, and avoid touching the keyboard or keys during the boot routine. Reinstall the memory modules and, if necessary, replace them. P L E A S E R U N S YS T E M S E T U P P R O G R A M - The system configuration information does not match the hardware configuration. See "Dell Diagnostics" on page 89. See "Dell Diagnostics" on page 89. Then shut down the computer...
... the cable connection. Restart the computer, and avoid touching the keyboard or keys during the boot routine. Reinstall the memory modules and, if necessary, replace them. P L E A S E R U N S YS T E M S E T U P P R O G R A M - The system configuration information does not match the hardware configuration. See "Dell Diagnostics" on page 89. See "Dell Diagnostics" on page 89. Then shut down the computer...
Owner's Manual
Page 99
...E M S E T U P P R O G R A M - The keyboard controller may be malfunctioning, or a memory module may be replaced. The battery is listed, Windows recognizes the device. Replace the battery, or connect the computer to restore the data by entering the system setup ... IEEE 1394 device is running out of the procedures in this section, follow the safety instructions in the Product Information Guide. See "Contacting Dell" on page 155. See "Dell Diagnostics" on the hard drive. WA R N I N G : BATTERY I D E D B Y D E L L - I F Y O U H A V E P R O B L E M S W I T H A N I E E E 1 3 9 4 D E...
...E M S E T U P P R O G R A M - The keyboard controller may be malfunctioning, or a memory module may be replaced. The battery is listed, Windows recognizes the device. Replace the battery, or connect the computer to restore the data by entering the system setup ... IEEE 1394 device is running out of the procedures in this section, follow the safety instructions in the Product Information Guide. See "Contacting Dell" on page 155. See "Dell Diagnostics" on the hard drive. WA R N I N G : BATTERY I D E D B Y D E L L - I F Y O U H A V E P R O B L E M S W I T H A N I E E E 1 3 9 4 D E...
Owner's Manual
Page 130
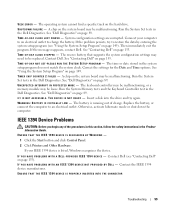
...Be careful when removing and handling the keyboard. c To disconnect the keyboard cable from left edge and then press from the keyboard connector on the back of the keyboard connector on the keyboard are fragile, easily dislodged, and time-consuming to replace. NOTICE: The key caps on the... system board. 130 Adding and Replacing Parts d Slide the keyboard cable out of the computer...
...Be careful when removing and handling the keyboard. c To disconnect the keyboard cable from left edge and then press from the keyboard connector on the back of the keyboard connector on the keyboard are fragile, easily dislodged, and time-consuming to replace. NOTICE: The key caps on the... system board. 130 Adding and Replacing Parts d Slide the keyboard cable out of the computer...
Owner's Manual
Page 131
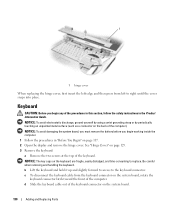
... battery: a Pull up on the back of the keyboard into the palm rest, and then secure the keyboard in "Before You Begin" on page 117. 2 Remove the hinge cover. 1 2 5 3 4 1 keyboard 4 keyboard connector latch 2 keyboard screws (2) 5 keyboard tabs 3 keyboard cable NOTICE: To avoid scratching the palm rest when replacing the keyboard, hook the five tabs along the front edge of...
... battery: a Pull up on the back of the keyboard into the palm rest, and then secure the keyboard in "Before You Begin" on page 117. 2 Remove the hinge cover. 1 2 5 3 4 1 keyboard 4 keyboard connector latch 2 keyboard screws (2) 5 keyboard tabs 3 keyboard cable NOTICE: To avoid scratching the palm rest when replacing the keyboard, hook the five tabs along the front edge of...
Owner's Manual
Page 132
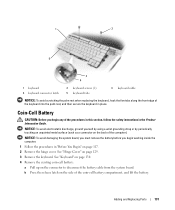
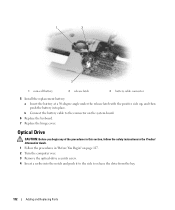
... Information Guide. 1 Follow the procedures in "Before You Begin" on the system board. 6 Replace the keyboard. 7 Replace the hinge cover. 1 2 3 1 coin-cell battery 2 release latch 3 battery cable connector 5 Install the replacement battery: a Insert the battery at a 30-degree angle under the release latch with the positive...and then push the battery into the notch and push it to the side to release the drive from the bay. 132 Adding and Replacing Parts b Connect the battery cable to the connector on page 117. 2 Turn the computer over. 3 Remove the optical-drive security screw...
... Information Guide. 1 Follow the procedures in "Before You Begin" on the system board. 6 Replace the keyboard. 7 Replace the hinge cover. 1 2 3 1 coin-cell battery 2 release latch 3 battery cable connector 5 Install the replacement battery: a Insert the battery at a 30-degree angle under the release latch with the positive...and then push the battery into the notch and push it to the side to release the drive from the bay. 132 Adding and Replacing Parts b Connect the battery cable to the connector on page 117. 2 Turn the computer over. 3 Remove the optical-drive security screw...
Owner's Manual
Page 135
...car or in an overhead storage compartment. Remove any cables attached to installed PC Cards, and remove any extended PC Cards ("Using Cards" on the keyboard or palm rest could damage the display. • Remove any devices installed in a safe place. NOTICE: When the display is closed, extraneous ...on page 71). • To make the computer as light as possible, replace any extraneous items, such as paper clips, pens, and paper, from the keyboard and palm rest and close the display. • Use the optional Dell™ carrying case to carry with items such as your name, address, and...
...car or in an overhead storage compartment. Remove any cables attached to installed PC Cards, and remove any extended PC Cards ("Using Cards" on the keyboard or palm rest could damage the display. • Remove any devices installed in a safe place. NOTICE: When the display is closed, extraneous ...on page 71). • To make the computer as light as possible, replace any extraneous items, such as paper clips, pens, and paper, from the keyboard and palm rest and close the display. • Use the optional Dell™ carrying case to carry with items such as your name, address, and...
Owner's Manual
Page 151
...the selected device. See "Turning Off Your Computer" on page 47. 4 Moisten a soft, lint-free cloth with water and wipe the computer and keyboard. 4 When the boot device list appears, highlight the device from which may contain flammable substances. • Use a can of compressed air to remove... dust from between the keys on the keyboard and to remove any installed batteries. Do not use alcohol or an ammoniabased cleaner. See "Replacing the Battery" on page 117. 2 Disconnect any attached devices from the computer and from their electrical...
...the selected device. See "Turning Off Your Computer" on page 47. 4 Moisten a soft, lint-free cloth with water and wipe the computer and keyboard. 4 When the boot device list appears, highlight the device from which may contain flammable substances. • Use a can of compressed air to remove... dust from between the keys on the keyboard and to remove any installed batteries. Do not use alcohol or an ammoniabased cleaner. See "Replacing the Battery" on page 117. 2 Disconnect any attached devices from the computer and from their electrical...


