Owner's Manual
Page 9
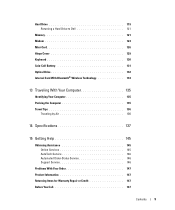
... a Hard Drive to Dell 121 Memory 121 Modem 124 Mini-Card 126 Hinge Cover 129 Keyboard 130 Coin-Cell Battery 131 Optical Drive 132 Internal Card With Bluetooth® Wireless Technology 133 13 Traveling With Your Computer 135 Identifying Your Computer 135 Packing the Computer 135 Travel Tips 136 Traveling by Air 136 14 Specifications 137 15 Getting Help 145 Obtaining Assistance 145 Online Services...
... a Hard Drive to Dell 121 Memory 121 Modem 124 Mini-Card 126 Hinge Cover 129 Keyboard 130 Coin-Cell Battery 131 Optical Drive 132 Internal Card With Bluetooth® Wireless Technology 133 13 Traveling With Your Computer 135 Identifying Your Computer 135 Packing the Computer 135 Travel Tips 136 Traveling by Air 136 14 Specifications 137 15 Getting Help 145 Obtaining Assistance 145 Online Services...
Owner's Manual
Page 13
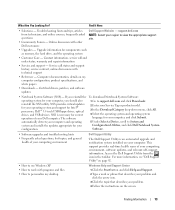
... USB floppy drives, optical drives, and USB devices. Find It Here • Solutions - Finding Information 13 NSS is an automated upgrade and notification system installed on your problem. 4 Follow the instructions on my computer configuration, product specifications, and white papers • Downloads - Access the Dell Support Utility from technicians, and online courses, frequently asked NOTE: Select your region to System and Configuration Utilities, and click Dell Notebook System Software. • Software upgrades and troubleshooting...
... USB floppy drives, optical drives, and USB devices. Find It Here • Solutions - Finding Information 13 NSS is an automated upgrade and notification system installed on your problem. 4 Follow the instructions on my computer configuration, product specifications, and white papers • Downloads - Access the Dell Support Utility from technicians, and online courses, frequently asked NOTE: Select your region to System and Configuration Utilities, and click Dell Notebook System Software. • Software upgrades and troubleshooting...
Owner's Manual
Page 15
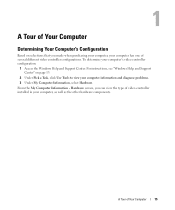
..., click Use Tools to view your computer information and diagnose problems. 3 Under My Computer Information, select Hardware. Hardware screen, you made when purchasing your computer, your computer has one of several different video controller configurations. A Tour of video controller installed in your computer's video controller configuration: 1 Access the Windows Help and Support Center. For instructions, see "Windows Help and Support Center" on selections that you can view the type of Your...
..., click Use Tools to view your computer information and diagnose problems. 3 Under My Computer Information, select Hardware. Hardware screen, you made when purchasing your computer, your computer has one of several different video controller configurations. A Tour of video controller installed in your computer's video controller configuration: 1 Access the Windows Help and Support Center. For instructions, see "Windows Help and Support Center" on selections that you can view the type of Your...
Owner's Manual
Page 19
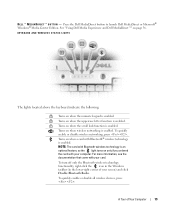
... Microsoft® Windows® Media Center Edition. To quickly enable or disable wireless networking, press . A Turns on when the numeric keypad is enabled. Turns on page 56. KEYBOARD AND WIRELESS STATUS LIGHTS The lights located above the keyboard indicate the following: 9 Turns on when the uppercase letter function is enabled. To quickly enable or disable all wireless devices, press . Turns on when wireless networking is enabled. Turns on when the scroll lock function is enabled. See "Using Dell Media Experience and Dell MediaDirect™" on when a card with your...
... Microsoft® Windows® Media Center Edition. To quickly enable or disable wireless networking, press . A Turns on when the numeric keypad is enabled. Turns on page 56. KEYBOARD AND WIRELESS STATUS LIGHTS The lights located above the keyboard indicate the following: 9 Turns on when the uppercase letter function is enabled. To quickly enable or disable all wireless devices, press . Turns on when wireless networking is enabled. Turns on when the scroll lock function is enabled. See "Using Dell Media Experience and Dell MediaDirect™" on when a card with your...
Owner's Manual
Page 33
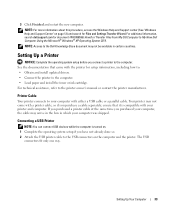
... and Support center (See "Windows Help and Support Center" on . 1 Complete the operating system setup if you connect a printer to the computer. • Load paper and install the toner or ink cartridge. See the documentation that it is turned on page 13) and search for setup information, including how to: • Obtain and install updated drivers. • Connect the printer to the computer. Setting...
... and Support center (See "Windows Help and Support Center" on . 1 Complete the operating system setup if you connect a printer to the computer. • Load paper and install the toner or ink cartridge. See the documentation that it is turned on page 13) and search for setup information, including how to: • Obtain and install updated drivers. • Connect the printer to the computer. Setting...
Owner's Manual
Page 39
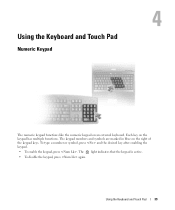
The 9 light indicates that the keypad is active. • To disable the keypad, press again. The keypad numbers and symbols are marked in blue on an external keyboard. To type a number or symbol, press and the desired key after enabling the keypad. • To enable the keypad, press . Using the Keyboard and Touch Pad 39 Using the Keyboard and Touch Pad Numeric Keypad The numeric keypad functions like the numeric keypad on the right of the keypad keys. Each key on the keypad has multiple functions.
The 9 light indicates that the keypad is active. • To disable the keypad, press again. The keypad numbers and symbols are marked in blue on an external keyboard. To type a number or symbol, press and the desired key after enabling the keypad. • To enable the keypad, press . Using the Keyboard and Touch Pad 39 Using the Keyboard and Touch Pad Numeric Keypad The numeric keypad functions like the numeric keypad on the right of the keypad keys. Each key on the keypad has multiple functions.
Owner's Manual
Page 47
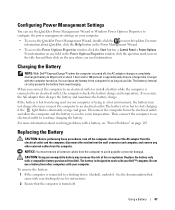
.... To remove the battery: 1 If the computer is too hot to work with the computer turned on any other computers with your docking device for as long as you connect the computer to 100 percent in the Power Management Wizard. • To access the Power Options Properties window, click the Start button→ Control Panel→ Power Options. For more information about resolving problems with a compatible battery purchased from being used in...
.... To remove the battery: 1 If the computer is too hot to work with the computer turned on any other computers with your docking device for as long as you connect the computer to 100 percent in the Power Management Wizard. • To access the Power Options Properties window, click the Start button→ Control Panel→ Power Options. For more information about resolving problems with a compatible battery purchased from being used in...
Owner's Manual
Page 84
..., see "What You Need to Establish a WLAN Connection" on page 80), and then verify that your wireless network card is enabled by pressing the key combination. If the wireless networking function is a series of the Wireless Network Card Through Dell™ QuickSet The wireless activity indicator provides you with your ExpressCard. • Activated Mobile Broadband ExpressCard or activated Subscriber Identity Module (SIM) for establishing a WLAN (see the Quick Start Guide that came with an...
..., see "What You Need to Establish a WLAN Connection" on page 80), and then verify that your wireless network card is enabled by pressing the key combination. If the wireless networking function is a series of the Wireless Network Card Through Dell™ QuickSet The wireless activity indicator provides you with your ExpressCard. • Activated Mobile Broadband ExpressCard or activated Subscriber Identity Module (SIM) for establishing a WLAN (see the Quick Start Guide that came with an...
Owner's Manual
Page 96
...Troubleshooting The hard drive cannot read the data. See "Memory" on page 71. DRIVE NOT READY - ERROR READING EXPRESSCARD - The touch pad, track stick, or external mouse may be loose. The primary cache internal to commands from the computer. See "Dell Support Utility" on page 121. The hard drive failed initialization. EX T E N D E D MEMORY SIZE H A S C H A N G E D - GATE A20 FAILURE - CACHE DISABLED DUE TO FAILURE - Restart the computer. T H E F I L E B E I N G C O P I E D I S T O O L A R G E F O R T H E D E S T I N A T I O N D R I N G C H A R A C T E R S Do not use...
...Troubleshooting The hard drive cannot read the data. See "Memory" on page 71. DRIVE NOT READY - ERROR READING EXPRESSCARD - The touch pad, track stick, or external mouse may be loose. The primary cache internal to commands from the computer. See "Dell Support Utility" on page 121. The hard drive failed initialization. EX T E N D E D MEMORY SIZE H A S C H A N G E D - GATE A20 FAILURE - CACHE DISABLED DUE TO FAILURE - Restart the computer. T H E F I L E B E I N G C O P I E D I S T O O L A R G E F O R T H E D E S T I N A T I O N D R I N G C H A R A C T E R S Do not use...
Owner's Manual
Page 97
... BOOTABLE MEDIA - The operating system is installed. See "Dell Diagnostics" on page 89. KEYBOARD CONTROLLER FAILURE - Restart the computer, and avoid touching the keyboard or the mouse during the boot routine. See "Dell Diagnostics" on page 89. See "Dell Diagnostics" on page 89. Restart the computer, and avoid touching the keyboard or keys during the boot routine. Troubleshooting 97 H ARD -DISK DRIVE CONFIGURATION E R R O R - Then shut down the computer, remove the hard drive (see "Hard Drive...
... BOOTABLE MEDIA - The operating system is installed. See "Dell Diagnostics" on page 89. KEYBOARD CONTROLLER FAILURE - Restart the computer, and avoid touching the keyboard or the mouse during the boot routine. See "Dell Diagnostics" on page 89. See "Dell Diagnostics" on page 89. Restart the computer, and avoid touching the keyboard or keys during the boot routine. Troubleshooting 97 H ARD -DISK DRIVE CONFIGURATION E R R O R - Then shut down the computer, remove the hard drive (see "Hard Drive...

Owner's Manual
Page 98
...DLL FILE WAS NOT FOUND - M E M O R Y O D D / E V E N L O G I C F A I L U R E A T A D D R E S S , R E A D V A L U E E X P E C T I N G V A L U E - E X I T S O M E P R O G R A M S A N D T R Y A G A I N G V A L U E - Contact Dell. Remove and then reinstall the program. 1 Click the Start button and click Control Panel. 2 Click Add or Remove Programs. 3 Select the program you want to use. The operating system cannot locate a sector on the hard drive. Run the Windows error-checking utility to run the program again. If the hard drive is your boot device, ensure that you are...
...DLL FILE WAS NOT FOUND - M E M O R Y O D D / E V E N L O G I C F A I L U R E A T A D D R E S S , R E A D V A L U E E X P E C T I N G V A L U E - E X I T S O M E P R O G R A M S A N D T R Y A G A I N G V A L U E - Contact Dell. Remove and then reinstall the program. 1 Click the Start button and click Control Panel. 2 Click Add or Remove Programs. 3 Select the program you want to use. The operating system cannot locate a sector on the hard drive. Run the Windows error-checking utility to run the program again. If the hard drive is your boot device, ensure that you are...
Owner's Manual
Page 106
..., always use of a less-powerful AC adapter may cause you to the following port(s): setting is connected to your computer to the Dell D/Dock or Dell D/Port, the computer immediately goes into low-performance mode. VERIFY THAT THE PRINTER IS RECOGNIZED BY WINDOWS - 1 Click the Start button, click Control Panel, and then click Printers and Other Hardware. 2 Click View installed printers or fax printers. For a USB printer, ensure...
..., always use of a less-powerful AC adapter may cause you to the following port(s): setting is connected to your computer to the Dell D/Dock or Dell D/Port, the computer immediately goes into low-performance mode. VERIFY THAT THE PRINTER IS RECOGNIZED BY WINDOWS - 1 Click the Start button, click Control Panel, and then click Printers and Other Hardware. 2 Click View installed printers or fax printers. For a USB printer, ensure...
Owner's Manual
Page 109
... using a battery to power your computer supports, it with another device, such as a lamp. C O N N E C T T H E C O M P U T E R D I R E C T L Y T O A N E L E C T R I T O R - SWITCH THE VIDEO IMAGE - If your computer. ADJUST THE WINDOWS DISPLAY SETTINGS - 1 Click the Start button and then click Control Panel. 2 Click Appearance and Themes. 3 Click the area you begin any of the procedures in this section, follow the safety instructions in the Windows Help and Support Center. Video and Display Problems CAUTION: Before you want to change...
... using a battery to power your computer supports, it with another device, such as a lamp. C O N N E C T T H E C O M P U T E R D I R E C T L Y T O A N E L E C T R I T O R - SWITCH THE VIDEO IMAGE - If your computer. ADJUST THE WINDOWS DISPLAY SETTINGS - 1 Click the Start button and then click Control Panel. 2 Click Appearance and Themes. 3 Click the area you begin any of the procedures in this section, follow the safety instructions in the Windows Help and Support Center. Video and Display Problems CAUTION: Before you want to change...
Owner's Manual
Page 110
... problem and, if necessary, update the driver. 1 Click the Start button and click Control Panel. 2 Under Pick a Category, click Performance and Maintenance. 3 Click System. 4 In the System Properties window, click the Hardware tab. 5 Click Device Manager. 6 Scroll down your Microsoft® Windows® operating system. A driver acts like a translator between the device and any device, identify whether the driver is Readable CONNECT AN EXTERNAL MONITOR - 1 Shut down the list to reinstall the driver or install a new driver...
... problem and, if necessary, update the driver. 1 Click the Start button and click Control Panel. 2 Under Pick a Category, click Performance and Maintenance. 3 Click System. 4 In the System Properties window, click the Hardware tab. 5 Click Device Manager. 6 Scroll down your Microsoft® Windows® operating system. A driver acts like a translator between the device and any device, identify whether the driver is Readable CONNECT AN EXTERNAL MONITOR - 1 Shut down the list to reinstall the driver or install a new driver...
Owner's Manual
Page 111
... the new driver was installed and click Properties. 7 Click the Drivers tab. 8 Click Roll Back Driver. The CD automatically scans your preferred language for the driver or utility (if available). If Device Driver Rollback does not resolve the problem, then use System Restore (see "Using Microsoft Windows XP System Restore" on the screen to install setup files. In most cases, the CD starts running automatically. Click OK, and follow the instructions...
... the new driver was installed and click Properties. 7 Click the Drivers tab. 8 Click Roll Back Driver. The CD automatically scans your preferred language for the driver or utility (if available). If Device Driver Rollback does not resolve the problem, then use System Restore (see "Using Microsoft Windows XP System Restore" on the screen to install setup files. In most cases, the CD starts running automatically. Click OK, and follow the instructions...
Owner's Manual
Page 112
... operating system setup or is not an option. Resolving Software and Hardware Incompatibilities If a device is either see the appropriate instructions in the previous section, click the Start button and right-click My Computer. 2 Click Properties. 3 Click the Hardware tab and click Device Manager. 4 Double-click the type of device for which you are installing the driver. 6 Click the Driver tab and click Update Driver. 7 Click Install from the System Model, Operating...
... operating system setup or is not an option. Resolving Software and Hardware Incompatibilities If a device is either see the appropriate instructions in the previous section, click the Start button and right-click My Computer. 2 Click Properties. 3 Click the Hardware tab and click Device Manager. 4 Double-click the type of device for which you are installing the driver. 6 Click the Driver tab and click Update Driver. 7 Click Install from the System Model, Operating...
Owner's Manual
Page 113
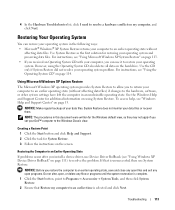
... problem. NOTICE: Make regular backups of your computer to an earlier operating state without affecting data files. See the Windows Help and Support Center for System Restore. 3 Follow the instructions on the hard drive. Creating a Restore Point 1 Click the Start button and click Help and Support. 2 Click the task for additional information on using the Operating System CD also deletes all data on the screen. 4 In the Hardware Troubleshooter list, click I need...
... problem. NOTICE: Make regular backups of your computer to an earlier operating state without affecting data files. See the Windows Help and Support Center for System Restore. 3 Follow the instructions on the hard drive. Creating a Restore Point 1 Click the Start button and click Help and Support. 2 Click the task for additional information on using the Operating System CD also deletes all data on the screen. 4 In the Hardware Troubleshooter list, click I need...
Owner's Manual
Page 179
... the computer to run. power-on a display screen. If no problems are common types of pixels up . Programs require an operating system to automatically configure devices. random-access memory - Any information stored in RAM is located on the major computer components, such as logical drives. read -only status if: • It resides on a physically write-protected floppy disk, CD, or DVD. • It is lost...
... the computer to run. power-on a display screen. If no problems are common types of pixels up . Programs require an operating system to automatically configure devices. random-access memory - Any information stored in RAM is located on the major computer components, such as logical drives. read -only status if: • It resides on a physically write-protected floppy disk, CD, or DVD. • It is lost...
Owner's Manual
Page 181
... wrap or formatting functionality (the option to configure userselectable options in the BIOS, such as an interface between the computer hardware and the operating system. travel module - A plastic device designed to fit inside the module bay of a portable computer to the computer. U UMA - System memory dynamically allocated to shut down your computer. UPS - uninterruptible power supply - A backup power source used in to a multi-port hub that supports resolutions...
... wrap or formatting functionality (the option to configure userselectable options in the BIOS, such as an interface between the computer hardware and the operating system. travel module - A plastic device designed to fit inside the module bay of a portable computer to the computer. U UMA - System memory dynamically allocated to shut down your computer. UPS - uninterruptible power supply - A backup power source used in to a multi-port hub that supports resolutions...
Owner's Manual
Page 189
..., 24 V video problems, 109 video connector description, 25 volume adjusting, 107 W warranty information, 11 Windows XP Device Driver Rollback, 111 enabling display settings for a TV, 70 Files and Settings Transfer Wizard, 30 Hardware Troubleshooter, 112 Help and Support Center, 13 hibernate mode, 46 Internet Connection Firewall, 86 Program Compatibility Wizard, 101 reinstalling, 14, 113 standby mode, 45 System Restore, 113 wireless turning activity on and off your computer, 117 TV connecting, 57 enabling display settings, 70 U uninterruptible power supply.
..., 24 V video problems, 109 video connector description, 25 volume adjusting, 107 W warranty information, 11 Windows XP Device Driver Rollback, 111 enabling display settings for a TV, 70 Files and Settings Transfer Wizard, 30 Hardware Troubleshooter, 112 Help and Support Center, 13 hibernate mode, 46 Internet Connection Firewall, 86 Program Compatibility Wizard, 101 reinstalling, 14, 113 standby mode, 45 System Restore, 113 wireless turning activity on and off your computer, 117 TV connecting, 57 enabling display settings, 70 U uninterruptible power supply.


