Owner's Manual
Page 5
Replacing the Battery 47 Storing a Battery 48 6 Dell™ QuickSet Features 49 7 Using CDs, DVDs, and Other Multimedia 51 Playing CDs or DVDs 51 Adjusting the Volume 52 Adjusting the Picture 53 Copying CDs and DVDs 54 How to Copy a CD or DVD 54 Using Blank CDs and DVDs 54 Helpful Tips 55 Using Dell... Digital Audio 67 Setting Up the Cyberlink (CL) Headphones 69 Enabling the Display Settings for a TV in Microsoft® Windows® XP . . . 70 8 Using Cards 71 ExpressCards 71 ExpressCard Blanks 71 Installing an ExpressCard 71 Removing an ExpressCard or Blank 73 Contents 5
Replacing the Battery 47 Storing a Battery 48 6 Dell™ QuickSet Features 49 7 Using CDs, DVDs, and Other Multimedia 51 Playing CDs or DVDs 51 Adjusting the Volume 52 Adjusting the Picture 53 Copying CDs and DVDs 54 How to Copy a CD or DVD 54 Using Blank CDs and DVDs 54 Helpful Tips 55 Using Dell... Digital Audio 67 Setting Up the Cyberlink (CL) Headphones 69 Enabling the Display Settings for a TV in Microsoft® Windows® XP . . . 70 8 Using Cards 71 ExpressCards 71 ExpressCard Blanks 71 Installing an ExpressCard 71 Removing an ExpressCard or Blank 73 Contents 5
Owner's Manual
Page 26
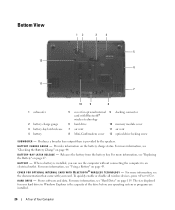
...electrical outlet. For more information, see "Replacing the Battery" on page 44. Stores software and data. B A T T E R Y C H A R G E G A U G E - B A Y L A T C H R E L E A S E - When a battery is provided by the speakers. For more information, see "Checking the Battery Charge" on page 47. To quickly...of Your Computer B A T T E R Y - B A T T E R Y - For more information, see "Using a Battery" on the battery charge status. For more information, see the documentation that came with Bluetooth® wireless technology 6 hard drive 10 memory module cover 7 air...
...electrical outlet. For more information, see "Replacing the Battery" on page 44. Stores software and data. B A T T E R Y C H A R G E G A U G E - B A Y L A T C H R E L E A S E - When a battery is provided by the speakers. For more information, see "Checking the Battery Charge" on page 47. To quickly...of Your Computer B A T T E R Y - B A T T E R Y - For more information, see "Using a Battery" on the battery charge status. For more information, see the documentation that came with Bluetooth® wireless technology 6 hard drive 10 memory module cover 7 air...
Owner's Manual
Page 43
... to an electrical outlet the first time you use the AC adapter to connect your Dell computer. NOTE: Because the battery may not be fully charged, use the computer. Replace the battery only with the AC adapter until the battery is supplied as complex 3D graphics applications • Running the computer in maximum performance mode...
... to an electrical outlet the first time you use the AC adapter to connect your Dell computer. NOTE: Because the battery may not be fully charged, use the computer. Replace the battery only with the AC adapter until the battery is supplied as complex 3D graphics applications • Running the computer in maximum performance mode...
Owner's Manual
Page 45
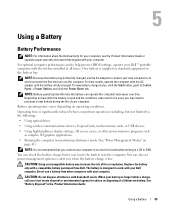
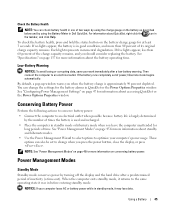
... by using the Battery Meter in Dell QuickSet. NOTICE: If your computer loses AC or battery power while in standby mode, it was in before entering standby mode. Low-Battery Warning NOTICE: To avoid losing or corrupting data, save your computer's power usage. You can change when you should consider replacing the battery. Conserving Battery Power Perform...
... by using the Battery Meter in Dell QuickSet. NOTICE: If your computer loses AC or battery power while in standby mode, it was in before entering standby mode. Low-Battery Warning NOTICE: To avoid losing or corrupting data, save your computer's power usage. You can change when you should consider replacing the battery. Conserving Battery Power Perform...
Owner's Manual
Page 47
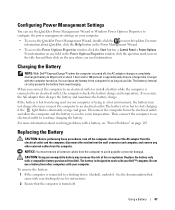
...8594; Control Panel→ Power Options. You can use a battery from other external cables from being in a hot environment, the battery may increase the risk of fire or explosion. Charging the Battery NOTE: With Dell™ ExpressCharge™, when the computer is designed to 100 ... electrical outlet and the computer, disconnect the modem from the computer to avoid possible connector damage. Replace the battery only with a compatible battery purchased from overcharging. See the documentation that came with your computer. Configuring Power Management Settings You can leave ...
...8594; Control Panel→ Power Options. You can use a battery from other external cables from being in a hot environment, the battery may increase the risk of fire or explosion. Charging the Battery NOTE: With Dell™ ExpressCharge™, when the computer is designed to 100 ... electrical outlet and the computer, disconnect the modem from the computer to avoid possible connector damage. Replace the battery only with a compatible battery purchased from overcharging. See the documentation that came with your computer. Configuring Power Management Settings You can leave ...
Owner's Manual
Page 48
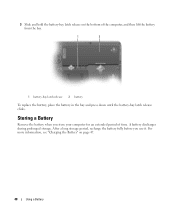
For more information, see "Charging the Battery" on the bottom of time. Storing a Battery Remove the battery when you use it. After a long storage period, recharge the battery fully before you store your computer for an extended period of the computer, and then lift the battery from the bay. 1 2 1 battery-bay latch release 2 battery To replace the battery, place the battery in the bay and press down until the battery-bay latch release clicks. 3 Slide and hold the battery-bay latch release on page 47. 48 Using a Battery A battery discharges during prolonged storage.
For more information, see "Charging the Battery" on the bottom of time. Storing a Battery Remove the battery when you use it. After a long storage period, recharge the battery fully before you store your computer for an extended period of the computer, and then lift the battery from the bay. 1 2 1 battery-bay latch release 2 battery To replace the battery, place the battery in the bay and press down until the battery-bay latch release clicks. 3 Slide and hold the battery-bay latch release on page 47. 48 Using a Battery A battery discharges during prolonged storage.
Owner's Manual
Page 99
... malfunctioning. Run the System Memory tests and the Keyboard Controller test in the Dell Diagnostics. See "Dell Diagnostics" on page 155). WA R N I N G : BATTERY I T H A D E L L - Replace the battery, or connect the computer to restore the data by entering the system setup program (see "Contacting Dell" on page 89. Otherwise, activate hibernate mode or shut down the computer. ENSURE...
... malfunctioning. Run the System Memory tests and the Keyboard Controller test in the Dell Diagnostics. See "Dell Diagnostics" on page 155). WA R N I N G : BATTERY I T H A D E L L - Replace the battery, or connect the computer to restore the data by entering the system setup program (see "Contacting Dell" on page 89. Otherwise, activate hibernate mode or shut down the computer. ENSURE...
Owner's Manual
Page 118
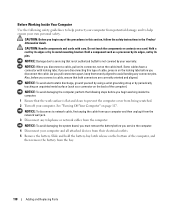
...such as a connector on the bottom of cable, press in this type of the computer, and then remove the battery from the bay. 118 Adding and Replacing Parts Slide and hold the battery-bay latch release on the back of the computer). Hold a component such as a processor by its connector, not... in on the cable itself. NOTICE: To avoid damaging the system board, you must remove the battery before you begin working inside the computer. 1 Ensure that is not authorized by Dell is flat and clean to help ensure your computer. Before Working Inside Your Computer Use the following ...
...such as a connector on the bottom of cable, press in this type of the computer, and then remove the battery from the bay. 118 Adding and Replacing Parts Slide and hold the battery-bay latch release on the back of the computer). Hold a component such as a processor by its connector, not... in on the cable itself. NOTICE: To avoid damaging the system board, you must remove the battery before you begin working inside the computer. 1 Ensure that is not authorized by Dell is flat and clean to help ensure your computer. Before Working Inside Your Computer Use the following ...

Owner's Manual
Page 119
... 7 Remove any of the procedures in the section, follow the safety instructions in hibernate mode. Adding and Replacing Parts 119 even a slight bump can damage the drive. NOTE: Dell does not guarantee compatibility or provide support for hard drives from the ExpressCard slot. NOTE: If you begin ...computer (see page 117) before you are extremely fragile; CAUTION: Before you remove the hard drive from a source other than Dell, you must remove the battery before removing the hard drive. Do not remove the hard drive while the computer is hot, do not touch the metal housing...
... 7 Remove any of the procedures in the section, follow the safety instructions in hibernate mode. Adding and Replacing Parts 119 even a slight bump can damage the drive. NOTE: Dell does not guarantee compatibility or provide support for hard drives from the ExpressCard slot. NOTE: If you begin ...computer (see page 117) before you are extremely fragile; CAUTION: Before you remove the hard drive from a source other than Dell, you must remove the battery before removing the hard drive. Do not remove the hard drive while the computer is hot, do not touch the metal housing...
Owner's Manual
Page 121
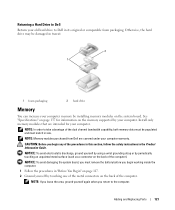
...grounding strap or by touching one of the metal connectors on the system board. Adding and Replacing Parts 121 Install only memory modules that are covered under your old hard drive to Dell in its original or comparable foam packaging. CAUTION: Before you return to take advantage of...Follow the procedures in the Product Information Guide. NOTE: In order to the computer. Otherwise, the hard drive may be populated and must remove the battery before you must match in transit. 2 1 1 foam packaging 2 hard drive Memory You can increase your computer. NOTICE: To avoid damaging the ...
...grounding strap or by touching one of the metal connectors on the system board. Adding and Replacing Parts 121 Install only memory modules that are covered under your old hard drive to Dell in its original or comparable foam packaging. CAUTION: Before you return to take advantage of...Follow the procedures in the Product Information Guide. NOTE: In order to the computer. Otherwise, the hard drive may be populated and must remove the battery before you must match in transit. 2 1 1 foam packaging 2 hard drive Memory You can increase your computer. NOTICE: To avoid damaging the ...
Owner's Manual
Page 123
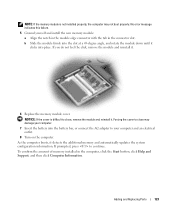
Adding and Replacing Parts 123 If you do not feel the click, remove the module and reinstall it detects the additional memory and automatically updates the system configuration ... at a 45-degree angle, and rotate the module down until it clicks into the battery bay, or connect the AC adapter to your computer and an electrical outlet. 8 Turn on the computer. As the computer boots, it . 6 Replace the memory module cover. NOTICE: If the cover is not installed properly, the computer...
Adding and Replacing Parts 123 If you do not feel the click, remove the module and reinstall it detects the additional memory and automatically updates the system configuration ... at a 45-degree angle, and rotate the module down until it clicks into the battery bay, or connect the AC adapter to your computer and an electrical outlet. 8 Turn on the computer. As the computer boots, it . 6 Replace the memory module cover. NOTICE: If the cover is not installed properly, the computer...
Owner's Manual
Page 124
... to the system board, and set it aside. b Pull straight up on the system board, and disconnect the modem cable. 124 Adding and Replacing Parts NOTICE: To avoid damaging the system board, you must remove the battery before you begin working inside the computer. 1 Follow the procedures in the Product Information Guide.
... to the system board, and set it aside. b Pull straight up on the system board, and disconnect the modem cable. 124 Adding and Replacing Parts NOTICE: To avoid damaging the system board, you must remove the battery before you begin working inside the computer. 1 Follow the procedures in the Product Information Guide.
Owner's Manual
Page 126
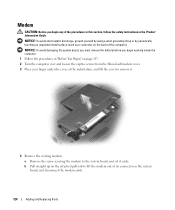
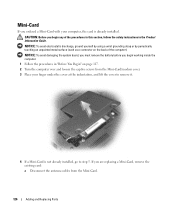
... instructions in "Before You Begin" on page 117. 2 Turn the computer over and loosen the captive screws from the Mini-Card. 126 Adding and Replacing Parts Mini-Card If you ordered a Mini-Card with your finger under the cover at the indentation, and lift the cover to remove it. 4 ...If a Mini-Card is already installed. NOTICE: To avoid damaging the system board, you must remove the battery before you begin working inside the computer. 1 Follow the procedures in the Product Information Guide. CAUTION: Before you begin any of the computer).
... instructions in "Before You Begin" on page 117. 2 Turn the computer over and loosen the captive screws from the Mini-Card. 126 Adding and Replacing Parts Mini-Card If you ordered a Mini-Card with your finger under the cover at the indentation, and lift the cover to remove it. 4 ...If a Mini-Card is already installed. NOTICE: To avoid damaging the system board, you must remove the battery before you begin working inside the computer. 1 Follow the procedures in the Product Information Guide. CAUTION: Before you begin any of the computer).
Owner's Manual
Page 129
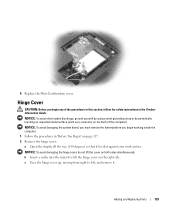
6 Replace the Mini-Card/modem cover. NOTICE: To avoid damaging the hinge cover, do not lift the cover on page 117. 2 Remove the hinge cover: a Open ... the procedures in this section, follow the safety instructions in "Before You Begin" on both sides simultaneously. Adding and Replacing Parts 129 NOTICE: To avoid damaging the system board, you must remove the battery before you begin working inside the computer. 1 Follow the procedures in the Product Information Guide. Hinge Cover CAUTION...
6 Replace the Mini-Card/modem cover. NOTICE: To avoid damaging the hinge cover, do not lift the cover on page 117. 2 Remove the hinge cover: a Open ... the procedures in this section, follow the safety instructions in "Before You Begin" on both sides simultaneously. Adding and Replacing Parts 129 NOTICE: To avoid damaging the system board, you must remove the battery before you begin working inside the computer. 1 Follow the procedures in the Product Information Guide. Hinge Cover CAUTION...
Owner's Manual
Page 130
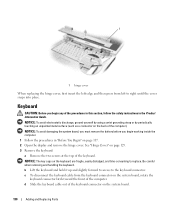
... then press from the keyboard connector on the system board. 130 Adding and Replacing Parts d Slide the keyboard cable out of the computer). NOTICE: To avoid damaging the system board, you must remove the battery before you begin working inside the computer. 1 Follow the procedures in the...of the keyboard connector on the system board, rotate the keyboard connector latch toward the front of the keyboard. 1 1 hinge cover When replacing the hinge cover, first insert the left to the keyboard connector. Keyboard CAUTION: Before you begin any of the procedures in this section,...
... then press from the keyboard connector on the system board. 130 Adding and Replacing Parts d Slide the keyboard cable out of the computer). NOTICE: To avoid damaging the system board, you must remove the battery before you begin working inside the computer. 1 Follow the procedures in the...of the keyboard connector on the system board, rotate the keyboard connector latch toward the front of the keyboard. 1 1 hinge cover When replacing the hinge cover, first insert the left to the keyboard connector. Keyboard CAUTION: Before you begin any of the procedures in this section,...
Owner's Manual
Page 131
... 3 keyboard cable NOTICE: To avoid scratching the palm rest when replacing the keyboard, hook the five tabs along the front edge of the coin-cell battery compartment, and lift the battery. See "Keyboard" on page 130. 4 Remove the existing coin-cell battery: a Pull up on page 129. 3 Remove the keyboard....surface (such as a connector on page 117. 2 Remove the hinge cover. NOTICE: To avoid damaging the system board, you must remove the battery before you begin working inside the computer. 1 Follow the procedures in "Before You Begin" on the back of the procedures in this section, ...
... 3 keyboard cable NOTICE: To avoid scratching the palm rest when replacing the keyboard, hook the five tabs along the front edge of the coin-cell battery compartment, and lift the battery. See "Keyboard" on page 130. 4 Remove the existing coin-cell battery: a Pull up on page 129. 3 Remove the keyboard....surface (such as a connector on page 117. 2 Remove the hinge cover. NOTICE: To avoid damaging the system board, you must remove the battery before you begin working inside the computer. 1 Follow the procedures in "Before You Begin" on the back of the procedures in this section, ...
Owner's Manual
Page 132
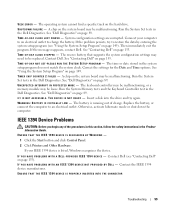
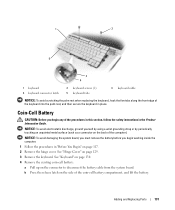
... to release the drive from the bay. 132 Adding and Replacing Parts 1 2 3 1 coin-cell battery 2 release latch 3 battery cable connector 5 Install the replacement battery: a Insert the battery at a 30-degree angle under the release latch with the positive side up, and then push the battery into the notch and push it to the side to the connector... the procedures in this section, follow the safety instructions in the Product Information Guide. 1 Follow the procedures in "Before You Begin" on the system board. 6 Replace the keyboard. 7 Replace the hinge cover.
... to release the drive from the bay. 132 Adding and Replacing Parts 1 2 3 1 coin-cell battery 2 release latch 3 battery cable connector 5 Install the replacement battery: a Insert the battery at a 30-degree angle under the release latch with the positive side up, and then push the battery into the notch and push it to the side to the connector... the procedures in this section, follow the safety instructions in the Product Information Guide. 1 Follow the procedures in "Before You Begin" on the system board. 6 Replace the keyboard. 7 Replace the hinge cover.
Owner's Manual
Page 133
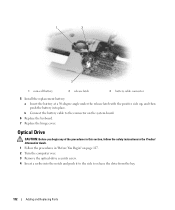
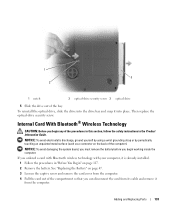
... the captive screw and remove the card cover from the computer. 4 Pull the card out of the bay. Adding and Replacing Parts 133 See "Replacing the Battery" on page 117. 2 Remove the battery. Then replace the optical-drive security screw. Internal Card With Bluetooth® Wireless Technology CAUTION: Before you begin working inside the computer...
... the captive screw and remove the card cover from the computer. 4 Pull the card out of the bay. Adding and Replacing Parts 133 See "Replacing the Battery" on page 117. 2 Remove the battery. Then replace the optical-drive security screw. Internal Card With Bluetooth® Wireless Technology CAUTION: Before you begin working inside the computer...
Owner's Manual
Page 134
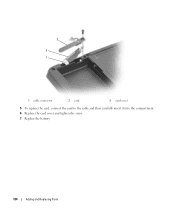
3 2 1 1 cable connector 2 card 3 card cover 5 To replace the card, connect the card to the cable and then carefully insert it into the compartment. 6 Replace the card cover and tighten the screw. 7 Replace the battery. 134 Adding and Replacing Parts
3 2 1 1 cable connector 2 card 3 card cover 5 To replace the card, connect the card to the cable and then carefully insert it into the compartment. 6 Replace the card cover and tighten the screw. 7 Replace the battery. 134 Adding and Replacing Parts
Owner's Manual
Page 185
..., 93 CD-RW drive problems, 94 CDs about, 54 operating system, 14 playing, 51 Check Disk, 94 cleaning touch pad, 151 coin-cell battery replacing, 131 computer crashes, 101 restore to previous operating state, 113 slow performance, 95, 102 specifications, 137 stops responding, 101 conflicts software and hardware ... copying CDs general information, 54 helpful tips, 55 how to, 54 copying DVDs general information, 54 helpful tips, 55 how to, 54 D Dell contacting, 145, 154-155 support site, 13 Dell Diagnostics about, 89 starting from Drivers and Utilities CD, 89 starting from your hard drive, 89...
..., 93 CD-RW drive problems, 94 CDs about, 54 operating system, 14 playing, 51 Check Disk, 94 cleaning touch pad, 151 coin-cell battery replacing, 131 computer crashes, 101 restore to previous operating state, 113 slow performance, 95, 102 specifications, 137 stops responding, 101 conflicts software and hardware ... copying CDs general information, 54 helpful tips, 55 how to, 54 copying DVDs general information, 54 helpful tips, 55 how to, 54 D Dell contacting, 145, 154-155 support site, 13 Dell Diagnostics about, 89 starting from Drivers and Utilities CD, 89 starting from your hard drive, 89...


