
Owner's Manual (PDF)
Page 28
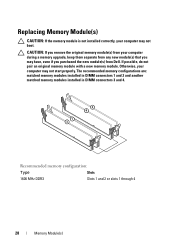
If possible, do not pair an original memory module with a new memory module. The recommended memory configurations are: matched memory modules installed in DIMM connectors 1 and 2 and another matched memory modules installed in DIMM connectors 3 and 4....: Type Slots 1600 MHz DDR3 Slots 1 and 2 or slots 1 through 4 28 Memory Module(s) Otherwise, your computer during a memory upgrade, keep them separate from any new module(s) that you may have, even if you purchased the new module(s) from Dell. CAUTION: If you remove the original memory module(s) from your computer may not boot.
If possible, do not pair an original memory module with a new memory module. The recommended memory configurations are: matched memory modules installed in DIMM connectors 1 and 2 and another matched memory modules installed in DIMM connectors 3 and 4....: Type Slots 1600 MHz DDR3 Slots 1 and 2 or slots 1 through 4 28 Memory Module(s) Otherwise, your computer during a memory upgrade, keep them separate from any new module(s) that you may have, even if you purchased the new module(s) from Dell. CAUTION: If you remove the original memory module(s) from your computer may not boot.

Owner's Manual (PDF)
Page 99
...-Board Components" on page 15. Replacing the Processor Fan and Heat-Sink Assembly 1 Clean the thermal grease from the bottom of the heat-sink. 2 Apply new thermal grease to the top of the processor, if applicable. 3 Place the processor fan and heat-sink assembly over the processor. 4 Align the captive screws...
...-Board Components" on page 15. Replacing the Processor Fan and Heat-Sink Assembly 1 Clean the thermal grease from the bottom of the heat-sink. 2 Apply new thermal grease to the top of the processor, if applicable. 3 Place the processor fan and heat-sink assembly over the processor. 4 Align the captive screws...

Owner's Manual (PDF)
Page 101
.... See "Removing the Computer Cover" on page 13. Processor 101 For additional safety best practices information, see the Regulatory Compliance Homepage at dell.com/regulatory_compliance. 22 Processor CAUTION: Before working inside your computer and follow the steps in "Before You Begin" on page 23. Ensure ...that it . See "Removing the Processor Fan and Heat-Sink Assembly" on page 97. NOTE: Unless a new processor fan and heat-sink assembly is required for the new processor, reuse the original processor fan and heat-sink assembly when you touch it has had sufficient time to ...
.... See "Removing the Computer Cover" on page 13. Processor 101 For additional safety best practices information, see the Regulatory Compliance Homepage at dell.com/regulatory_compliance. 22 Processor CAUTION: Before working inside your computer and follow the steps in "Before You Begin" on page 23. Ensure ...that it . See "Removing the Processor Fan and Heat-Sink Assembly" on page 97. NOTE: Unless a new processor fan and heat-sink assembly is required for the new processor, reuse the original processor fan and heat-sink assembly when you touch it has had sufficient time to ...

Owner's Manual (PDF)
Page 103
3 Gently lift the processor to remove it to that the socket is ready for the new processor. 2 1 1 processor 2 socket Replacing the Processor CAUTION: When replacing the processor, do not touch any of the pins inside the socket or allow any objects ...to touch the underside of the processor. Leave the release lever extended in the socket. 1 Unpack the new processor, being careful not to fall on the socket is not fully extended, move it from the socket. Processor 103 CAUTION: You must position the...
3 Gently lift the processor to remove it to that the socket is ready for the new processor. 2 1 1 processor 2 socket Replacing the Processor CAUTION: When replacing the processor, do not touch any of the pins inside the socket or allow any objects ...to touch the underside of the processor. Leave the release lever extended in the socket. 1 Unpack the new processor, being careful not to fall on the socket is not fully extended, move it from the socket. Processor 103 CAUTION: You must position the...


