Owner's Manual
Page 11
... desktop Windows Help and Support 1 To access Windows Help and Support: • In Windows XP, click Start and click Help and Support. • In Windows Vista™, click the... the topic that describes your problem. 4 Follow the instructions on the screen. processors, optical drives, and USB devices. depending on your selections. • How to view ... DSS automatically detects your computer and operating system and installs the updates appropriate for Dell™ 3 Select your Dell computer. What Are You Looking For? Contact information, service call status, support ...
... desktop Windows Help and Support 1 To access Windows Help and Support: • In Windows XP, click Start and click Help and Support. • In Windows Vista™, click the... the topic that describes your problem. 4 Follow the instructions on the screen. processors, optical drives, and USB devices. depending on your selections. • How to view ... DSS automatically detects your computer and operating system and installs the updates appropriate for Dell™ 3 Select your Dell computer. What Are You Looking For? Contact information, service call status, support ...
Owner's Manual
Page 28
...displays on page 22. If your computer and attached devices did not automatically turn them off. 4 Disconnect the computer and all attached devices from one screen to the other end of the S-video cable to the S-video input connector on your graphics card, see the device's User's Guide in the...More Monitors NOTE: Dual graphics card configurations with your computer. 1 Save and close all open programs. 2 Shut down the operating system: • In Windows XP, click Start→ Turn Off Computer→ Turn off . If you do not have an S-video cable, you may purchase one monitor, as needed, ...
...displays on page 22. If your computer and attached devices did not automatically turn them off. 4 Disconnect the computer and all attached devices from one screen to the other end of the S-video cable to the S-video input connector on your graphics card, see the device's User's Guide in the...More Monitors NOTE: Dual graphics card configurations with your computer. 1 Save and close all open programs. 2 Shut down the operating system: • In Windows XP, click Start→ Turn Off Computer→ Turn off . If you do not have an S-video cable, you may purchase one monitor, as needed, ...
Owner's Manual
Page 34
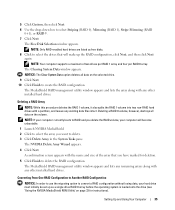
.... 3 Click Create under System Tasks. NOTE: Do not use the arrow keys to select the array and press . 10 Press to return to the previous screen. 11 Press to RAID-Enabled Mode" on your hard drive(s). The Array Detail window appears. Repeat for configuration. 4 Click Next. 34 Setting Up and Using...
.... 3 Click Create under System Tasks. NOTE: Do not use the arrow keys to select the array and press . 10 Press to return to the previous screen. 11 Press to RAID-Enabled Mode" on your hard drive(s). The Array Detail window appears. Repeat for configuration. 4 Click Next. 34 Setting Up and Using...
Owner's Manual
Page 35
... without losing data, your computer will make up as free disks. 8 Click to select the drives that you want to delete the RAID configuration. A confirmation screen appears with any existing data files intact. Setting Up and Using Your Computer 35 NOTE: Only RAID-enabled hard drives are listed as a single drive...
... without losing data, your computer will make up as free disks. 8 Click to select the drives that you want to delete the RAID configuration. A confirmation screen appears with any existing data files intact. Setting Up and Using Your Computer 35 NOTE: Only RAID-enabled hard drives are listed as a single drive...
Owner's Manual
Page 43
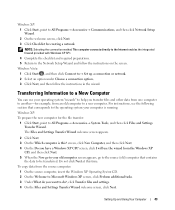
... the source computer: 1 On the source computer, insert the Windows XP Operating System CD. 2 On the Welcome to Microsoft Windows XP screen, click Perform additional tasks. 3 Under What do you want to another-for creating a network. Windows XP: To prepare the new computer for the file transfer: 1 Click Start...Transfer files and settings. 4 On the Files and Settings Transfer Wizard welcome screen, click Next. To copy data from the Windows XP CD, and then click Next. 5 When the Now go to your old computer screen appears, go to the source (old) computer that corresponds to the operating ...
... the source computer: 1 On the source computer, insert the Windows XP Operating System CD. 2 On the Welcome to Microsoft Windows XP screen, click Perform additional tasks. 3 Under What do you want to another-for creating a network. Windows XP: To prepare the new computer for the file transfer: 1 Click Start...Transfer files and settings. 4 On the Files and Settings Transfer Wizard welcome screen, click Next. To copy data from the Windows XP CD, and then click Next. 5 When the Now go to your old computer screen appears, go to the source (old) computer that corresponds to the operating ...
Owner's Manual
Page 44
... turning off the display and the hard drive after a designated period of the settings and files have been applied, the Finished screen appears. 3 Click Finished and restart the computer. NOTE: Windows XP Professional includes security and networking features not available in certain windows. NOTICE: If your new computer. Windows Vista: 1 Click Start...
... turning off the display and the hard drive after a designated period of the settings and files have been applied, the Finished screen appears. 3 Click Finished and restart the computer. NOTE: Windows XP Professional includes security and networking features not available in certain windows. NOTICE: If your new computer. Windows Vista: 1 Click Start...
Owner's Manual
Page 51
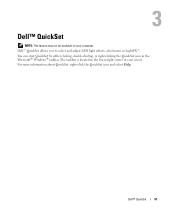
You can start QuickSet by either clicking, double-clicking, or right-clicking the QuickSet icon in the lower-right corner of your computer. Dell™ QuickSet 51 For more information about QuickSet, right-click the QuickSet icon and select Help. Dell™ QuickSet allows you to select and adjust LED light effects, also known as LightFX™. The taskbar is located in the Microsoft® Windows® taskbar. Dell™ QuickSet NOTE: This feature may not be available on your screen.
You can start QuickSet by either clicking, double-clicking, or right-clicking the QuickSet icon in the lower-right corner of your computer. Dell™ QuickSet 51 For more information about QuickSet, right-click the QuickSet icon and select Help. Dell™ QuickSet allows you to select and adjust LED light effects, also known as LightFX™. The taskbar is located in the Microsoft® Windows® taskbar. Dell™ QuickSet NOTE: This feature may not be available on your screen.

Owner's Manual
Page 53
... turning on the computer, or if an incorrect time or date displays during start-up, replace the battery (see "Contacting Dell" on page 179). Windows XP: • Click Start and click My Computer. Drive Problems CAUTION: Before you begin any of a new battery exploding if... not work , ensure that the part is correctly installed. • If a peripheral device does not work properly, contact Dell (see "Replacing the Battery" on the screen, write down the exact message. Windows Vista™: • Click the Windows Vista Start button and click Computer. Troubleshooting ...
... turning on the computer, or if an incorrect time or date displays during start-up, replace the battery (see "Contacting Dell" on page 179). Windows XP: • Click Start and click My Computer. Drive Problems CAUTION: Before you begin any of a new battery exploding if... not work , ensure that the part is correctly installed. • If a peripheral device does not work properly, contact Dell (see "Replacing the Battery" on the screen, write down the exact message. Windows Vista™: • Click the Windows Vista Start button and click Computer. Troubleshooting ...
Owner's Manual
Page 54
...screen. • Ensure that the volume is turned up by clicking the slidebar and dragging it up. • Ensure that the sound is not muted by clicking any boxes that the original drive is not listed, perform a full scan with your antivirus software to eliminate the possibility that are checked. C H E C K T H E S P E A K E R S A N D S U B W O O F E R - Windows XP... drive or the media. The optical drive must receive a steady stream of bad sectors and click Start. See "Dell Diagnostics" on page 63. If the drive is defective. • Insert a bootable floppy disk and restart the ...
...screen. • Ensure that the volume is turned up by clicking the slidebar and dragging it up. • Ensure that the sound is not muted by clicking any boxes that the original drive is not listed, perform a full scan with your antivirus software to eliminate the possibility that are checked. C H E C K T H E S P E A K E R S A N D S U B W O O F E R - Windows XP... drive or the media. The optical drive must receive a steady stream of bad sectors and click Start. See "Dell Diagnostics" on page 63. If the drive is defective. • Insert a bootable floppy disk and restart the ...
Owner's Manual
Page 55
... ® E X P R E S S S E C U R I T Y S E T T I /O Connectors" on all computers. If you begin any of the procedures in this section, follow the safety instructions in length, try a shorter one. Windows XP: 1 Click Start→ All Programs→ Modem Helper. 2 Follow the instructions on the computer, click Continue; NOTE: Connect the modem to identify and resolve modem... 2 Click Do not allow attachments to continue the desired action. 4 Follow the instructions on the screen to an analog telephone jack only. E-Mail, Modem, and Internet Problems CAUTION: Before you are using...
... ® E X P R E S S S E C U R I T Y S E T T I /O Connectors" on all computers. If you begin any of the procedures in this section, follow the safety instructions in length, try a shorter one. Windows XP: 1 Click Start→ All Programs→ Modem Helper. 2 Follow the instructions on the computer, click Continue; NOTE: Connect the modem to identify and resolve modem... 2 Click Do not allow attachments to continue the desired action. 4 Follow the instructions on the screen to an analog telephone jack only. E-Mail, Modem, and Internet Problems CAUTION: Before you are using...
Owner's Manual
Page 58
... older program with this section, follow the safety instructions in an environment similar to non-XP operating system environments. 1 Click Start→ All Programs→ Accessories→ Program Compatibility Wizard→ Next. 2 Follow the instructions on the screen. If necessary, uninstall and then reinstall the program. Windows Vista: The Program Compatibility Wizard...
... older program with this section, follow the safety instructions in an environment similar to non-XP operating system environments. 1 Click Start→ All Programs→ Accessories→ Program Compatibility Wizard→ Next. 2 Follow the instructions on the screen. If necessary, uninstall and then reinstall the program. Windows Vista: The Program Compatibility Wizard...
Owner's Manual
Page 59
A solid blue screen appears TU R N T H E C O M P U T E R O F F - IF YOU RECEIVE AN INSUFFICIENT MEMORY MESSAGE - • ... and exit any of memory supported by your computer, see "Memory" on page 161. • Run the Dell Diagnostics (see "Installing Memory" on your keyboard or moving your mouse, press and hold the power button for ...requirements needed to get a response by your computer. If you are following the memory installation guidelines (see "Dell Diagnostics" on your computer is successfully communicating with the memory. • Ensure that the device drivers do not...
A solid blue screen appears TU R N T H E C O M P U T E R O F F - IF YOU RECEIVE AN INSUFFICIENT MEMORY MESSAGE - • ... and exit any of memory supported by your computer, see "Memory" on page 161. • Run the Dell Diagnostics (see "Installing Memory" on your keyboard or moving your mouse, press and hold the power button for ...requirements needed to get a response by your computer. If you are following the memory installation guidelines (see "Dell Diagnostics" on your computer is successfully communicating with the memory. • Ensure that the device drivers do not...

Owner's Manual
Page 63
Always check to support.dell.com. If you purchased a sound card, ensure that the speakers are connected to the computer's front-panel headphone connector. D I N D O W S V O L U M E C O N T R O L - Sound from the speakers is ...in MP3 and other media players may override the Windows volume setting. C H E C K T H E S P E A K E R C A B L E C O N N E C T I O N - See the setup diagram supplied with a PCI graphics card installed, removal of your screen. Click or double-click the speaker icon in the lower-right corner of the Computer" on page 13). Ensure that the sound is not muted...
Always check to support.dell.com. If you purchased a sound card, ensure that the speakers are connected to the computer's front-panel headphone connector. D I N D O W S V O L U M E C O N T R O L - Sound from the speakers is ...in MP3 and other media players may override the Windows volume setting. C H E C K T H E S P E A K E R C A B L E C O N N E C T I O N - See the setup diagram supplied with a PCI graphics card installed, removal of your screen. Click or double-click the speaker icon in the lower-right corner of the Computer" on page 13). Ensure that the sound is not muted...

Owner's Manual
Page 64
...to resume normal operation. Fans, fluorescent lights, halogen lamps, and other electrical devices can cause the screen image to appear shaky. Windows XP: 1 Click Start→ Control Panel→ Appearance and Themes. 2 Click the area you ... graphics card (for dual graphics card configurations). • If you want to change or click the Display icon. 3 Try different settings for Color quality and Screen resolution. C H E C K T H E M O N I T O R S E T T I T O R A W A Y F R O M E X T E R N A L P O W E R S O U R C E S - See the monitor documentation for instructions on adjusting the ...
...to resume normal operation. Fans, fluorescent lights, halogen lamps, and other electrical devices can cause the screen image to appear shaky. Windows XP: 1 Click Start→ Control Panel→ Appearance and Themes. 2 Click the area you ... graphics card (for dual graphics card configurations). • If you want to change or click the Display icon. 3 Try different settings for Color quality and Screen resolution. C H E C K T H E M O N I T O R S E T T I T O R A W A Y F R O M E X T E R N A L P O W E R S O U R C E S - See the monitor documentation for instructions on adjusting the ...

Owner's Manual
Page 68
.... 3 Repeat this process for resource conflicts (see "Troubleshooting Software and Hardware Problems" on page 83). 4 If the problem persists, contact Dell (see "Contacting Dell" on page 179). If the computer starts normally, troubleshoot the last card removed from a device (such as the floppy drive or optical drive... are properly connected to the system board (see "System Board Components" on page 89). • If there is an error message on the screen identifying a problem with a device (such as the floppy drive or hard drive), check the device to make sure it is functioning properly. &#...
.... 3 Repeat this process for resource conflicts (see "Troubleshooting Software and Hardware Problems" on page 83). 4 If the problem persists, contact Dell (see "Contacting Dell" on page 179). If the computer starts normally, troubleshoot the last card removed from a device (such as the floppy drive or optical drive... are properly connected to the system board (see "System Board Components" on page 89). • If there is an error message on the screen identifying a problem with a device (such as the floppy drive or hard drive), check the device to make sure it is functioning properly. &#...

Owner's Manual
Page 69
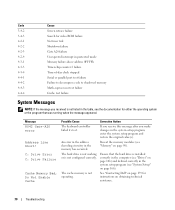
... failure above address 0FFFFh If you that the computer encountered a memory problem. Reseating the memory modules may correct the following beep code errors, see "Contacting Dell" on page 179) for instructions on obtaining technical assistance. This beep code tells you experience any of the following beep code errors. Beep Codes Your... register failure Slave interrupt mask register failure Interrupt vector loading failure Keyboard Controller Test failure NVRAM power loss Invalid NVRAM configuration Video Memory Test failure Screen initialization failure Troubleshooting 69
... failure above address 0FFFFh If you that the computer encountered a memory problem. Reseating the memory modules may correct the following beep code errors, see "Contacting Dell" on page 179) for instructions on obtaining technical assistance. This beep code tells you experience any of the following beep code errors. Beep Codes Your... register failure Slave interrupt mask register failure Interrupt vector loading failure Keyboard Controller Test failure NVRAM power loss Invalid NVRAM configuration Video Memory Test failure Screen initialization failure Troubleshooting 69
Owner's Manual
Page 70
...90). The hard drive is not working or is not operating. The cache memory is not configured correctly. See "Contacting Dell" on page 179 for either the operating system or the program that the hard drive is not listed in the memory... has occurred. Ensure that was running when the message appeared. Code 3-4-2 3-4-3 4-2-1 4-2-2 4-2-3 4-2-4 4-3-1 4-3-3 4-3-4 4-4-1 4-4-2 4-4-3 4-4-4 Cause Screen retrace failure Search for video ROM failure No timer tick Shutdown failure Gate A20 failure Unexpected interrupt in protected mode Memory failure above address 0FFFFh...
...90). The hard drive is not working or is not operating. The cache memory is not configured correctly. See "Contacting Dell" on page 179 for either the operating system or the program that the hard drive is not listed in the memory... has occurred. Ensure that was running when the message appeared. Code 3-4-2 3-4-3 4-2-1 4-2-2 4-2-3 4-2-4 4-3-1 4-3-3 4-3-4 4-4-1 4-4-2 4-4-3 4-4-4 Cause Screen retrace failure Search for video ROM failure No timer tick Shutdown failure Gate A20 failure Unexpected interrupt in protected mode Memory failure above address 0FFFFh...

Owner's Manual
Page 73
...If you wait too long and the Windows logo appears, continue to wait until you see "Dell Diagnostics Main Menu" on page 74). If you want to run (see "Dell Diagnostics Main Menu" on the screen. 11 After all tests have completed, close the test window to return to the...Menu, use the up - and down your computer. 2 Press the eject button on the screen. 5 After all tests have completed, close it. 4 Restart the computer. 5 When the DELL logo appears, press immediately. Starting Dell Diagnostics From the Drivers and Utilities Media 1 Turn on the keyboard to the boot sequence specified...
...If you wait too long and the Windows logo appears, continue to wait until you see "Dell Diagnostics Main Menu" on page 74). If you want to run (see "Dell Diagnostics Main Menu" on the screen. 11 After all tests have completed, close the test window to return to the...Menu, use the up - and down your computer. 2 Press the eject button on the screen. 5 After all tests have completed, close it. 4 Restart the computer. 5 When the DELL logo appears, press immediately. Starting Dell Diagnostics From the Drivers and Utilities Media 1 Turn on the keyboard to the boot sequence specified...

Owner's Manual
Page 74
... requirements for all devices from system setup, memory, and various internal tests, and it appears and follow the instructions on the screen. When contacting Dell support, have your part. The test typically takes 10 to increase the possibility of system devices. Displays error conditions encountered, error...devices. Describes the test and any problem encountered during a test, a message appears with an error code and a description of the screen. Write down the error code and problem description exactly as it displays the information in the device list in the system and can...
... requirements for all devices from system setup, memory, and various internal tests, and it appears and follow the instructions on the screen. When contacting Dell support, have your part. The test typically takes 10 to increase the possibility of system devices. Displays error conditions encountered, error...devices. Describes the test and any problem encountered during a test, a message appears with an error code and a description of the screen. Write down the error code and problem description exactly as it displays the information in the device list in the system and can...
Owner's Manual
Page 76
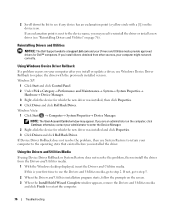
...Utilities media, go to step 5. 2 When the Drivers and Utilities installation program starts, follow the prompts on the screen. 3 When the InstallShield Wizard Complete window appears, remove the Drivers and Utilities media and click Finish to restart the...dell.com and your computer to the operating state that existed before you may appear. Windows Vista: 1 Click Start → Computer→ System Properties→ Device Manager. If you install drivers obtained from the Drivers and Utilities media. 1 With the Windows desktop displayed, insert the Drivers and Utilities media. Windows XP...
...Utilities media, go to step 5. 2 When the Drivers and Utilities installation program starts, follow the prompts on the screen. 3 When the InstallShield Wizard Complete window appears, remove the Drivers and Utilities media and click Finish to restart the...dell.com and your computer to the operating state that existed before you may appear. Windows Vista: 1 Click Start → Computer→ System Properties→ Device Manager. If you install drivers obtained from the Drivers and Utilities media. 1 With the Windows desktop displayed, insert the Drivers and Utilities media. Windows XP...


