Setup and specifications guide
Page 13
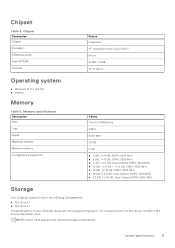
Chipset Table 4. NOTE: Vostro 5502 supports the following configurations: ● M.2 drive x1 ● M.2 drive x2 The primary drive of your computer varies with two M.2 drives, the SSD-1 M.2 drive is the primary drive. Memory specifications Description Slots Type Speed Maximum memory Minimum memory Configurations supported Values Two SO-DIMM slots DDR4 3200 MHz 32 GB 4 GB ● 4 GB, 1 x 4 GB, DDR4, 3200 MHz ● 8 GB, 1 x 8 GB, DDR4, 3200 MHz ● 8 GB, 2 x 4 GB...
Chipset Table 4. NOTE: Vostro 5502 supports the following configurations: ● M.2 drive x1 ● M.2 drive x2 The primary drive of your computer varies with two M.2 drives, the SSD-1 M.2 drive is the primary drive. Memory specifications Description Slots Type Speed Maximum memory Minimum memory Configurations supported Values Two SO-DIMM slots DDR4 3200 MHz 32 GB 4 GB ● 4 GB, 1 x 4 GB, DDR4, 3200 MHz ● 8 GB, 1 x 8 GB, DDR4, 3200 MHz ● 8 GB, 2 x 4 GB...
Setup and specifications guide
Page 23
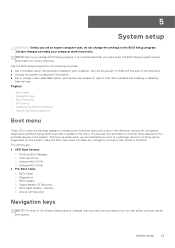
... boot menu with a list of hard drive installed, and enabling or disabling base devices. Diagnostics and BIOS Setup options are : ● UEFI Boot Devices: ○ Windows Boot Manager ○ UEFI Hard Drive ○ Onboard NIC (IPV4) ○ Onboard NIC (IPV6) ● Pre-Boot Tasks: ○ BIOS Setup ○ Diagnostics ○ BIOS Update ○ SupportAssist OS Recovery ○ BIOS Flash Update - Using the boot menu does not make your computer, such as the amount of RAM and the size of the hard drive. ● Change the system configuration...
... boot menu with a list of hard drive installed, and enabling or disabling base devices. Diagnostics and BIOS Setup options are : ● UEFI Boot Devices: ○ Windows Boot Manager ○ UEFI Hard Drive ○ Onboard NIC (IPV4) ○ Onboard NIC (IPV6) ● Pre-Boot Tasks: ○ BIOS Setup ○ Diagnostics ○ BIOS Update ○ SupportAssist OS Recovery ○ BIOS Flash Update - Using the boot menu does not make your computer, such as the amount of RAM and the size of the hard drive. ● Change the system configuration...

Setup and specifications guide
Page 24
..., displays the SupportAssist diagnostics screen. Keys Up arrow Down arrow Enter Spacebar Tab Esc Navigation Moves to access the System Setup screen. During the Power-on the tabletcomputerlaptop and its installed devices, the items listed in the field. BIOS setup NOTE: Depending on Self-Test (POST), when the Dell logo appears, you to a specific device (for example: optical drive or hard drive). Overview Table 26. The one -time boot menu by...
..., displays the SupportAssist diagnostics screen. Keys Up arrow Down arrow Enter Spacebar Tab Esc Navigation Moves to access the System Setup screen. During the Power-on the tabletcomputerlaptop and its installed devices, the items listed in the field. BIOS setup NOTE: Depending on Self-Test (POST), when the Dell logo appears, you to a specific device (for example: optical drive or hard drive). Overview Table 26. The one -time boot menu by...

Setup and specifications guide
Page 27
... controls whether hard drive errors for integrated drives are enabled. The options are : ● Brightness on board. By default, set to set the operating mode of the Self Monitoring Analysis and Reporting Technology (SMART) specification. EcoPower increases the battery life by reducing the display brightness when appropriate. Provides information about drive type and device. The options are : ● Disabled ● AHCI/NVMe ● RAID On-By default, the RAID On option is disabled. System setup 27 Integrated device options (continued) Option...
... controls whether hard drive errors for integrated drives are enabled. The options are : ● Brightness on board. By default, set to set the operating mode of the Self Monitoring Analysis and Reporting Technology (SMART) specification. EcoPower increases the battery life by reducing the display brightness when appropriate. Provides information about drive type and device. The options are : ● Disabled ● AHCI/NVMe ● RAID On-By default, the RAID On option is disabled. System setup 27 Integrated device options (continued) Option...
Setup and specifications guide
Page 29
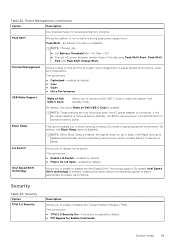
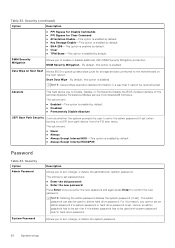
... of fans and the processor heat management to Sleep. NOTE: When Block Sleep is enabled. Enabling this option is connected. Thermal Management Allows cooling of the day using Peak Shift Start, Peak Shift End, and Peak Shift Charge Start. Lid Switch Allows you to block entering to sleep (S3) mode in operating system environment. Security Table 33. The options are only functional when the AC power adapter is disabled. By default, the option Wake on Dell USB...
... of fans and the processor heat management to Sleep. NOTE: When Block Sleep is enabled. Enabling this option is connected. Thermal Management Allows cooling of the day using Peak Shift Start, Peak Shift End, and Peak Shift Charge Start. Lid Switch Allows you to block entering to sleep (S3) mode in operating system environment. Security Table 33. The options are only functional when the AC power adapter is disabled. By default, the option Wake on Dell USB...
Setup and specifications guide
Page 30
...; Software. The admin password can also be used with system password and/or hard drive password. Security (continued) Option Description ● PPI Bypass for Disable Commands ● PPI Bypass for storage devices connected to the motherboard on Next Boot Allows BIOS to Enable, Disable, or Permanently Disable the BIOS module interface of the optional Absolute Persistence Module service from the F12 boot menu. Start Data Wipe - NOTE: Deleting the admin password deletes the system password (if set ) when booting...
...; Software. The admin password can also be used with system password and/or hard drive password. Security (continued) Option Description ● PPI Bypass for Disable Commands ● PPI Bypass for storage devices connected to the motherboard on Next Boot Allows BIOS to Enable, Disable, or Permanently Disable the BIOS module interface of the optional Absolute Persistence Module service from the F12 boot menu. Start Data Wipe - NOTE: Deleting the admin password deletes the system password (if set ) when booting...

Setup and specifications guide
Page 34
... to configure the speed of the following options: ● Prompt on Warnings and Errors-enabled by default. ● 5 seconds ● 10 seconds Mouse/Touchpad This option defines how the system handles mouse and touchpad input. Table 37. USB-C Warnings This option enables or disables dock warning messages. Enable Dock Warning Messages - Keyboard (continued) Option Description ● 10 seconds - Pre-boot behavior Option Description Adapter Warnings This option displays warning messages during boot when adapters...
... to configure the speed of the following options: ● Prompt on Warnings and Errors-enabled by default. ● 5 seconds ● 10 seconds Mouse/Touchpad This option defines how the system handles mouse and touchpad input. Table 37. USB-C Warnings This option enables or disables dock warning messages. Enable Dock Warning Messages - Keyboard (continued) Option Description ● 10 seconds - Pre-boot behavior Option Description Adapter Warnings This option displays warning messages during boot when adapters...
Setup and specifications guide
Page 36
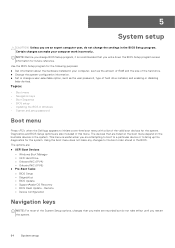
... Download File. This option is enabled by default. ● Clear Updating the BIOS in Windows It is recommended to save the file on your computer battery is available. This option is enabled by default. ● Clear Thermal Event Log Allows you replace the system board or if an update is fully charged and connected to reach the product page. 5. Click Save to update your BIOS (System Setup) when you to Enable or Disable...
... Download File. This option is enabled by default. ● Clear Updating the BIOS in Windows It is recommended to save the file on your computer battery is available. This option is enabled by default. ● Clear Thermal Event Log Allows you replace the system board or if an update is fully charged and connected to reach the product page. 5. Click Save to update your BIOS (System Setup) when you to Enable or Disable...

Setup and specifications guide
Page 37
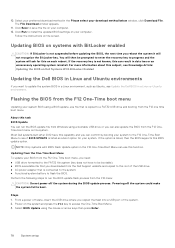
... USB drive where you copied the flash into a USB port of the USB drive. ● AC power adapter that is not known, this BIOS update option. NOTE: Only systems with BitLocker enabled CAUTION: If BitLocker is listed as Ubuntu, see if BIOS UPDATE is not suspended before updating the BIOS, the next time you need: ● USB drive formatted to a FAT32 USB drive and booting from the F12 one time boot menu. You will ask for your BIOS...
... USB drive where you copied the flash into a USB port of the USB drive. ● AC power adapter that is not known, this BIOS update option. NOTE: Only systems with BitLocker enabled CAUTION: If BitLocker is listed as Ubuntu, see if BIOS UPDATE is not suspended before updating the BIOS, the next time you need: ● USB drive formatted to a FAT32 USB drive and booting from the F12 one time boot menu. You will ask for your BIOS...

Service Manual
Page 3
... service kit ...8 After working inside your computer...9 Chapter 2: Major components of your system 10 Chapter 3: Disassembly and reassembly 12 Recommended tools...12 Screw list...12 Base cover...14 Removing the base cover...14 Installing the base cover...15 Battery...17 Lithium-ion battery precautions...17 Removing the 3-cell battery - SSD-2 28 Installing the M.2 2230 solid-state drive - SSD-2 29 Removing the thermal support bracket...30 Replacing the thermal support...
... service kit ...8 After working inside your computer...9 Chapter 2: Major components of your system 10 Chapter 3: Disassembly and reassembly 12 Recommended tools...12 Screw list...12 Base cover...14 Removing the base cover...14 Installing the base cover...15 Battery...17 Lithium-ion battery precautions...17 Removing the 3-cell battery - SSD-2 28 Installing the M.2 2230 solid-state drive - SSD-2 29 Removing the thermal support bracket...30 Replacing the thermal support...

Service Manual
Page 4
... keyboard assembly...60 Removing the palm-rest and keyboard assembly 60 Installing the palm-rest and keyboard assembly 61 Chapter 4: Software...63 Downloading Windows drivers...63 Chapter 5: System setup...64 Boot menu...64 Navigation keys...64 Boot Sequence...65 BIOS setup...65 Overview...65 Boot configuration...66 Integrated Devices...67 Storage...68 Display...68 Connection options...69 Power management...69 Security...70 Password...71 Update and Recovery...73 System management...73 Keyboard...74 Pre-boot behavior...75 4 Contents UMA...37 Installing...
... keyboard assembly...60 Removing the palm-rest and keyboard assembly 60 Installing the palm-rest and keyboard assembly 61 Chapter 4: Software...63 Downloading Windows drivers...63 Chapter 5: System setup...64 Boot menu...64 Navigation keys...64 Boot Sequence...65 BIOS setup...65 Overview...65 Boot configuration...66 Integrated Devices...67 Storage...68 Display...68 Connection options...69 Power management...69 Security...70 Password...71 Update and Recovery...73 System management...73 Keyboard...74 Pre-boot behavior...75 4 Contents UMA...37 Installing...

Service Manual
Page 32
... the BIOS setup program settings before working inside your computer. Disconnect the coin-cell battery cable from the I/O board. 2. Steps 1. Place the thermal support bracket using the alignment posts. 2. Follow the procedure in before removing the coin-cell battery. NOTE: Removing the coin-cell battery resets the BIOS setup program settings to tighten the thermal support bracket. 3. Replace the two screws (M1.6x2) to default. Next steps 1. Connect the battery. 3. Install the base cover...
... the BIOS setup program settings before working inside your computer. Disconnect the coin-cell battery cable from the I/O board. 2. Steps 1. Place the thermal support bracket using the alignment posts. 2. Follow the procedure in before removing the coin-cell battery. NOTE: Removing the coin-cell battery resets the BIOS setup program settings to tighten the thermal support bracket. 3. Replace the two screws (M1.6x2) to default. Next steps 1. Connect the battery. 3. Install the base cover...
Service Manual
Page 64
...; UEFI Boot Devices: ○ Windows Boot Manager ○ UEFI Hard Drive ○ Onboard NIC (IPV4) ○ Onboard NIC (IPV6) ● Pre-Boot Tasks: ○ BIOS Setup ○ Diagnostics ○ BIOS Update ○ SupportAssist OS Recovery ○ BIOS Flash Update - This menu is recommended that you write down the BIOS Setup program screen information for the system. Using the boot menu does not make any changes to the boot order stored in the BIOS Setup program. Remote ○ Device Configuration Navigation keys NOTE...
...; UEFI Boot Devices: ○ Windows Boot Manager ○ UEFI Hard Drive ○ Onboard NIC (IPV4) ○ Onboard NIC (IPV6) ● Pre-Boot Tasks: ○ BIOS Setup ○ Diagnostics ○ BIOS Update ○ SupportAssist OS Recovery ○ BIOS Flash Update - This menu is recommended that you write down the BIOS Setup program screen information for the system. Using the boot menu does not make any changes to the boot order stored in the BIOS Setup program. Remote ○ Device Configuration Navigation keys NOTE...

Service Manual
Page 65
...; Access System Setup by pressing F2 key ● Bring up the one -time boot menu displays the devices that prompts you can boot from including the diagnostic option. Boot Sequence Boot sequence enables you view the main screen. The boot sequence screen also displays the option to the next field. BIOS setup NOTE: Depending on Self-Test (POST), when the Dell logo appears, you to a specific device (for example: optical drive or hard drive). Overview Option...
...; Access System Setup by pressing F2 key ● Bring up the one -time boot menu displays the devices that prompts you can boot from including the diagnostic option. Boot Sequence Boot sequence enables you view the main screen. The boot sequence screen also displays the option to the next field. BIOS setup NOTE: Depending on Self-Test (POST), when the Dell logo appears, you to a specific device (for example: optical drive or hard drive). Overview Option...

Service Manual
Page 71
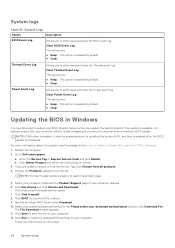
... storage devices connected to set ). Security Option Admin Password System Password Description Allows you to the motherboard on the next reboot. NOTE: Secure Wipe operation deletes information in a way that it cannot be used with system password and/or hard drive password. Start Data Wipe - The options are: ● Never ● Always ● Always Except Internal HDD-This option is enabled by default. ● Disabled ● Permanently Disable Absolute UEFI Boot Path Security Controls whether...
... storage devices connected to set ). Security Option Admin Password System Password Description Allows you to the motherboard on the next reboot. NOTE: Secure Wipe operation deletes information in a way that it cannot be used with system password and/or hard drive password. Start Data Wipe - The options are: ● Never ● Always ● Always Except Internal HDD-This option is enabled by default. ● Disabled ● Permanently Disable Absolute UEFI Boot Path Security Controls whether...

Service Manual
Page 75
... on battery power. Enable Dock Warning Messages - This feature is useful where the system is running on Warnings and Errors NOTE: Errors deemed critical to configure the speed of the system hardware always stop , prompt, and wait for user input. Select one of the following options: ● Serial Mouse ● PS/2 Mouse ● Touchpad and PS/2 Mouse-enabled by default ● Auto Extend BIOS POST Time This option allows...
... on battery power. Enable Dock Warning Messages - This feature is useful where the system is running on Warnings and Errors NOTE: Errors deemed critical to configure the speed of the system hardware always stop , prompt, and wait for user input. Select one of the following options: ● Serial Mouse ● PS/2 Mouse ● Touchpad and PS/2 Mouse-enabled by default ● Auto Extend BIOS POST Time This option allows...
Service Manual
Page 78
... run the BIOS update flash process from the F12 one time boot menu. If the recovery key is listed, then the BIOS supports this can use this on the system. Click Save to a FAT32 USB drive and booting from the F12 menu: CAUTION: Do not power off state, insert the USB drive where you need: ● USB drive formatted to run the BIOS update file from Windows using the mouse or arrow keys then press Enter. 78 System setup You...
... run the BIOS update flash process from the F12 one time boot menu. If the recovery key is listed, then the BIOS supports this can use this on the system. Click Save to a FAT32 USB drive and booting from the F12 menu: CAUTION: Do not power off state, insert the USB drive where you need: ● USB drive formatted to run the BIOS update file from Windows using the mouse or arrow keys then press Enter. 78 System setup You...

Service Manual
Page 85
...; Display panel built-in self-test (LCD-BIST) • Outcome • SupportAssist diagnostics • Running the SupportAssist diagnostics • System diagnostic lights • Recovering the operating system • Flashing the BIOS • Flashing BIOS (USB key) • Backup media and recovery options • WiFi power cycle • Releasing Ethernet (RJ-45) cable Built-in self-test diagnostics tool that is introduced through Preboot System Assessment (PSA) on a dead system . 2. Battery LED error code...
...; Display panel built-in self-test (LCD-BIST) • Outcome • SupportAssist diagnostics • Running the SupportAssist diagnostics • System diagnostic lights • Recovering the operating system • Flashing the BIOS • Flashing BIOS (USB key) • Backup media and recovery options • WiFi power cycle • Releasing Ethernet (RJ-45) cable Built-in self-test diagnostics tool that is introduced through Preboot System Assessment (PSA) on a dead system . 2. Battery LED error code...
Service Manual
Page 88
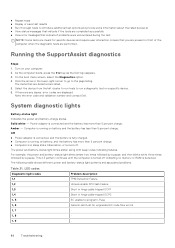
... boot menu screen, select the Diagnostics option. 4. Click the arrow in sleep state, hibernation, or turned off indicating no memory or RAM is running on battery and the battery has less than 5 percent charge. The items that indicate if problems were encountered during the test NOTE: Some tests are meant for ungraceful EC code flow errors 1, 7 - 1, 8 - 1, 9 - 88 Troubleshooting System diagnostic lights Battery-status light Indicates the power and battery-charge status. The power and battery-status light blinks...
... boot menu screen, select the Diagnostics option. 4. Click the arrow in sleep state, hibernation, or turned off indicating no memory or RAM is running on battery and the battery has less than 5 percent charge. The items that indicate if problems were encountered during the test NOTE: Some tests are meant for ungraceful EC code flow errors 1, 7 - 1, 8 - 1, 9 - 88 Troubleshooting System diagnostic lights Battery-status light Indicates the power and battery-charge status. The power and battery-status light blinks...
Service Manual
Page 90
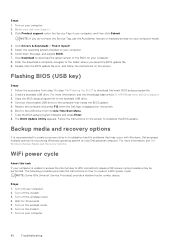
... manually browse for 30 seconds. 5. Type the BIOS setup program filename and press Enter. 8. Backup media and recovery options It is unable to access the internet due to complete the BIOS update. Dell proposes multiple options for your computer is recommended to create a recovery drive to troubleshoot and fix problems that needs the BIOS update. 5. Steps 1. Scroll down the page, and expand BIOS. 7. Steps 1. WiFi power cycle About this task If your computer. 8. Flashing BIOS (USB key) Steps 1. Connect the bootable USB drive to the USB drive...
... manually browse for 30 seconds. 5. Type the BIOS setup program filename and press Enter. 8. Backup media and recovery options It is unable to access the internet due to complete the BIOS update. Dell proposes multiple options for your computer is recommended to create a recovery drive to troubleshoot and fix problems that needs the BIOS update. 5. Steps 1. Scroll down the page, and expand BIOS. 7. Steps 1. WiFi power cycle About this task If your computer. 8. Flashing BIOS (USB key) Steps 1. Connect the bootable USB drive to the USB drive...


