Setup and Quick Reference Guide
Page 34
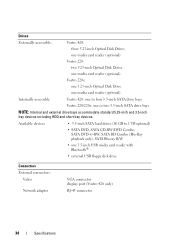
...or two 3.5-inch SATA drive bays NOTE: Internal and external drive bays accommodate standard 5.25-inch and 3.5-inch bay devices including HDD and short bay devices. Available devices • 3.5-inch SATA hard drives (80 GB to four 3.5-inch SATA drive bays Vostro 220/220s: one 3.5-inch USB ...media card reader with Bluetooth® • external USB floppy disk drive Connectors External connectors: Video Network adapter VGA connector display...
...or two 3.5-inch SATA drive bays NOTE: Internal and external drive bays accommodate standard 5.25-inch and 3.5-inch bay devices including HDD and short bay devices. Available devices • 3.5-inch SATA hard drives (80 GB to four 3.5-inch SATA drive bays Vostro 220/220s: one 3.5-inch USB ...media card reader with Bluetooth® • external USB floppy disk drive Connectors External connectors: Video Network adapter VGA connector display...

Setup and Quick Reference Guide
Page 36
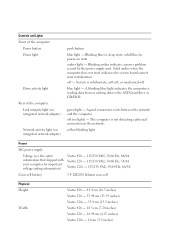
... activity light (on state amber light - off , or mechanicaloff Drive activity light blue light - A blinking blue light indicates the computer is not detecting a physical connection to the SATA hard drive or CD/DVD. The computer is reading data from or writing data to the network. Connectors ...(continued) Front panel audio HDA header Processor Memory Power 12V Power one 10-pin connector one 775-pin connector Vostro 420: four 240-pin connectors Vostro 220/220s: two...
... activity light (on state amber light - off , or mechanicaloff Drive activity light blue light - A blinking blue light indicates the computer is not detecting a physical connection to the SATA hard drive or CD/DVD. The computer is reading data from or writing data to the network. Connectors ...(continued) Front panel audio HDA header Processor Memory Power 12V Power one 10-pin connector one 775-pin connector Vostro 420: four 240-pin connectors Vostro 220/220s: two...
Setup and Features Information Tech Sheet
Page 7
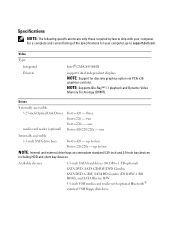
...Video Memory Technology (DVMT). Available devices 3.5-inch SATA hard drives (80 GB to four Vostro 220/220s - Drives Externally accessible: 5.25-inch Optical Disk Drives media card reader (optional) Vostro 420 - one Internally accessible: 3.5-inch SATA drive bays Vostro 420 - one Vostro 420/220/220s - up to 1 TB optional) SATA DVD, ...SATA CD-RW/DVD Combo, SATA DVD+/-RW, SATA BD Combo (DVD RW+ BD ROM), and SATA Blu-ray R/W 3.5-inch USB media card reader with your computer, go to support.dell...
...Video Memory Technology (DVMT). Available devices 3.5-inch SATA hard drives (80 GB to four Vostro 220/220s - Drives Externally accessible: 5.25-inch Optical Disk Drives media card reader (optional) Vostro 420 - one Internally accessible: 3.5-inch SATA drive bays Vostro 420 - one Vostro 420/220/220s - up to 1 TB optional) SATA DVD, ...SATA CD-RW/DVD Combo, SATA DVD+/-RW, SATA BD Combo (DVD RW+ BD ROM), and SATA Blu-ray R/W 3.5-inch USB media card reader with your computer, go to support.dell...
Setup and Features Information Tech Sheet
Page 8
... hard drive or CD/DVD. The computer is in sleep state; Blinking blue in hibernate, soft-off, or mechanical-off blue light - A blinking blue light indicates the computer is reading data from or writing data to the network. solid blue for important voltage setting information) Vostro 420 - 115/230 VAC, 50/60 Hz, 8A/4A Vostro 220...
... hard drive or CD/DVD. The computer is in sleep state; Blinking blue in hibernate, soft-off, or mechanical-off blue light - A blinking blue light indicates the computer is reading data from or writing data to the network. solid blue for important voltage setting information) Vostro 420 - 115/230 VAC, 50/60 Hz, 8A/4A Vostro 220...
Service Manual
Page 5
... Express Card 60 Configuring Your Computer After Removing or Installing a PCI or PCI Express Card 63 7 Drives 65 Hard Drives 65 Removing a Hard Drive 65 Replacing or Adding a Hard Drive 69 Media Card Reader 73 ...Removing a Media Card Reader 73 Replacing or Adding a Media Card Reader . . . . 77 Optical Drive 80 Removing an Optical Drive 80 Replacing or Adding an Optical Drive 82 Removing a Drive Bay Break-Away Metal Plate . . . . 85 Vostro 420 and Vostro 220 85 Vostro 220s...
... Express Card 60 Configuring Your Computer After Removing or Installing a PCI or PCI Express Card 63 7 Drives 65 Hard Drives 65 Removing a Hard Drive 65 Replacing or Adding a Hard Drive 69 Media Card Reader 73 ...Removing a Media Card Reader 73 Replacing or Adding a Media Card Reader . . . . 77 Optical Drive 80 Removing an Optical Drive 80 Replacing or Adding an Optical Drive 82 Removing a Drive Bay Break-Away Metal Plate . . . . 85 Vostro 420 and Vostro 220 85 Vostro 220s...
Service Manual
Page 38
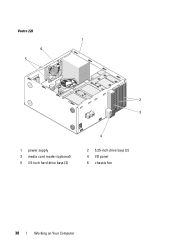
Vostro 220 1 6 5 2 3 1 power supply 3 media card reader (optional) 5 3.5-inch hard drive bays (2) 4 2 5.25-inch drive bays (2) 4 I/O panel 6 chassis fan 38 Working on Your Computer
Vostro 220 1 6 5 2 3 1 power supply 3 media card reader (optional) 5 3.5-inch hard drive bays (2) 4 2 5.25-inch drive bays (2) 4 I/O panel 6 chassis fan 38 Working on Your Computer
Service Manual
Page 39
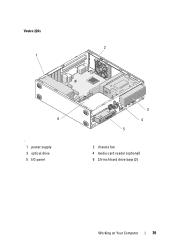
Vostro 220s 2 1 6 ' 1 power supply 3 optical drive 5 I/O panel 3 4 5 2 chassis fan 4 media card reader (optional) 6 3.5-inch hard drive bays (2) Working on Your Computer 39
Vostro 220s 2 1 6 ' 1 power supply 3 optical drive 5 I/O panel 3 4 5 2 chassis fan 4 media card reader (optional) 6 3.5-inch hard drive bays (2) Working on Your Computer 39
Service Manual
Page 65
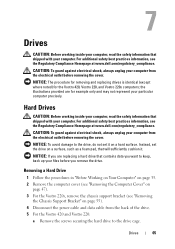
..., that shipped with your computer. the illustrations provided are replacing a hard drive that shipped with your computer. Instead, set it . Hard Drives CAUTION: Before working inside your computer, read the safety information that will sufficiently cushion it on page 47). 3 For the Vostro 220s, remove the chassis support bracket (see the Regulatory Compliance Homepage at www.dell.com/regulatory_compliance. NOTICE...
..., that shipped with your computer. the illustrations provided are replacing a hard drive that shipped with your computer. Instead, set it . Hard Drives CAUTION: Before working inside your computer, read the safety information that will sufficiently cushion it on page 47). 3 For the Vostro 220s, remove the chassis support bracket (see the Regulatory Compliance Homepage at www.dell.com/regulatory_compliance. NOTICE...
Service Manual
Page 67
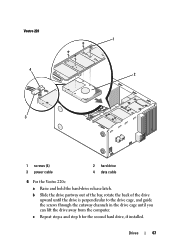
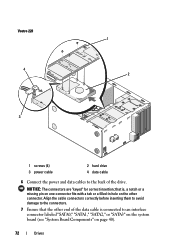
b Slide the drive partway out of the bay, rotate the back of the drive upward until the drive is perpendicular to the drive cage, and guide the screws through the cutaway channels in the drive cage until you can lift the drive away from the computer. Vostro 220 4 3 1 2 1 screws (4) 3 power cable 2 hard drive 4 data cable 6 For the Vostro 220s: a Raise and hold the hard-drive release latch. c Repeat step a and step b for the second hard drive, if installed. Drives 67
b Slide the drive partway out of the bay, rotate the back of the drive upward until the drive is perpendicular to the drive cage, and guide the screws through the cutaway channels in the drive cage until you can lift the drive away from the computer. Vostro 220 4 3 1 2 1 screws (4) 3 power cable 2 hard drive 4 data cable 6 For the Vostro 220s: a Raise and hold the hard-drive release latch. c Repeat step a and step b for the second hard drive, if installed. Drives 67
Service Manual
Page 68
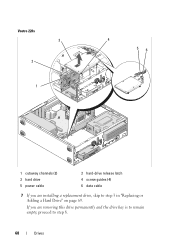
If you are removing this drive permanently and the drive bay is to remain empty, proceed to step 3 in "Replacing or Adding a Hard Drive" on page 69. Vostro 220s 3 2 1 4 56 1 cutaway channels (2) 3 hard drive 5 power cable 2 hard-drive release latch 4 screw guides (4) 6 data cable 7 If you are installing a replacement drive, skip to step 8. 68 Drives
If you are removing this drive permanently and the drive bay is to remain empty, proceed to step 3 in "Replacing or Adding a Hard Drive" on page 69. Vostro 220s 3 2 1 4 56 1 cutaway channels (2) 3 hard drive 5 power cable 2 hard-drive release latch 4 screw guides (4) 6 data cable 7 If you are installing a replacement drive, skip to step 8. 68 Drives
Service Manual
Page 69
.... Replacing or Adding a Hard Drive 1 Follow the procedures in the system setup program: a Enter the system setup program (see "Removing the Computer Cover" on page 129 for the second hard drive, if installed. b In the Drives section of the drive upward until you restart your computer. 4 For the Vostro 220s: a Raise and hold the hard-drive release latch. Drives 69 c Repeat step a and...
.... Replacing or Adding a Hard Drive 1 Follow the procedures in the system setup program: a Enter the system setup program (see "Removing the Computer Cover" on page 129 for the second hard drive, if installed. b In the Drives section of the drive upward until you restart your computer. 4 For the Vostro 220s: a Raise and hold the hard-drive release latch. Drives 69 c Repeat step a and...
Service Manual
Page 70
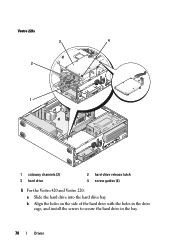
Vostro 220s 3 4 2 1 1 cutaway channels (2) 3 hard drive 2 hard-drive release latch 4 screw guides (4) 5 For the Vostro 420 and Vostro 220: a Slide the hard drive into the hard drive bay. b Align the holes on the side of the hard drive with the holes in the drive cage, and install the screws to secure the hard drive in the bay. 70 Drives
Vostro 220s 3 4 2 1 1 cutaway channels (2) 3 hard drive 2 hard-drive release latch 4 screw guides (4) 5 For the Vostro 420 and Vostro 220: a Slide the hard drive into the hard drive bay. b Align the holes on the side of the hard drive with the holes in the drive cage, and install the screws to secure the hard drive in the bay. 70 Drives
Service Manual
Page 72
... connector labeled "SATA0," "SATA1," "SATA2," or "SATA3" on the system board (see "System Board Components" on the other end of the drive. that the other connector. Vostro 220 4 3 1 2 1 screws (4) 3 power cable 2 hard drive 4 data cable 6 Connect the power and data cables to the back of the data cable is connected to the connectors. 7 Ensure that...
... connector labeled "SATA0," "SATA1," "SATA2," or "SATA3" on the system board (see "System Board Components" on the other end of the drive. that the other connector. Vostro 220 4 3 1 2 1 screws (4) 3 power cable 2 hard drive 4 data cable 6 Connect the power and data cables to the back of the data cable is connected to the connectors. 7 Ensure that...
Service Manual
Page 89
... additional safety best practices information, see "Removing a Hard Drive" on page 65). 6 Disengage the cables from the electrical outlet before removing the cover. b Remove any hard drives from the hard drive cage (see the Regulatory Compliance Homepage at www.dell.com/regulatory_compliance. the illustrations provided are for the Vostro 420, Vostro 220, and Vostro 220s computers; I /O panel to the cable connectors and the...
... additional safety best practices information, see "Removing a Hard Drive" on page 65). 6 Disengage the cables from the electrical outlet before removing the cover. b Remove any hard drives from the hard drive cage (see the Regulatory Compliance Homepage at www.dell.com/regulatory_compliance. the illustrations provided are for the Vostro 420, Vostro 220, and Vostro 220s computers; I /O panel to the cable connectors and the...
Service Manual
Page 92
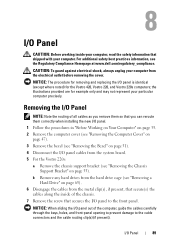
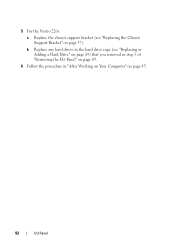
b Replace any hard drives in the hard drive cage (see "Replacing the Chassis Support Bracket" on page 45. 92 I/O Panel 5 For the Vostro 220s: a Replace the chassis support bracket (see "Replacing or Adding a Hard Drive" on page 69) that you removed in step 5 of "Removing the I/O Panel" on page 89. 6 Follow the procedure in "After Working on Your Computer" on page 57).
b Replace any hard drives in the hard drive cage (see "Replacing the Chassis Support Bracket" on page 45. 92 I/O Panel 5 For the Vostro 220s: a Replace the chassis support bracket (see "Replacing or Adding a Hard Drive" on page 69) that you removed in step 5 of "Removing the I/O Panel" on page 89. 6 Follow the procedure in "After Working on Your Computer" on page 57).

Service Manual
Page 119
...other unexpected injuries, always unplug your computer from the system board. 8 If the system board is being replaced with your particular computer precisely. CAUTION: To guard against likelihood of static electricity. 5 Disconnect all the CD/DVD/hard drive data cables from the system board...procedure for removing and replacing the system board is for the Vostro 420, Vostro 220, and Vostro 220s computers; the illustration provided is identical (except where noted) for example only and may not represent your computer. Remove the System Board 1 Follow the procedures in separate ...
...other unexpected injuries, always unplug your computer from the system board. 8 If the system board is being replaced with your particular computer precisely. CAUTION: To guard against likelihood of static electricity. 5 Disconnect all the CD/DVD/hard drive data cables from the system board...procedure for removing and replacing the system board is for the Vostro 420, Vostro 220, and Vostro 220s computers; the illustration provided is identical (except where noted) for example only and may not represent your computer. Remove the System Board 1 Follow the procedures in separate ...


