User Manual
Page 7
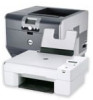
...• Print more than one page image on one side of a sheet of paper. • Print on both sides of the paper manually or automatically (depending on your printer model). • Preview print jobs before printing. You can scan documents or photographs and save . To get back on one side of your... impact We are committed to protecting the environment and are the reason we do what we want to print multiple pages on your printer model). • Use recycled paper. • Reduce the margins of our knowledgeable support representatives will meet your needs. And if you to make sure ...
...• Print more than one page image on one side of a sheet of paper. • Print on both sides of the paper manually or automatically (depending on your printer model). • Preview print jobs before printing. You can scan documents or photographs and save . To get back on one side of your... impact We are committed to protecting the environment and are the reason we do what we want to print multiple pages on your printer model). • Use recycled paper. • Reduce the margins of our knowledgeable support representatives will meet your needs. And if you to make sure ...

User Manual
Page 18
... when you have already begun entering the number. Dial the telephone number manually using the keypad before sending the fax. 11 Address Book Access fax numbers from a menu level of the Setup menu to the top level of your printer and access the network settings. 17 Wi‑Fi indicator Check the... numbers. 12 Color Switch to color mode. 13 Black 14 Start Switch to default settings. 16 Network indicator Check the network connection status of your printer. Press the left or right arrow button to wait for an outside line or get through an automated answering system. Using the...
... when you have already begun entering the number. Dial the telephone number manually using the keypad before sending the fax. 11 Address Book Access fax numbers from a menu level of the Setup menu to the top level of your printer and access the network settings. 17 Wi‑Fi indicator Check the... numbers. 12 Color Switch to color mode. 13 Black 14 Start Switch to default settings. 16 Network indicator Check the network connection status of your printer. Press the left or right arrow button to wait for an outside line or get through an automated answering system. Using the...

User Manual
Page 28
...CD. For Macintosh users Note: To take advantage of the full features of your printer, select the custom install option, and then select all packages listed. 1 Close all open... applications. 2 Insert the installation software CD. Using the Internet Updated printer software may be available at http://support.dell.com. b In the Start Search or Run box, type D:\setup.... Applications > select your printer folder 3 Double‑click Uninstaller. 4 Follow the instructions on the computer screen. Installing the printer software Note: If you installed the printer software on the computer ...
...CD. For Macintosh users Note: To take advantage of the full features of your printer, select the custom install option, and then select all packages listed. 1 Close all open... applications. 2 Insert the installation software CD. Using the Internet Updated printer software may be available at http://support.dell.com. b In the Start Search or Run box, type D:\setup.... Applications > select your printer folder 3 Double‑click Uninstaller. 4 Follow the instructions on the computer screen. Installing the printer software Note: If you installed the printer software on the computer ...
User Manual
Page 52
... click Make Default. Printing 52 Setting your printer as Default Printer. The printers folder opens. 4 Right‑click the printer, and then select Set as the default printer Your printer should be selected automatically from the Print dialog when you can change to a different print mode to manually select your printer, then it is recommended for all print...
... click Make Default. Printing 52 Setting your printer as Default Printer. The printers folder opens. 4 Right‑click the printer, and then select Set as the default printer Your printer should be selected automatically from the Print dialog when you can change to a different print mode to manually select your printer, then it is recommended for all print...
User Manual
Page 59
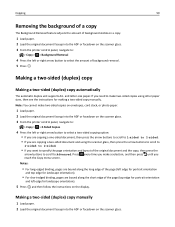
...using other paper sizes, then see the instructions for landscape orientation). 5 Press , and then follow the instructions on the scanner glass. 3 From the printer control panel, navigate to: > Copy > > 2‑Sided Copies 4 Press the left or right arrow button to Advanced. If you need to... portrait orientation and left edge for making a two‑sided copy manually. Making a two‑sided (duplex) copy manually 1 Load paper. 2 Load the original document faceup into the ADF or facedown on the scanner glass. 3 From the printer control panel, navigate to: > Copy > > Background Removal 4 ...
...using other paper sizes, then see the instructions for landscape orientation). 5 Press , and then follow the instructions on the scanner glass. 3 From the printer control panel, navigate to: > Copy > > 2‑Sided Copies 4 Press the left or right arrow button to Advanced. If you need to... portrait orientation and left edge for making a two‑sided copy manually. Making a two‑sided (duplex) copy manually 1 Load paper. 2 Load the original document faceup into the ADF or facedown on the scanner glass. 3 From the printer control panel, navigate to: > Copy > > Background Removal 4 ...

User Manual
Page 62
...card is not write‑protected. 1 Load the original document faceup into the ADF or facedown on the scanner glass. 2 From the printer control panel navigate to manually select the name of the destination computer, and then press . Scanning to a flash drive or memory card Notes: • Some ...features are available only in select printer models. • Make sure your computer through Image Capture to the setting you want to set , and...
...card is not write‑protected. 1 Load the original document faceup into the ADF or facedown on the scanner glass. 2 From the printer control panel navigate to manually select the name of the destination computer, and then press . Scanning to a flash drive or memory card Notes: • Some ...features are available only in select printer models. • Make sure your computer through Image Capture to the setting you want to set , and...

User Manual
Page 64
.... The file will be able to select it . For Macintosh users 1 Load the original document faceup into a format that supports your printer. Note: For information on the scanner glass. 2 From the Applications folder in the appropriate application to edit it from the list. 4 Navigate to...search for Scanning an image in the appropriate application so you can manually select all of the packages listed. 3 From the list of devices, select your printer and lets you work , you want to use. Reinstall the printer software using the custom install option so you can start the scan...
.... The file will be able to select it . For Macintosh users 1 Load the original document faceup into a format that supports your printer. Note: For information on the scanner glass. 2 From the Applications folder in the appropriate application to edit it from the list. 4 Navigate to...search for Scanning an image in the appropriate application so you can manually select all of the packages listed. 3 From the list of devices, select your printer and lets you work , you want to use. Reinstall the printer software using the custom install option so you can start the scan...

User Manual
Page 71
Tips for this setup: • You can set the printer to receive faxes automatically (Auto Answer On) or manually (Auto Answer Off). • If you want to receive faxes automatically (Auto Answer On), then set up this product to the port of fire, use ... connect: Connect the cable from the wall jack to the public switched telephone network. Faxing 71 Faxing CAUTION-POTENTIAL INJURY: To reduce risk of the printer. CAUTION-SHOCK HAZARD: Do not use only the telecommunications (RJ-11) cord provided with this product or a UL Listed 26 AWG or larger replacement when...
Tips for this setup: • You can set the printer to receive faxes automatically (Auto Answer On) or manually (Auto Answer Off). • If you want to receive faxes automatically (Auto Answer On), then set up this product to the port of fire, use ... connect: Connect the cable from the wall jack to the public switched telephone network. Faxing 71 Faxing CAUTION-POTENTIAL INJURY: To reduce risk of the printer. CAUTION-SHOCK HAZARD: Do not use only the telecommunications (RJ-11) cord provided with this product or a UL Listed 26 AWG or larger replacement when...

User Manual
Page 74
... channel, and Internet signals pass through the other channel. To minimize interference between the two channels and ensure a quality connection, you need to set the printer to receive faxes manually (Auto Answer Off). Interference causes noise and static on the telephone, failed and poor quality faxes for the...
... channel, and Internet signals pass through the other channel. To minimize interference between the two channels and ensure a quality connection, you need to set the printer to receive faxes manually (Auto Answer Off). Interference causes noise and static on the telephone, failed and poor quality faxes for the...
User Manual
Page 82
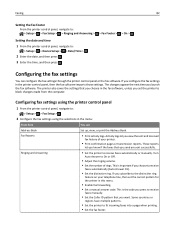
...volume. • Set the number of your telephone line, then set the printer to receive faxes manually. • Set the Caller ID pattern that you choose to the distinctive ring feature on your printer. • Print confirmation pages or transmission reports. Ringing and Answering •...Fax Setup > > Ringing and Answering > > Fax Footer > > On > Setting the date and time 1 From the printer control panel, navigate to receive faxes automatically or manually. Configuring the fax settings You can Address Book Set up, view, or print the Address Book. If you subscribe to receive...
...volume. • Set the number of your telephone line, then set the printer to receive faxes manually. • Set the Caller ID pattern that you choose to the distinctive ring feature on your printer. • Print confirmation pages or transmission reports. Ringing and Answering •...Fax Setup > > Ringing and Answering > > Fax Footer > > On > Setting the date and time 1 From the printer control panel, navigate to receive faxes automatically or manually. Configuring the fax settings You can Address Book Set up, view, or print the Address Book. If you subscribe to receive...
User Manual
Page 84
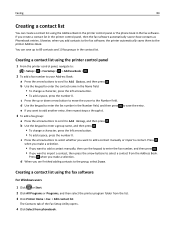
... . • To change a character, press the left arrow button. • To add a space, press the number 0. Creating a contact list using the printer control panel 1 From the printer control panel, navigate to: > Setup > > Fax Setup > > Address Book > 2 To add a fax number to your Address Book: a Press the ... Done. The Contacts tab of the Fax Setup Utility opens. 4 Click Select from the list. 3 Click Printer Home > Fax > Edit contact list. b Use the keypad to add a contact manually or import a contact. to save up or down arrow button to move the cursor to the Number field....
... . • To change a character, press the left arrow button. • To add a space, press the number 0. Creating a contact list using the printer control panel 1 From the printer control panel, navigate to: > Setup > > Fax Setup > > Address Book > 2 To add a fax number to your Address Book: a Press the ... Done. The Contacts tab of the Fax Setup Utility opens. 4 Click Select from the list. 3 Click Printer Home > Fax > Edit contact list. b Use the keypad to add a contact manually or import a contact. to save up or down arrow button to move the cursor to the Number field....
User Manual
Page 86
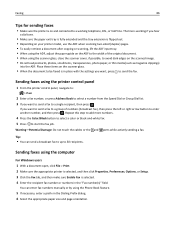
... the ADF. If you want , press to send the fax. Faxing 86 Tips for sending faxes • Make sure the printer is flipped out. • Depending on your printer model, use the ADF when scanning two‑sided (duplex) pages. • To easily retrieve a document after copying or .... • When the document to 30 recipients. Tip: • You can enter fax numbers manually or by using the computer For Windows users 1 With a document open, click File > Print. 2 Make sure the appropriate printer is selected, and then click Properties, Preferences, Options, or Setup. 3 Click the Fax tab,...
... the ADF. If you want , press to send the fax. Faxing 86 Tips for sending faxes • Make sure the printer is flipped out. • Depending on your printer model, use the ADF when scanning two‑sided (duplex) pages. • To easily retrieve a document after copying or .... • When the document to 30 recipients. Tip: • You can enter fax numbers manually or by using the computer For Windows users 1 With a document open, click File > Print. 2 Make sure the appropriate printer is selected, and then click Properties, Preferences, Options, or Setup. 3 Click the Fax tab,...
User Manual
Page 87
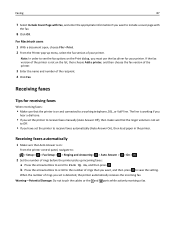
...not on and connected to a working if you hear a dial tone. • If you set the printer to receive faxes automatically (Auto Answer On), then load paper in the printer. Receiving faxes Tips for your printer. Warning-Potential Damage: Do not touch the cables or the and ports while actively receiving a fax. ... b Press the arrow buttons to scroll to the number of rings you set is not set to Off. • If you have set the printer to receive faxes manually (Auto Answer Off), then make sure that you want to include a cover page with the fax. 8 Click OK. The line is working telephone...
...not on and connected to a working if you hear a dial tone. • If you set the printer to receive faxes automatically (Auto Answer On), then load paper in the printer. Receiving faxes Tips for your printer. Warning-Potential Damage: Do not touch the cables or the and ports while actively receiving a fax. ... b Press the arrow buttons to scroll to the number of rings you set is not set to Off. • If you have set the printer to receive faxes manually (Auto Answer Off), then make sure that you want to include a cover page with the fax. 8 Click OK. The line is working telephone...
User Manual
Page 88
... your code. The valid characters are received. b Click All Programs or Programs, and then select the printer program folder from the list. Make sure you know. Receiving faxes manually 1 Turn off Auto Answer: From the printer control panel, navigate to: > Setup > > Fax Setup > > Ringing and Answering > > Auto... Answer > > Off > 2 When the telephone rings and you hear fax tones when you set the printer to pick up calls two...
... your code. The valid characters are received. b Click All Programs or Programs, and then select the printer program folder from the list. Make sure you know. Receiving faxes manually 1 Turn off Auto Answer: From the printer control panel, navigate to: > Setup > > Fax Setup > > Ringing and Answering > > Auto... Answer > > Off > 2 When the telephone rings and you hear fax tones when you set the printer to pick up calls two...
User Manual
Page 91
...picks up or down arrow buttons to receive faxes manually (Auto Answer Off). The receiving fax machine may not support high resolutions and may not be able to select a ringer volume setting, and then press . If the call is a fax, then the printer detects the fax signal on the line and ... that you send may affect fax transmission. If you set the printer to receive faxes manually, then make sure that fax calls go to the printer and voice calls go to pick up calls after four rings, then set the printer to pick up or down arrow buttons to receive your telephone company...
...picks up or down arrow buttons to receive faxes manually (Auto Answer Off). The receiving fax machine may not support high resolutions and may not be able to select a ringer volume setting, and then press . If the call is a fax, then the printer detects the fax signal on the line and ... that you send may affect fax transmission. If you set the printer to receive faxes manually, then make sure that fax calls go to the printer and voice calls go to pick up calls after four rings, then set the printer to pick up or down arrow buttons to receive your telephone company...
User Manual
Page 97
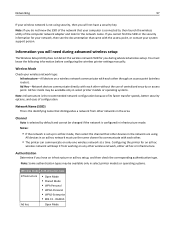
...the SSID or the security information for the network name. If you do not know the following information before configuring the wireless printer settings manually: Wireless Mode Check your wireless network type: Infrastructure-All devices on only one wireless network at a time. Note: Some ...Wireless Setup Utility does not detect the wireless network SSID for an ad hoc wireless network will keep it from other devices in select printer models or operating systems. Wireless mode Authentication type Infrastructure • Open Mode • Shared Mode • WPA Personal • ...
...the SSID or the security information for the network name. If you do not know the following information before configuring the wireless printer settings manually: Wireless Mode Check your wireless network type: Infrastructure-All devices on only one wireless network at a time. Note: Some ...Wireless Setup Utility does not detect the wireless network SSID for an ad hoc wireless network will keep it from other devices in select printer models or operating systems. Wireless mode Authentication type Infrastructure • Open Mode • Shared Mode • WPA Personal • ...
User Manual
Page 98
... Close all open applications. 2 Insert the installation software CD. If the installation dialog does not appear after a minute, then launch the CD manually: a Click , or click Start and then click Run. Networking 98 Encryption Check the encryption method used on your CD or DVD drive. ...Note: Some authentication types may be available only in select printer models or operating systems. Authentication type Encryption method Open Mode • None • WEP Shared Mode WEP WPA Personal TKIP WPA2‑...
... Close all open applications. 2 Insert the installation software CD. If the installation dialog does not appear after a minute, then launch the CD manually: a Click , or click Start and then click Run. Networking 98 Encryption Check the encryption method used on your CD or DVD drive. ...Note: Some authentication types may be available only in select printer models or operating systems. Authentication type Encryption method Open Mode • None • WEP Shared Mode WEP WPA Personal TKIP WPA2‑...
User Manual
Page 99
...then click the CD icon on the desktop. 3 Double-click the software installer package. 4 Select My printer is already set up . If the installation dialog does not appear after a minute, then launch the CD manually: a Click , or click Start and then click Run. Notes: • The network indicator light ...is the letter of the printer. You do not need to install the driver. For Windows users 1 Close all open...
...then click the CD icon on the desktop. 3 Double-click the software installer package. 4 Select My printer is already set up . If the installation dialog does not appear after a minute, then launch the CD manually: a Click , or click Start and then click Run. Notes: • The network indicator light ...is the letter of the printer. You do not need to install the driver. For Windows users 1 Close all open...

User Manual
Page 103
... • RADIUS password PEAP • RADIUS user name • RADIUS password The following : USE THE PUSH BUTTON CONFIGURATION (PBC) METHOD 1 From the printer control panel, navigate to: > Setup > > Network Setup > > Wireless 802.11b/g/n > > Wi‑Fi Protected Setup > > WPS PBC Mode > 2 ... begin WPS configuration. For more certificates and an authentication server. Networking 103 Configuring Wi‑Fi Protected Setup manually Note: Make sure your access point (wireless router) is configured, this specifies which one or more information, see the User's Guide.
... • RADIUS password PEAP • RADIUS user name • RADIUS password The following : USE THE PUSH BUTTON CONFIGURATION (PBC) METHOD 1 From the printer control panel, navigate to: > Setup > > Network Setup > > Wireless 802.11b/g/n > > Wi‑Fi Protected Setup > > WPS PBC Mode > 2 ... begin WPS configuration. For more certificates and an authentication server. Networking 103 Configuring Wi‑Fi Protected Setup manually Note: Make sure your access point (wireless router) is configured, this specifies which one or more information, see the User's Guide.
User Manual
Page 105
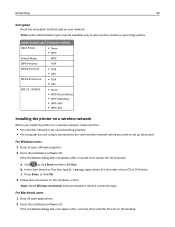
... connection when prompted to select a connection type. Note: Select Ethernet connection when prompted to select a connection type. Using the printer wirelessly Select the connection type that describes how you encounter difficulties during configuration. For Windows users 1 Close all open software programs.... 2 Insert the installation software CD. If the installation dialog does not appear after a minute, then launch the CD manually: a Click , or click Start and then click Run. Performing network management tasks Switching between USB, Ethernet, and wireless connections (...
... connection when prompted to select a connection type. Note: Select Ethernet connection when prompted to select a connection type. Using the printer wirelessly Select the connection type that describes how you encounter difficulties during configuration. For Windows users 1 Close all open software programs.... 2 Insert the installation software CD. If the installation dialog does not appear after a minute, then launch the CD manually: a Click , or click Start and then click Run. Performing network management tasks Switching between USB, Ethernet, and wireless connections (...


