
User's Guide
Page 4
Printing 33 Tips for printing...33 Printing basic documents...33 Printing specialty documents...37 Working with photos...40 Printing from a Bluetooth-enabled device...45 Printing on both sides of the paper (duplexing)...48 Managing print jobs...50 Copying 54 Tips for copying...54 Making copies...54 Copying photos...54 Enlarging or reducing images...55 Adjusting copy quality...55...
Printing 33 Tips for printing...33 Printing basic documents...33 Printing specialty documents...37 Working with photos...40 Printing from a Bluetooth-enabled device...45 Printing on both sides of the paper (duplexing)...48 Managing print jobs...50 Copying 54 Tips for copying...54 Making copies...54 Copying photos...54 Enlarging or reducing images...55 Adjusting copy quality...55...
User's Guide
Page 5
... Using the Service Center to solve printer problems 116 If Troubleshooting does not solve your problem 116 Setup troubleshooting...116 Jams and misfeeds troubleshooting...123 Print troubleshooting...125 Copy and scan troubleshooting...127 Fax troubleshooting...129 Memory card troubleshooting...135 Wireless troubleshooting...137 Notices 155 Product information...155 Edition notice...155...
... Using the Service Center to solve printer problems 116 If Troubleshooting does not solve your problem 116 Setup troubleshooting...116 Jams and misfeeds troubleshooting...123 Print troubleshooting...125 Copy and scan troubleshooting...127 Fax troubleshooting...129 Memory card troubleshooting...135 Wireless troubleshooting...137 Notices 155 Product information...155 Edition notice...155...
User's Guide
Page 8
... set amount of the paper. On selected printer models, this printer! Duplexing lets you print on your printer model). • Preview print jobs before printing. To avoid printing multiple copies, you can print up to make sure it better. If you do encounter any problems along the way, ... using your printer's environmental impact even further. By selecting certain printer settings or tasks, you are continually improving our printers to automatically print on both sides of the paper (duplex) for 10 minutes. • Select the lowest Power Saver timeout. This feature sets the...
... set amount of the paper. On selected printer models, this printer! Duplexing lets you print on your printer model). • Preview print jobs before printing. To avoid printing multiple copies, you can print up to make sure it better. If you do encounter any problems along the way, ... using your printer's environmental impact even further. By selecting certain printer settings or tasks, you are continually improving our printers to automatically print on both sides of the paper (duplex) for 10 minutes. • Select the lowest Power Saver timeout. This feature sets the...
User's Guide
Page 9
...configuring the printer on a network, depending on the installation software CD. Conserving ink • Use Quick Print or Draft Mode. Recycling • Recycle the product packaging. • Recycle your prints. Initial setup instructions: • Connecting the printer • Installing the printer software Find it away. ...the "Clean Printhead" and "Deep Clean Printhead" features. For updates, check our Web site at support.dell.com. These modes can be used to print more pages with the printer. Before replacing and recycling your ink cartridges, try using less ink than normal ...
...configuring the printer on a network, depending on the installation software CD. Conserving ink • Use Quick Print or Draft Mode. Recycling • Recycle the product packaging. • Recycle your prints. Initial setup instructions: • Connecting the printer • Installing the printer software Find it away. ...the "Clean Printhead" and "Deep Clean Printhead" features. For updates, check our Web site at support.dell.com. These modes can be used to print more pages with the printer. Before replacing and recycling your ink cartridges, try using less ink than normal ...

User's Guide
Page 16
... scan menu and scan documents. Press and hold for three seconds to turn off . • Switch to Power Saver mode. Access the photo menu and print photos. Access the fax menu and send faxes. Using the printer control panel buttons and menus 16 Access the copy menu and make copies. Note...
... scan menu and scan documents. Press and hold for three seconds to turn off . • Switch to Power Saver mode. Access the photo menu and print photos. Access the fax menu and send faxes. Using the printer control panel buttons and menus 16 Access the copy menu and make copies. Note...
User's Guide
Page 18
... Clear current settings or error messages, and return to default settings. 7 Keypad In Copy mode or Photo mode: enter the number of copies or prints you want to make. Use the: To 3 Dialtone Dial the telephone number manually using the keypad before sending the fax. 4 Color/Black Switch to... color mode or black-and-white mode. 5 Start button Start a print, scan, fax, or copy job, depending on the display. In Fax mode: • Enter fax numbers. • Navigate an automated answering system. &#...
... Clear current settings or error messages, and return to default settings. 7 Keypad In Copy mode or Photo mode: enter the number of copies or prints you want to make. Use the: To 3 Dialtone Dial the telephone number manually using the keypad before sending the fax. 4 Color/Black Switch to... color mode or black-and-white mode. 5 Start button Start a print, scan, fax, or copy job, depending on the display. In Fax mode: • Enter fax numbers. • Navigate an automated answering system. &#...
User's Guide
Page 23
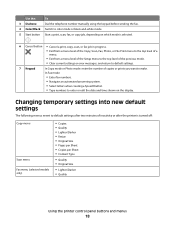
...as Wireless Setup Utility) • Set up the wireless printer on your printer model. Dell Fax Solutions (referred to as Fast Pics) Manage, edit, transfer, and print photos and documents. Using the printer software 23 Abbyy Sprint OCR Scan a document and produce...the printer. • Order supplies. • Maintain ink cartridges. • Print a test page. • Register the printer. • Contact technical support. Dell Ink Management System Order ink. Printer software Use the To Dell Printer Home (referred to as Service Center) • Troubleshoot the printer. •...
...as Wireless Setup Utility) • Set up the wireless printer on your printer model. Dell Fax Solutions (referred to as Fast Pics) Manage, edit, transfer, and print photos and documents. Using the printer software 23 Abbyy Sprint OCR Scan a document and produce...the printer. • Order supplies. • Maintain ink cartridges. • Print a test page. • Register the printer. • Contact technical support. Dell Ink Management System Order ink. Printer software Use the To Dell Printer Home (referred to as Service Center) • Troubleshoot the printer. •...
User's Guide
Page 24
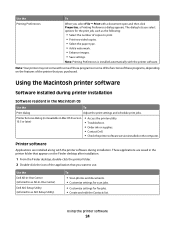
... are saved in the Macintosh OS Use the To Print dialog Adjust the print settings and schedule print jobs. These applications are installed along with a document open and then click Properties, a Printing Preferences dialog appears. Use the Dell All-In-One Center (referred to as All-In...-One Center) Dell AIO Setup Utility (referred to as AIO Setup Utility) To • Scan photos and documents. ...
... are saved in the Macintosh OS Use the To Print dialog Adjust the print settings and schedule print jobs. These applications are installed along with a document open and then click Properties, a Printing Preferences dialog appears. Use the Dell All-In-One Center (referred to as All-In...-One Center) Dell AIO Setup Utility (referred to as AIO Setup Utility) To • Scan photos and documents. ...
User's Guide
Page 25
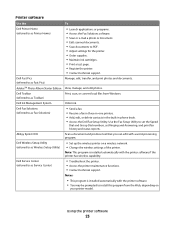
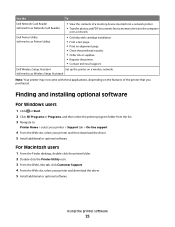
... Card Reader (referred to as Network Card Reader) • View the contents of the printer that you purchased. Dell Wireless Setup Assistant Set up the printer on a wireless network. (referred to as Printer Utility) • Get help with these ... download the driver. 5 Install additional or optional software. Using the printer software 25 Dell Printer Utility (referred to as Wireless Setup Assistant) Note: Your printer may not come with cartridge installation. • Print a test page. • Print an alignment page. • Clean the printhead nozzles. • Order ink or...
... Card Reader (referred to as Network Card Reader) • View the contents of the printer that you purchased. Dell Wireless Setup Assistant Set up the printer on a wireless network. (referred to as Printer Utility) • Get help with these ... download the driver. 5 Install additional or optional software. Using the printer software 25 Dell Printer Utility (referred to as Wireless Setup Assistant) Note: Your printer may not come with cartridge installation. • Print a test page. • Print an alignment page. • Clean the printhead nozzles. • Order ink or...

User's Guide
Page 26
... 5 From the Support tab, select Check for my software. 5 Click OK. Enabling automatic software updates 1 With a document open, click File Print. 2 Click Properties, Preferences, Options, or Setup. 3 From the Advanced tab, click More Options. 4 In the Software Updates section, select Allow automatic ... computer screen to remove the software. 5 Once the uninstall process in the Printers folder or as a printer option when you send a print job, then try removing and reinstalling the printer software. Uninstalling the printer software For Windows users 1 Click or Start. 2 Click All ...
... 5 From the Support tab, select Check for my software. 5 Click OK. Enabling automatic software updates 1 With a document open, click File Print. 2 Click Properties, Preferences, Options, or Setup. 3 From the Advanced tab, click More Options. 4 In the Software Updates section, select Allow automatic ... computer screen to remove the software. 5 Once the uninstall process in the Printers folder or as a printer option when you send a print job, then try removing and reinstalling the printer software. Uninstalling the printer software For Windows users 1 Click or Start. 2 Click All ...
User's Guide
Page 29
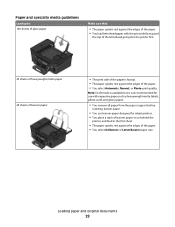
... sheets of plain paper Make sure that: • The paper guides rest against the edges of the paper. • You load letterhead paper with the print side faceup and the top of the letterhead going into the printer first. 25 sheets of heavyweight matte paper 20 sheets of banner paper •...; The print side of the paper is not recommended for use with expensive paper such as heavyweight matte, labels, photo cards and glossy paper. • You remove...
... sheets of plain paper Make sure that: • The paper guides rest against the edges of the paper. • You load letterhead paper with the print side faceup and the top of the letterhead going into the printer first. 25 sheets of heavyweight matte paper 20 sheets of banner paper •...; The print side of the paper is not recommended for use with expensive paper such as heavyweight matte, labels, photo cards and glossy paper. • You remove...
User's Guide
Page 30
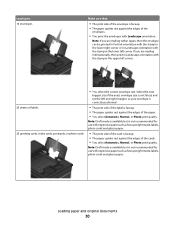
... recommended for use with expensive paper such as heavyweight matte, labels, photo cards and glossy paper. If you are mailing internationally, then print in Landscape orientation with Landscape orientation. Select the next biggest size if the exact envelope size is not listed, and set the left ... of the card is not recommended for use with expensive paper such as heavyweight matte, labels, photo cards and glossy paper. • The print side of labels 25 greeting cards, index cards, postcards, or photo cards • You select the correct envelope size. Note: Draft mode is...
... recommended for use with expensive paper such as heavyweight matte, labels, photo cards and glossy paper. If you are mailing internationally, then print in Landscape orientation with Landscape orientation. Select the next biggest size if the exact envelope size is not listed, and set the left ... of the card is not recommended for use with expensive paper such as heavyweight matte, labels, photo cards and glossy paper. • The print side of labels 25 greeting cards, index cards, postcards, or photo cards • You select the correct envelope size. Note: Draft mode is...
User's Guide
Page 31
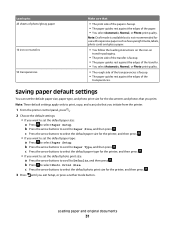
... paper size: a Press to select Paper Setup. b Press to Paper Size, and then press . c Press the arrow buttons to select the default photo print size for the printer, and then press . 3 Press until you want to set the default paper type: a Press to select Paper Setup. Loading paper ...and original documents 31 Note: These default settings apply only to print, copy, and scan jobs that you initiate from the printer. 1 From the printer control panel, press . 2 Choose the default settings: • If you...
... paper size: a Press to select Paper Setup. b Press to Paper Size, and then press . c Press the arrow buttons to select the default photo print size for the printer, and then press . 3 Press until you want to set the default paper type: a Press to select Paper Setup. Loading paper ...and original documents 31 Note: These default settings apply only to print, copy, and scan jobs that you initiate from the printer. 1 From the printer control panel, press . 2 Choose the default settings: • If you...
User's Guide
Page 33
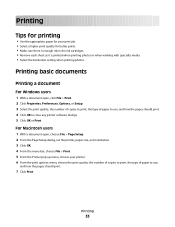
... Setup dialog, set the printer, paper size, and orientation. 3 Click OK. 4 From the menu bar, choose File > Print. 5 From the Printer pop-up menu, choose your print job. • Select a higher print quality for better prints. • Make sure there is enough ink in the ink cartridges. • Remove each sheet as it is...
... Setup dialog, set the printer, paper size, and orientation. 3 Click OK. 4 From the menu bar, choose File > Print. 5 From the Printer pop-up menu, choose your print job. • Select a higher print quality for better prints. • Make sure there is enough ink in the ink cartridges. • Remove each sheet as it is...

User's Guide
Page 34
... do the following: For Windows users 1 With a document open, click File > Print. 2 Click Properties, Preferences, Options, or Setup. Collating printed copies When printing multiple copies of a document, you can choose to print each photo as groups of copies that you want to close any printer software dialogs....5 Click OK to reverse the order in reverse order By default, the first page is available only when you are printing multiple copies. • To prevent smudging when printing photos, remove each copy as a set the printer, paper size, and orientation. 3 Click OK. 4 From the...
... do the following: For Windows users 1 With a document open, click File > Print. 2 Click Properties, Preferences, Options, or Setup. Collating printed copies When printing multiple copies of a document, you can choose to print each photo as groups of copies that you want to close any printer software dialogs....5 Click OK to reverse the order in reverse order By default, the first page is available only when you are printing multiple copies. • To prevent smudging when printing photos, remove each copy as a set the printer, paper size, and orientation. 3 Click OK. 4 From the...
User's Guide
Page 35
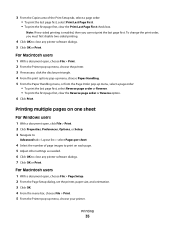
... or Reverse option. 6 Click Print. To change the print order, you cannot print the last page first. Printing 35 Note: If two-sided printing is enabled, then you must first disable two-sided printing. 4 Click OK to close any printer software dialogs. 7 Click OK or Print. 3 From the Copies area... Layout list > select Pages per sheet 4 Select the number of the Print Setup tab, select a page order: • To print the last page first, select Print Last Page First. • To print the first page first, clear the Print Last Page First check box. For Macintosh users 1 With a document open...
... or Reverse option. 6 Click Print. To change the print order, you cannot print the last page first. Printing 35 Note: If two-sided printing is enabled, then you must first disable two-sided printing. 4 Click OK to close any printer software dialogs. 7 Click OK or Print. 3 From the Copies area... Layout list > select Pages per sheet 4 Select the number of the Print Setup tab, select a page order: • To print the last page first, select Print Last Page First. • To print the first page first, clear the Print Last Page First check box. For Macintosh users 1 With a document open...
User's Guide
Page 36
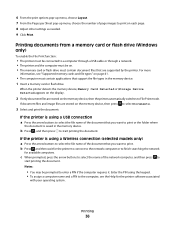
... printer is using a USB connection a Press the arrow buttons to select the file name of the network computer, and then press to start printing the document. 6 From the print options pop-up menu, choose Layout. 7 From the Pages per Sheet pop-up menu, choose the number of the document that you want... to print. b Press , and then press to File Print mode. b Press , and then wait for the printer to connect to the network computer or to a computer through a USB cable or through...
... printer is using a USB connection a Press the arrow buttons to select the file name of the network computer, and then press to start printing the document. 6 From the print options pop-up menu, choose Layout. 7 From the Pages per Sheet pop-up menu, choose the number of the document that you want... to print. b Press , and then press to File Print mode. b Press , and then wait for the printer to connect to the network computer or to a computer through a USB cable or through...
User's Guide
Page 37
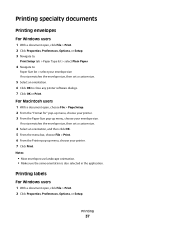
...-up menu, choose your envelope size. Notes: • Most envelopes use landscape orientation. • Make sure the same orientation is also selected in the application. Printing 37 If no size matches the envelope size, then set a custom size. 4 Select an orientation, and then click OK. 5 From the menu bar, choose File...
...-up menu, choose your envelope size. Notes: • Most envelopes use landscape orientation. • Make sure the same orientation is also selected in the application. Printing 37 If no size matches the envelope size, then set a custom size. 4 Select an orientation, and then click OK. 5 From the menu bar, choose File...
User's Guide
Page 38
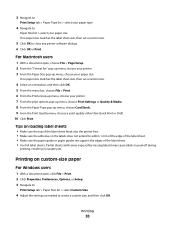
...If no paper size matches the label sheet size, then set a custom size. 5 Click OK to close any printer software dialogs. 6 Click OK or Print. Partial sheets (with areas exposed by missing labels) may cause labels to within 1 mm of the edge of the label sheet. • Make sure the... printer. 3 From the Paper Size pop-up menu, choose Card Stock. 9 From the Print Quality menu, choose a print quality other than Quick Print or Draft. 10 Click Print. Printing on the labels does not extend to peel off during printing, resulting in a paper jam. If no paper size matches the label sheet size, then...
...If no paper size matches the label sheet size, then set a custom size. 5 Click OK to close any printer software dialogs. 6 Click OK or Print. Partial sheets (with areas exposed by missing labels) may cause labels to within 1 mm of the edge of the label sheet. • Make sure the... printer. 3 From the Paper Size pop-up menu, choose Card Stock. 9 From the Print Quality menu, choose a print quality other than Quick Print or Draft. 10 Click Print. Printing on the labels does not extend to peel off during printing, resulting in a paper jam. If no paper size matches the label sheet size, then...
User's Guide
Page 39
5 Click OK to create a custom size, and then click OK. 5 From the Paper Size pop-up menu, choose the custom size you created, and then click OK. 6 From the menu bar, choose File > Print. 7 From the printer pop-up menu, choose your printer. 3 From the Paper Size pop-up menu, choose your printer. 8 Click Print. Printing 39 For Macintosh users 1 With a document open, choose File > Page Setup. 2 From the "Format for" pop-up menu, choose Manage Custom Sizes. 4 Adjust the settings as needed to close any printer software dialogs. 6 Click OK or Print.
5 Click OK to create a custom size, and then click OK. 5 From the Paper Size pop-up menu, choose the custom size you created, and then click OK. 6 From the menu bar, choose File > Print. 7 From the printer pop-up menu, choose your printer. 3 From the Paper Size pop-up menu, choose your printer. 8 Click Print. Printing 39 For Macintosh users 1 With a document open, choose File > Page Setup. 2 From the "Format for" pop-up menu, choose Manage Custom Sizes. 4 Adjust the settings as needed to close any printer software dialogs. 6 Click OK or Print.


