
User's Guide
Page 4
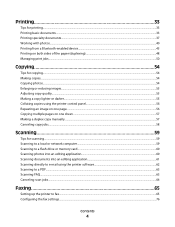
Printing 33 Tips for printing...33 Printing basic documents...33 Printing specialty documents...37 Working with photos...40 Printing from a Bluetooth-enabled device...45 Printing on both sides of the paper (duplexing)...48 Managing print jobs...50 Copying 54 Tips for copying...54 Making copies...54 Copying photos...54 Enlarging or reducing images...55 Adjusting copy quality...55...
Printing 33 Tips for printing...33 Printing basic documents...33 Printing specialty documents...37 Working with photos...40 Printing from a Bluetooth-enabled device...45 Printing on both sides of the paper (duplexing)...48 Managing print jobs...50 Copying 54 Tips for copying...54 Making copies...54 Copying photos...54 Enlarging or reducing images...55 Adjusting copy quality...55...
User's Guide
Page 5
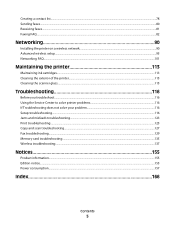
... Using the Service Center to solve printer problems 116 If Troubleshooting does not solve your problem 116 Setup troubleshooting...116 Jams and misfeeds troubleshooting...123 Print troubleshooting...125 Copy and scan troubleshooting...127 Fax troubleshooting...129 Memory card troubleshooting...135 Wireless troubleshooting...137 Notices 155 Product information...155 Edition notice...155...
... Using the Service Center to solve printer problems 116 If Troubleshooting does not solve your problem 116 Setup troubleshooting...116 Jams and misfeeds troubleshooting...123 Print troubleshooting...125 Copy and scan troubleshooting...127 Fax troubleshooting...129 Memory card troubleshooting...135 Wireless troubleshooting...137 Notices 155 Product information...155 Edition notice...155...
User's Guide
Page 8
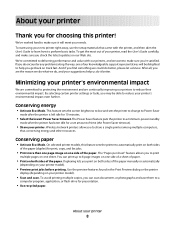
... By selecting certain printer settings or tasks, you may be delighted to help us know. The Power Saver feature puts the printer in the Print Preview dialog or the printer display (depending on your new printer right away, use the setup materials that came with our printers, and we...• Scan and save them to reduce their environmental impact. This feature sets the screen brightness to low and sets the printer to change to print multiple pages on track fast. To get back on one side of time (the Power Saver timeout). • Share your printer's environmental impact ...
... By selecting certain printer settings or tasks, you may be delighted to help us know. The Power Saver feature puts the printer in the Print Preview dialog or the printer display (depending on your new printer right away, use the setup materials that came with our printers, and we...• Scan and save them to reduce their environmental impact. This feature sets the screen brightness to low and sets the printer to change to print multiple pages on track fast. To get back on one side of time (the Power Saver timeout). • Share your printer's environmental impact ...
User's Guide
Page 9
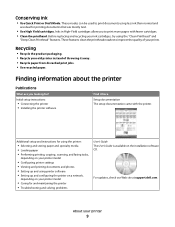
... the printer • Installing the printer software Find it away. • Recycle paper from discarded print jobs. • Use recycled paper. These modes can be used to print more pages with the printer. Recycling • Recycle the product packaging. • Recycle your old...check our Web site at support.dell.com. Finding information about the printer Publications What are mostly text. • Use High Yield cartridges. About your prints. Inks in High-Yield cartridges allow you looking for printing documents that are you to print documents using the "Clean Printhead...
... the printer • Installing the printer software Find it away. • Recycle paper from discarded print jobs. • Use recycled paper. These modes can be used to print more pages with the printer. Recycling • Recycle the product packaging. • Recycle your old...check our Web site at support.dell.com. Finding information about the printer Publications What are mostly text. • Use High Yield cartridges. About your prints. Inks in High-Yield cartridges allow you looking for printing documents that are you to print documents using the "Clean Printhead...

User's Guide
Page 16
... and scan documents. Note: When the printer is on and off the printer. Access the fax menu and send faxes. Access the photo menu and print photos. Using the printer control panel buttons and menus Using the printer control panel The following diagrams explain the sections of the printer control panel...
... and scan documents. Note: When the printer is on and off the printer. Access the fax menu and send faxes. Access the photo menu and print photos. Using the printer control panel buttons and menus Using the printer control panel The following diagrams explain the sections of the printer control panel...
User's Guide
Page 18
..., scan, or fax job in progress. • Exit from a menu level of the Copy, Scan, Fax, Photo, or File Print menu to the top level of a menu. • Exit from a menu level of the Setup menu to the top level of the previous mode. • ...Clear current settings or error messages, and return to default settings. 7 Keypad In Copy mode or Photo mode: enter the number of copies or prints you want to make. In Fax mode: • Enter fax numbers. • Navigate an automated answering system. • Select letters when creating a Speed Dial list...
..., scan, or fax job in progress. • Exit from a menu level of the Copy, Scan, Fax, Photo, or File Print menu to the top level of a menu. • Exit from a menu level of the Setup menu to the top level of the previous mode. • ...Clear current settings or error messages, and return to default settings. 7 Keypad In Copy mode or Photo mode: enter the number of copies or prints you want to make. In Fax mode: • Enter fax numbers. • Navigate an automated answering system. • Select letters when creating a Speed Dial list...
User's Guide
Page 23
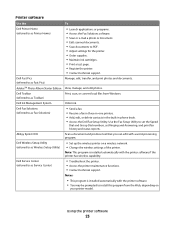
... or delete contacts in the built-in phone book. • Access the Dell Fax Setup Utility. Dell Fax Solutions (referred to as Fast Pics) Manage, edit, transfer, and print photos and documents. Dell Service Center (referred to as Printer Home) • Launch applications or programs... for the printer. • Order supplies. • Maintain ink cartridges. • Print a test page. • Register the printer. • Contact technical support. Printer software Use the To Dell Printer Home (referred to as Service Center) • Troubleshoot the printer. • Access...
... or delete contacts in the built-in phone book. • Access the Dell Fax Setup Utility. Dell Fax Solutions (referred to as Fast Pics) Manage, edit, transfer, and print photos and documents. Dell Service Center (referred to as Printer Home) • Launch applications or programs... for the printer. • Order supplies. • Maintain ink cartridges. • Print a test page. • Register the printer. • Contact technical support. Printer software Use the To Dell Printer Home (referred to as Service Center) • Troubleshoot the printer. • Access...
User's Guide
Page 24
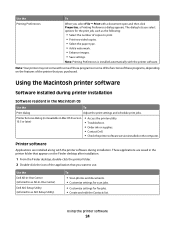
...in the Macintosh OS Use the To Print dialog Adjust the print settings and schedule print jobs. Use the Printing Preferences To When you select File Print with the printer software. Use the Dell All-In-One Center (referred to as All-In-One Center) Dell AIO Setup Utility (referred to as AIO... Setup Utility) To • Scan photos and documents. • Customize settings for scan jobs. • Customize settings for the print job, such as the following: • Select the number of...
...in the Macintosh OS Use the To Print dialog Adjust the print settings and schedule print jobs. Use the Printing Preferences To When you select File Print with the printer software. Use the Dell All-In-One Center (referred to as All-In-One Center) Dell AIO Setup Utility (referred to as AIO... Setup Utility) To • Scan photos and documents. • Customize settings for scan jobs. • Customize settings for the print job, such as the following: • Select the number of...
User's Guide
Page 25
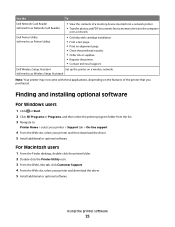
Dell Printer Utility (referred to as Printer Utility) • Get help with these applications, depending on a wireless network. (referred to as Wireless Setup Assistant) Note: Your printer may not come with cartridge installation. • Print a test page. • Print an alignment page. • Clean ...click Customer Support. 4 From the Web site, select your printer and then download the driver. 5 Install additional or optional software. Dell Wireless Setup Assistant Set up the printer on the features of a memory device inserted into a network printer. • Transfer photos...
Dell Printer Utility (referred to as Printer Utility) • Get help with these applications, depending on a wireless network. (referred to as Wireless Setup Assistant) Note: Your printer may not come with cartridge installation. • Print a test page. • Print an alignment page. • Clean ...click Customer Support. 4 From the Web site, select your printer and then download the driver. 5 Install additional or optional software. Dell Wireless Setup Assistant Set up the printer on the features of a memory device inserted into a network printer. • Transfer photos...

User's Guide
Page 26
Enabling automatic software updates 1 With a document open, click File Print. 2 Click Properties, Preferences, Options, or Setup. 3 From the Advanced tab, click More Options. 4 In the Software Updates section, select Allow automatic updates from the web ... the instructions on the computer screen to remove the software. 5 Once the uninstall process in the Printers folder or as a printer option when you send a print job, then try removing and reinstalling the printer software. If you set up the printer using the installation software CD, all the necessary software was...
Enabling automatic software updates 1 With a document open, click File Print. 2 Click Properties, Preferences, Options, or Setup. 3 From the Advanced tab, click More Options. 4 In the Software Updates section, select Allow automatic updates from the web ... the instructions on the computer screen to remove the software. 5 Once the uninstall process in the Printers folder or as a printer option when you send a print job, then try removing and reinstalling the printer software. If you set up the printer using the installation software CD, all the necessary software was...
User's Guide
Page 29
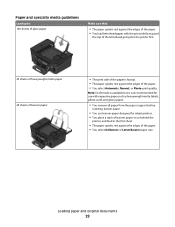
... paper. • You remove all paper from the paper support before inserting banner paper. • You use banner paper designed for use with the print side faceup and the top of the letterhead going into the printer first. 25 sheets of heavyweight matte paper 20 sheets of banner paper •...; The print side of the paper is faceup. • The paper guides rest against the edges of the paper. • You select Automatic, Normal, or Photo print quality.
... paper. • You remove all paper from the paper support before inserting banner paper. • You use banner paper designed for use with the print side faceup and the top of the letterhead going into the printer first. 25 sheets of heavyweight matte paper 20 sheets of banner paper •...; The print side of the paper is faceup. • The paper guides rest against the edges of the paper. • You select Automatic, Normal, or Photo print quality.
User's Guide
Page 30
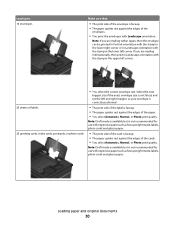
... size is not listed, and set the left corner. Loading paper and original documents 30 Load up to: 10 envelopes Make sure that: • The print side of the envelope is faceup. • The paper guides rest against the edges of the paper. • You select Automatic, Normal, or Photo... print quality. Note: Draft mode is available but is not recommended for use with expensive paper such as heavyweight matte, labels, photo cards and glossy paper. &#...
... size is not listed, and set the left corner. Loading paper and original documents 30 Load up to: 10 envelopes Make sure that: • The print side of the envelope is faceup. • The paper guides rest against the edges of the paper. • You select Automatic, Normal, or Photo... print quality. Note: Draft mode is available but is not recommended for use with expensive paper such as heavyweight matte, labels, photo cards and glossy paper. &#...
User's Guide
Page 31
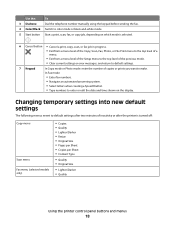
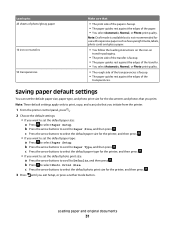
... then press . 3 Press until you want to set the default paper size: a Press to select Paper Setup. Note: These default settings apply only to print, copy, and scan jobs that you initiate from the printer. 1 From the printer control panel, press . 2 Choose the default settings: • If you... exit Setup, or press another mode button. c Press the arrow buttons to select the default photo print size for use with expensive paper such as heavyweight matte, labels, photo cards and glossy paper. • You follow the loading instructions on the iron...
... then press . 3 Press until you want to set the default paper size: a Press to select Paper Setup. Note: These default settings apply only to print, copy, and scan jobs that you initiate from the printer. 1 From the printer control panel, press . 2 Choose the default settings: • If you... exit Setup, or press another mode button. c Press the arrow buttons to select the default photo print size for use with expensive paper such as heavyweight matte, labels, photo cards and glossy paper. • You follow the loading instructions on the iron...
User's Guide
Page 33
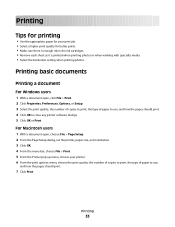
... Setup dialog, set the printer, paper size, and orientation. 3 Click OK. 4 From the menu bar, choose File > Print. 5 From the Printer pop-up menu, choose your print job. • Select a higher print quality for better prints. • Make sure there is enough ink in the ink cartridges. • Remove each sheet as it is...
... Setup dialog, set the printer, paper size, and orientation. 3 Click OK. 4 From the menu bar, choose File > Print. 5 From the Printer pop-up menu, choose your print job. • Select a higher print quality for better prints. • Make sure there is enough ink in the ink cartridges. • Remove each sheet as it is...

User's Guide
Page 34
... , choose File > Page Setup. 2 From the Page Setup dialog, set the printer, paper size, and orientation. 3 Click OK. 4 From the menu bar, choose File > Print. 5 From the Printer pop-up menu, choose your printer. 6 From the Copies area, enter the number of copies that you are... printing multiple copies. • To prevent smudging when printing photos, remove each copy as a set (collated) or to print the copies as it exits the printer, and then let it dry before stacking. For Macintosh users...
... , choose File > Page Setup. 2 From the Page Setup dialog, set the printer, paper size, and orientation. 3 Click OK. 4 From the menu bar, choose File > Print. 5 From the Printer pop-up menu, choose your printer. 6 From the Copies area, enter the number of copies that you are... printing multiple copies. • To prevent smudging when printing photos, remove each copy as a set (collated) or to print the copies as it exits the printer, and then let it dry before stacking. For Macintosh users...
User's Guide
Page 35
...as needed. 6 Click OK to close any printer software dialogs. 7 Click OK or Print. To change the print order, you cannot print the last page first. Printing 35 3 From the Copies area of page images to print on one sheet For Windows users 1 With a document open , choose File > ...page order or Reverse option. 6 Click Print. Note: If two-sided printing is enabled, then you must first disable two-sided printing. 4 Click OK to close any printer software dialogs. 5 Click OK or Print. For Macintosh users 1 With a document open , click File > Print. 2 Click Properties, Preferences, Options, ...
...as needed. 6 Click OK to close any printer software dialogs. 7 Click OK or Print. To change the print order, you cannot print the last page first. Printing 35 3 From the Copies area of page images to print on one sheet For Windows users 1 With a document open , choose File > ...page order or Reverse option. 6 Click Print. Note: If two-sided printing is enabled, then you must first disable two-sided printing. 4 Click OK to close any printer software dialogs. 5 Click OK or Print. For Macintosh users 1 With a document open , click File > Print. 2 Click Properties, Preferences, Options, ...
User's Guide
Page 36
... computers. Notes: • You may be on. • The memory card or flash drive must contain document files that you want to print or the folder where the document is using a USB connection a Press the arrow buttons to finish searching the network for the printer software associated.... • The printer and the computer must contain applications that support the file types in the memory device. b Press , and then press to start printing the document. If the printer is using the keypad. • To assign a computer name and a PIN to the computer, see "Supported memory cards ...
... computers. Notes: • You may be on. • The memory card or flash drive must contain document files that you want to print or the folder where the document is using a USB connection a Press the arrow buttons to finish searching the network for the printer software associated.... • The printer and the computer must contain applications that support the file types in the memory device. b Press , and then press to start printing the document. If the printer is using the keypad. • To assign a computer name and a PIN to the computer, see "Supported memory cards ...
User's Guide
Page 37
...From the Paper Size pop-up menu, choose your printer. 7 Click Print. Printing specialty documents Printing envelopes For Windows users 1 With a document open, click File > Print. 2 Click Properties, Preferences, Options, or Setup. 3 Navigate to: Print Setup tab > Paper Type list > select Plain Paper 4 Navigate to...custom size. 5 Select an orientation. 6 Click OK to close any printer software dialogs. 7 Click OK or Print. For Macintosh users 1 With a document open , click File > Print. 2 Click Properties, Preferences, Options, or Setup. If no size matches the envelope size, then set a custom...
...From the Paper Size pop-up menu, choose your printer. 7 Click Print. Printing specialty documents Printing envelopes For Windows users 1 With a document open, click File > Print. 2 Click Properties, Preferences, Options, or Setup. 3 Navigate to: Print Setup tab > Paper Type list > select Plain Paper 4 Navigate to...custom size. 5 Select an orientation. 6 Click OK to close any printer software dialogs. 7 Click OK or Print. For Macintosh users 1 With a document open , click File > Print. 2 Click Properties, Preferences, Options, or Setup. If no size matches the envelope size, then set a custom...
User's Guide
Page 38
...top of the label sheet. • Use full label sheets. For Macintosh users 1 With a document open , click File > Print. 2 Click Properties, Preferences, Options, or Setup. 3 Navigate to: Print Setup tab > Paper Size list > select Custom Size 4 Adjust the settings as needed to within 1 mm of the edge of ...-up menu, choose your printer. 3 From the Paper Size pop-up menu, choose Card Stock. 9 From the Print Quality menu, choose a print quality other than Quick Print or Draft. 10 Click Print. If no paper size matches the label sheet size, then set a custom size. 4 Select an orientation, and then...
...top of the label sheet. • Use full label sheets. For Macintosh users 1 With a document open , click File > Print. 2 Click Properties, Preferences, Options, or Setup. 3 Navigate to: Print Setup tab > Paper Size list > select Custom Size 4 Adjust the settings as needed to within 1 mm of the edge of ...-up menu, choose your printer. 3 From the Paper Size pop-up menu, choose Card Stock. 9 From the Print Quality menu, choose a print quality other than Quick Print or Draft. 10 Click Print. If no paper size matches the label sheet size, then set a custom size. 4 Select an orientation, and then...
User's Guide
Page 39
For Macintosh users 1 With a document open, choose File > Page Setup. 2 From the "Format for" pop-up menu, choose your printer. 3 From the Paper Size pop-up menu, choose your printer. 8 Click Print. 5 Click OK to create a custom size, and then click OK. 5 From the Paper Size pop-up menu, choose the custom size you created, and then click OK. 6 From the menu bar, choose File > Print. 7 From the printer pop-up menu, choose Manage Custom Sizes. 4 Adjust the settings as needed to close any printer software dialogs. 6 Click OK or Print. Printing 39
For Macintosh users 1 With a document open, choose File > Page Setup. 2 From the "Format for" pop-up menu, choose your printer. 3 From the Paper Size pop-up menu, choose your printer. 8 Click Print. 5 Click OK to create a custom size, and then click OK. 5 From the Paper Size pop-up menu, choose the custom size you created, and then click OK. 6 From the menu bar, choose File > Print. 7 From the printer pop-up menu, choose Manage Custom Sizes. 4 Adjust the settings as needed to close any printer software dialogs. 6 Click OK or Print. Printing 39


