
Monitor Users Guide
Page 3
... View 11 Bottom View 12 Monitor Specifications 14 Resolution Specifications 16 Preset Display Modes 16 DP Multi-Stream Transport (MST) Modes 17 USB-C Multi-Stream Transport (MST) Modes 17 Electrical Specifications 17 Physical Characteristics 19 Environmental Characteristics 21 Pin Assignments 22 Plug and Play capability 30 LCD Monitor Quality and Pixel Policy 30 Maintenance guidelines 31 Cleaning your monitor 31 Setting Up the Monitor 32 Connecting the Stand 32 Using the Tilt, Swivel, and Vertical...
... View 11 Bottom View 12 Monitor Specifications 14 Resolution Specifications 16 Preset Display Modes 16 DP Multi-Stream Transport (MST) Modes 17 USB-C Multi-Stream Transport (MST) Modes 17 Electrical Specifications 17 Physical Characteristics 19 Environmental Characteristics 21 Pin Assignments 22 Plug and Play capability 30 LCD Monitor Quality and Pixel Policy 30 Maintenance guidelines 31 Cleaning your monitor 31 Setting Up the Monitor 32 Connecting the Stand 32 Using the Tilt, Swivel, and Vertical...

Monitor Users Guide
Page 4
... (MST) function 48 Connecting the Monitor for USB-C 49 Securing Your Monitor Using Kensington Lock (Optional) . . . 51 Removing the Monitor Stand 52 Wall Mounting (Optional 53 Operating the Monitor 54 Power On the Monitor 54 Using the Joystick Control 54 Using the Menu Launcher 55 Front‑Panel Button 57 Using the Main Menu 58 Using the OSD Lock Function 73 Initial Setup 76 OSD Warning Messages 77 Setting the Maximum Resolution 80 Multi-Monitor Sync (MMS 81 Setting Multi-Monitor Sync (MMS 82...
... (MST) function 48 Connecting the Monitor for USB-C 49 Securing Your Monitor Using Kensington Lock (Optional) . . . 51 Removing the Monitor Stand 52 Wall Mounting (Optional 53 Operating the Monitor 54 Power On the Monitor 54 Using the Joystick Control 54 Using the Menu Launcher 55 Front‑Panel Button 57 Using the Main Menu 58 Using the OSD Lock Function 73 Initial Setup 76 OSD Warning Messages 77 Setting the Maximum Resolution 80 Multi-Monitor Sync (MMS 81 Setting Multi-Monitor Sync (MMS 82...

Monitor Users Guide
Page 8
...-P3 color with an average Delta E or its subsidiaries. UltraSharp U2723QX/U2723QE/U3223QE HDMI www.dell.com/U2723QX/U2723QE www.dell.com/U3223QE Dell P/N: TGWP5 Rev. A00 746.07N01.0001 • Quick Setup Guide • Safety, Environmental, and Regulatory Information • Factory Calibration Report Product Features The Dell UltraSharp U2723QX/U2723QE/U3223QE monitor has an active matrix, Thin-Film Transistor (TFT), Liquid Crystal Display (LCD), and LED backlight. USB-C 1.0 M cable (C to C) HDMI 1.8 M cable (U2723QX...
...-P3 color with an average Delta E or its subsidiaries. UltraSharp U2723QX/U2723QE/U3223QE HDMI www.dell.com/U2723QX/U2723QE www.dell.com/U3223QE Dell P/N: TGWP5 Rev. A00 746.07N01.0001 • Quick Setup Guide • Safety, Environmental, and Regulatory Information • Factory Calibration Report Product Features The Dell UltraSharp U2723QX/U2723QE/U3223QE monitor has an active matrix, Thin-Film Transistor (TFT), Liquid Crystal Display (LCD), and LED backlight. USB-C 1.0 M cable (C to C) HDMI 1.8 M cable (U2723QX...

Monitor Users Guide
Page 9
... Sync (MMS). • Premium Panel Exchange for peace of mind. • Optimize eye comfort with a flicker-free screen and low blue light feature to minimizes hazard blue light emission. • The Monitor use Low Blue Light panel and compliance with TUV Rheinland (Hardware Solution) at factory reset/default setting model (Preset mode: Standard). • Decreases the level of hazard blue light emitted from the screen to make viewing more comfortable for your eyes. • The Monitor adopts Flicker-Free...
... Sync (MMS). • Premium Panel Exchange for peace of mind. • Optimize eye comfort with a flicker-free screen and low blue light feature to minimizes hazard blue light emission. • The Monitor use Low Blue Light panel and compliance with TUV Rheinland (Hardware Solution) at factory reset/default setting model (Preset mode: Standard). • Decreases the level of hazard blue light emitted from the screen to make viewing more comfortable for your eyes. • The Monitor adopts Flicker-Free...

Monitor Users Guide
Page 39
... card may not display normally. To connect your monitor to product specific problems - Select the correct input source from your monitor to change default setting. No image when using DP connection to the PC to the computer: 1. NOTE: U2723QX/U2723QE/U3223QE default setting is DisplayPort 1.4. Connecting the HDMI Cable (U2723QX (Inbox) / U2723QE/U3223QE (Optional)) Setting Up the Monitor | 39 Please refer to the computer. 3. Connect the HDMI/DisplayPort/USB cable, and the USB-C cable from the OSD Menu on your monitor and then turn...
... card may not display normally. To connect your monitor to product specific problems - Select the correct input source from your monitor to change default setting. No image when using DP connection to the PC to the computer: 1. NOTE: U2723QX/U2723QE/U3223QE default setting is DisplayPort 1.4. Connecting the HDMI Cable (U2723QX (Inbox) / U2723QE/U3223QE (Optional)) Setting Up the Monitor | 39 Please refer to the computer. 3. Connect the HDMI/DisplayPort/USB cable, and the USB-C cable from the OSD Menu on your monitor and then turn...

Monitor Users Guide
Page 42
Connecting the Monitor for USB-C Multi-Stream Transport (MST) Function NOTE: The maximum number of supported U2723QX/U2723QE/U3223QE via MST is subjected to product specific problems -No image when using DP out connector. Please refer to the bandwith of the USB-C source. Rated power (on laptops that have USB-C with Power Delivery) 45 W 65 W 90 W 130 W Maximum charging power 45 W 65 W 90 W Not supported Connecting the Monitor for RJ45 Cable (Optional) 42 | Setting Up the Monitor NOTE: Remove the rubber plug when using USB-C MST.
Connecting the Monitor for USB-C Multi-Stream Transport (MST) Function NOTE: The maximum number of supported U2723QX/U2723QE/U3223QE via MST is subjected to product specific problems -No image when using DP out connector. Please refer to the bandwith of the USB-C source. Rated power (on laptops that have USB-C with Power Delivery) 45 W 65 W 90 W 130 W Maximum charging power 45 W 65 W 90 W Not supported Connecting the Monitor for RJ45 Cable (Optional) 42 | Setting Up the Monitor NOTE: Remove the rubber plug when using USB-C MST.
Monitor Users Guide
Page 61
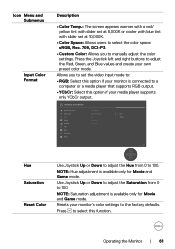
.... Resets your own preset color mode. Press to select this function. Press the Joystick left and right buttons to adjust the Red, Green, and Blue values and create your monitor's color settings to the factory defaults. NOTE: Saturation adjustment is available only for Movie and Game mode. Icon Menu and Submenus Input Color Format Description • Color Temp.: The screen appears warmer with a red/ yellow tint with slider set the video input mode to: • RGB...
.... Resets your own preset color mode. Press to select this function. Press the Joystick left and right buttons to adjust the Red, Green, and Blue values and create your monitor's color settings to the factory defaults. NOTE: Saturation adjustment is available only for Movie and Game mode. Icon Menu and Submenus Input Color Format Description • Color Temp.: The screen appears warmer with a red/ yellow tint with slider set the video input mode to: • RGB...

Monitor Users Guide
Page 73
... Monitor Brightness/Contrast Input Source Color Display PIP/PBP USB Menu Personalize Others Language Rotation Transparency Timer Lock Reset Menu Menu Buttons Power Button Menu + Power Buttons Disable Exit The following options. Yes No 2. Select Yes to Lock the Button(s). 1. Use the Lock Menu to lock buttons. To unlock the Buttons, refer to the OSD menu and/ or power button. Operating the Monitor | 73 Using the OSD Lock Function You can lock the front-panel control buttons to prevent access to the User's Guide. Once locked, pressing any control button will display the...
... Monitor Brightness/Contrast Input Source Color Display PIP/PBP USB Menu Personalize Others Language Rotation Transparency Timer Lock Reset Menu Menu Buttons Power Button Menu + Power Buttons Disable Exit The following options. Yes No 2. Select Yes to Lock the Button(s). 1. Use the Lock Menu to lock buttons. To unlock the Buttons, refer to the OSD menu and/ or power button. Operating the Monitor | 73 Using the OSD Lock Function You can lock the front-panel control buttons to prevent access to the User's Guide. Once locked, pressing any control button will display the...

Monitor Users Guide
Page 83
... mode, the power LED remains white. Troubleshooting WARNING: Before you to check whether your monitor is working correctly. Unplug the video cable from the back of the computer. The floating dialog box should appear on the monitor. www.dell.com/U2723QX/U2723QE/U3223QE or No HDMI Cable The display will continuously scroll through the screen. www.dell.com/U2723QX/U2723QE/U3223QE Troubleshooting | 83 Turn off both your monitor and computer are properly connected...
... mode, the power LED remains white. Troubleshooting WARNING: Before you to check whether your monitor is working correctly. Unplug the video cable from the back of the computer. The floating dialog box should appear on the monitor. www.dell.com/U2723QX/U2723QE/U3223QE or No HDMI Cable The display will continuously scroll through the screen. www.dell.com/U2723QX/U2723QE/U3223QE Troubleshooting | 83 Turn off both your monitor and computer are properly connected...

Monitor Users Guide
Page 84
... the screen is an inherent problem with your monitor, or with your monitor is functioning properly. 4. Turn off your computer and the monitor. Observe if the screen has any defects or abnormalities. 7. Built-in Diagnostics Your monitor has a built-in Others feature. 3. UltraSharp 27/32 Monitor Brightness/Contrast Input Source Color Display PIP/PBP USB Menu Personalize Others Display Info DDC/CI LCD Conditioning Firmware Service Tag Self-Diagnostic Reset Others Factory Reset Select...
... the screen is an inherent problem with your monitor, or with your monitor is functioning properly. 4. Turn off your computer and the monitor. Observe if the screen has any defects or abnormalities. 7. Built-in Diagnostics Your monitor has a built-in Others feature. 3. UltraSharp 27/32 Monitor Brightness/Contrast Input Source Color Display PIP/PBP USB Menu Personalize Others Display Info DDC/CI LCD Conditioning Firmware Service Tag Self-Diagnostic Reset Others Factory Reset Select...

Monitor Users Guide
Page 86
... Preset Modes in Color settings OSD. • Adjust R/G/B value under Custom Color in Color menu OSD. • Change the Input Color Format to RGB or YCbCr in the Color settings OSD. • Run the built-in the video cable connector. Image retention Faint shadow • Set the screen to turn off and is secure. • Reset the monitor to factory settings. • Perform monitor self-test feature check to determine if the intermittent problem occurs in image left on image displayed Windows Power Options or Mac...
... Preset Modes in Color settings OSD. • Adjust R/G/B value under Custom Color in Color menu OSD. • Change the Input Color Format to RGB or YCbCr in the Color settings OSD. • Run the built-in the video cable connector. Image retention Faint shadow • Set the screen to turn off and is secure. • Reset the monitor to factory settings. • Perform monitor self-test feature check to determine if the intermittent problem occurs in image left on image displayed Windows Power Options or Mac...

Monitor Users Guide
Page 87
... screen No image when using DP connection to the PC The picture cannot fill the height or width of the screen Black screen Possible Solutions • Check the Aspect Ratio setting in the power saving mode by moving the mouse or pressing any key on the monitor. • Check the signal source. Ensure the computer is not in the Display menu OSD. • Reset the monitor to DP 1.1a. Download and install the latest graphics card driver...
... screen No image when using DP connection to the PC The picture cannot fill the height or width of the screen Black screen Possible Solutions • Check the Aspect Ratio setting in the power saving mode by moving the mouse or pressing any key on the monitor. • Check the signal source. Ensure the computer is not in the Display menu OSD. • Reset the monitor to DP 1.1a. Download and install the latest graphics card driver...

Monitor Users Guide
Page 88
... Dell approved adapter or the adapter that comes with the product. • Ensure that the USB-C cable is not damaged. • USB-C input, Go to OSD menu, under Display Info check the Link Rate is HBR2 or HBR3, if Link Rate is HBR2, suggest to use USB-C to DP cable to turn on MST. • Do not toggle Off/On the power button when network is connected, keeps the power button On. 88 | Troubleshooting
... Dell approved adapter or the adapter that comes with the product. • Ensure that the USB-C cable is not damaged. • USB-C input, Go to OSD menu, under Display Info check the Link Rate is HBR2 or HBR3, if Link Rate is HBR2, suggest to use USB-C to DP cable to turn on MST. • Do not toggle Off/On the power button when network is connected, keeps the power button On. 88 | Troubleshooting
Monitor Users Guide
Page 89
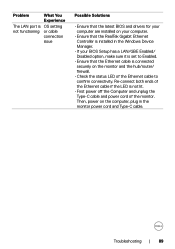
... Ethernet Controller is installed in the monitor power cord and Type-C cable. Then, power on the monitor and the hub/router/ firewall. • Check the status LED of the monitor. Troubleshooting | 89 Re-connect both ends of the Ethernet cable if the LED is connected securely on the computer, plug in the Windows Device Manager. • If your BIOS Setup has a LAN/GBE Enabled/ Disabled option, make sure it is set to...
... Ethernet Controller is installed in the monitor power cord and Type-C cable. Then, power on the monitor and the hub/router/ firewall. • Check the status LED of the monitor. Troubleshooting | 89 Re-connect both ends of the Ethernet cable if the LED is connected securely on the computer, plug in the Windows Device Manager. • If your BIOS Setup has a LAN/GBE Enabled/ Disabled option, make sure it is set to...
Display Manager Users Guide
Page 4
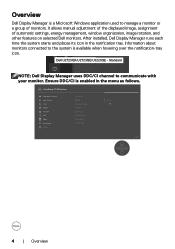
... the notification tray. Dell U2723QX/U2723QE/U3223QE - UltraSharp 27/32 Monitor Brightness/Contrast Display Info Input Source DDC/CI On Color Display LCD Conditioning O Firmware PIP/PBP USB Service Tag Self-Diagnostic Menu Personalize Reset Others Factory Reset Others Exit 4 | Overview After installed, Dell Display Manager runs each time the system starts and places its icon in the menu as follows. It allows manual adjustment of the displayed image, assignment of monitors. Standard NOTE: Dell Display Manager uses DDC/CI channel...
... the notification tray. Dell U2723QX/U2723QE/U3223QE - UltraSharp 27/32 Monitor Brightness/Contrast Display Info Input Source DDC/CI On Color Display LCD Conditioning O Firmware PIP/PBP USB Service Tag Self-Diagnostic Menu Personalize Reset Others Factory Reset Others Exit 4 | Overview After installed, Dell Display Manager runs each time the system starts and places its icon in the menu as follows. It allows manual adjustment of the displayed image, assignment of monitors. Standard NOTE: Dell Display Manager uses DDC/CI channel...

Monitor Simplified Service Manual
Page 15
... a video signal and is functioning properly. www.dell.com/U3023E/U2723QE/U3223QE 4. Trouble Shooting Instructions Self-Test Your monitor provides a self-test feature that allows you use the previous procedure, check your video controller and computer, because your computer and the monitor. www.dell.com/U3023E/U2723QE/U3223QE or No USB-C Cable The display will go into Standby Mode in 4 minutes. Turn off your monitor is working correctly. If your monitor screen remains...
... a video signal and is functioning properly. www.dell.com/U3023E/U2723QE/U3223QE 4. Trouble Shooting Instructions Self-Test Your monitor provides a self-test feature that allows you use the previous procedure, check your video controller and computer, because your computer and the monitor. www.dell.com/U3023E/U2723QE/U3223QE or No USB-C Cable The display will go into Standby Mode in 4 minutes. Turn off your monitor is working correctly. If your monitor screen remains...

Monitor Simplified Service Manual
Page 16
... until the screen displays green, blue, black, and white colors. Observe if the screen has any screen abnormalities upon using the built-in diagnostic tool that the screen is an inherent problem with your monitor, or with your computer and video card. Press the joystick button to start the diagnostics. UltraSharp 30/27/32 Monitor Brightness/Contrast Input Source Color Display PIP/PBP USB Menu Personalize Others Display Info DDC/CI LCD Conditioning Firmware Service Tag Self-Diagnostics Reset Others Factory Reset Select...
... until the screen displays green, blue, black, and white colors. Observe if the screen has any screen abnormalities upon using the built-in diagnostic tool that the screen is an inherent problem with your monitor, or with your computer and video card. Press the joystick button to start the diagnostics. UltraSharp 30/27/32 Monitor Brightness/Contrast Input Source Color Display PIP/PBP USB Menu Personalize Others Display Info DDC/CI LCD Conditioning Firmware Service Tag Self-Diagnostics Reset Others Factory Reset Select...

Monitor Simplified Service Manual
Page 18
... screen to turn off and is connected properly & off after a few minutes of screen idle time. Wrong Color Picture color not good • Try different Preset Modes in Color settings OSD. • Adjust R/G/B value under Custom Color in Color menu OSD. • Change the Input Color Format to determine if the intermittent problem occurs in diagnostics. 6. These can be adjusted in the video cable connector. Trouble Shooting Instructions Common symptoms What you experience Possible solutions Intermittent Problems Monitor...
... screen to turn off and is connected properly & off after a few minutes of screen idle time. Wrong Color Picture color not good • Try different Preset Modes in Color settings OSD. • Adjust R/G/B value under Custom Color in Color menu OSD. • Change the Input Color Format to determine if the intermittent problem occurs in diagnostics. 6. These can be adjusted in the video cable connector. Trouble Shooting Instructions Common symptoms What you experience Possible solutions Intermittent Problems Monitor...
Monitor Simplified Service Manual
Page 19
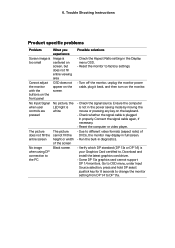
... monitor power cable, plug it back, and then turn on the keyboard. • Check whether the signal cable is plugged in the power saving mode by moving the mouse or pressing any key on the monitor. • Check the signal source. Trouble Shooting Instructions Product specific problems Problem Screen image is too small Cannot adjust the monitor with the buttons on the front panel No Input Signal when user controls are pressed The picture does not fill the entire screen No image when using DP connection...
... monitor power cable, plug it back, and then turn on the keyboard. • Check whether the signal cable is plugged in the power saving mode by moving the mouse or pressing any key on the monitor. • Check the signal source. Trouble Shooting Instructions Product specific problems Problem Screen image is too small Cannot adjust the monitor with the buttons on the front panel No Input Signal when user controls are pressed The picture does not fill the entire screen No image when using DP connection...
Display Manager on Mac Users Guide
Page 18
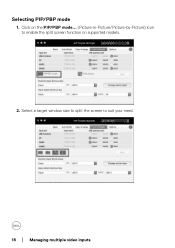
Select a target window size to split the screen to enable the split screen function on supported models. 2. Click on the PIP/PBP mode... (Picture-in-Picture/Picture-by-Picture) icon to suit your need. 18 │ Managing multiple video inputs Selecting PIP/PBP mode 1.
Select a target window size to split the screen to enable the split screen function on supported models. 2. Click on the PIP/PBP mode... (Picture-in-Picture/Picture-by-Picture) icon to suit your need. 18 │ Managing multiple video inputs Selecting PIP/PBP mode 1.


