Users Guide
Page 6
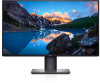
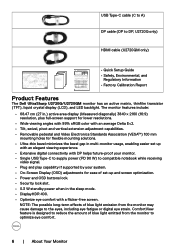
... duplicate. • Quick Setup Guide • Safety, Environmental, and Regulatory Information • Factory Calibration Report Product Features The Dell UltraSharp U2720Q/U2720QM monitor has an active matrix, thinfilm transistor (TFT), liquid crystal display (LCD), and LED backlight. Please retain this Report for ... line. USB Type-C cable (C to A) DP cable (DP to DP, U2720Q only) HDMI cable (U2720QM only) U2720Q Color Calibration Factory Report Every Dell U2720Q is shipped incorporating pre-tuned standard mode(sRGB) with other test equipment, setups and test patterns. The...
... duplicate. • Quick Setup Guide • Safety, Environmental, and Regulatory Information • Factory Calibration Report Product Features The Dell UltraSharp U2720Q/U2720QM monitor has an active matrix, thinfilm transistor (TFT), liquid crystal display (LCD), and LED backlight. Please retain this Report for ... line. USB Type-C cable (C to A) DP cable (DP to DP, U2720Q only) HDMI cable (U2720QM only) U2720Q Color Calibration Factory Report Every Dell U2720Q is shipped incorporating pre-tuned standard mode(sRGB) with other test equipment, setups and test patterns. The...
Users Guide
Page 8
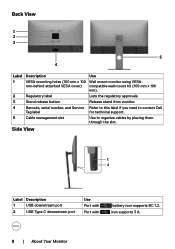
icon supports 3 A. 8 | About Your Monitor mm-behind attached VESA cover) compatible wall mount kit (100 mm x 100 mm). 2 Regulatory label Lists the regulatory approvals. 3 Stand release button Release stand from monitor. 4 Barcode, serial number, and Service Refer to this label if you need to contact Dell Tag label for technical support. 5 Cable management...
icon supports 3 A. 8 | About Your Monitor mm-behind attached VESA cover) compatible wall mount kit (100 mm x 100 mm). 2 Regulatory label Lists the regulatory approvals. 3 Stand release button Release stand from monitor. 4 Barcode, serial number, and Service Refer to this label if you need to contact Dell Tag label for technical support. 5 Cable management...

Users Guide
Page 14
.../hour (typical) 14 | About Your Monitor Depth Weight Weight with packaging Weight with stand assembly and cables Weight without stand assembly (For wall mount or VESA mount considerations - no cables) Weight of stand assembly 185.0 mm (7.28 in.) 9.6 kg (21.16 lb) 6.6 kg (14.55 lb) 4.4 kg (9.70 lb) 1.8 kg (3.97...
.../hour (typical) 14 | About Your Monitor Depth Weight Weight with packaging Weight with stand assembly and cables Weight without stand assembly (For wall mount or VESA mount considerations - no cables) Weight of stand assembly 185.0 mm (7.28 in.) 9.6 kg (21.16 lb) 6.6 kg (14.55 lb) 4.4 kg (9.70 lb) 1.8 kg (3.97...
Users Guide
Page 15
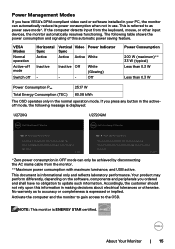
This is referred to accuracy or completeness is displayed: U2720Q U2720QM Dell UltraSharp 27 Monitor Dell UltraSharp 27 Monitor No DP signal from your device. The following message is expressed or implied. U2720QM *Zero power consumption in use. This document is ENERGY STAR certified. NOTE: ...Accordingly, the customer should not rely upon this automatic power saving feature. No warranty as to as power save mode*. VESA Modes Normal operation Active-off mode Switch off Horizontal Vertical Video Power Indicator Sync Sync Active Active Active White Inactive - If...
This is referred to accuracy or completeness is displayed: U2720Q U2720QM Dell UltraSharp 27 Monitor Dell UltraSharp 27 Monitor No DP signal from your device. The following message is expressed or implied. U2720QM *Zero power consumption in use. This document is ENERGY STAR certified. NOTE: ...Accordingly, the customer should not rely upon this automatic power saving feature. No warranty as to as power save mode*. VESA Modes Normal operation Active-off mode Switch off Horizontal Vertical Video Power Indicator Sync Sync Active Active Active White Inactive - If...

Users Guide
Page 22
5 Lift the cover, as shown, to expose the VESA area for stand assembly. 6 Attach the stand assembly to the groove on the upper part of the monitor. b.Press the stand down till it snaps into place. a.Fit the two tabs on the back of the stand to the monitor. b a 22 | Setting Up the Monitor
5 Lift the cover, as shown, to expose the VESA area for stand assembly. 6 Attach the stand assembly to the groove on the upper part of the monitor. b.Press the stand down till it snaps into place. a.Fit the two tabs on the back of the stand to the monitor. b a 22 | Setting Up the Monitor

Users Guide
Page 30
... the plastic cover. 4 Attach the mounting bracket from the wall mounting kit to the wall-mounting kit. Refer to the instructions that come with the VESA-compatible wall mounting kit. 1 Place the monitor on a soft cloth or cushion on the wall by following the instructions that comes with minimum weight/load...
... the plastic cover. 4 Attach the mounting bracket from the wall mounting kit to the wall-mounting kit. Refer to the instructions that come with the VESA-compatible wall mounting kit. 1 Place the monitor on a soft cloth or cushion on the wall by following the instructions that comes with minimum weight/load...


