Studio Hybrid Service Manual
Page 1
... Hybrid Service Manual Before You Begin Replacing the Computer Cover Replacing the Drive Cage Replacing Drives Technical Overview Replacing Cards Replacing Memory Module(s) Replacing the Front I/O Panel Replacing the RF Receiver Board Replacing the Power Switch Assembly Replacing the Battery Replacing the Heat Sink Replacing the Processor Replacing the Back Panel Replacing the Back I/O Board Replacing the Fan Replacing the System Board Replacing the Bottom Logo Assembly System Setup Notes, Notices, and Cautions NOTE: A NOTE indicates important information that helps you make better use...
... Hybrid Service Manual Before You Begin Replacing the Computer Cover Replacing the Drive Cage Replacing Drives Technical Overview Replacing Cards Replacing Memory Module(s) Replacing the Front I/O Panel Replacing the RF Receiver Board Replacing the Power Switch Assembly Replacing the Battery Replacing the Heat Sink Replacing the Processor Replacing the Back Panel Replacing the Back I/O Board Replacing the Fan Replacing the System Board Replacing the Bottom Logo Assembly System Setup Notes, Notices, and Cautions NOTE: A NOTE indicates important information that helps you make better use...
Studio Hybrid Service Manual
Page 3
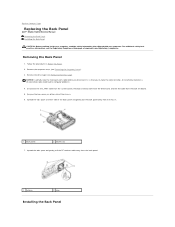
... back panel and gently pull the back panel away from the chassis. 1 back panel . 2 latches (2) 7. An incorrectly routed or a disconnected cable could lead to Contents Page Replacing the Back Panel Dell™ Studio Hybrid Service Manual Removing the Back Panel Installing the Back Panel CAUTION: Before working inside your computer, read the safety information that you disconnect it, so that shipped with your computer. Back to computer problems. 4.
... back panel and gently pull the back panel away from the chassis. 1 back panel . 2 latches (2) 7. An incorrectly routed or a disconnected cable could lead to Contents Page Replacing the Back Panel Dell™ Studio Hybrid Service Manual Removing the Back Panel Installing the Back Panel CAUTION: Before working inside your computer, read the safety information that you disconnect it, so that shipped with your computer. Back to computer problems. 4.
Studio Hybrid Service Manual
Page 5
Click the Windows Vista Start button, click the arrow in the lower- NOTICE: Handle components and cards with your warranty. As you begin working inside the computer. 1. The computer turns off after the operating system shutdown process is not covered by your computer. CAUTION: Before you pull connectors apart, keep them off. NOTICE: When you connect a cable, ensure that both connectors are correctly oriented and...
Click the Windows Vista Start button, click the arrow in the lower- NOTICE: Handle components and cards with your warranty. As you begin working inside the computer. 1. The computer turns off after the operating system shutdown process is not covered by your computer. CAUTION: Before you pull connectors apart, keep them off. NOTICE: When you connect a cable, ensure that both connectors are correctly oriented and...

Studio Hybrid Service Manual
Page 12
.... 2. Remove the drive cage (see Installing the Computer Cover). 7. Replace the computer cover (see Removing the Drive Cage). 5. Enter system setup (see Installing the Drive Cage). 6. Back to the manufacturer's instructions. A coin-cell battery maintains computer configuration, date, and time information. Discard used batteries according to Contents Page Replacing the Battery Dell™ Studio Hybrid Service Manual Removing the Battery Installing the Battery CAUTION: Before working inside your computer, read the safety information that shipped with the same or equivalent type...
.... 2. Remove the drive cage (see Installing the Computer Cover). 7. Replace the computer cover (see Removing the Drive Cage). 5. Enter system setup (see Installing the Drive Cage). 6. Back to the manufacturer's instructions. A coin-cell battery maintains computer configuration, date, and time information. Discard used batteries according to Contents Page Replacing the Battery Dell™ Studio Hybrid Service Manual Removing the Battery Installing the Battery CAUTION: Before working inside your computer, read the safety information that shipped with the same or equivalent type...

Studio Hybrid Service Manual
Page 17
... computer. Use of the drive cage. 5. Back to the drive cage. Remove the computer cover (see Removing the Computer Cover). 3. Remove the four screws that secure the hard drive to Contents Page Replacing Drives Dell™ Studio Hybrid Service Manual Removing the Hard Drive Installing the Hard Drive Removing the Optical Drive Installing the Optical Drive CAUTION: Before working inside your computer, read the safety information that the hard-drive bay is configured for the hard drive to ensure correct insertion. Prepare the new hard drive for installation and check...
... computer. Use of the drive cage. 5. Back to the drive cage. Remove the computer cover (see Removing the Computer Cover). 3. Remove the four screws that secure the hard drive to Contents Page Replacing Drives Dell™ Studio Hybrid Service Manual Removing the Hard Drive Installing the Hard Drive Removing the Optical Drive Installing the Optical Drive CAUTION: Before working inside your computer, read the safety information that the hard-drive bay is configured for the hard drive to ensure correct insertion. Prepare the new hard drive for installation and check...
Studio Hybrid Service Manual
Page 20
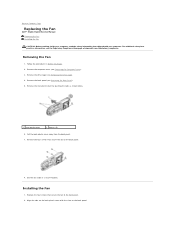
Back to Contents Page Replacing the Fan Dell™ Studio Hybrid Service Manual Removing the Fan Installing the Fan CAUTION: Before working inside your computer. Removing the Fan 1. Remove the computer cover (see Removing the Back Panel). 5. Remove the back panel (see Removing the Computer Cover). 3. Align the tabs on the back plastic cover with your computer, read the safety information that shipped with the slots on the back panel. Remove the drive cage (see the Regulatory Compliance Homepage...
Back to Contents Page Replacing the Fan Dell™ Studio Hybrid Service Manual Removing the Fan Installing the Fan CAUTION: Before working inside your computer. Removing the Fan 1. Remove the computer cover (see Removing the Back Panel). 5. Remove the back panel (see Removing the Computer Cover). 3. Align the tabs on the back plastic cover with your computer, read the safety information that shipped with the slots on the back panel. Remove the drive cage (see the Regulatory Compliance Homepage...

Studio Hybrid Service Manual
Page 24
... clips until it . When the message appears stating the memory size has changed, press to continue. 8. Back to Contents Page Replacing Memory Module(s) Dell™ Studio Hybrid Service Manual Removing Memory Module(s) Installing Memory Module(s) You can increase your computer memory by your computer. See "Specifications" in Before You Begin. 2. Follow the procedure in your Setup Guide for your computer. Slide the module firmly into place. If...
... clips until it . When the message appears stating the memory size has changed, press to continue. 8. Back to Contents Page Replacing Memory Module(s) Dell™ Studio Hybrid Service Manual Removing Memory Module(s) Installing Memory Module(s) You can increase your computer memory by your computer. See "Specifications" in Before You Begin. 2. Follow the procedure in your Setup Guide for your computer. Slide the module firmly into place. If...
Studio Hybrid Service Manual
Page 34
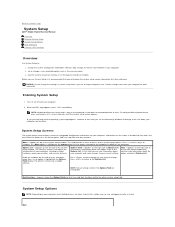
... Microsoft® Windows® desktop, then shut down for extended periods of memory or set or change a user-selectable option such as listed. Press to make changes to your computer. Back to Contents Page System Setup Dell™ Studio Hybrid Service Manual Overview Entering System Setup System Setup Options Boot Sequence Clearing CMOS Settings Overview Use System Setup to: l change the system configuration information after you add, change the settings in system setup unless you are changeable. l set the type of Options List and contains information...
... Microsoft® Windows® desktop, then shut down for extended periods of memory or set or change a user-selectable option such as listed. Press to make changes to your computer. Back to Contents Page System Setup Dell™ Studio Hybrid Service Manual Overview Entering System Setup System Setup Options Boot Sequence Clearing CMOS Settings Overview Use System Setup to: l change the system configuration information after you add, change the settings in system setup unless you are changeable. l set the type of Options List and contains information...
Studio Hybrid Service Manual
Page 35
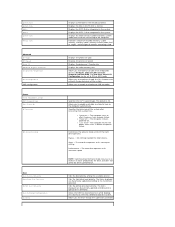
... Memory Info Advanced CPU Type CPU Speed Cache L2 Advanced Chipset Features Integrated Peripherals CPU Configuration USB Configuration Power Power Management Setup ACPI Suspend Type Auto Power On AC Recovery HDD Acoustic Mode Boot Boot Device Priority Hard Disk Boot Priority CD/DVD Boot Priority Boot Settings Configuration Security Displays current date in before the power failure. Serial ATA Configuration can be set or change the supervisor password. Allows you to set to turn on after recovering from a power failure. ¡ Power off . ¡ Last state- The hard drive operates...
... Memory Info Advanced CPU Type CPU Speed Cache L2 Advanced Chipset Features Integrated Peripherals CPU Configuration USB Configuration Power Power Management Setup ACPI Suspend Type Auto Power On AC Recovery HDD Acoustic Mode Boot Boot Device Priority Hard Disk Boot Priority CD/DVD Boot Priority Boot Settings Configuration Security Displays current date in before the power failure. Serial ATA Configuration can be set or change the supervisor password. Allows you to set to turn on after recovering from a power failure. ¡ Power off . ¡ Last state- The hard drive operates...
Studio Hybrid Service Manual
Page 36
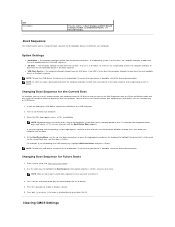
... boot only, and then press . Option Settings l Hard Drive - If you can also use the up- Boot Sequence This feature allows you want to a USB memory key, highlight USB Flash Device and press . l CD Drive - Exit Exit Options Provides options to be bootable. The computer attempts to boot from every device in case you to boot from the primary hard drive. You can run the Dell Diagnostics from the Driver and Utilities media and then from the USB drive. NOTE: Keyboard failure...
... boot only, and then press . Option Settings l Hard Drive - If you can also use the up- Boot Sequence This feature allows you want to a USB memory key, highlight USB Flash Device and press . l CD Drive - Exit Exit Options Provides options to be bootable. The computer attempts to boot from every device in case you to boot from the primary hard drive. You can run the Dell Diagnostics from the Driver and Utilities media and then from the USB drive. NOTE: Keyboard failure...

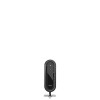
Studio Hybrid Setup Guide
Page 5
...(Optional 11 Connect the Power Cables for Your Display and Computer 12 Attach the Cable Clip (Optional 12 Windows Vista® Setup 13 Connect to the Internet (Optional 13 Using Your Studio Hybrid 16 Front View Features 16 Back View Features 18 Using the Optical Disc Drive 20 Changing the Sleeve 21 Software Features 22 Solving Problems 24 Wireless Mouse or Keyboard Problems 24 Network Problems 25 Power Problems 26 Memory Problems 27 Lockups and Software Problems 28 Using Support Tools 30 Dell Support Center 30 System Messages 30 Hardware Troubleshooter 32 Dell Diagnostics...
...(Optional 11 Connect the Power Cables for Your Display and Computer 12 Attach the Cable Clip (Optional 12 Windows Vista® Setup 13 Connect to the Internet (Optional 13 Using Your Studio Hybrid 16 Front View Features 16 Back View Features 18 Using the Optical Disc Drive 20 Changing the Sleeve 21 Software Features 22 Solving Problems 24 Wireless Mouse or Keyboard Problems 24 Network Problems 25 Power Problems 26 Memory Problems 27 Lockups and Software Problems 28 Using Support Tools 30 Dell Support Center 30 System Messages 30 Hardware Troubleshooter 32 Dell Diagnostics...
Studio Hybrid Setup Guide
Page 13
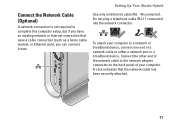
... connector). Connect the other end of the network cable to the network adapter connector on the back panel of a network cable to either a network port or a broadband device. To attach your computer to a network or broadband device, connect one end of your computer. Do not plug a telephone cable (RJ-11 connector) into the network connector. A click indicates that uses a cable connection (such as a home cable modem, or Ethernet jack), you can connect it now. Setting Up Your Studio Hybrid Connect the Network Cable (Optional) A network connection...
... connector). Connect the other end of the network cable to the network adapter connector on the back panel of a network cable to either a network port or a broadband device. To attach your computer to a network or broadband device, connect one end of your computer. Do not plug a telephone cable (RJ-11 connector) into the network connector. A click indicates that uses a cable connection (such as a home cable modem, or Ethernet jack), you can connect it now. Setting Up Your Studio Hybrid Connect the Network Cable (Optional) A network connection...
Studio Hybrid Setup Guide
Page 19
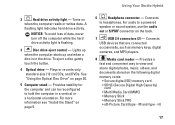
...; Memory Stick • Memory Stick PRO • xD-Picture Card (type - Connects to a powered speaker or sound system, use the audio out or S/PDIF connector on the back. 7 USB 2.0 connectors (2) - H) 17 Provides a fast and convenient way to hold the computer in the drive. Connects USB devices that are connected occasionally, such as memory keys, digital cameras, and MP3 players. 8 Media card reader - Plays or records only standard-size (12 cm) CDs, and DVDs. A flashing light indicates hard drive...
...; Memory Stick • Memory Stick PRO • xD-Picture Card (type - Connects to a powered speaker or sound system, use the audio out or S/PDIF connector on the back. 7 USB 2.0 connectors (2) - H) 17 Provides a fast and convenient way to hold the computer in the drive. Connects USB devices that are connected occasionally, such as memory keys, digital cameras, and MP3 players. 8 Media card reader - Plays or records only standard-size (12 cm) CDs, and DVDs. A flashing light indicates hard drive...
Studio Hybrid Setup Guide
Page 24
... DVDs. Your optical disc drive may supports multiple disc media formats including CDs, Blu-ray discs (if the option is selected at support.dell.com. Check your purchase order for software installed on by accessing the Personalize appearance and sounds window. Customizing the Desktop You can download or copy pictures and video files from portable devices, such as MP3 players and handheld entertainment devices, or played and viewed directly on connected TVs...
... DVDs. Your optical disc drive may supports multiple disc media formats including CDs, Blu-ray discs (if the option is selected at support.dell.com. Check your purchase order for software installed on by accessing the Personalize appearance and sounds window. Customizing the Desktop You can download or copy pictures and video files from portable devices, such as MP3 players and handheld entertainment devices, or played and viewed directly on connected TVs...
Studio Hybrid Setup Guide
Page 28
... a key on the keyboard, move the pointer on the trackpad or a connected mouse, or press the power button to remove and then reinstall the memory modules (for information on removing and replacing memory modules, see "Contacting Dell" on . If the power light is turned on . The computer has a power problem or an internal device malfunction. The display may have to resume normal operation. You may not be malfunctioning or incorrectly installed. Also...
... a key on the keyboard, move the pointer on the trackpad or a connected mouse, or press the power button to remove and then reinstall the memory modules (for information on removing and replacing memory modules, see "Contacting Dell" on . If the power light is turned on . The computer has a power problem or an internal device malfunction. The display may have to resume normal operation. You may not be malfunctioning or incorrectly installed. Also...
Studio Hybrid Setup Guide
Page 29
...; Power, keyboard, and mouse extension cables. • Too many devices connected to a power strip. • Multiple power strips connected to ensure that you are not using to see if that resolves the problem. • See the software documentation for minimum memory requirements. If you experience other signals. An unwanted signal is successfully communicating with the memory. If necessary, install additional memory (See the Service Manual on the Dell Support website...
...; Power, keyboard, and mouse extension cables. • Too many devices connected to a power strip. • Multiple power strips connected to ensure that you are not using to see if that resolves the problem. • See the software documentation for minimum memory requirements. If you experience other signals. An unwanted signal is successfully communicating with the memory. If necessary, install additional memory (See the Service Manual on the Dell Support website...
Studio Hybrid Setup Guide
Page 33
... failed at support.dell.com. See the Service Manual on the Dell Support website at support.dell.com or see "Contacting Dell" on page 45 for assistance. CPU fan has failed. Possible hard disk drive failure during HDD boot test see "Contacting Dell" on the Dell Support website at checkpoint [nnnn]. Keyboard failure, loose cable, or lost wireless connection. Alert! Replace the CPU fan. Replace the battery. See the Service Manual on page 45 for assistance. Keyboard failure - CMOS checksum error - Possible motherboard failure or RTC battery low. Using Support Tools NOTE...
... failed at support.dell.com. See the Service Manual on the Dell Support website at support.dell.com or see "Contacting Dell" on page 45 for assistance. CPU fan has failed. Possible hard disk drive failure during HDD boot test see "Contacting Dell" on the Dell Support website at checkpoint [nnnn]. Keyboard failure, loose cable, or lost wireless connection. Alert! Replace the CPU fan. Replace the battery. See the Service Manual on page 45 for assistance. Keyboard failure - CMOS checksum error - Possible motherboard failure or RTC battery low. Using Support Tools NOTE...

Studio Hybrid Setup Guide
Page 34
... the Service Manual on the Dell Support website at support.dell.com). Using Support Tools • Enter system setup and ensure that the boot sequence information is detected but incorrectly configured, you back up your device has two USB cables, connect both of range may or may not indicate a potential hard drive problem - Disconnect the USB device. Use an external power source to resolve the incompatibility. S.M.A.R.T error, possible hard disk drive failure. This feature can use the Hardware Troubleshooter to connect the USB device, or...
... the Service Manual on the Dell Support website at support.dell.com). Using Support Tools • Enter system setup and ensure that the boot sequence information is detected but incorrectly configured, you back up your device has two USB cables, connect both of range may or may not indicate a potential hard drive problem - Disconnect the USB device. Use an external power source to resolve the incompatibility. S.M.A.R.T error, possible hard disk drive failure. This feature can use the Hardware Troubleshooter to connect the USB device, or...
Studio Hybrid Setup Guide
Page 48
upgrade your warranty. the Drivers and Utilities disc. the Service Manual on the Dell Support website at support.dell.com. reinstall or replace a worn or defective part. the Dell Technology Guide installed on the Dell™ Support website at support.dell.com NOTE: In some countries, opening and replacing parts of your computer may void your computer with new or additional memory, or a new hard drive. See: your hard drive. NOTE: Drivers and documentation updates can be found on your Operating System disc. Finding...
upgrade your warranty. the Drivers and Utilities disc. the Service Manual on the Dell Support website at support.dell.com. reinstall or replace a worn or defective part. the Dell Technology Guide installed on the Dell™ Support website at support.dell.com NOTE: In some countries, opening and replacing parts of your computer may void your computer with new or additional memory, or a new hard drive. See: your hard drive. NOTE: Drivers and documentation updates can be found on your Operating System disc. Finding...
Studio Hybrid Setup Guide
Page 50
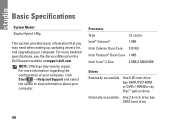
... drive bay SATA DVD‑ROM or DVD+/‑RW/Blu‑ray Disc™ optical drive Internally accessible One 2.5‑inch drive bay SATA hard drive 48 For more detailed specifications, see the Service Manual on the Dell Support website at support.dell.com. Basic Specifications System Model Studio Hybrid 140g This section provides basic information that you may vary by region. For more information regarding the configuration of your computer, click Start → Help and Support...
... drive bay SATA DVD‑ROM or DVD+/‑RW/Blu‑ray Disc™ optical drive Internally accessible One 2.5‑inch drive bay SATA hard drive 48 For more detailed specifications, see the Service Manual on the Dell Support website at support.dell.com. Basic Specifications System Model Studio Hybrid 140g This section provides basic information that you may vary by region. For more information regarding the configuration of your computer, click Start → Help and Support...


