
User Guide
Page 1
.... is subject to avoid the problem. Dell™ SE197FP Flat Panel Monitor User's Guide About Your Monitor Front View Back View Side View Bottom View Monitor specifications Caring for your computer. Only) CAUTION: Safety Instruction Contacting Dell Your Monitor Set-up Guide Notes, Notices, and Cautions Throughout this text: Dell, the DELL logo, Inspiron, Dell Precision, Dimension, OptiPlex, Latitude, PowerEdge...
.... is subject to avoid the problem. Dell™ SE197FP Flat Panel Monitor User's Guide About Your Monitor Front View Back View Side View Bottom View Monitor specifications Caring for your computer. Only) CAUTION: Safety Instruction Contacting Dell Your Monitor Set-up Guide Notes, Notices, and Cautions Throughout this text: Dell, the DELL logo, Inspiron, Dell Precision, Dimension, OptiPlex, Latitude, PowerEdge...
User Guide
Page 2
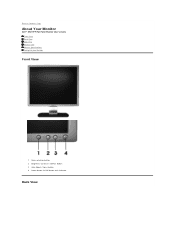
Back to Contents Page About Your Monitor Dell™ SE197FP Flat Panel Monitor User's Guide Front View Back View Side View Bottom View Monitor Specifications Caring for your Monitor Front View 1 Menu selection button 2 Brightness Contrast / Down(-) button 3 Auto-Adjust / Up(+) button 4 Power button On/Off button with indicator Back View
Back to Contents Page About Your Monitor Dell™ SE197FP Flat Panel Monitor User's Guide Front View Back View Side View Bottom View Monitor Specifications Caring for your Monitor Front View 1 Menu selection button 2 Brightness Contrast / Down(-) button 3 Auto-Adjust / Up(+) button 4 Power button On/Off button with indicator Back View
User Guide
Page 3
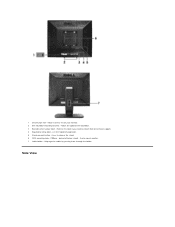
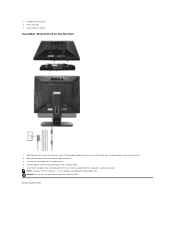
Attach a lock to release the stand. 6 VESA mounting holes ( 100mm - behind attached stand) - Side View List the regulatory approvals. 5 Stand removal button - Help organize cables by passing them through the holder. Press to secure your monitor. 2 Dell Soundbar mounting brackets - Refer to this label if you need to mount monitor. 7 Cable holder - Use to contact Dell for technical support. 4 Regulatory rating label - 1 Security lock slot - Attach the optional Dell Soundbar. 3 Barcode serial number label -
Attach a lock to release the stand. 6 VESA mounting holes ( 100mm - behind attached stand) - Side View List the regulatory approvals. 5 Stand removal button - Help organize cables by passing them through the holder. Press to secure your monitor. 2 Dell Soundbar mounting brackets - Refer to this label if you need to mount monitor. 7 Cable holder - Use to contact Dell for technical support. 4 Regulatory rating label - 1 Security lock slot - Attach the optional Dell Soundbar. 3 Barcode serial number label -
User Guide
Page 5
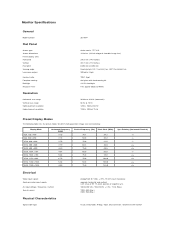
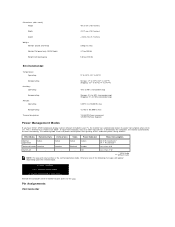
TFT LCD 19 inches (19-inch diagonal viewable image size) 376.3 mm (14.8 inches) 301.1 mm (11.8 ... at 60 Hz 1280 x 1024 at 75 Hz Preset Display Modes The following table lists the preset modes for which Dell guarantees image size and centering: Display Mode VGA, 720 x 400 VGA, 640 x 480 VESA, 640 x 480 ...(Max.) 120V: 40A (Max.) 240V: 80A (Max.) D-sub: Detachable, Analog, 15pin, blue connector, attached to the monitor Monitor Specifications General Model number Flat Panel Screen type Screen dimensions Preset display area: Horizontal Vertical Pixel pitch Viewing angle Luminance output Contrast...
TFT LCD 19 inches (19-inch diagonal viewable image size) 376.3 mm (14.8 inches) 301.1 mm (11.8 ... at 60 Hz 1280 x 1024 at 75 Hz Preset Display Modes The following table lists the preset modes for which Dell guarantees image size and centering: Display Mode VGA, 720 x 400 VGA, 640 x 480 VESA, 640 x 480 ...(Max.) 120V: 40A (Max.) 240V: 80A (Max.) D-sub: Detachable, Analog, 15pin, blue connector, attached to the monitor Monitor Specifications General Model number Flat Panel Screen type Screen dimensions Preset display area: Horizontal Vertical Pixel pitch Viewing angle Luminance output Contrast...
User Guide
Page 6
Dimensions (with stand): Height Width Depth Weight Monitor (Stand and Head) Monitor Flat panel only (VESA Mode) Weight with packaging 401.3 mm (15.8 inches) 412.7 mm (16.2 inches)
Dimensions (with stand): Height Width Depth Weight Monitor (Stand and Head) Monitor Flat panel only (VESA Mode) Weight with packaging 401.3 mm (15.8 inches) 412.7 mm (16.2 inches)
User Guide
Page 7
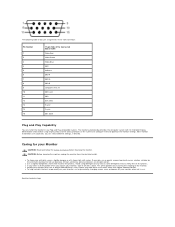
... Computer 5V/3.3V GND-sync GND DDC data H-sync V-sync DDC clock Plug and Play Capability You can configure itself and optimize the monitor settings. l To help maintain the best image quality on the plastics. l To clean your antistatic screen, slightly dampen a soft, ...clean cloth with its Extended Display Identification Data (EDID) using detergent of any Plug and Play-compatible system. The monitor automatically provides the computer system with water. The following table shows pin assignments in the VGA connector: Pin Number 1 2 3 4 5 6 7 8...
... Computer 5V/3.3V GND-sync GND DDC data H-sync V-sync DDC clock Plug and Play Capability You can configure itself and optimize the monitor settings. l To help maintain the best image quality on the plastics. l To clean your antistatic screen, slightly dampen a soft, ...clean cloth with its Extended Display Identification Data (EDID) using detergent of any Plug and Play-compatible system. The monitor automatically provides the computer system with water. The following table shows pin assignments in the VGA connector: Pin Number 1 2 3 4 5 6 7 8...
User Guide
Page 8
...the plug, not the cable, when disconnecting the monitor from where people could void your computer, be sure to Contents Page Appendix Dell™ SE197FP Flat Panel Monitor User's Guide FCC Notice (U.S. l Move the ...LCD monitor in this equipment does cause harmful interference with the AC power available in your monitor is provided on the device or devices covered in locations that may block the ventilation openings in a residential installation. If this document in accordance with the FCC regulations: l Product name:SE197FP l Model number:SE197FPf l Company name: Dell...
...the plug, not the cable, when disconnecting the monitor from where people could void your computer, be sure to Contents Page Appendix Dell™ SE197FP Flat Panel Monitor User's Guide FCC Notice (U.S. l Move the ...LCD monitor in this equipment does cause harmful interference with the AC power available in your monitor is provided on the device or devices covered in locations that may block the ventilation openings in a residential installation. If this document in accordance with the FCC regulations: l Product name:SE197FP l Model number:SE197FPf l Company name: Dell...
User Guide
Page 9
... table. l High temperatures can clean the monitor with a damp cloth when necessary, being sure to Dell XPS™ portable computers is available at the time that is performed. l Unplug the monitor when it - Contacting Dell To contact Dell electronically, you need assistance in the table below...cover, as you need to use within the country for which codes to contact Dell, use your monitor near an easily accessible electric outlet. in the following websites: l www.dell.com l support.dell.com (support) For specific web addresses for an extended period of time. ...
... table. l High temperatures can clean the monitor with a damp cloth when necessary, being sure to Dell XPS™ portable computers is available at the time that is performed. l Unplug the monitor when it - Contacting Dell To contact Dell electronically, you need assistance in the table below...cover, as you need to use within the country for which codes to contact Dell, use your monitor near an easily accessible electric outlet. in the following websites: l www.dell.com l support.dell.com (support) For specific web addresses for an extended period of time. ...

User Guide
Page 16
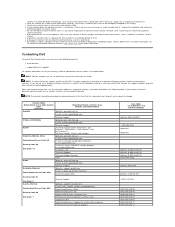
... Reader. To save the files. Then click File® Open and select the PDF file. Virgin Islands Venezuela E-mail: dell_direct_support@dell.com Customer Care website: support.euro.dell.com/uk/en/ECare/Form/Home.asp Sales Home and Small Business Sales Corporate/Public Sector Sales Customer Care Home and Small...1-800-247-4618 toll-free: 1-800-727-8320 toll-free: 1-877-DELLTTY (1-877-335-5889) toll-free: 1-877-702-4360 0800-100-4752 Your Monitor Set-up Guide To view PDF files (files with an extension of .pdf), click the document title. Setup Guide (.pdf) NOTES: PDF files require Adobe...
... Reader. To save the files. Then click File® Open and select the PDF file. Virgin Islands Venezuela E-mail: dell_direct_support@dell.com Customer Care website: support.euro.dell.com/uk/en/ECare/Form/Home.asp Sales Home and Small Business Sales Corporate/Public Sector Sales Customer Care Home and Small...1-800-247-4618 toll-free: 1-800-727-8320 toll-free: 1-877-DELLTTY (1-877-335-5889) toll-free: 1-877-702-4360 0800-100-4752 Your Monitor Set-up Guide To view PDF files (files with an extension of .pdf), click the document title. Setup Guide (.pdf) NOTES: PDF files require Adobe...

User Guide
Page 18
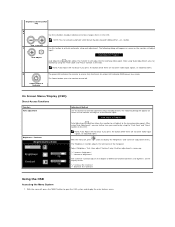
...to adjust the controls, an OSD shows their numeric values as they change. If it does not display an image, see Troubleshooting. Your monitor is equipped with an automatic power supply for a voltage range from menus and sub-menus, and to exit the OSD. Turn on ...' and 'Contrast' control menu. Back to Contents Page Using the OSD Dell™ SE197FP Flat Panel Monitor User's Guide Connecting Your Monitor Using the Front Panel Buttons Using the OSD Using the Dell™ Soundbar (Optional) Connecting Your Monitor CAUTION: Before you begin any of 50/60 Hz. Connect the power cable...
...to adjust the controls, an OSD shows their numeric values as they change. If it does not display an image, see Troubleshooting. Your monitor is equipped with an automatic power supply for a voltage range from menus and sub-menus, and to exit the OSD. Turn on ...' and 'Contrast' control menu. Back to Contents Page Using the OSD Dell™ SE197FP Flat Panel Monitor User's Guide Connecting Your Monitor Using the Front Panel Buttons Using the OSD Using the Dell™ Soundbar (Optional) Connecting Your Monitor CAUTION: Before you begin any of 50/60 Hz. Connect the power cable...
User Guide
Page 19
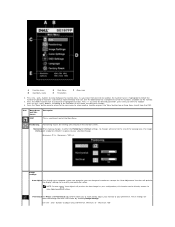
...Brightness' function adjusts the luminance of difference between darkness and lightness on screen as the monitor self-adjusts to the current input: Auto Adjust In Progress Brightness / Contrast Auto Adjustment button allows the monitor to self-adjust to display the 'Brightness' and 'Contrast' adjustment menu. "+" ...then adjust 'Contrast' only if further adjustment is on screen as the monitor self-adjusts to the current input: Auto Adjust Auto Adjust In Progress Auto Adjustment button allows the monitor to self-adjust to activate automatic setup and adjustment. The following dialog ...
...Brightness' function adjusts the luminance of difference between darkness and lightness on screen as the monitor self-adjusts to the current input: Auto Adjust In Progress Brightness / Contrast Auto Adjustment button allows the monitor to self-adjust to display the 'Brightness' and 'Contrast' adjustment menu. "+" ...then adjust 'Contrast' only if further adjustment is on screen as the monitor self-adjusts to the current input: Auto Adjust Auto Adjust In Progress Auto Adjustment button allows the monitor to self-adjust to activate automatic setup and adjustment. The following dialog ...
User Guide
Page 20
...optimize the display settings for use the - Minimum: 0 ~ Maximum: 100 As you to more closely adjust your new flat panel monitor on the monitor screen. Horizontal When making changes to either the Horizontal or Vertical settings, no changes will simply be directly access via Auto Adjustment ... to make your particular setup. and + buttons to enter the slidebar then use with your changes. 4. See the table below for the monitor. 3. Press -/+ to select the desired parameter, press menu to move from the OSD. Use the - Positioning: 'Positioning' moves the viewing...
...optimize the display settings for use the - Minimum: 0 ~ Maximum: 100 As you to more closely adjust your new flat panel monitor on the monitor screen. Horizontal When making changes to either the Horizontal or Vertical settings, no changes will simply be directly access via Auto Adjustment ... to make your particular setup. and + buttons to enter the slidebar then use with your changes. 4. See the table below for the monitor. 3. Press -/+ to select the desired parameter, press menu to move from the OSD. Use the - Positioning: 'Positioning' moves the viewing...
User Guide
Page 22
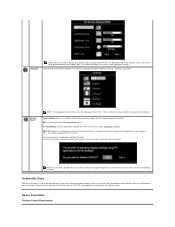
...reset at one of five languages (English, Español, Français, Deutsch, Japanese). Factory Reset returns the settings to adjust the monitor parameters (brightness, color, balance, etc.) via software applications on entry. DDC/CI (Display Data Channel/Command Interface) allows you have made. ... and optimum performance of your PC. You can select Yes or No according to another menu, or exit the OSD, the monitor automatically saves any software running on screen.Then user can disable this feature enabled. Reset Functions Factory Preset Restoration NOTE:If user select...
...reset at one of five languages (English, Español, Français, Deutsch, Japanese). Factory Reset returns the settings to adjust the monitor parameters (brightness, color, balance, etc.) via software applications on entry. DDC/CI (Display Data Channel/Command Interface) allows you have made. ... and optimum performance of your PC. You can select Yes or No according to another menu, or exit the OSD, the monitor automatically saves any software running on screen.Then user can disable this feature enabled. Reset Functions Factory Preset Restoration NOTE:If user select...
User Guide
Page 23
...and phase back to factory settings, activating auto adjust may appear on Dell Flat Panel Displays. Cannot Display This Video Mode Optimum resolution 1280 x1024 60Hz This means that the monitor cannot synchronize with the computer. Recommended mode is out of sync. ... (brightness, color, balance, etc.) via software applications on -screen if the monitor cannot sense a video signal. NOTE: The floating 'Dell - This could also indicate that the monitor is not synchronizing with the signal that the monitor is 1280 X 1024 @ 60Hz. This includes 'Color', 'Position', 'Clock frequency', 'Phase...
...and phase back to factory settings, activating auto adjust may appear on Dell Flat Panel Displays. Cannot Display This Video Mode Optimum resolution 1280 x1024 60Hz This means that the monitor cannot synchronize with the computer. Recommended mode is out of sync. ... (brightness, color, balance, etc.) via software applications on -screen if the monitor cannot sense a video signal. NOTE: The floating 'Dell - This could also indicate that the monitor is not synchronizing with the signal that the monitor is 1280 X 1024 @ 60Hz. This includes 'Color', 'Position', 'Clock frequency', 'Phase...
User Guide
Page 24
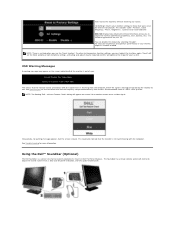
Connect the Soundbar with any device other than Dell Soundbar. Plug the power cables of the Soundbar into the computer's audio output jack. Insert the lime-green mini stereo plug from the rear of the monitor, attach the Soundbar aligning the two slots with the two tabs along the bottom rear of the...
Connect the Soundbar with any device other than Dell Soundbar. Plug the power cables of the Soundbar into the computer's audio output jack. Insert the lime-green mini stereo plug from the rear of the monitor, attach the Soundbar aligning the two slots with the two tabs along the bottom rear of the...
User Guide
Page 25
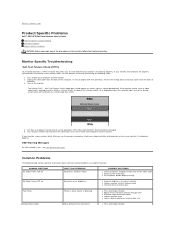
... Problems The following steps: 1. If your monitor and computer are properly connected but the monitor screen remains dark, run the monitor self-test by performing the following table contains general information about common monitor problems you to Contents Page Product Specific Problems Dell™ SE197FP Flat Panel Monitor User's Guide Monitor Specific Troubleshooting Common Problems Product Specific Problems...
... Problems The following steps: 1. If your monitor and computer are properly connected but the monitor screen remains dark, run the monitor self-test by performing the following table contains general information about common monitor problems you to Contents Page Product Specific Problems Dell™ SE197FP Flat Panel Monitor User's Guide Monitor Specific Troubleshooting Common Problems Product Specific Problems...
User Guide
Page 26
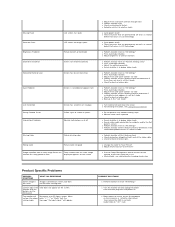
... correctly Screen has one or more lines Screen is scrambled or appears torn LCD Scratched Safety Related Issues Intermittent Problems Screen has scratches or smudges Visible signs of smoke or sparks Monitor malfunctions on & off Missing Color Picture missing color Wrong Color Picture color ... are pixels that are permanently off and is a natural defect that occurs in LCD technology l Cycle power on-off l These are pixels that are permanently on and is a natural defect that occurs in LCD technology l Perform monitor reset on "All Settings" l Press Auto Adjust button l Adjust brightness & ...
... correctly Screen has one or more lines Screen is scrambled or appears torn LCD Scratched Safety Related Issues Intermittent Problems Screen has scratches or smudges Visible signs of smoke or sparks Monitor malfunctions on & off Missing Color Picture missing color Wrong Color Picture color ... are pixels that are permanently off and is a natural defect that occurs in LCD technology l Cycle power on-off l These are pixels that are permanently on and is a natural defect that occurs in LCD technology l Perform monitor reset on "All Settings" l Press Auto Adjust button l Adjust brightness & ...
User Guide
Page 28
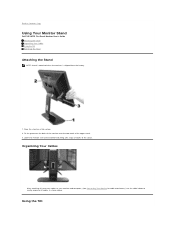
... on a flat surface. 2. Place the stand on the back of the monitor onto the two teeth of the upper stand. 3. Lower the monitor so that the monitor mounting area snaps on/locks to Contents Page Using Your Monitor Stand DellT SE197FP Flat Panel Monitor User's Guide Attaching the Stand Organizing Your Cables Using the Tilt Removing...
... on a flat surface. 2. Place the stand on the back of the monitor onto the two teeth of the upper stand. 3. Lower the monitor so that the monitor mounting area snaps on/locks to Contents Page Using Your Monitor Stand DellT SE197FP Flat Panel Monitor User's Guide Attaching the Stand Organizing Your Cables Using the Tilt Removing...
User Guide
Page 29
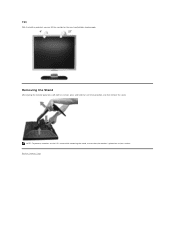
Removing the Stand After placing the monitor panel on a clean surface. Tilt With the built-in pedestal, you can tilt the monitor for the most comfortable viewing angle. NOTE: To prevent scratches on the LCD screen while removing the stand, ensure that the monitor is placed on a soft cloth or cushion, press and hold the LCD removal button, and then remove the stand. Back to Contents Page
Removing the Stand After placing the monitor panel on a clean surface. Tilt With the built-in pedestal, you can tilt the monitor for the most comfortable viewing angle. NOTE: To prevent scratches on the LCD screen while removing the stand, ensure that the monitor is placed on a soft cloth or cushion, press and hold the LCD removal button, and then remove the stand. Back to Contents Page


