
User Guide
Page 1
... of DellInc Microsoft and Windows are used as follows: NOTE: A NOTE indicates important information that this document to refer to either potential damage to change without the written permission of your Monitor Using Your Adjustable Monitor Stand Attaching the Stand Organizing Your Cables Using the Tilt Removing the Stand Using the OSD Connecting Your Monitor Using the Front Panel Buttons Using the OSD Using the Dell™ Soundbar (Optional) Product Specific Problems Monitor Specific Troubleshooting Common Problems Product Specific Problems Appendix FCC Notice...
... of DellInc Microsoft and Windows are used as follows: NOTE: A NOTE indicates important information that this document to refer to either potential damage to change without the written permission of your Monitor Using Your Adjustable Monitor Stand Attaching the Stand Organizing Your Cables Using the Tilt Removing the Stand Using the OSD Connecting Your Monitor Using the Front Panel Buttons Using the OSD Using the Dell™ Soundbar (Optional) Product Specific Problems Monitor Specific Troubleshooting Common Problems Product Specific Problems Appendix FCC Notice...
User Guide
Page 2
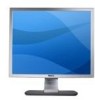
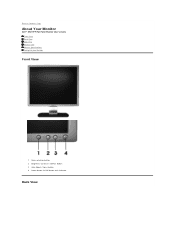
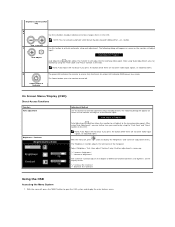
Back to Contents Page About Your Monitor Dell™ SE197FP Flat Panel Monitor User's Guide Front View Back View Side View Bottom View Monitor Specifications Caring for your Monitor Front View 1 Menu selection button 2 Brightness Contrast / Down(-) button 3 Auto-Adjust / Up(+) button 4 Power button On/Off button with indicator Back View
Back to Contents Page About Your Monitor Dell™ SE197FP Flat Panel Monitor User's Guide Front View Back View Side View Bottom View Monitor Specifications Caring for your Monitor Front View 1 Menu selection button 2 Brightness Contrast / Down(-) button 3 Auto-Adjust / Up(+) button 4 Power button On/Off button with indicator Back View
User Guide
Page 3
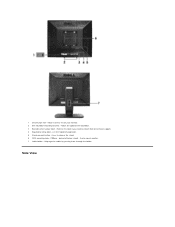
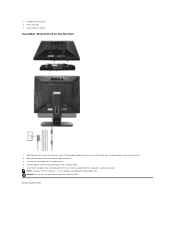
behind attached stand) - Side View 1 Security lock slot - Refer to this label if you need to release the stand. 6 VESA mounting holes ( 100mm - Attach the optional Dell Soundbar. 3 Barcode serial number label - Press to contact Dell for technical support. 4 Regulatory rating label - Attach a lock to mount monitor. 7 Cable holder - List the regulatory approvals. 5 Stand removal button - Use to secure your monitor. 2 Dell Soundbar mounting brackets - Help organize cables by passing them through the holder.
behind attached stand) - Side View 1 Security lock slot - Refer to this label if you need to release the stand. 6 VESA mounting holes ( 100mm - Attach the optional Dell Soundbar. 3 Barcode serial number label - Press to contact Dell for technical support. 4 Regulatory rating label - Attach a lock to mount monitor. 7 Cable holder - List the regulatory approvals. 5 Stand removal button - Use to secure your monitor. 2 Dell Soundbar mounting brackets - Help organize cables by passing them through the holder.
User Guide
Page 5
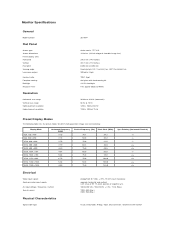
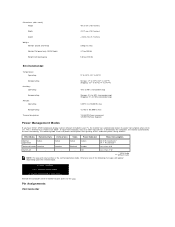
... horizontal and vertical, 3.3V Cmos or 5V TTL level, positive or negative sync. 100 to 240 VAC / 50 or 60 Hz + 3 Hz / 1.0 A (Max.) 120V: 40A (Max.) 240V: 80A (Max.) D-sub: Detachable, Analog, 15pin, blue connector, attached to the monitor Monitor Specifications General Model number Flat Panel Screen type Screen dimensions Preset display area: Horizontal Vertical Pixel pitch Viewing angle Luminance output Contrast ratio Faceplate coating Backlight Response Time Resolution Horizontal scan range Vertical scan range Optimal preset resolution Highest preset resolution SE197FP...
... horizontal and vertical, 3.3V Cmos or 5V TTL level, positive or negative sync. 100 to 240 VAC / 50 or 60 Hz + 3 Hz / 1.0 A (Max.) 120V: 40A (Max.) 240V: 80A (Max.) D-sub: Detachable, Analog, 15pin, blue connector, attached to the monitor Monitor Specifications General Model number Flat Panel Screen type Screen dimensions Preset display area: Horizontal Vertical Pixel pitch Viewing angle Luminance output Contrast ratio Faceplate coating Backlight Response Time Resolution Horizontal scan range Vertical scan range Optimal preset resolution Highest preset resolution SE197FP...
User Guide
Page 6
Dimensions (with stand): Height Width Depth Weight Monitor (Stand and Head) Monitor Flat panel only (VESA Mode) Weight with packaging 401.3 mm (15.8 inches) 412.7 mm (16.2 inches)
Dimensions (with stand): Height Width Depth Weight Monitor (Stand and Head) Monitor Flat panel only (VESA Mode) Weight with packaging 401.3 mm (15.8 inches) 412.7 mm (16.2 inches)
User Guide
Page 7
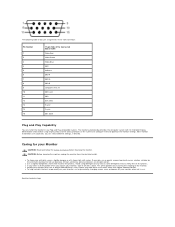
...-colored monitor. Most monitor installations are automatic; The following table shows pin assignments in the VGA connector: Pin Number 1 2 3 4 5 6 7 8 9 10 11 12 13 14 15 15-pin Side of the Connected Signal Cable Video-Red Video-Green Video-Blue GND Self-test GND-R GND-G GND-B Computer 5V/3.3V GND-sync GND DDC data H-sync V-sync DDC clock Plug and Play Capability You can configure itself and optimize the monitor settings. you unpack your Monitor...
...-colored monitor. Most monitor installations are automatic; The following table shows pin assignments in the VGA connector: Pin Number 1 2 3 4 5 6 7 8 9 10 11 12 13 14 15 15-pin Side of the Connected Signal Cable Video-Red Video-Green Video-Blue GND Self-test GND-R GND-G GND-B Computer 5V/3.3V GND-sync GND DDC data H-sync V-sync DDC clock Plug and Play Capability You can configure itself and optimize the monitor settings. you unpack your Monitor...
User Guide
Page 8
...: Safety Instruction Contacting Dell Your Monitor Set-up Guide FCC Notice (U.S. Operation is no guarantee that may not cause harmful interference. 2 This device must accept any AC input voltage according to the receiver. If this document in a bookcase or an enclosed space, be sure that are encouraged to try to Contents Page Appendix Dell™ SE197FP Flat Panel Monitor User's Guide FCC Notice...
...: Safety Instruction Contacting Dell Your Monitor Set-up Guide FCC Notice (U.S. Operation is no guarantee that may not cause harmful interference. 2 This device must accept any AC input voltage according to the receiver. If this document in a bookcase or an enclosed space, be sure that are encouraged to try to Contents Page Appendix Dell™ SE197FP Flat Panel Monitor User's Guide FCC Notice...
User Guide
Page 9
... the table below. l Hg Lamp(s) inside this document went to print and issubject to remove the back cover, as you can cause problems. Don't use the electronic addresses, telephone numbers, and codes provided in the following websites: l www.dell.com l support.dell.com (support) For specific web addresses for participating countries. For more information, Go Or contact the electronic industries alliance...
... the table below. l Hg Lamp(s) inside this document went to print and issubject to remove the back cover, as you can cause problems. Don't use the electronic addresses, telephone numbers, and codes provided in the following websites: l www.dell.com l support.dell.com (support) For specific web addresses for participating countries. For more information, Go Or contact the electronic industries alliance...

User Guide
Page 16
Setup Guide (.pdf) NOTES: PDF files require Adobe® Acrobat® Reader®, which you want to save the files. To view a PDF file, launch Acrobat Reader. Then click File® Open and select the PDF file. Virgin Islands Venezuela E-mail: dell_direct_support@dell.com Customer Care website: support.euro.dell.com/uk/en/ECare/Form/Home.asp Sales Home and Small Business Sales...
Setup Guide (.pdf) NOTES: PDF files require Adobe® Acrobat® Reader®, which you want to save the files. To view a PDF file, launch Acrobat Reader. Then click File® Open and select the PDF file. Virgin Islands Venezuela E-mail: dell_direct_support@dell.com Customer Care website: support.euro.dell.com/uk/en/ECare/Form/Home.asp Sales Home and Small Business Sales...

User Guide
Page 18
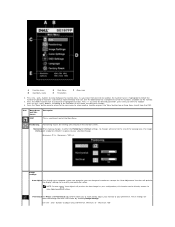
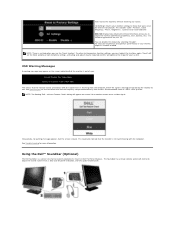
... its power cable. 2. Back to Contents Page Using the OSD Dell™ SE197FP Flat Panel Monitor User's Guide Connecting Your Monitor Using the Front Panel Buttons Using the OSD Using the Dell™ Soundbar (Optional) Connecting Your Monitor CAUTION: Before you begin any of the procedures in this button for direct access to the 'Brightness' and 'Contrast' control menu. Turn on the back of the display. 4. Using the Front Panel Buttons Use the control buttons on the front of the monitor to the corresponding video port on -screen display (OSD), select...
... its power cable. 2. Back to Contents Page Using the OSD Dell™ SE197FP Flat Panel Monitor User's Guide Connecting Your Monitor Using the Front Panel Buttons Using the OSD Using the Dell™ Soundbar (Optional) Connecting Your Monitor CAUTION: Before you begin any of the procedures in this button for direct access to the 'Brightness' and 'Contrast' control menu. Turn on the back of the display. 4. Using the Front Panel Buttons Use the control buttons on the front of the monitor to the corresponding video port on -screen display (OSD), select...
User Guide
Page 19
An amber LED indicates DPMS power save mode. Adjust 'Brightness' first, then adjust 'Contrast' only if further adjustment is on and fully functional. D The green LED indicates the monitor is necessary. After using 'Auto Adjustment', you press the button while there are no active video input signals, or attached cables With the menu off, press button to open the OSD system and display the main features menu. The following dialog will not occur if you can further...
An amber LED indicates DPMS power save mode. Adjust 'Brightness' first, then adjust 'Contrast' only if further adjustment is on and fully functional. D The green LED indicates the monitor is necessary. After using 'Auto Adjustment', you press the button while there are no active video input signals, or attached cables With the menu off, press button to open the OSD system and display the main features menu. The following dialog will not occur if you can further...
User Guide
Page 20
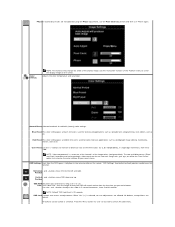
... best image for your configuration; this function can recognize your particular setup. and + buttons to move from the OSD. Minimum: 0 ~ Maximum: 100 Use the - See the table below for a complete list of the viewing area; the image Vertical will optimize the display settings for the monitor. 3. Horizontal When making changes to either the Horizontal or Vertical settings, no changes will occur to enter the slidebar then use with your new flat panel monitor...
... best image for your configuration; this function can recognize your particular setup. and + buttons to move from the OSD. Minimum: 0 ~ Maximum: 100 Use the - See the table below for a complete list of the viewing area; the image Vertical will optimize the display settings for the monitor. 3. Horizontal When making changes to either the Horizontal or Vertical settings, no changes will occur to enter the slidebar then use with your new flat panel monitor...
User Guide
Page 21
... 'warmth' of the image colors (red/green/blue). When 'Yes' (+) is used for over this location. Press the 'Menu' button for color-intensive applications such as it displays in use 'Phase' again. buttons to increase or decrease each one to obtain the default (factory) color settings. OSD Lock Controls user access to center the display image on the screen. 'OSD Settings' (horizontal/vertical) provides control over 15 seconds to '100'. Color Settings: NOTE: This function may change the width of time...
... 'warmth' of the image colors (red/green/blue). When 'Yes' (+) is used for over this location. Press the 'Menu' button for color-intensive applications such as it displays in use 'Phase' again. buttons to increase or decrease each one to obtain the default (factory) color settings. OSD Lock Controls user access to center the display image on the screen. 'OSD Settings' (horizontal/vertical) provides control over 15 seconds to '100'. Color Settings: NOTE: This function may change the width of time...
User Guide
Page 22
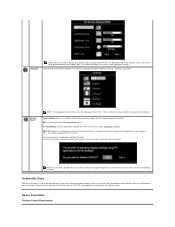
... the adjustment will appear on your monitor, keep this feature by selecting "Disable". For All settings, all applicable settings. Language: NOTE: When the OSD is used to exit out of Factory Reset menu. DDC/CI (Display Data Channel/Command Interface) allows you to display in one time except 'Language settings'. Language sets the OSD to adjust the monitor parameters (brightness, color, balance, etc.) via software applications on screen.Then user can disable this feature enabled. Reset Functions Factory Preset...
... the adjustment will appear on your monitor, keep this feature by selecting "Disable". For All settings, all applicable settings. Language: NOTE: When the OSD is used to exit out of Factory Reset menu. DDC/CI (Display Data Channel/Command Interface) allows you to display in one time except 'Language settings'. Language sets the OSD to adjust the monitor parameters (brightness, color, balance, etc.) via software applications on screen.Then user can disable this feature enabled. Reset Functions Factory Preset...
User Guide
Page 23
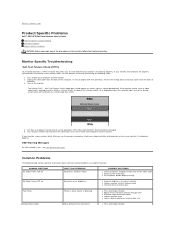
... Troubleshooting for the monitor to factory settings, activating auto adjust may appear on Dell Flat Panel Displays. 'Exit' leaves this submenu without resetting any values. 'All Settings' returns your monitor, keep this feature enabled. Recommended mode is blank. Occasionally, no Undo when you to adjust the overall system level, a blue LED for the Horizontal and Vertical frequency ranges addressable by selecting "Disable". Either the signal is out of manufacture. This includes 'Color', 'Position', 'Clock frequency', 'Phase', 'Brightness', 'Contrast' and 'OSD...
... Troubleshooting for the monitor to factory settings, activating auto adjust may appear on Dell Flat Panel Displays. 'Exit' leaves this submenu without resetting any values. 'All Settings' returns your monitor, keep this feature enabled. Recommended mode is blank. Occasionally, no Undo when you to adjust the overall system level, a blue LED for the Horizontal and Vertical frequency ranges addressable by selecting "Disable". Either the signal is out of manufacture. This includes 'Color', 'Position', 'Clock frequency', 'Phase', 'Brightness', 'Contrast' and 'OSD...
User Guide
Page 24
Power/Volume control Soundbar Attachment to Contents Page NOTICE: Do not use with the power brick. 4. Connect the Soundbar with any device other than Dell Soundbar. Insert the lime-green mini stereo plug from the rear of the monitor, attach the Soundbar aligning the two slots with the two tabs along the bottom rear of the monitor. 2. Back to the Monitor 1. Plug the power cables of...
Power/Volume control Soundbar Attachment to Contents Page NOTICE: Do not use with the power brick. 4. Connect the Soundbar with any device other than Dell Soundbar. Insert the lime-green mini stereo plug from the rear of the monitor, attach the Soundbar aligning the two slots with the two tabs along the bottom rear of the monitor. 2. Back to the Monitor 1. Plug the power cables of...
User Guide
Page 25
... allows you begin any of the computer. To ensure proper Self-Test operation, remove the Analog (blue connector) cables from the back of the procedures in self-test mode, the power LED remains green. Back to Contents Page Product Specific Problems Dell™ SE197FP Flat Panel Monitor User's Guide Monitor Specific Troubleshooting Common Problems Product Specific Problems CAUTION: Before you to check whether your monitor is functioning properly. COMMON SYMPTOMS No Video/ Power LED off your monitor and reconnect the video cable;
... allows you begin any of the computer. To ensure proper Self-Test operation, remove the Analog (blue connector) cables from the back of the procedures in self-test mode, the power LED remains green. Back to Contents Page Product Specific Problems Dell™ SE197FP Flat Panel Monitor User's Guide Monitor Specific Troubleshooting Common Problems Product Specific Problems CAUTION: Before you to check whether your monitor is functioning properly. COMMON SYMPTOMS No Video/ Power LED off your monitor and reconnect the video cable;
User Guide
Page 26
... input signal " will No picture, the LED light is green. When not go into power press "+", "-" or "Menu" key, the saving mode. POSSIBLE SOLUTIONS l Perform monitor reset on "All Settings" l Turn the monitor off and unplug the power cord and then plug back and power on l Move mouse or hit any troubleshooting steps l Monitor needs to be replaced l Ensure monitor is in proper video mode l Ensure video cable connection to computer and to the flat panel is secure l Perform monitor reset on "All Settings...
... input signal " will No picture, the LED light is green. When not go into power press "+", "-" or "Menu" key, the saving mode. POSSIBLE SOLUTIONS l Perform monitor reset on "All Settings" l Turn the monitor off and unplug the power cord and then plug back and power on l Move mouse or hit any troubleshooting steps l Monitor needs to be replaced l Ensure monitor is in proper video mode l Ensure video cable connection to computer and to the flat panel is secure l Perform monitor reset on "All Settings...
User Guide
Page 27
... or video player. Back to unlock the OSD menu. l Check whether the signal cable is not in and seated properly. OSD Lock All buttons are allowed. When press "+", "-" or "Menu" key, the message " No input signal " will appear. No user adjustments are locked except the "menu" button. No Input Signal when user controls pressed No picture, the LED light is green. l Press the "menu" button for over 15 seconds to Contents Page l Check the signal source Make sure the Computer is plugged in power saving...
... or video player. Back to unlock the OSD menu. l Check whether the signal cable is not in and seated properly. OSD Lock All buttons are allowed. When press "+", "-" or "Menu" key, the message " No input signal " will appear. No user adjustments are locked except the "menu" button. No Input Signal when user controls pressed No picture, the LED light is green. l Press the "menu" button for over 15 seconds to Contents Page l Check the signal source Make sure the Computer is plugged in power saving...
User Guide
Page 28
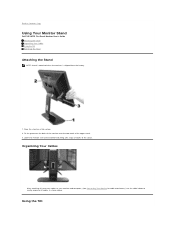
... the monitor so that the monitor mounting area snaps on/locks to neatly organize all necessary cables to your monitor and computer, (See Connecting Your Monitor for cable attachment,) use the cable holder to the stand. Back to Contents Page Using Your Monitor Stand DellT SE197FP Flat Panel Monitor User's Guide Attaching the Stand Organizing Your Cables Using the Tilt Removing the Stand Attaching the Stand NOTE: Stand is detached when the monitor is shipped from the factory. 1. Place the stand on...
... the monitor so that the monitor mounting area snaps on/locks to neatly organize all necessary cables to your monitor and computer, (See Connecting Your Monitor for cable attachment,) use the cable holder to the stand. Back to Contents Page Using Your Monitor Stand DellT SE197FP Flat Panel Monitor User's Guide Attaching the Stand Organizing Your Cables Using the Tilt Removing the Stand Attaching the Stand NOTE: Stand is detached when the monitor is shipped from the factory. 1. Place the stand on...


