
Installation and Troubleshooting Guide (.htm)
Page 3
... Contents 3 Contents Safety Instructions 5 Installation Instructions 6 Before You Begin 6 Installing the Tower-to-Rack Kit 7 Tower-to-Rack Kit Contents 8 Recommended Tools and Supplies 8 Conversion Tasks 8 Removing the Optional Tower Bezel, Metal Feet, and Cover 9 Removing the Control Panel Assembly and Tower Front Panel 11 Installing the Rack Front Panel and Control Panel Assembly 13 Removing the Trim Panel...
... Contents 3 Contents Safety Instructions 5 Installation Instructions 6 Before You Begin 6 Installing the Tower-to-Rack Kit 7 Tower-to-Rack Kit Contents 8 Recommended Tools and Supplies 8 Conversion Tasks 8 Removing the Optional Tower Bezel, Metal Feet, and Cover 9 Removing the Control Panel Assembly and Tower Front Panel 11 Installing the Rack Front Panel and Control Panel Assembly 13 Removing the Trim Panel...

Installation and Troubleshooting Guide (.htm)
Page 5
... that the rack meets the specifications. Tower-to tip over , potentially resulting in a rack. Precautions for Rack-Mountable Products Observe the following safety guidelines to ensure your own personal safety and to help protect your responsibility to have the final combination of more than one time. The weight of system and rack kit in the rack. It...
... that the rack meets the specifications. Tower-to tip over , potentially resulting in a rack. Precautions for Rack-Mountable Products Observe the following safety guidelines to ensure your own personal safety and to help protect your responsibility to have the final combination of more than one time. The weight of system and rack kit in the rack. It...

Installation and Troubleshooting Guide (.htm)
Page 6
... the leveling feet for support and to prevent the cabinet from rolling. 6 Tower-to install the next system. One rack kit is required for each system installed in most industry-standard rack cabinets. Avoid long or steep inclines or ramps where loss of American National ...be installed by trained service technicians in a rack. The Dell™ RapidRails™ rack kit can be extremely heavy and move easily on any Dell rack cabinet and in a rack, complete all the manufacturer's rack cabinets without tools, and the VersaRails™ rack kit can be installed in all of the ...
... the leveling feet for support and to prevent the cabinet from rolling. 6 Tower-to install the next system. One rack kit is required for each system installed in most industry-standard rack cabinets. Avoid long or steep inclines or ramps where loss of American National ...be installed by trained service technicians in a rack. The Dell™ RapidRails™ rack kit can be extremely heavy and move easily on any Dell rack cabinet and in a rack, complete all the manufacturer's rack cabinets without tools, and the VersaRails™ rack kit can be installed in all of the ...
Installation and Troubleshooting Guide (.htm)
Page 7
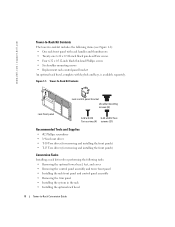
Installing the Tower-to-Rack Kit CAUTION: The system may be involved. Your system may be very large and heavy, and proper preparation and planning are installed high up to 49 kilograms (108 pounds) when fully loaded. Tower-to move the system by yourself. Failure to install stabilizers accordingly before installing components in bodily injury...
Installing the Tower-to-Rack Kit CAUTION: The system may be involved. Your system may be very large and heavy, and proper preparation and planning are installed high up to 49 kilograms (108 pounds) when fully loaded. Tower-to move the system by yourself. Failure to install stabilizers accordingly before installing components in bodily injury...
Installation and Troubleshooting Guide (.htm)
Page 8
... 6-32 x 0.312-inch black pan-head Torx screws • Four 6-32 x 0.312-inch black flat-head Phillips screws • Six shoulder mounting screws • Replacement rack control-panel bracket An optional rack bezel, complete with keylock and keys, is available separately. www.dell.com | support.dell.com Tower-to-Rack Kit Contents The tower-to -Rack Conversion Guide Figure 1-1.
... 6-32 x 0.312-inch black pan-head Torx screws • Four 6-32 x 0.312-inch black flat-head Phillips screws • Six shoulder mounting screws • Replacement rack control-panel bracket An optional rack bezel, complete with keylock and keys, is available separately. www.dell.com | support.dell.com Tower-to-Rack Kit Contents The tower-to -Rack Conversion Guide Figure 1-1.
Installation and Troubleshooting Guide (.htm)
Page 13
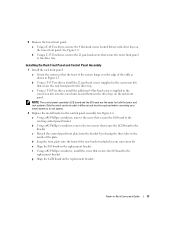
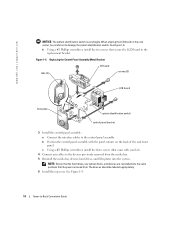
... #2 Phillips screwdriver, install the screw that secures the I /O board are the same for both the tower and rack systems. Only the metal carrier bracket is different and must be replaced when converting your conversion kit. NOTE: The control panel assembly's LCD board and the I /O board to the replacement bracket. ...the three tabs on the inside of the table as shown in your tower system to a rack system. 2 Replace the metal bracket in the conversion kit) that secure the tower front panel to the drive tray. 5 Remove the tower front panel: a Using a T-10 Torx driver, remove the 4...
... #2 Phillips screwdriver, install the screw that secures the I /O board are the same for both the tower and rack systems. Only the metal carrier bracket is different and must be replaced when converting your conversion kit. NOTE: The control panel assembly's LCD board and the I /O board to the replacement bracket. ...the three tabs on the inside of the table as shown in your tower system to a rack system. 2 Replace the metal bracket in the conversion kit) that secure the tower front panel to the drive tray. 5 Remove the tower front panel: a Using a T-10 Torx driver, remove the 4...
Installation and Troubleshooting Guide (.htm)
Page 14
... plates into the same positions that secure the LCD board to the replacement bracket. b Position the control panel assembly with your kit). 4 Connect any optical drives, and devices are reinstalled into the system. NOTE: Ensure that the hard drives, any cables ...screwdriver, install the three screws (that came with the panel cutouts on the rack carrier, be labeled appropriately. 6 Install the top cover. See Figure 1-4. 14 Tower-to the control panel assembly. www.dell.com | support.dell.com NOTICE: The system identification switch is very fragile. Figure 1-6. When ...
... plates into the same positions that secure the LCD board to the replacement bracket. b Position the control panel assembly with your kit). 4 Connect any optical drives, and devices are reinstalled into the system. NOTE: Ensure that the hard drives, any cables ...screwdriver, install the three screws (that came with the panel cutouts on the rack carrier, be labeled appropriately. 6 Install the top cover. See Figure 1-4. 14 Tower-to the control panel assembly. www.dell.com | support.dell.com NOTICE: The system identification switch is very fragile. Figure 1-6. When ...

Installation and Troubleshooting Guide (.htm)
Page 15
...Removing the Trim Panel 1 Lay the system on the system, install the six shoulder screws included with the kit, attaching three screws to prevent loosening. See Figure 1-7. 3 Using a #2 Phillips screwdriver or 1/4-inch ...Slide the trim panel backward and then remove the trim panel from the side of the system in the rack and to each side. Removing the Trim Panel hex-head Phillips screws (6) shoulder mounting screws (6) 2 Using... 5 If not already present on its cover as shown in the rack. Tower-to install in Figure 1-7. Figure 1-7. The system is ready to -Rack Conversion Guide 15
...Removing the Trim Panel 1 Lay the system on the system, install the six shoulder screws included with the kit, attaching three screws to prevent loosening. See Figure 1-7. 3 Using a #2 Phillips screwdriver or 1/4-inch ...Slide the trim panel backward and then remove the trim panel from the side of the system in the rack and to each side. Removing the Trim Panel hex-head Phillips screws (6) shoulder mounting screws (6) 2 Using... 5 If not already present on its cover as shown in the rack. Tower-to install in Figure 1-7. Figure 1-7. The system is ready to -Rack Conversion Guide 15


