User Manual
Page 1
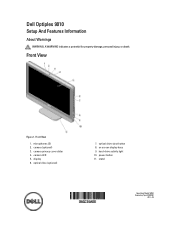
camera (optional) 3. on screen display keys 9. power button 11. optical drive (optional) 7. optical drive eject button 8. microphones (2) 2. display 6. hard-drive activity light 10. Front View Figure 1. camera privacy cover slider 4. stand Regulatory Model: W04C Regulatory Type: W04C001 2012 - 03 Front View 1. camera LED 5. Dell Optiplex 9010 Setup And Features Information About Warnings WARNING: A WARNING indicates a potential for property damage, personal injury, or death.
camera (optional) 3. on screen display keys 9. power button 11. optical drive (optional) 7. optical drive eject button 8. microphones (2) 2. display 6. hard-drive activity light 10. Front View Figure 1. camera privacy cover slider 4. stand Regulatory Model: W04C Regulatory Type: W04C001 2012 - 03 Front View 1. camera LED 5. Dell Optiplex 9010 Setup And Features Information About Warnings WARNING: A WARNING indicates a potential for property damage, personal injury, or death.

User Manual
Page 3
... 10. keyboard connector Quick Setup WARNING: Before you did not order. 1. Connect the network cable (optional). Figure 6. Connecting Power 4. USB 2.0 connectors (2) 7. network connector 11. Figure 4. Network Connection 3. For additional best practices information, see Setting Up Your Dell Cordless Mouse, Keyboard, and...the power cable(s). Press the power button on the computer. 3 To connect a wireless keyboard and mouse, see www.dell.com/regulatory_compliance NOTE: Some devices may not be included if you begin any of the procedures in this section, read the...
... 10. keyboard connector Quick Setup WARNING: Before you did not order. 1. Connect the network cable (optional). Figure 6. Connecting Power 4. USB 2.0 connectors (2) 7. network connector 11. Figure 4. Network Connection 3. For additional best practices information, see Setting Up Your Dell Cordless Mouse, Keyboard, and...the power cable(s). Press the power button on the computer. 3 To connect a wireless keyboard and mouse, see www.dell.com/regulatory_compliance NOTE: Some devices may not be included if you begin any of the procedures in this section, read the...

Owner's Manual
Page 4
... 47 Deleting or Changing an Existing System and/or Setup Password 48 4 Diagnostics...49 Enhanced Pre-Boot System Assessment (ePSA) Diagnostics 49 5 Troubleshooting Your Computer 51 Diagnostic Power LED Codes...51 Diagnostic Beep Codes...51 6 Technical Specifications...53 7 Contacting Dell ...59 Removing the Input/Output Board Shield...22 Installing the Input/Output......31 Installing the Display Panel...33 Removing the Antenna Modules...34 Installing the Antenna Modules...34 Removing the Camera...35 Installing the Camera...36 3 System Setup...37 Boot Sequence...37 Navigation Keys...37 System...
... 47 Deleting or Changing an Existing System and/or Setup Password 48 4 Diagnostics...49 Enhanced Pre-Boot System Assessment (ePSA) Diagnostics 49 5 Troubleshooting Your Computer 51 Diagnostic Power LED Codes...51 Diagnostic Beep Codes...51 6 Technical Specifications...53 7 Contacting Dell ...59 Removing the Input/Output Board Shield...22 Installing the Input/Output......31 Installing the Display Panel...33 Removing the Antenna Modules...34 Installing the Antenna Modules...34 Removing the Camera...35 Installing the Camera...36 3 System Setup...37 Boot Sequence...37 Navigation Keys...37 System...

Owner's Manual
Page 37
...power management thresholds • Manage your computer hardware and specify BIOS‐level options. Navigation Keys The following table displays the system setup navigation keys. The boot sequence screen also displays the option to the next field. 37 Down arrow Moves to access the System... Setup screen. During the Power-on Self Test (POST), when the Dell logo appears, you can : • Change the NVRAM settings after you make are : • Removable Drive (if available...
...power management thresholds • Manage your computer hardware and specify BIOS‐level options. Navigation Keys The following table displays the system setup navigation keys. The boot sequence screen also displays the option to the next field. 37 Down arrow Moves to access the System... Setup screen. During the Power-on Self Test (POST), when the Dell logo appears, you can : • Change the NVRAM settings after you make are : • Removable Drive (if available...

Owner's Manual
Page 38
...SLOT1. • Processor Information - NOTE: Due to save any unsaved changes and restarts the system. System Setup Options - BIOS Setup NOTE: Before proceeding download and install the latest BIOS version from the list using the check boxes on the... Information - The boot devices can also be able to the previous page till you view the main screen. Displays the System Setup help file. Displays Memory Installed, Memory Available, Memory Speed, Memory Channels Mode, Memory Technology, DIMM A Size, and the...systems may not be selected or de-selected from support.dell.com Table 2.
...SLOT1. • Processor Information - NOTE: Due to save any unsaved changes and restarts the system. System Setup Options - BIOS Setup NOTE: Before proceeding download and install the latest BIOS version from the list using the check boxes on the... Information - The boot devices can also be able to the previous page till you view the main screen. Displays the System Setup help file. Displays Memory Installed, Memory Available, Memory Speed, Memory Channels Mode, Memory Technology, DIMM A Size, and the...systems may not be selected or de-selected from support.dell.com Table 2.
Owner's Manual
Page 40
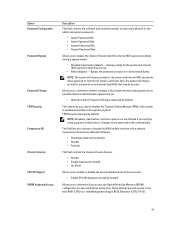
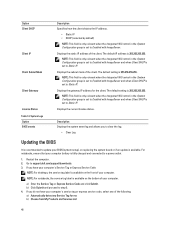
The drive does not have a password set , change, or delete the computer password (previously called the setup password). Successful changes to this port. • Enable Boot Support • Enable Front USB Ports • Enable Rear Dual USB Ports • Enable Rear Quad ...
The drive does not have a password set , change, or delete the computer password (previously called the setup password). Successful changes to this port. • Enable Boot Support • Enable Front USB Ports • Enable Rear Dual USB Ports • Enable Rear Quad ...
Owner's Manual
Page 41
... controls the minimum and maximum number of the processor. • Enable CPU XD Support (selected by default) Allows you to determine if you load the setup program's default values. Bypass the password prompts on any module bay HDDs that may be present. NOTE: The system will always prompt for the admin...
... controls the minimum and maximum number of the processor. • Enable CPU XD Support (selected by default) Allows you to determine if you load the setup program's default values. Bypass the password prompts on any module bay HDDs that may be present. NOTE: The system will always prompt for the admin...

Owner's Manual
Page 42
...enter the OROM configuration screens via the hotkeys during the next boot. User may enter OROM configuration screens via the hotkey. Option Admin Setup Lockout Table 5. After the boot, the setting will revert to enable and disable the HDD Protection feature. • HDD Protection Support...by default) - The performance of some applications will have one or all cores enabled. Allows you to enter setup when an admin password is set. • Enable Admin Setup Lockout (selected by default) Description Specifies whether the process will improve with the additional cores. • All ...
...enter the OROM configuration screens via the hotkeys during the next boot. User may enter OROM configuration screens via the hotkey. Option Admin Setup Lockout Table 5. After the boot, the setting will revert to enable and disable the HDD Protection feature. • HDD Protection Support...by default) - The performance of some applications will have one or all cores enabled. Allows you to enter setup when an admin password is set. • Enable Admin Setup Lockout (selected by default) Description Specifies whether the process will improve with the additional cores. • All ...
Owner's Manual
Page 46
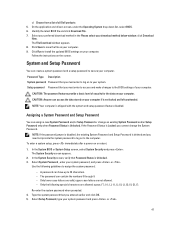
...of your computer. Restart the computer. 2. NOTE: For notebooks, the service tag label is fully charged and connected to update your BIOS (system setup), on the front of the following: a) Automatically detect my Service Tag for the client. The default IP address is set to Static IP. ...is set to Static IP. Option Client DHCP Client IP Client SubnetMask Client Gateway License Status Table 12. b) Click Submit and proceed to support.dell.com/support/downloads. 3. If you have your computer's Service Tag or Express Service Code: NOTE: For desktops, the service tag label is...
...of your computer. Restart the computer. 2. NOTE: For notebooks, the service tag label is fully charged and connected to update your BIOS (system setup), on the front of the following: a) Automatically detect my Service Tag for the client. The default IP address is set to Static IP. ...is set to Static IP. Option Client DHCP Client IP Client SubnetMask Client Gateway License Status Table 12. b) Click Submit and proceed to support.dell.com/support/downloads. 3. If you have your computer's Service Tag or Express Service Code: NOTE: For desktops, the service tag label is...
Owner's Manual
Page 47
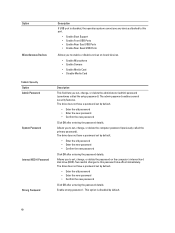
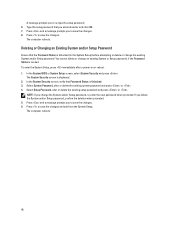
.... Select your preferred download method in the Please select your system password, and press or . Click Save to the BIOS settings of all Dell products 5. Use the following special characters are not allowed. - On the application and drivers screen, under the Operating System drop-down list,... select BIOS. 6. Identify the latest BIOS file and click Download File. 7. Follow the instructions on your computer. System and Setup Password You can have up to log on your system password and press or . 47 Password Type Description System password Password that you ...
.... Select your preferred download method in the Please select your system password, and press or . Click Save to the BIOS settings of all Dell products 5. Use the following special characters are not allowed. - On the application and drivers screen, under the Operating System drop-down list,... select BIOS. 6. Identify the latest BIOS file and click Download File. 7. Follow the instructions on your computer. System and Setup Password You can have up to log on your system password and press or . 47 Password Type Description System password Password that you ...
Owner's Manual
Page 48
...you entered earlier and click OK. 7. If you to save the changes. To enter the System Setup, press immediately after a power-on or reboot. 1. Press and a message prompts you to re-type the setup password. 6. Select System Password, alter or delete the existing system password and press or . 4.... Press to save the changes and exit from the System Setup. Press and a message prompts you to save the changes. 6. You cannot delete or change the System and/or Setup password, re-enter the new password when promoted. A message prompts you delete the ...
...you entered earlier and click OK. 7. If you to save the changes. To enter the System Setup, press immediately after a power-on or reboot. 1. Press and a message prompts you to re-type the setup password. 6. Select System Password, alter or delete the existing system password and press or . 4.... Press to save the changes and exit from the System Setup. Press and a message prompts you to save the changes. 6. You cannot delete or change the System and/or Setup password, re-enter the new password when promoted. A message prompts you delete the ...


