Owners Manual
Page 11
...not use only the battery designed for other Dell computers. 1. The computer turns off after the operating system shutdown process is complete. 2. After Working Inside Your Computer After you complete any telephone or network cables to your computer. Connect any replacement procedure, ensure you shut..., or media base, and replace any external devices, cards, and cables before you turn off your operating system, press and hold the power button for about 4 seconds to the computer, use batteries designed for this particular Dell computer. If your computer and attached ...
...not use only the battery designed for other Dell computers. 1. The computer turns off after the operating system shutdown process is complete. 2. After Working Inside Your Computer After you complete any telephone or network cables to your computer. Connect any replacement procedure, ensure you shut..., or media base, and replace any external devices, cards, and cables before you turn off your operating system, press and hold the power button for about 4 seconds to the computer, use batteries designed for this particular Dell computer. If your computer and attached ...
Owners Manual
Page 12
Replace the battery. 4. Connect your computer. 12 Turn on your computer and all attached devices to their electrical outlets. 5. CAUTION: To connect a network cable, first plug the cable into the network device and then plug it into the computer. 3.
Replace the battery. 4. Connect your computer. 12 Turn on your computer and all attached devices to their electrical outlets. 5. CAUTION: To connect a network cable, first plug the cable into the network device and then plug it into the computer. 3.

Owners Manual
Page 22
Pull and remove the hard-drive caddy away from the hard drive. Slide the hard drive into the computer. 4. Replace and tighten the screws that secure the hard drive to the hard drive. 2. Follow the procedures in After working inside your computer. 22 6. Install the battery. 6. Attach the hard-drive caddy to the computer. 5. Tighten the screws to secure the hard-drive caddy to the hard drive. 3. Installing The Hard Drive 1.
Pull and remove the hard-drive caddy away from the hard drive. Slide the hard drive into the computer. 4. Replace and tighten the screws that secure the hard drive to the hard drive. 2. Follow the procedures in After working inside your computer. 22 6. Install the battery. 6. Attach the hard-drive caddy to the computer. 5. Tighten the screws to secure the hard-drive caddy to the hard drive. 3. Installing The Hard Drive 1.
Owners Manual
Page 34
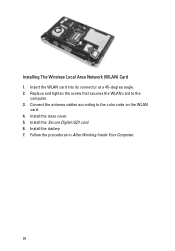
Replace and tighten the screw that secures the WLAN card to the color code on the WLAN card. 4. Installing The Wireless Local Area Network (WLAN) Card 1. Install the Secure Digital (SD) card. 6. Follow the procedures in After Working Inside Your Computer. 34 Install the battery 7. Insert the WLAN card into its connector at a 45-degree angle. 2. Install the base cover. 5. Connect the antenna cables according to the computer. 3.
Replace and tighten the screw that secures the WLAN card to the color code on the WLAN card. 4. Installing The Wireless Local Area Network (WLAN) Card 1. Install the Secure Digital (SD) card. 6. Follow the procedures in After Working Inside Your Computer. 34 Install the battery 7. Insert the WLAN card into its connector at a 45-degree angle. 2. Install the base cover. 5. Connect the antenna cables according to the computer. 3.
Owners Manual
Page 36
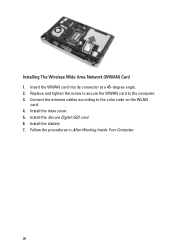
Install the Secure Digital (SD) card. 6. Connect the antenna cables according to the computer. 3. Install the battery 7. Install the base cover. 5. Insert the WWAN card into its connector at a 45-degree angle. 2. Replace and tighten the screw to secure the WWAN card to the color code on the WLAN card. 4. Follow the procedures in After Working Inside Your Computer. 36 Installing The Wireless Wide Area Network (WWAN) Card 1.
Install the Secure Digital (SD) card. 6. Connect the antenna cables according to the computer. 3. Install the battery 7. Install the base cover. 5. Insert the WWAN card into its connector at a 45-degree angle. 2. Replace and tighten the screw to secure the WWAN card to the color code on the WLAN card. 4. Follow the procedures in After Working Inside Your Computer. 36 Installing The Wireless Wide Area Network (WWAN) Card 1.
Owners Manual
Page 41
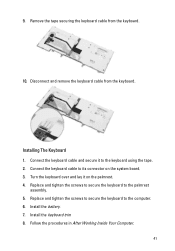
... tighten the screws to secure the keyboard to the palmrest assembly. 5. Disconnect and remove the keyboard cable from the keyboard. 10. Install the battery. 7. Replace and tighten the screws to secure the keyboard to the computer. 6. Install the keyboard trim 8. Remove the tape securing the keyboard cable from the keyboard. ...
... tighten the screws to secure the keyboard to the palmrest assembly. 5. Disconnect and remove the keyboard cable from the keyboard. 10. Install the battery. 7. Replace and tighten the screws to secure the keyboard to the computer. 6. Install the keyboard trim 8. Remove the tape securing the keyboard cable from the keyboard. ...
Owners Manual
Page 45
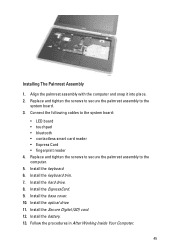
... the system board. 3. Install the keyboard trim. 7. Replace and tighten the screws to secure the palmrest assembly to the system board: • LED board • touchpad • bluetooth • contactless smart card reader • Express Card • fingerprint reader 4. Install the ExpressCard. 9. Install the battery. 13. Installing The Palmrest Assembly 1. Install the...
... the system board. 3. Install the keyboard trim. 7. Replace and tighten the screws to secure the palmrest assembly to the system board: • LED board • touchpad • bluetooth • contactless smart card reader • Express Card • fingerprint reader 4. Install the ExpressCard. 9. Install the battery. 13. Installing The Palmrest Assembly 1. Install the...
Owners Manual
Page 48
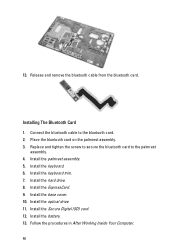
...the palmrest assembly. 3. Install the keyboard trim. 7. Install the ExpressCard. 9. Installing The Bluetooth Card 1. Install the palmrest assembly. 5. Replace and tighten the screw to secure the bluetooth card to the bluetooth card. 2. Release and remove the bluetooth cable from the bluetooth card.... Install the hard drive. 8. Install the Secure Digital (SD) card. 12. Install the battery. 13. Follow the procedures in After Working Inside Your Computer. 48 Install the optical drive. 11. Install the base cover. 10. ...
...the palmrest assembly. 3. Install the keyboard trim. 7. Install the ExpressCard. 9. Installing The Bluetooth Card 1. Install the palmrest assembly. 5. Replace and tighten the screw to secure the bluetooth card to the bluetooth card. 2. Release and remove the bluetooth cable from the bluetooth card.... Install the hard drive. 8. Install the Secure Digital (SD) card. 12. Install the battery. 13. Follow the procedures in After Working Inside Your Computer. 48 Install the optical drive. 11. Install the base cover. 10. ...
Owners Manual
Page 51
Align the LED board on the palmrest. 2. Replace and tighten the screw that secure the LED board to its original position. 4. Install the base cover. 10. Install the optical drive. 11. Install the battery. 13. Install the keyboard. 6. Install the hard drive. 8. Install the palmrest assembly. 5. Install the keyboard trim. 7. Follow the procedures in After Working Inside Your Computer. 51 Install the Secure Digital (SD) card. 12. Installing The LED Board 1. Route the LED board cable to the palmrest. 3. Install the ExpressCard. 9.
Align the LED board on the palmrest. 2. Replace and tighten the screw that secure the LED board to its original position. 4. Install the base cover. 10. Install the optical drive. 11. Install the battery. 13. Install the keyboard. 6. Install the hard drive. 8. Install the palmrest assembly. 5. Install the keyboard trim. 7. Follow the procedures in After Working Inside Your Computer. 51 Install the Secure Digital (SD) card. 12. Installing The LED Board 1. Route the LED board cable to the palmrest. 3. Install the ExpressCard. 9.
Owners Manual
Page 55
Install the keyboard trim. 8. Install the base cover. 11. Follow the procedures in After Working Inside Your Computer. 55 Replace and tighten the screws to secure the smart card reader to the computer. 5. Replace and tighten the screws to secure the palmrest assembly to the computer. 3. Install the keyboard. 7. Place the smart card... assembly. 6. Connect the smart card reader cable to its original position on the computer. 2. Install the ExpressCard. 10. Install the optical drive. 12. Install the battery. 14. Installing The Smart Card Reader 1.
Install the keyboard trim. 8. Install the base cover. 11. Follow the procedures in After Working Inside Your Computer. 55 Replace and tighten the screws to secure the smart card reader to the computer. 5. Replace and tighten the screws to secure the palmrest assembly to the computer. 3. Install the keyboard. 7. Place the smart card... assembly. 6. Connect the smart card reader cable to its original position on the computer. 2. Install the ExpressCard. 10. Install the optical drive. 12. Install the battery. 14. Installing The Smart Card Reader 1.
Owners Manual
Page 59
Installing The Media Board 1. Install the battery. 13. Install the keyboard. 6. Install the optical drive. 11. Follow the procedures in After Working Inside Your Computer. 59 Align the media board to the system board. 4. Install the hard drive. 8. Install the keyboard trim. 7. Install the Secure Digital (SD) card. 12. Connect the media board cable to its original position on the computer. 2. Install the ExpressCard. 9. Replace and tighten the screws to secure the media board to the computer. 3. Install the palmrest assembly. 5. Install the base cover. 10.
Installing The Media Board 1. Install the battery. 13. Install the keyboard. 6. Install the optical drive. 11. Follow the procedures in After Working Inside Your Computer. 59 Align the media board to the system board. 4. Install the hard drive. 8. Install the keyboard trim. 7. Install the Secure Digital (SD) card. 12. Connect the media board cable to its original position on the computer. 2. Install the ExpressCard. 9. Replace and tighten the screws to secure the media board to the computer. 3. Install the palmrest assembly. 5. Install the base cover. 10.
Owners Manual
Page 62
Install the optical drive. 10. Install the keyboard. 5. Install the hard drive. 7. Install the base cover. 9. Install the battery. 12. Replace and tighten the screws to secure the display hinge covers to the computer. 3. Install the palmrest assembly. 4. Install the ExpressCard. 8. Install the Secure Digital (SD) card. 11. Install the keyboard trim. 6. Installing The Display Hinge Covers 1. Place the display hinges in After Working Inside Your Computer. 62 Follow the procedures in the appropriate positions. 2.
Install the optical drive. 10. Install the keyboard. 5. Install the hard drive. 7. Install the base cover. 9. Install the battery. 12. Replace and tighten the screws to secure the display hinge covers to the computer. 3. Install the palmrest assembly. 4. Install the ExpressCard. 8. Install the Secure Digital (SD) card. 11. Install the keyboard trim. 6. Installing The Display Hinge Covers 1. Place the display hinges in After Working Inside Your Computer. 62 Follow the procedures in the appropriate positions. 2.

Owners Manual
Page 67
... to their original position. 9. Route the antenna cables to the computer. 3. Replace and tighten the screws to secure the display panel to the system board. 4. Replace and connect the display cable to the computer. 8. Install the base cover. ...16. Install the Secure Digital (SD) card. 18. Align the display assembly into its original position. 5. Route the antenna cables through the system board. 7. Install the display hinge covers. 10. Install the palmrest assembly. 11. Install the battery...
... to their original position. 9. Route the antenna cables to the computer. 3. Replace and tighten the screws to secure the display panel to the system board. 4. Replace and connect the display cable to the computer. 8. Install the base cover. ...16. Install the Secure Digital (SD) card. 18. Align the display assembly into its original position. 5. Route the antenna cables through the system board. 7. Install the display hinge covers. 10. Install the palmrest assembly. 11. Install the battery...

Owners Manual
Page 73
... into its original position on the computer. 4. Install the display hinge covers. 9. Install the display assembly. 8. Install the battery. 18. Replace and tighten the screw to secure the TAA board to the system board. 7. Replace and tighten the screws to secure the system board to the computer. 6. Install the keyboard. 11. Install the...
... into its original position on the computer. 4. Install the display hinge covers. 9. Install the display assembly. 8. Install the battery. 18. Replace and tighten the screw to secure the TAA board to the system board. 7. Replace and tighten the screws to secure the system board to the computer. 6. Install the keyboard. 11. Install the...
Owners Manual
Page 81
Install the keyboard trim. 8. Install the base cover. 11. Install the palmrest assembly. 6. Install the hard drive. 9. Install the battery. 14. Install the keyboard. 7. Install the ExpressCard. 10. Installing The Input/Output Panel 1. Install the display assembly. 4. Install the display hinge covers. 5. Follow the procedures in the computer 2. Tighten the screw securing the I /O panel in After Working Inside Your Computer. 81 Install the Secure Digital (SD) card. 13. Replace the I /O panel to the computer. 3. Install the optical drive. 12.
Install the keyboard trim. 8. Install the base cover. 11. Install the palmrest assembly. 6. Install the hard drive. 9. Install the battery. 14. Install the keyboard. 7. Install the ExpressCard. 10. Installing The Input/Output Panel 1. Install the display assembly. 4. Install the display hinge covers. 5. Follow the procedures in the computer 2. Tighten the screw securing the I /O panel in After Working Inside Your Computer. 81 Install the Secure Digital (SD) card. 13. Replace the I /O panel to the computer. 3. Install the optical drive. 12.
Owners Manual
Page 85
Replace the speakers to the computer. 3. Install the hard drive. 14. Installing The Speakers 1. Install the Wireless Wide Area Network (WWAN) card 11. Install the media ... screws to secure the speakers to their original position in After Working Inside Your Computer. 85 Install the display hinge covers. 7. Install the coin-cell battery. 9. Install the keyboard. 12. Install the keyboard trim. 13. Install the...
Replace the speakers to the computer. 3. Install the hard drive. 14. Installing The Speakers 1. Install the Wireless Wide Area Network (WWAN) card 11. Install the media ... screws to secure the speakers to their original position in After Working Inside Your Computer. 85 Install the display hinge covers. 7. Install the coin-cell battery. 9. Install the keyboard. 12. Install the keyboard trim. 13. Install the...
Owners Manual
Page 89
Install the display hinge covers. 7. Install the Wireless Local Area Network (WLAN) card 10. Install the coin cell battery 12. Install the keyboard trim. 14. Install the base cover. 17. Install the palmrest assembly. 8. Install the Wireless Wide Area Network (WWAN) card 11... the screw to secure the DC-In bracket to its original position in the computer. 3. Installing The DC-In Port 1. Replace the DC-In port to the computer. 4. Replace the DC-In bracket to its original position in After Working Inside Your Computer. 89 Install the optical drive. 19. Install ...
Install the display hinge covers. 7. Install the Wireless Local Area Network (WLAN) card 10. Install the coin cell battery 12. Install the keyboard trim. 14. Install the base cover. 17. Install the palmrest assembly. 8. Install the Wireless Wide Area Network (WWAN) card 11... the screw to secure the DC-In bracket to its original position in the computer. 3. Installing The DC-In Port 1. Replace the DC-In port to the computer. 4. Replace the DC-In bracket to its original position in After Working Inside Your Computer. 89 Install the optical drive. 19. Install ...

Owners Manual
Page 115
...8226; White light on - Battery Status Lights If the computer is unable to your computer is connected to indicate battery charge status. Battery in a power management mode. Battery in charge mode with AC adapter...or writes data. Temporary battery failure with AC adapter present. Fatal battery failure with steady blue light - Appearance Description Next Step Blinki Solid Solid Processor error Replace the system board. Turns... or blinks to an electrical outlet, the battery light operates as follows: • Alternately blinking amber light and blue light - An unauthenticated ...
...8226; White light on - Battery Status Lights If the computer is unable to your computer is connected to indicate battery charge status. Battery in a power management mode. Battery in charge mode with AC adapter...or writes data. Temporary battery failure with AC adapter present. Fatal battery failure with steady blue light - Appearance Description Next Step Blinki Solid Solid Processor error Replace the system board. Turns... or blinks to an electrical outlet, the battery light operates as follows: • Alternately blinking amber light and blue light - An unauthenticated ...


