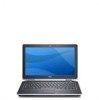
Owners Manual
Page 4
...Base Cover 28 9 Memory Card 29 Removing The Memory 29 Installing The Memory...30 10 Coin-Cell Battery 31 Removing The Coin-Cell Battery 31 Installing The Coin-Cell Battery 32 11 Wireless Local Area Network (WLAN) Card 33 Removing The Wireless Local Area Network (WLAN... Card 35 Removing The Wireless Wide Area Network (WWAN) Card 35 Installing The Wireless Wide Area Network (WWAN) Card 36 13 Keyboard Trim 37 Removing The Keyboard Trim 37 Installing The Keyboard Trim 38 14 Keyboard 39 Removing The Keyboard 39 Installing The Keyboard 41 15 Palm Rest 43 Removing The Palmrest Assembly...
...Base Cover 28 9 Memory Card 29 Removing The Memory 29 Installing The Memory...30 10 Coin-Cell Battery 31 Removing The Coin-Cell Battery 31 Installing The Coin-Cell Battery 32 11 Wireless Local Area Network (WLAN) Card 33 Removing The Wireless Local Area Network (WLAN... Card 35 Removing The Wireless Wide Area Network (WWAN) Card 35 Installing The Wireless Wide Area Network (WWAN) Card 36 13 Keyboard Trim 37 Removing The Keyboard Trim 37 Installing The Keyboard Trim 38 14 Keyboard 39 Removing The Keyboard 39 Installing The Keyboard 41 15 Palm Rest 43 Removing The Palmrest Assembly...
Owners Manual
Page 37
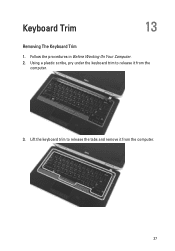
Lift the keyboard trim to release it from the computer. 3. Using a plastic scribe, pry under the keyboard trim to release the tabs and remove it from the computer. 37 Follow the procedures in Before Working On Your Computer. 2. Keyboard Trim 13 Removing The Keyboard Trim 1.
Lift the keyboard trim to release it from the computer. 3. Using a plastic scribe, pry under the keyboard trim to release the tabs and remove it from the computer. 37 Follow the procedures in Before Working On Your Computer. 2. Keyboard Trim 13 Removing The Keyboard Trim 1.
Owners Manual
Page 39
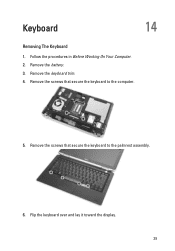
Remove the screws that secure the keyboard to the palmrest assembly. 6. Remove the screws that secure the keyboard to the computer. 5. Remove the battery. 3. Flip the keyboard over and lay it toward the display. 39 Follow the procedures in Before Working On Your Computer. 2. Remove the keyboard trim. 4. Keyboard 14 Removing The Keyboard 1.
Remove the screws that secure the keyboard to the palmrest assembly. 6. Remove the screws that secure the keyboard to the computer. 5. Remove the battery. 3. Flip the keyboard over and lay it toward the display. 39 Follow the procedures in Before Working On Your Computer. 2. Remove the keyboard trim. 4. Keyboard 14 Removing The Keyboard 1.
Owners Manual
Page 40
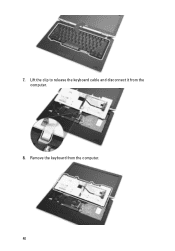
Remove the keyboard from the computer. 8. 7. Lift the clip to release the keyboard cable and disconnect it from the computer. 40
Remove the keyboard from the computer. 8. 7. Lift the clip to release the keyboard cable and disconnect it from the computer. 40
Owners Manual
Page 41
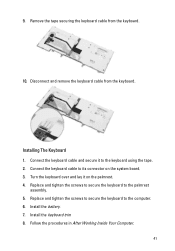
.... 6. Replace and tighten the screws to secure the keyboard to its connector on the palmrest. 4. Disconnect and remove the keyboard cable from the keyboard. 10. Install the keyboard trim 8. Install the battery. 7. Replace and tighten the screws to secure the keyboard to the keyboard using the tape. 2. Turn the keyboard over and lay it to the palmrest assembly...
.... 6. Replace and tighten the screws to secure the keyboard to its connector on the palmrest. 4. Disconnect and remove the keyboard cable from the keyboard. 10. Install the keyboard trim 8. Install the battery. 7. Replace and tighten the screws to secure the keyboard to the keyboard using the tape. 2. Turn the keyboard over and lay it to the palmrest assembly...
Owners Manual
Page 43
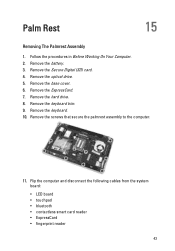
Remove the optical drive. 5. Remove the base cover. 6. Remove the hard drive. 8. Remove the keyboard. 10. Remove the screws that secure the palmrest assembly to the computer. 11. Remove the keyboard trim. 9. Flip the computer and disconnect the following cables from the system board: • LED board • touchpad • bluetooth • contactless smart card reader &#...
Remove the optical drive. 5. Remove the base cover. 6. Remove the hard drive. 8. Remove the keyboard. 10. Remove the screws that secure the palmrest assembly to the computer. 11. Remove the keyboard trim. 9. Flip the computer and disconnect the following cables from the system board: • LED board • touchpad • bluetooth • contactless smart card reader &#...
Owners Manual
Page 47
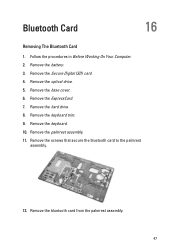
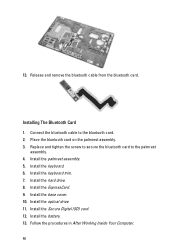
Remove the ExpressCard. 7. Remove the optical drive. 5. Remove the hard drive. 8. Remove the bluetooth card from the palmrest assembly. 47 Remove the keyboard trim. 9. Remove the screws that secure the bluetooth card to the palmrest assembly. 12. Remove the keyboard. 10. Remove the battery. 3. Remove the base cover. 6. Remove the Secure Digital (SD) card. 4. Remove the palmrest assembly. 11. Follow the procedures in Before Working On Your Computer. 2. Bluetooth Card 16 Removing The Bluetooth Card 1.
Remove the ExpressCard. 7. Remove the optical drive. 5. Remove the hard drive. 8. Remove the bluetooth card from the palmrest assembly. 47 Remove the keyboard trim. 9. Remove the screws that secure the bluetooth card to the palmrest assembly. 12. Remove the keyboard. 10. Remove the battery. 3. Remove the base cover. 6. Remove the Secure Digital (SD) card. 4. Remove the palmrest assembly. 11. Follow the procedures in Before Working On Your Computer. 2. Bluetooth Card 16 Removing The Bluetooth Card 1.
Owners Manual
Page 48
.... 4. Install the palmrest assembly. 5. Install the battery. 13. Follow the procedures in After Working Inside Your Computer. 48 Install the base cover. 10. Install the keyboard trim. 7. Install the hard drive. 8. 13. Install the keyboard. 6. Installing The Bluetooth Card 1. Release and remove the bluetooth cable from the bluetooth card.
.... 4. Install the palmrest assembly. 5. Install the battery. 13. Follow the procedures in After Working Inside Your Computer. 48 Install the base cover. 10. Install the keyboard trim. 7. Install the hard drive. 8. 13. Install the keyboard. 6. Installing The Bluetooth Card 1. Release and remove the bluetooth cable from the bluetooth card.
Owners Manual
Page 49
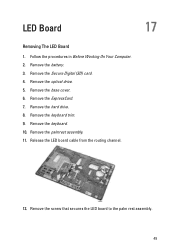
Remove the battery. 3. Remove the ExpressCard. 7. Release the LED board cable from the routing channel. 12. Follow the procedures in Before Working On Your Computer. 2. Remove the Secure Digital (SD) card. 4. Remove the base cover. 6. Remove the hard drive. 8. Remove the keyboard trim. 9. Remove the keyboard. 10. LED Board 17 Removing The LED Board 1. Remove the screw that secures the LED board to the palm rest assembly. 49 Remove the optical drive. 5. Remove the palmrest assembly. 11.
Remove the battery. 3. Remove the ExpressCard. 7. Release the LED board cable from the routing channel. 12. Follow the procedures in Before Working On Your Computer. 2. Remove the Secure Digital (SD) card. 4. Remove the base cover. 6. Remove the hard drive. 8. Remove the keyboard trim. 9. Remove the keyboard. 10. LED Board 17 Removing The LED Board 1. Remove the screw that secures the LED board to the palm rest assembly. 49 Remove the optical drive. 5. Remove the palmrest assembly. 11.
Owners Manual
Page 53
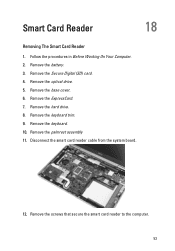
Remove the ExpressCard. 7. Remove the palmrest assembly 11. Disconnect the smart card reader cable from the system board. 12. Follow the procedures in Before Working On Your Computer. 2. Remove the battery. 3. Remove the hard drive. 8. Remove the optical drive. 5. Remove the keyboard trim. 9. Smart Card Reader 18 Removing The Smart Card Reader 1. Remove the Secure Digital (SD) card. 4. Remove the base cover. 6. Remove the keyboard. 10. Remove the screws that secure the smart card reader to the computer. 53
Remove the ExpressCard. 7. Remove the palmrest assembly 11. Disconnect the smart card reader cable from the system board. 12. Follow the procedures in Before Working On Your Computer. 2. Remove the battery. 3. Remove the hard drive. 8. Remove the optical drive. 5. Remove the keyboard trim. 9. Smart Card Reader 18 Removing The Smart Card Reader 1. Remove the Secure Digital (SD) card. 4. Remove the base cover. 6. Remove the keyboard. 10. Remove the screws that secure the smart card reader to the computer. 53
Owners Manual
Page 57
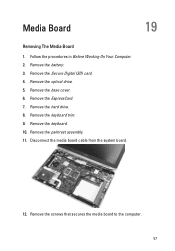
Remove the hard drive. 8. Remove the keyboard. 10. Follow the procedures in Before Working On Your Computer. 2. Remove the optical drive. 5. Remove the base cover. 6. Remove the keyboard trim. 9. Media Board 19 Removing The Media Board 1. Remove the ExpressCard. 7. Remove the battery. 3. Remove the palmrest assembly. 11. Remove the Secure Digital (SD) card. 4. Disconnect the media board cable from the system board. 12. Remove the screws that secures the media board to the computer. 57
Remove the hard drive. 8. Remove the keyboard. 10. Follow the procedures in Before Working On Your Computer. 2. Remove the optical drive. 5. Remove the base cover. 6. Remove the keyboard trim. 9. Media Board 19 Removing The Media Board 1. Remove the ExpressCard. 7. Remove the battery. 3. Remove the palmrest assembly. 11. Remove the Secure Digital (SD) card. 4. Disconnect the media board cable from the system board. 12. Remove the screws that secures the media board to the computer. 57
Owners Manual
Page 61
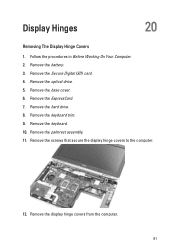
Remove the optical drive. 5. Display Hinges 20 Removing The Display Hinge Covers 1. Remove the base cover. 6. Remove the keyboard trim. 9. Remove the battery. 3. Remove the keyboard. 10. Remove the hard drive. 8. Remove the screws that secure the display hinge covers to the computer. 12. Remove the ExpressCard. 7. Remove the display hinge covers from the computer. 61 Remove the Secure Digital (SD) card. 4. Remove the palmrest assembly. 11. Follow the procedures in Before Working On Your Computer. 2.
Remove the optical drive. 5. Display Hinges 20 Removing The Display Hinge Covers 1. Remove the base cover. 6. Remove the keyboard trim. 9. Remove the battery. 3. Remove the keyboard. 10. Remove the hard drive. 8. Remove the screws that secure the display hinge covers to the computer. 12. Remove the ExpressCard. 7. Remove the display hinge covers from the computer. 61 Remove the Secure Digital (SD) card. 4. Remove the palmrest assembly. 11. Follow the procedures in Before Working On Your Computer. 2.
Owners Manual
Page 63
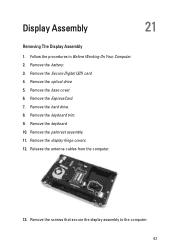
Remove the hard drive. 8. Remove the keyboard. 10. Remove the ExpressCard. 7. Remove the palmrest assembly. 11. Remove the display hinge covers. 12. Remove the screws that secure the display assembly to the computer. 63 Remove the Secure Digital (SD) card. 4. Release the antenna cables from the computer. 13. Remove the optical drive. 5. Remove the base cover. 6. Display Assembly 21 Removing The Display Assembly 1. Follow the procedures in Before Working On Your Computer. 2. Remove the battery. 3. Remove the keyboard trim. 9.
Remove the hard drive. 8. Remove the keyboard. 10. Remove the ExpressCard. 7. Remove the palmrest assembly. 11. Remove the display hinge covers. 12. Remove the screws that secure the display assembly to the computer. 63 Remove the Secure Digital (SD) card. 4. Release the antenna cables from the computer. 13. Remove the optical drive. 5. Remove the base cover. 6. Display Assembly 21 Removing The Display Assembly 1. Follow the procedures in Before Working On Your Computer. 2. Remove the battery. 3. Remove the keyboard trim. 9.
Owners Manual
Page 69
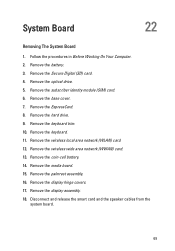
... (SD) card. 4. Remove the hard drive. 9. Remove the keyboard trim. 10. Remove the wireless wide area network (WWAN) card. 13. Remove the base cover. 7. Remove the palmrest assembly. 16. Remove the battery. 3. Remove the optical drive. 5. Remove the ExpressCard. 8. Remove the keyboard. 11. Remove the media board. 15. Remove the wireless local area network (WLAN) card. 12. Remove the display assembly. 18. Remove the display...
... (SD) card. 4. Remove the hard drive. 9. Remove the keyboard trim. 10. Remove the wireless wide area network (WWAN) card. 13. Remove the base cover. 7. Remove the palmrest assembly. 16. Remove the battery. 3. Remove the optical drive. 5. Remove the ExpressCard. 8. Remove the keyboard. 11. Remove the media board. 15. Remove the wireless local area network (WLAN) card. 12. Remove the display assembly. 18. Remove the display...
Owners Manual
Page 75
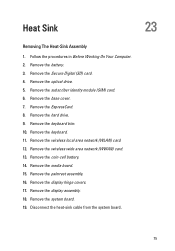
.... 6. Remove the keyboard trim. 10. Remove the system board. 19. Heat Sink 23 Removing The Heat-Sink Assembly 1. Remove the Secure Digital (SD) card. 4. Remove the hard drive. 9. Remove the keyboard. 11. Follow the procedures in Before Working On Your Computer. 2. Remove the optical drive. 5. Remove the base cover. 7. Remove the media board. 15. Remove the palmrest assembly. 16. Remove the ExpressCard. 8. Remove the...
.... 6. Remove the keyboard trim. 10. Remove the system board. 19. Heat Sink 23 Removing The Heat-Sink Assembly 1. Remove the Secure Digital (SD) card. 4. Remove the hard drive. 9. Remove the keyboard. 11. Follow the procedures in Before Working On Your Computer. 2. Remove the optical drive. 5. Remove the base cover. 7. Remove the media board. 15. Remove the palmrest assembly. 16. Remove the ExpressCard. 8. Remove the...
Owners Manual
Page 79
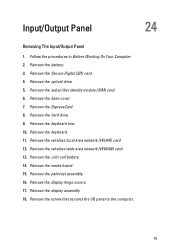
... Panel 24 Removing The Input/Output Panel 1. Remove the Secure Digital (SD) card. 4. Remove the ExpressCard. 8. Remove the keyboard. 11. Remove the battery. 3. Remove the wireless wide area network (WWAN) card. 13. Remove the display hinge covers. 17. Remove the display assembly. 18. Remove the keyboard trim. 10. Remove the subscriber identity module (SIM) card. 6. Remove the media board. 15. Remove the screw that...
... Panel 24 Removing The Input/Output Panel 1. Remove the Secure Digital (SD) card. 4. Remove the ExpressCard. 8. Remove the keyboard. 11. Remove the battery. 3. Remove the wireless wide area network (WWAN) card. 13. Remove the display hinge covers. 17. Remove the display assembly. 18. Remove the keyboard trim. 10. Remove the subscriber identity module (SIM) card. 6. Remove the media board. 15. Remove the screw that...
Owners Manual
Page 83
... from the routing channel. 83 Remove the subscriber identity module (SIM) card. 7. Remove the keyboard. 11. Remove the display hinge covers. 17. Follow the procedures in Before Working On Your Computer. 2. Remove the optical drive. 6. Remove the hard drive. 9. Remove the ExpressCard. 8. Remove the media board. 15. Remove the system board 19. Remove the battery. 3. Remove the wireless wide area network...
... from the routing channel. 83 Remove the subscriber identity module (SIM) card. 7. Remove the keyboard. 11. Remove the display hinge covers. 17. Follow the procedures in Before Working On Your Computer. 2. Remove the optical drive. 6. Remove the hard drive. 9. Remove the ExpressCard. 8. Remove the media board. 15. Remove the system board 19. Remove the battery. 3. Remove the wireless wide area network...
Owners Manual
Page 87
... the system. 87 Remove the Secure Digital (SD) card. 4. Remove the wireless wide area network (WWAN) card. 13. Remove the coin-cell battery. 14. Remove the display hinge covers. 17. Remove the display assembly. 18. Remove the ExpressCard. 8. Remove the optical drive. 5. Remove the palmrest assembly. 16. Remove the battery. 3. Remove the hard drive. 9. Remove the keyboard trim. 10. Remove the media board...
... the system. 87 Remove the Secure Digital (SD) card. 4. Remove the wireless wide area network (WWAN) card. 13. Remove the coin-cell battery. 14. Remove the display hinge covers. 17. Remove the display assembly. 18. Remove the ExpressCard. 8. Remove the optical drive. 5. Remove the palmrest assembly. 16. Remove the battery. 3. Remove the hard drive. 9. Remove the keyboard trim. 10. Remove the media board...
Owners Manual
Page 103
CAUTION: Unless you are prompted, this program. When the blue DELL logo is recommended that the keyboard has initialized. Once the F2 prompt appears, press immediately. This prompt can cause your computer. • set or change a user-selectable option such as the ...down your computer. 2. System Setup Menu Options The following sections describe the menu options available in your computer to wait until you add, change, or remove any hardware in the System Setup. 103 Turn on (or restart) your computer and try again. System Setup 31 Overview System Setup allows you to...
CAUTION: Unless you are prompted, this program. When the blue DELL logo is recommended that the keyboard has initialized. Once the F2 prompt appears, press immediately. This prompt can cause your computer. • set or change a user-selectable option such as the ...down your computer. 2. System Setup Menu Options The following sections describe the menu options available in your computer to wait until you add, change, or remove any hardware in the System Setup. 103 Turn on (or restart) your computer and try again. System Setup 31 Overview System Setup allows you to...
Owners Manual
Page 116
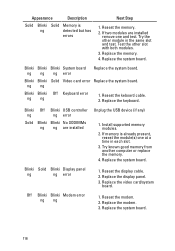
...detected but has errors Next Step 1. Blinki Solid Blinki Display panel ng ng error 1. Replace the memory. 4. Replace the system board. Replace the keyboard. Try the other slot with both modules. 3. Test the other module in each slot. 3. Blinki Blinki Blinki System board ng ng ng error ...controller ng ng error Solid Blinki Blinki No SODIMMs ng ng are installed remove one at a time in the same slot and test. Reseat the modem. 2. Replace the system board. 116 ng ng Blinki Blinki Off Keyboard error ng ng 1. Replace the system board. Try known good memory ...
...detected but has errors Next Step 1. Blinki Solid Blinki Display panel ng ng error 1. Replace the memory. 4. Replace the system board. Replace the keyboard. Try the other slot with both modules. 3. Test the other module in each slot. 3. Blinki Blinki Blinki System board ng ng ng error ...controller ng ng error Solid Blinki Blinki No SODIMMs ng ng are installed remove one at a time in the same slot and test. Reseat the modem. 2. Replace the system board. 116 ng ng Blinki Blinki Off Keyboard error ng ng 1. Replace the system board. Try known good memory ...


