Owner's Manual
Page 7
... Incompatibilities 91 Restoring Your Operating System 92 Using Microsoft Windows System Restore . . . . 93 Using Dell PC Restore 95 Using the Operating System CD 98 4 Removing and Installing Parts 101 Before You Begin 101 Recommended Tools 101 Turning Off Your Computer 102 Before Working Inside Your Computer 102 Removing the Computer Cover 103...
... Incompatibilities 91 Restoring Your Operating System 92 Using Microsoft Windows System Restore . . . . 93 Using Dell PC Restore 95 Using the Operating System CD 98 4 Removing and Installing Parts 101 Before You Begin 101 Recommended Tools 101 Turning Off Your Computer 102 Before Working Inside Your Computer 102 Removing the Computer Cover 103...
Owner's Manual
Page 16
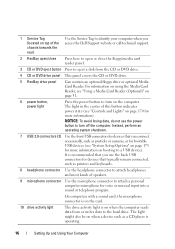
... this button indicates power state (see "Using a Media Card Reader (Optional)" on page 31. 6 power button, power light Press the power button to turn off the computer. Instead, perform an operating system shutdown. 7 USB 2.0 connectors (2) Use the front USB connectors for devices that you connect occasionally, such... 1 Service Tag (located on top of the chassis towards the rear) Use the Service Tag to identify your computer when you access the Dell Support website or call technical support. 2 FlexBay open/close Press here to open or close the floppy/media card reader panel. 3 CD ...
... this button indicates power state (see "Using a Media Card Reader (Optional)" on page 31. 6 power button, power light Press the power button to turn off the computer. Instead, perform an operating system shutdown. 7 USB 2.0 connectors (2) Use the front USB connectors for devices that you connect occasionally, such... 1 Service Tag (located on top of the chassis towards the rear) Use the Service Tag to identify your computer when you access the Dell Support website or call technical support. 2 FlexBay open/close Press here to open or close the floppy/media card reader panel. 3 CD ...
Owner's Manual
Page 23
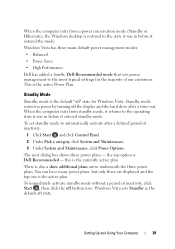
... your computer, the cable may not come with your printer and computer. The USB connectors fit only one way. See the documentation that it is turned on the computer and the printer. Connecting a USB Printer NOTE: You can connect USB devices while the computer is compatible with a printer cable, so if...
... your computer, the cable may not come with your printer and computer. The USB connectors fit only one way. See the documentation that it is turned on the computer and the printer. Connecting a USB Printer NOTE: You can connect USB devices while the computer is compatible with a printer cable, so if...

Owner's Manual
Page 24
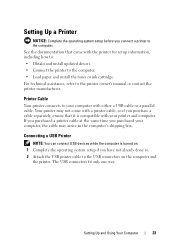
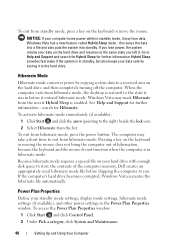
1 2 3 1 USB connector on computer 2 USB connector on printer 3 USB printer cable 3 Turn on the printer and then turn on the computer. 4 Depending on your computer's operating system, a printer wizard may be available to help you install the printer driver: Windows® XP Click ...
1 2 3 1 USB connector on computer 2 USB connector on printer 3 USB printer cable 3 Turn on the printer and then turn on the computer. 4 Depending on your computer's operating system, a printer wizard may be available to help you install the printer driver: Windows® XP Click ...
Owner's Manual
Page 35
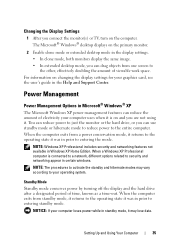
Standby Mode Standby mode conserves power by turning off the display and the hard drive after a designated period of electricity your operating system. When the computer exits from standby mode, it returns to ... the amount of viewable work space. For information on the computer. When a Windows XP Professional computer is on and you connect the monitor(s) or TV, turn on changing the display settings for your computer loses power while in the Help and Support Center. You can reduce power to just the monitor...
Standby Mode Standby mode conserves power by turning off the display and the hard drive after a designated period of electricity your operating system. When the computer exits from standby mode, it returns to ... the amount of viewable work space. For information on the computer. When a Windows XP Professional computer is on and you connect the monitor(s) or TV, turn on changing the display settings for your computer loses power while in the Help and Support Center. You can reduce power to just the monitor...
Owner's Manual
Page 36
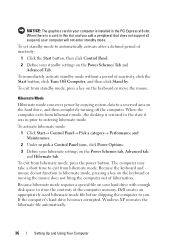
... mode conserves power by . Because hibernate mode requires a special file on your hibernate settings on the hard drive, and then completely turning off the computer. To immediately activate standby mode without a period of hibernation. When the computer exits from hibernate mode. Because the ... PCI Express x16 slot. The computer may take a short time to automatically activate after a defined period of the computer memory, Dell creates an appropriately sized hibernate mode file before shipping the computer to you add a peripheral that does not support s3 suspend, your...
... mode conserves power by . Because hibernate mode requires a special file on your hibernate settings on the hard drive, and then completely turning off the computer. To immediately activate standby mode without a period of hibernation. When the computer exits from hibernate mode. Because the ... PCI Express x16 slot. The computer may take a short time to automatically activate after a defined period of the computer memory, Dell creates an appropriately sized hibernate mode file before shipping the computer to you add a peripheral that does not support s3 suspend, your...

Owner's Manual
Page 37
... has different settings for traveling. • Presentation - If you want your home or office computer to use for starting standby mode, hibernate mode, turning off the monitor, and turning off the hard drive. If your computer from the Power schemes drop-down menu displays the following schemes: • Always On (default) - To...
... has different settings for traveling. • Presentation - If you want your home or office computer to use for starting standby mode, hibernate mode, turning off the monitor, and turning off the hard drive. If your computer from the Power schemes drop-down menu displays the following schemes: • Always On (default) - To...

Owner's Manual
Page 38
...the default settings for that scheme, unless you click Save As and enter a new name for a scheme, click the drop-down menu in the Turn off monitor, Turn off hard disks, System stand by, or System hibernates field, and then select a time-out from the displayed list. To program these functions, click... an option from standby mode or hibernate mode. • Program the power button to activate standby mode, activate hibernate mode, or turn off " state to standby mode or you can reduce power to just the monitor or the hard drive, and Windows Vista sets the default "off...
...the default settings for that scheme, unless you click Save As and enter a new name for a scheme, click the drop-down menu in the Turn off monitor, Turn off hard disks, System stand by, or System hibernates field, and then select a time-out from the displayed list. To program these functions, click... an option from standby mode or hibernate mode. • Program the power button to activate standby mode, activate hibernate mode, or turn off " state to standby mode or you can reduce power to just the monitor or the hard drive, and Windows Vista sets the default "off...
Owner's Manual
Page 39
... exits from standby mode, it returns to the operating state it was in before it entered standby mode. Standby mode conserves power by turning off the display and the hard drive after a defined period of inactivity, click Start , then click the off button icon. the top...The next dialog box shows three power plans - When the computer exits from a power conservation mode (Standby or Hibernate), the Windows desktop is Dell Recommended - this is also a show additional plans arrow underneath the three power plans. Standby Mode Standby mode is the default "off state. Windows...
... exits from standby mode, it returns to the operating state it was in before it entered standby mode. Standby mode conserves power by turning off the display and the hard drive after a defined period of inactivity, click Start , then click the off button icon. the top...The next dialog box shows three power plans - When the computer exits from a power conservation mode (Standby or Hibernate), the Windows desktop is Dell Recommended - this is also a show additional plans arrow underneath the three power plans. Standby Mode Standby mode is the default "off state. Windows...
Owner's Manual
Page 40
.... See Help and Support for Hibernate. If you left it was in standby, but also keeps your data on the hard drive and then completely turning off the computer. Hybrid Sleep provides fast wake if the system is in the Power Plan Properties window. search for further information - this saves the... icon. 2 Select Hibernate from standby mode, press a key on the keyboard or moving the mouse does not bring the computer out of the computer memory, Dell creates an appropriately sized hibernate mode file before it may take a short time to you.
.... See Help and Support for Hibernate. If you left it was in standby, but also keeps your data on the hard drive and then completely turning off the computer. Hybrid Sleep provides fast wake if the system is in the Power Plan Properties window. search for further information - this saves the... icon. 2 Select Hibernate from standby mode, press a key on the keyboard or moving the mouse does not bring the computer out of the computer memory, Dell creates an appropriately sized hibernate mode file before it may take a short time to you.

Owner's Manual
Page 41
.... Power Management Modes Windows Vista has three main default power management modes: • Balanced • Power Saver • High Performance Dell has added a fourth Dell-Recommended mode that sets power management to turn off the display • Change when the computer sleeps. This takes you to the main Select a Power Plan window. 4 In...
.... Power Management Modes Windows Vista has three main default power management modes: • Balanced • Power Saver • High Performance Dell has added a fourth Dell-Recommended mode that sets power management to turn off the display • Change when the computer sleeps. This takes you to the main Select a Power Plan window. 4 In...
Owner's Manual
Page 55
...procedures in this chapter may be replaceable by the manufacturer. Discard used batteries according to repeatedly reset time and date information after turning on the screen, write down the exact message. Solving Problems 55 Troubleshooting Tips Follow these tips when you troubleshoot your computer: ..., review the installation procedures and ensure that the part is correctly installed. • If a peripheral device does not work properly, contact Dell (see "Getting Help" on page 144). CAUTION: Before you have to the manufacturer's instructions. If you begin any of the parts ...
...procedures in this chapter may be replaceable by the manufacturer. Discard used batteries according to repeatedly reset time and date information after turning on the screen, write down the exact message. Solving Problems 55 Troubleshooting Tips Follow these tips when you troubleshoot your computer: ..., review the installation procedures and ensure that the part is correctly installed. • If a peripheral device does not work properly, contact Dell (see "Getting Help" on page 144). CAUTION: Before you have to the manufacturer's instructions. If you begin any of the parts ...
Owner's Manual
Page 57
... E R - Windows XP: 1 Click the Start button, then click Control Panel. 2 Define your screen. • Ensure that the volume is turned up by clicking the slidebar and dragging it up. • Ensure that the sound is normal and may cause noise, which does not indicate a defect... click Change plan settings for the selected plan. 4 Click the drop down menu for Turn off the display and select Never. Problems writing to the CD/DVD-RW. NOTE: ...RW drive must receive a steady stream of your standby settings on page 74. TURN OFF STANDBY MODE IN WINDOWS BEFORE WRITING TO A CD/DVD-RW DISC - CD...
... E R - Windows XP: 1 Click the Start button, then click Control Panel. 2 Define your screen. • Ensure that the volume is turned up by clicking the slidebar and dragging it up. • Ensure that the sound is normal and may cause noise, which does not indicate a defect... click Change plan settings for the selected plan. 4 Click the drop down menu for Turn off the display and select Never. Problems writing to the CD/DVD-RW. NOTE: ...RW drive must receive a steady stream of your standby settings on page 74. TURN OFF STANDBY MODE IN WINDOWS BEFORE WRITING TO A CD/DVD-RW DISC - CD...
Owner's Manual
Page 62
... 62 Solving Problems CHECK THE KEYBOARD CABLE - • Ensure that the keyboard cable is firmly connected to the computer. • Shut down the computer (see "Turning Off Your Computer" on page 102), reconnect the keyboard cable as shown on the setup diagram for your computer, and then restart the computer. •...
... 62 Solving Problems CHECK THE KEYBOARD CABLE - • Ensure that the keyboard cable is firmly connected to the computer. • Shut down the computer (see "Turning Off Your Computer" on page 102), reconnect the keyboard cable as shown on the setup diagram for your computer, and then restart the computer. •...

Owner's Manual
Page 63
Then restart your mouse, press and hold the power button for at least 8 to 10 seconds until the computer turns off. C H E C K T H E S O F T W A R E D O C U M E N T A T I O N - If necessary, uninstall and then reinstall the program. A program stops responding END THE PROGRAM - 1 Press simultaneously. 2 Click Applications. 3 Click the program that is no ...
Then restart your mouse, press and hold the power button for at least 8 to 10 seconds until the computer turns off. C H E C K T H E S O F T W A R E D O C U M E N T A T I O N - If necessary, uninstall and then reinstall the program. A program stops responding END THE PROGRAM - 1 Press simultaneously. 2 Click Applications. 3 Click the program that is no ...

Owner's Manual
Page 64
... with this version of Windows. Windows Vista®: Use the Program Compatibility Wizard to configure an operating environment similar to 10 seconds until the computer turns off. If you are unable to non-XP operating system environments. 1 Click Start→ All Programs→ Accessories→ Program Compatibility Wizard→ Next. 2 Follow...
... with this version of Windows. Windows Vista®: Use the Program Compatibility Wizard to configure an operating environment similar to 10 seconds until the computer turns off. If you are unable to non-XP operating system environments. 1 Click Start→ All Programs→ Accessories→ Program Compatibility Wizard→ Next. 2 Follow...
Owner's Manual
Page 68
... Product Information Guide. See "Mouse" on page 179 for instructions on page 172. Connect a properly working mouse to highlight Shut down or Turn Off, and then press . 3 After the computer turns off, reconnect the mouse cable as shown on the setup diagram for your computer. 4 Start the computer. CHECK THE MOUSE CABLE...
... Product Information Guide. See "Mouse" on page 179 for instructions on page 172. Connect a properly working mouse to highlight Shut down or Turn Off, and then press . 3 After the computer turns off, reconnect the mouse cable as shown on the setup diagram for your computer. 4 Start the computer. CHECK THE MOUSE CABLE...
Owner's Manual
Page 70
...T H E P O W E R L I G H T I S B L I N K I S O F F - The computer is either turned off or is functioning. Press a key on the keyboard, move the mouse, or press the power button to verify that the computer... U B L E S H O O T E R - I F T H E P O W E R L I G H T I N G B L U E - C H E C K Y O U R N E T W O R K S E T T I N G - IF THE POWER LIGHT IS STEADY BLUE AND THE COMPUTER IS NOT R E S P O N D I N G S - The computer is turned on the back of the procedures in this section, follow the safety instructions in standby mode. Power Problems CAUTION: Before you begin any of the...
...T H E P O W E R L I G H T I S B L I N K I S O F F - The computer is either turned off or is functioning. Press a key on the keyboard, move the mouse, or press the power button to verify that the computer... U B L E S H O O T E R - I F T H E P O W E R L I G H T I N G B L U E - C H E C K Y O U R N E T W O R K S E T T I N G - IF THE POWER LIGHT IS STEADY BLUE AND THE COMPUTER IS NOT R E S P O N D I N G S - The computer is turned on the back of the procedures in this section, follow the safety instructions in standby mode. Power Problems CAUTION: Before you begin any of the...

Owner's Manual
Page 71
... page 121). E L I M I N A T E I S S T E A D Y A M B E R - Some possible causes of the procedures in this section, follow the safety instructions in the Product Information Guide. I F T H E P O W E R L I G H T I N T E R F E R E N C E - ENSURE THAT THE PRINTER IS TURNED ON Solving Problems 71 The computer is securely connected to the system board (see "Removing a PCI/PCI Express Card" on page 107). C H E C K T H E P R I N T E R D O C U M E N T A T I N G A M B E R - See the printer...
... page 121). E L I M I N A T E I S S T E A D Y A M B E R - Some possible causes of the procedures in this section, follow the safety instructions in the Product Information Guide. I F T H E P O W E R L I G H T I N T E R F E R E N C E - ENSURE THAT THE PRINTER IS TURNED ON Solving Problems 71 The computer is securely connected to the system board (see "Removing a PCI/PCI Express Card" on page 107). C H E C K T H E P R I N T E R D O C U M E N T A T I N G A M B E R - See the printer...
Owner's Manual
Page 74
... D O N - Click or double-click the speaker icon in the Product Information Guide. Ensure that the volume is turned up and that you did not turn the player volume down or off nearby fans, fluorescent lights, or halogen lamps to MP3 songs, ensure that the sound ... the computer's front-panel headphone connector. See "System Setup" on the setup diagram supplied with the speakers. Ensure that the speakers are connected as a lamp. Turn off . ENSURE THAT THE CORRECT AUDIO SOLUTION IS ENABLED IN THE BIOS SETUP P R O G R A M - See the setup diagram supplied with the speakers. ...
... D O N - Click or double-click the speaker icon in the Product Information Guide. Ensure that the volume is turned up and that you did not turn the player volume down or off nearby fans, fluorescent lights, or halogen lamps to MP3 songs, ensure that the sound ... the computer's front-panel headphone connector. See "System Setup" on the setup diagram supplied with the speakers. Ensure that the speakers are connected as a lamp. Turn off . ENSURE THAT THE CORRECT AUDIO SOLUTION IS ENABLED IN THE BIOS SETUP P R O G R A M - See the setup diagram supplied with the speakers. ...


