Dell Force10 S25-01-GE-24P Support and Manuals
Get Help and Manuals for this Dell item
View All Support Options Below
Free Dell Force10 S25-01-GE-24P manuals!
Problems with Dell Force10 S25-01-GE-24P?
Ask a Question
Free Dell Force10 S25-01-GE-24P manuals!
Problems with Dell Force10 S25-01-GE-24P?
Ask a Question
Popular Dell Force10 S25-01-GE-24P Manual Pages
Installing the S25P System - Page 9
...
Alarm AC2
27 P28
S25-01-GE-24P
fn00157s25P
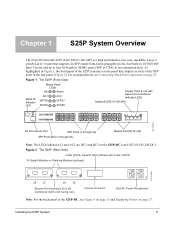
RJ-45 Console Port
SFP Ports (1 through 24)
SFP Port LEDs (1 through 24)
Shared Port IDs (21-24)
Note: The LEDs labeled AC1 and AC2 are DC1 and DC2 on page 27. Figure 2 The S25P (Rear View) Label (Part #, Serial #, MAC Address, Bar Code, FRU #)
10-Gigabit...
Installing the S25P System - Page 17
...-01-10GE-2P S50-01-10GE-2C S50-01-12G-2S S50-01-24G-1S
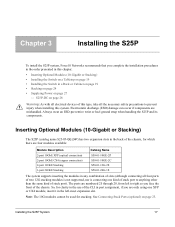
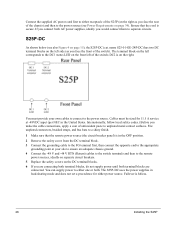
The system supports ...S25-01-GE-24P) has two expansion slots in the left to right as you are only using one kind of stack port to prevent injury when installing this system. Always wear an ESD-preventive wrist or heel ground strap when handling the S25P and its components. Chapter 3
Installing the S25P
To install the S25P system, Force10...
Installing the S25P System - Page 19
... S25P Two-post (Front-mounted) Rack-mounting
Stack ID
AC1 XFP25 XFP26
AACla2rm
27 P28
S25-01-GE-24P
Installing the S25P System
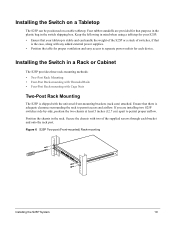
19 Position the chassis in a Rack or Cabinet
The S25P provides three rack...• Four-Post Rack-mounting with the universal front-mounting brackets (rack ears) attached. Installing the Switch in the rack. Ensure that
is the case, along with any added external ...
Installing the S25P System - Page 20
... into the rack, and secure the chassis to permit proper airflow. Stack ID
AC1 XFP25 XFP26
AACla2rm
27 P28
S25-01-GE-24P
20
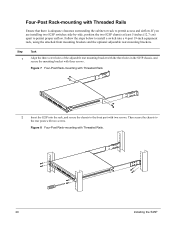
Installing the S25P Four-Post Rack-mounting with two screws. If you are installing two S25P switches side-by-side, position the two S25P chassis at least 5 inches (12.7 cm) apart to...
Installing the S25P System - Page 21
Step 3
Task
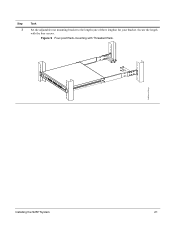
Set the adjustable rear mounting bracket to the length (one of three lengths) for your bracket. Secure the length with Threaded Rails .
Stack ID
AC1 XFP25 XFP26
AACla2rm
27 P28
S25-01-GE-24P
fn00146cs25P.eps
Installing the S25P System
21
Figure 9 Four-post Rack-mounting with the four screws.
Installing the S25P System - Page 22
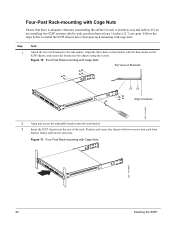
... S25P chassis into a four-post rack mounting with Cage Nuts
Stack ID
AC1 XFP25 XFP26
AACla2rm
27 P28
S25-01-GE-24P
fn00147a_s25P
22
Installing the S25P
Follow the steps below to the chassis using the screws. Figure 11 Four-Post Rack-mounting with cage nuts. Four-Post Rack-mounting ...
Installing the S25P System - Page 23
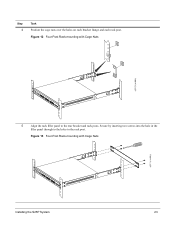
... Four-Post Rack-mounting with Cage Nuts
fn00147d_s25P
Stack ID
AC1 XFP25 XFP26
AACla2rm
27 P28
S25-01-GE-24P
5
Align the rack filler panel to the holes in the rack post. Figure 12 Four-Post Rack-mounting with Cage Nuts
fn00147e_s25P
Stack ID
AC1 XFP25 XFP26
AACla2rm
27 P28
S25-01-GE-24P
Installing the S25P System
23
Installing the S25P System - Page 28
...Internationally, follow local safety codes.) Before you are connecting... on separate circuit breakers. 5 Replace the safety covers on the left...and does not set a precedence for 11.5 A service at your own...Installing the S25P Failover is on page 15), the S25P-DC (cat. Ensure that the remote power source (the circuit breaker panel) is secure.
If you connect both . name S25-01-GE-24P...
Installing the S25P System - Page 31
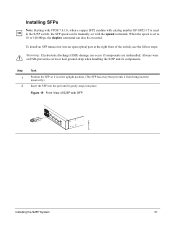
...into the port until it is set with SFP
S25-01-GE-24P
fn00161s25P
Installing the S25P System
31 Always ...wear an ESD-preventive wrist or heel ground strap when handling the S25P and its components. Figure 19 Front View of the switch, use the follow steps:
Warning: Electrostatic discharge (ESD) damage can also be manually set...
Installing the S25P System - Page 39
... Replacement on the suite of Force10 support and professional support services. Installing the S25P System
39
You can obtain technical information regarding Force10 products, access to software upgrades ...and tools to techtips, white papers, and user manuals. Appendix A
Technical Support
This appendix contains these services. Through iSupport you can even track your Technical...
Installing the S25P System - Page 41
...
Installing the S25P System
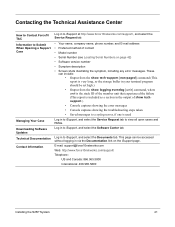
41 Log in to iSupport, and select the Software Center tab. Contacting the Technical Assistance Center
How to Contact Force10 TAC Information to Submit When Opening a Support Case
Managing Your Case Downloading Software Updates Technical Documentation Contact Information
Log in to iSupport at http://www.force10networks.com/support/, and select the Service...
Installing the S25P System - Page 45
...S25-01-GE-24P (S25P switch) 9 catalog name S50-01-10GE-2C (CX4 module) 18 catalog name, S25P 17 catalog names 9, 17, 28 catalog names, module 17 catalog number, SFP 31
Installing...settings 30 contacting TAC (technical support) 39 Contents, Table of 3 CX4 module 32 CX4 module (catalog name S50-01..., maximum 33
B
back-pressure support 10 bar code 9 battery removal 37 battery, lithium 34 baud rate 29 ...
Setup and Buffer Tuning of the S25P for Storage Environments - Page 2
...* 0 S25-01-GE-24P
DL277000000 7590004800 B
0 S50-PWR-AC
N/A
N/A
N/A
0 S50-FAN
N/A
N/A
N/A
* - Management Unit
Software Protocol Configured
Force10>
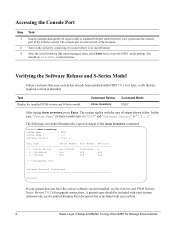
If your system.
2
Basic Layer 2 Setup and Buffer Tuning of output shown below . Turn on the switch by connecting it to get the EXEC mode prompt. You should be included with the type of the S25P for upgrade instructions.
In...
Setup and Buffer Tuning of the S25P for Storage Environments - Page 4
... 0/5
unassigned
NO Manual up
GigabitEthernet 0/6
unassigned
NO Manual up
GigabitEthernet 0/7
unassigned
NO Manual up
GigabitEthernet 0/8
unassigned
NO Manual up
GigabitEthernet 0/9
unassigned
NO Manual up : Gi 0/9 output truncated
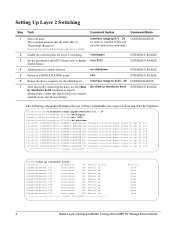
Force10#show ip interfaces brief INTERFACE RANGE ip interfaces brief command to handle mtu 9252 Jumbo frames.
Setting Up Layer 2 Switching...
Setup and Buffer Tuning of the S25P for Storage Environments - Page 7
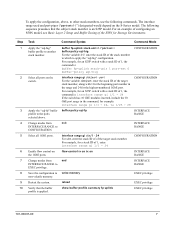
...the variable 0-7, enter the stack ID of 1, the command is :
buffer fp-uplink stack-unit 1 port-set 0 buffer-policy eql-hig
CONFIGURATION
interface range gi slot/port - For example, for a stack ID of.... Save the configuration to another stack member. For an example of configuring an S50N model, see Basic Layer 2 Setup and Buffer Tuning of 1, enter: interface range gi 1/1 - 24 flow-control rx...
Dell Force10 S25-01-GE-24P Reviews
We have not received any reviews for Dell yet.