
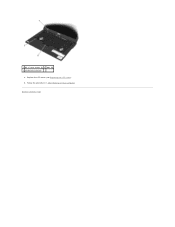
Setup and Quick Reference Guide
Page 38
... CMOS CHECKSUM ERROR - If the message reappears, contact Dell (see "Dell Diagnostics" on page 40). P L E A S E R U N T H E S YS T E M S E T U P P R O G R A M - See your Service Manual at support.dell.com or see "Contacting Dell" on page 65 for assistance). The keyboard controller may be malfunctioning, or a memory module may be...reserve battery that was running out of charge. Replace the battery. setup program, then immediately exit the program (see "Dell Diagnostics" on page 40). Run the System Memory tests and the Keyboard Controller test in the system setup program does ...
... CMOS CHECKSUM ERROR - If the message reappears, contact Dell (see "Dell Diagnostics" on page 40). P L E A S E R U N T H E S YS T E M S E T U P P R O G R A M - See your Service Manual at support.dell.com or see "Contacting Dell" on page 65 for assistance). The keyboard controller may be malfunctioning, or a memory module may be...reserve battery that was running out of charge. Replace the battery. setup program, then immediately exit the program (see "Dell Diagnostics" on page 40). Run the System Memory tests and the Keyboard Controller test in the system setup program does ...

Setup and Quick Reference Guide
Page 39
Replace processor fan. Possible hard drive failure during harddrive start test (see "Contacting Dell" on page 65 for assistance). NO BO OT D E V IC E AVAILA BLE - Troubleshooting Software and Hardware Problems If a device is either not detected during hard drive POST. See your Service Manual at support.dell.com). Keyboard failure or keyboard... error, possible hard drive failure. USB OVER CURRENT ERROR - • Disconnect the USB device. Troubleshooting 39 KEYBOARD F AILURE - Check cables, swap hard disks, or see your boot device, ensure that the cables are ...
Replace processor fan. Possible hard drive failure during harddrive start test (see "Contacting Dell" on page 65 for assistance). NO BO OT D E V IC E AVAILA BLE - Troubleshooting Software and Hardware Problems If a device is either not detected during hard drive POST. See your Service Manual at support.dell.com). Keyboard failure or keyboard... error, possible hard drive failure. USB OVER CURRENT ERROR - • Disconnect the USB device. Troubleshooting 39 KEYBOARD F AILURE - Check cables, swap hard disks, or see your boot device, ensure that the cables are ...

Service Manual
Page 2
Remove the heatsink assembly (see Removing the Keyboard). 9. Remove the keyboard (see Removing the Processor Heatsink Assembly). 6. Remove the right speaker grill (see Removing the Card Cage). 12. Remove the two M2 x 3 screws. 14....Remove the modular drive (see Removing the Display Assembly (E6400 and M2400) or Removing the Display Assembly (E6400 ATG)). 7. Back to Contents Page 1394 Card Dell™ Latitude™ E6400 and E6400 ATG and Mobile Workstation Precision™ M2400 Service Manual Removing the 1394 Card Replacing the 1394 Card Removing the 1394 Card CAUTION: Before you...
Remove the heatsink assembly (see Removing the Keyboard). 9. Remove the keyboard (see Removing the Processor Heatsink Assembly). 6. Remove the right speaker grill (see Removing the Card Cage). 12. Remove the two M2 x 3 screws. 14....Remove the modular drive (see Removing the Display Assembly (E6400 and M2400) or Removing the Display Assembly (E6400 ATG)). 7. Back to Contents Page 1394 Card Dell™ Latitude™ E6400 and E6400 ATG and Mobile Workstation Precision™ M2400 Service Manual Removing the 1394 Card Replacing the 1394 Card Removing the 1394 Card CAUTION: Before you...
Service Manual
Page 3
...) or Replacing the Display Assembly (E6400 ATG)). 10. Follow the procedures in After Working on Your Computer. Replace the palm rest assembly (Replacing the Palm Rest Assembly). 6. Replace the LED cover (see Replacing the Bottom of the base assembly (see Replacing the LED Cover). 9. Replace the bottom of the Base Assembly). 14. Replace the hinge covers (see Replacing the Keyboard). 8. Use...
...) or Replacing the Display Assembly (E6400 ATG)). 10. Follow the procedures in After Working on Your Computer. Replace the palm rest assembly (Replacing the Palm Rest Assembly). 6. Replace the LED cover (see Replacing the Bottom of the base assembly (see Replacing the LED Cover). 9. Replace the bottom of the Base Assembly). 14. Replace the hinge covers (see Replacing the Keyboard). 8. Use...

Service Manual
Page 5
... palm rest assembly (see Replacing the Processor Heatsink Assembly). 15. Replacing the Base Assembly 1. Replace the I/O card (see Removing the Keyboard). 13. Replace the RJ-11 modem connector (see Replacing the Keyboard). 10. Replace the keyboard (see Replacing the RJ-11 Modem Connector). 3. Replace the hard drive (see ... if present (see Replacing the Display Assembly (E6400 and M2400) or Replacing the Display Assembly (E6400 ATG)). 12. Remove the LED cover (see Replacing the LED Cover). 11. Replace the LED cover (see Removing the LED Cover). 12. Replace the card in the...
... palm rest assembly (see Replacing the Processor Heatsink Assembly). 15. Replacing the Base Assembly 1. Replace the I/O card (see Removing the Keyboard). 13. Replace the RJ-11 modem connector (see Replacing the Keyboard). 10. Replace the keyboard (see Replacing the RJ-11 Modem Connector). 3. Replace the hard drive (see ... if present (see Replacing the Display Assembly (E6400 and M2400) or Replacing the Display Assembly (E6400 ATG)). 12. Remove the LED cover (see Replacing the LED Cover). 11. Replace the LED cover (see Removing the LED Cover). 12. Replace the card in the...
Service Manual
Page 7
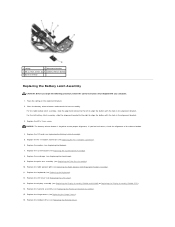
...of the base assembly (see Removing the Keyboard). 10. Remove the keyboard (see Removing the Bottom of the Base Assembly). 3. Remove the system board (see Removing the Display Assembly (E6400 and M2400) or Removing the Display Assembly (E6400 ATG)). 8. Remove the spring from ... from the system board. 14. Back to Contents Page Battery Latch Assembly Dell™ Latitude™ E6400 and E6400 ATG and Mobile Workstation Precision™ M2400 Service Manual Removing a Battery Latch Assembly Replacing the Battery Latch Assembly There are two battery latches, a left battery latches...
...of the base assembly (see Removing the Keyboard). 10. Remove the keyboard (see Removing the Bottom of the Base Assembly). 3. Remove the system board (see Removing the Display Assembly (E6400 and M2400) or Removing the Display Assembly (E6400 ATG)). 8. Remove the spring from ... from the system board. 14. Back to Contents Page Battery Latch Assembly Dell™ Latitude™ E6400 and E6400 ATG and Mobile Workstation Precision™ M2400 Service Manual Removing a Battery Latch Assembly Replacing the Battery Latch Assembly There are two battery latches, a left battery latches...
Service Manual
Page 8
... spring on the alignment bracket. 2. Replace the modem (see Replacing the Card Cage). 9. Replace the card cage (see Replacing the Modem). 7. Replace the display assembly (see Replacing the LED Cover). 13. Replace the LED cover (see Replacing the Display Assembly (E6400 and M2400) or Replacing the Display Assembly (E6400 ATG)). 14. Replace the palm rest assembly (see Replacing the RJ-11 Modem Connector...
... spring on the alignment bracket. 2. Replace the modem (see Replacing the Card Cage). 9. Replace the card cage (see Replacing the Modem). 7. Replace the display assembly (see Replacing the LED Cover). 13. Replace the LED cover (see Replacing the Display Assembly (E6400 and M2400) or Replacing the Display Assembly (E6400 ATG)). 14. Replace the palm rest assembly (see Replacing the RJ-11 Modem Connector...
Service Manual
Page 15
... down on Your Computer. 2. Remove the modular drive (see Removing the Processor Heatsink Assembly). 6. Remove the right speaker grill (see Removing the Keyboard). 9. If a card is in Before Working on the connector-end of the card cage, then grasp each side of the card cage and ...see Removing the LED Cover). 8. Pivot the card cage up to Contents Page Card Cage Dell™ Latitude™ E6400 and E6400 ATG and Mobile Workstation Precision™ M2400 Service Manual Removing the Card Cage Replacing the Card Cage Removing the Card Cage CAUTION: Before you begin any of the laptop....
... down on Your Computer. 2. Remove the modular drive (see Removing the Processor Heatsink Assembly). 6. Remove the right speaker grill (see Removing the Keyboard). 9. If a card is in Before Working on the connector-end of the card cage, then grasp each side of the card cage and ...see Removing the LED Cover). 8. Pivot the card cage up to Contents Page Card Cage Dell™ Latitude™ E6400 and E6400 ATG and Mobile Workstation Precision™ M2400 Service Manual Removing the Card Cage Replacing the Card Cage Removing the Card Cage CAUTION: Before you begin any of the laptop....
Service Manual
Page 16
... bottom of the base assembly (see Replacing the Modular Drive). 11. Replace the LED cover (see Replacing the Display Assembly (E6400 and M2400) or Replacing the Display Assembly (E6400 ATG)). 8. Replace the heatsink assembly (see Replacing the Keyboard). 6. Replace the keyboard (see Replacing the Processor Heatsink Assembly). 9. Back to the base assembly, then lower the card cage into place. 2. CAUTION: Before you...
... bottom of the base assembly (see Replacing the Modular Drive). 11. Replace the LED cover (see Replacing the Display Assembly (E6400 and M2400) or Replacing the Display Assembly (E6400 ATG)). 8. Replace the heatsink assembly (see Replacing the Keyboard). 6. Replace the keyboard (see Replacing the Processor Heatsink Assembly). 9. Back to the base assembly, then lower the card cage into place. 2. CAUTION: Before you...
Service Manual
Page 23
... Modem). 15. Remove the modem (see Removing the Display Assembly (E6400 and M2400) or Removing the Display Assembly (E6400 ATG)). 8. Remove the keyboard (see Removing the Right Speaker Grill/Fingerprint Reader Assembly). 11. Remove...Keyboard). 10. Remove the M2 x 3-mm screw from the I /O card. Remove the card cage (see Removing the System Board Assembly). Remove the system board (see Removing the Card Cage). 13. Back to Contents Page I/O Card Dell™ Latitude™ E6400 and E6400 ATG and Mobile Workstation Precision™ M2400 Service Manual Removing the I/O Card Replacing...
... Modem). 15. Remove the modem (see Removing the Display Assembly (E6400 and M2400) or Removing the Display Assembly (E6400 ATG)). 8. Remove the keyboard (see Removing the Right Speaker Grill/Fingerprint Reader Assembly). 11. Remove...Keyboard). 10. Remove the M2 x 3-mm screw from the I /O card. Remove the card cage (see Removing the System Board Assembly). Remove the system board (see Removing the Card Cage). 13. Back to Contents Page I/O Card Dell™ Latitude™ E6400 and E6400 ATG and Mobile Workstation Precision™ M2400 Service Manual Removing the I/O Card Replacing...

Service Manual
Page 24
.... Replace the keyboard (see Replacing the Processor Heatsink Assembly). 14. Replace the heatsink assembly (see Replacing the Keyboard). 11. Replace the hinge covers (see Replacing the Bottom of the Base Assembly). 18. Replace the bottom of the base assembly (see Replacing the Hinge Covers). 15. Replace the display assembly (see Replacing the Modular Drive). 16. Replace the modular drive (see Replacing the Display Assembly (E6400...
.... Replace the keyboard (see Replacing the Processor Heatsink Assembly). 14. Replace the heatsink assembly (see Replacing the Keyboard). 11. Replace the hinge covers (see Replacing the Bottom of the Base Assembly). 18. Replace the bottom of the base assembly (see Replacing the Hinge Covers). 15. Replace the display assembly (see Replacing the Modular Drive). 16. Replace the modular drive (see Replacing the Display Assembly (E6400...
Service Manual
Page 63
... M2 x 3-mm screws at an angle, and fit the tabs and keyboard connector along the top of the keyboard. Back to Contents Page Keyboard Dell™ Latitude™ E6400 and E6400 ATG and Mobile Workstation Precision™ M2400 Service Manual Removing the Keyboard Replacing the Keyboard Removing the Keyboard CAUTION: Before you begin any of the procedures in this section, follow...
... M2 x 3-mm screws at an angle, and fit the tabs and keyboard connector along the top of the keyboard. Back to Contents Page Keyboard Dell™ Latitude™ E6400 and E6400 ATG and Mobile Workstation Precision™ M2400 Service Manual Removing the Keyboard Replacing the Keyboard Removing the Keyboard CAUTION: Before you begin any of the procedures in this section, follow...
Service Manual
Page 64
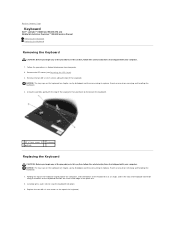
1 M2 x 3-mm screws (2) 2 tabs (5) 3 keyboard connector 4. Replace the LED cover (see Replacing the LED Cover). 5. Follow the procedures in After Working on Your Computer. Back to Contents Page
1 M2 x 3-mm screws (2) 2 tabs (5) 3 keyboard connector 4. Replace the LED cover (see Replacing the LED Cover). 5. Follow the procedures in After Working on Your Computer. Back to Contents Page
Service Manual
Page 69
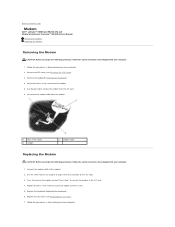
... Computer. Follow the procedures in After Working on Your Computer. 2. Remove the keyboard (Removing the Keyboard). 4. Connect the modem cable to Contents Page Modem Dell™ Latitude™ E6400 and E6400 ATG and Mobile Workstation Precision™ M2400 Service Manual Removing the Modem Replacing the Modem Removing the Modem CAUTION: Before you begin the following procedure, follow...
... Computer. Follow the procedures in After Working on Your Computer. 2. Remove the keyboard (Removing the Keyboard). 4. Connect the modem cable to Contents Page Modem Dell™ Latitude™ E6400 and E6400 ATG and Mobile Workstation Precision™ M2400 Service Manual Removing the Modem Replacing the Modem Removing the Modem CAUTION: Before you begin the following procedure, follow...
Service Manual
Page 72
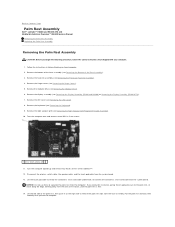
... the keyboard (see Removing the Bottom of the Base Assembly). 3. Disconnect the wireless switch cable, the speaker cable, and the touch pad cable from the system board. Back to Contents Page Palm Rest Assembly Dell™ Latitude™ E6400 and E6400 ATG and Mobile Workstation Precision™ M2400 Service Manual Removing the Palm Rest Assembly Replacing...
... the keyboard (see Removing the Bottom of the Base Assembly). 3. Disconnect the wireless switch cable, the speaker cable, and the touch pad cable from the system board. Back to Contents Page Palm Rest Assembly Dell™ Latitude™ E6400 and E6400 ATG and Mobile Workstation Precision™ M2400 Service Manual Removing the Palm Rest Assembly Replacing...
Service Manual
Page 73
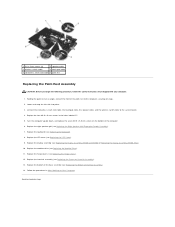
... Replacing the Keyboard). 8. Replace the four M2.5 x 5-mm screws in After Working on the bottom of the palm rest to the computer, securing all snaps. 2. Turn the computer upside down, and replace the seven M2.5 x 5.5-mm screws on Your Computer. Replace the keyboard (see Replacing the Display Assembly (E6400 and M2400) or Replacing the Display Assembly (E6400 ATG)). 10. Replace the...
... Replacing the Keyboard). 8. Replace the four M2.5 x 5-mm screws in After Working on the bottom of the palm rest to the computer, securing all snaps. 2. Turn the computer upside down, and replace the seven M2.5 x 5.5-mm screws on Your Computer. Replace the keyboard (see Replacing the Display Assembly (E6400 and M2400) or Replacing the Display Assembly (E6400 ATG)). 10. Replace the...
Service Manual
Page 74
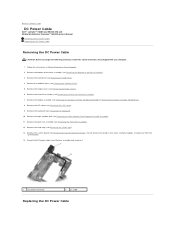
...Removing the LED Cover). 9. Remove the LED cover (see Removing the Processor Heatsink Assembly). 7. Remove the keyboard (see Removing the Bottom of the base assembly (see Removing the Keyboard). 10. Remove the bottom of the Base Assembly). 3. Remove the palm rest assembly (see Removing the ...see Removing the Hard Drive). 4. Back to Contents Page DC Power Cable Dell™ Latitude™ E6400 and E6400 ATG and Mobile Workstation Precision™ M2400 Service Manual Removing the DC Power Cable Replacing the DC Power Cable Removing the DC Power Cable CAUTION: Before you begin ...
...Removing the LED Cover). 9. Remove the LED cover (see Removing the Processor Heatsink Assembly). 7. Remove the keyboard (see Removing the Bottom of the base assembly (see Removing the Keyboard). 10. Remove the bottom of the Base Assembly). 3. Remove the palm rest assembly (see Removing the ...see Removing the Hard Drive). 4. Back to Contents Page DC Power Cable Dell™ Latitude™ E6400 and E6400 ATG and Mobile Workstation Precision™ M2400 Service Manual Removing the DC Power Cable Replacing the DC Power Cable Removing the DC Power Cable CAUTION: Before you begin ...
Service Manual
Page 75
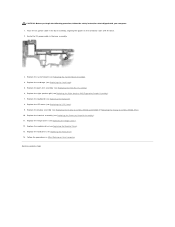
.... Back to Contents Page Replace the system board (see Replacing the LED Cover). 9. Replace the LED cover (see Replacing the System Board Assembly). 4. Replace the display assembly (see Replacing the Keyboard). 8. Route the DC power cable in the base assembly. 3. Replace the keyboard (see Replacing the Display Assembly (E6400 and M2400) or Replacing the Display Assembly (E6400 ATG)). 10. Replace the heatsink assembly (see...
.... Back to Contents Page Replace the system board (see Replacing the LED Cover). 9. Replace the LED cover (see Replacing the System Board Assembly). 4. Replace the display assembly (see Replacing the Keyboard). 8. Route the DC power cable in the base assembly. 3. Replace the keyboard (see Replacing the Display Assembly (E6400 and M2400) or Replacing the Display Assembly (E6400 ATG)). 10. Replace the heatsink assembly (see...
Service Manual
Page 76
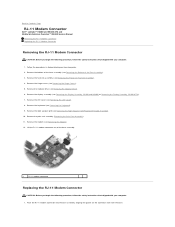
...Removing the LED Cover). 8. Back to Contents Page RJ-11 Modem Connector Dell™ Latitude™ E6400 and E6400 ATG and Mobile Workstation Precision™ M2400 Service Manual Removing the RJ-11 Modem Connector Replacing the RJ-11 Modem Connector Removing the RJ-11 Modem Connector CAUTION: Before ...Removing the Modem). 12. Lift the RJ-11 modem connector out of the base assembly (see Removing the Display Assembly (E6400 and M2400) or Removing the Display Assembly (E6400 ATG)). 7. Remove the modem (see Removing the Processor Heatsink Assembly). 4. Remove the keyboard (see Removing the...
...Removing the LED Cover). 8. Back to Contents Page RJ-11 Modem Connector Dell™ Latitude™ E6400 and E6400 ATG and Mobile Workstation Precision™ M2400 Service Manual Removing the RJ-11 Modem Connector Replacing the RJ-11 Modem Connector Removing the RJ-11 Modem Connector CAUTION: Before ...Removing the Modem). 12. Lift the RJ-11 modem connector out of the base assembly (see Removing the Display Assembly (E6400 and M2400) or Removing the Display Assembly (E6400 ATG)). 7. Remove the modem (see Removing the Processor Heatsink Assembly). 4. Remove the keyboard (see Removing the...
Service Manual
Page 77
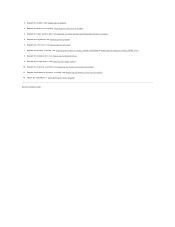
... (see Replacing the Keyboard). 6. Replace the heatsink assembly (see Replacing the LED Cover). 7. Follow the procedures in After Working on Your Computer. 2. Replace the palm rest assembly (Replacing the Palm Rest Assembly). 4. Back to Contents Page Replace the LED cover (see Replacing the Processor Heatsink Assembly). 11. Replace the display assembly (see Replacing the Display Assembly (E6400 and M2400) or Replacing the...
... (see Replacing the Keyboard). 6. Replace the heatsink assembly (see Replacing the LED Cover). 7. Follow the procedures in After Working on Your Computer. 2. Replace the palm rest assembly (Replacing the Palm Rest Assembly). 4. Back to Contents Page Replace the LED cover (see Replacing the Processor Heatsink Assembly). 11. Replace the display assembly (see Replacing the Display Assembly (E6400 and M2400) or Replacing the...


