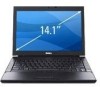
Setup and Quick Reference Guide
Page 4
... Tools 31 Power Lights 31 Beep Codes 31 Error Messages 33 System Messages 38 Troubleshooting Software and Hardware Problems 39 Dell Diagnostics 40 Troubleshooting Tips 42 Power Problems 42 Memory Problems 43 Lockups and Software Problems 44 Dell Technical Update Service 46 Dell Support Utility 46 5 Reinstalling Software 49 Drivers 49 Identifying Drivers 49 Reinstalling Drivers and Utilities 50 Restoring Your Operating System 52 Using Microsoft® Windows® System Restore . . . 52 Using Dell™ Factory Image Restore 54 Using the Operating System Media 55 6 Finding...
... Tools 31 Power Lights 31 Beep Codes 31 Error Messages 33 System Messages 38 Troubleshooting Software and Hardware Problems 39 Dell Diagnostics 40 Troubleshooting Tips 42 Power Problems 42 Memory Problems 43 Lockups and Software Problems 44 Dell Technical Update Service 46 Dell Support Utility 46 5 Reinstalling Software 49 Drivers 49 Identifying Drivers 49 Reinstalling Drivers and Utilities 50 Restoring Your Operating System 52 Using Microsoft® Windows® System Restore . . . 52 Using Dell™ Factory Image Restore 54 Using the Operating System Media 55 6 Finding...

Setup and Quick Reference Guide
Page 17
.... 5 Follow the instructions on the screen to complete the setup. Transferring Information to a New Computer Microsoft® Windows Vista® Operating System 1 Click the Windows Vista Start button , and then click Transfer files and settings→ Start Windows Easy Transfer. 2 In the User Account Control dialog box, click Continue. 3 Click Start a new transfer or Continue a transfer in step 3, continue to the Internet. 3 In the next window, click the appropriate option: •...
.... 5 Follow the instructions on the screen to complete the setup. Transferring Information to a New Computer Microsoft® Windows Vista® Operating System 1 Click the Windows Vista Start button , and then click Transfer files and settings→ Start Windows Easy Transfer. 2 In the User Account Control dialog box, click Continue. 3 Click Start a new transfer or Continue a transfer in step 3, continue to the Internet. 3 In the next window, click the appropriate option: •...
Setup and Quick Reference Guide
Page 23
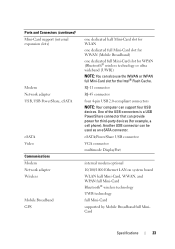
Ports and Connectors (continued) Mini-Card support (internal expansion slots) Modem Network adapter USB, USB PowerShare, eSATA eSATA Video Communications Modem Network adapter Wireless Mobile Broadband GPS one dedicated half Mini-Card slot for WLAN one dedicated full Mini-Card slot for WWAN (Mobile Broadband) one dedicated full Mini-Card slot for WPAN (Bluetooth® wireless technology or ultra wideband [UWB]) NOTE: You can also use the WWAN or WPAN full Mini-Card slot for...
Ports and Connectors (continued) Mini-Card support (internal expansion slots) Modem Network adapter USB, USB PowerShare, eSATA eSATA Video Communications Modem Network adapter Wireless Mobile Broadband GPS one dedicated half Mini-Card slot for WLAN one dedicated full Mini-Card slot for WWAN (Mobile Broadband) one dedicated full Mini-Card slot for WPAN (Bluetooth® wireless technology or ultra wideband [UWB]) NOTE: You can also use the WWAN or WPAN full Mini-Card slot for...

Setup and Quick Reference Guide
Page 31
... power, a device such as a memory module or graphics card might emit a series of beeps during start-up if the monitor cannot display errors or problems. This series of repetitive three short beeps. Beep Codes Your computer might be a power problem or an internal device malfunction. CAUTION: Before you that shipped with your computer from the electrical outlet before opening the cover. Tools Power Lights The two-color power-button light located on the keyboard, move the mouse...
... power, a device such as a memory module or graphics card might emit a series of beeps during start-up if the monitor cannot display errors or problems. This series of repetitive three short beeps. Beep Codes Your computer might be a power problem or an internal device malfunction. CAUTION: Before you that shipped with your computer from the electrical outlet before opening the cover. Tools Power Lights The two-color power-button light located on the keyboard, move the mouse...
Setup and Quick Reference Guide
Page 35
... keyboard or keys during the boot routine. Troubleshooting 35 Then, shut down the computer, reinstall the hard drive, and restart the computer. INVALID CONFIGURATION INFORMATION-PLEASE RUN SYSTEM SETUP PROGRAM - Run the Keyboard Controller test in the Dell Diagnostics (see "Dell Diagnostics" on page 40). Run the Keyboard Controller test in the Dell Diagnostics (see your Service Manual at support.dell.com), and boot the computer from a CD. Run the Hard Disk Drive...
... keyboard or keys during the boot routine. Troubleshooting 35 Then, shut down the computer, reinstall the hard drive, and restart the computer. INVALID CONFIGURATION INFORMATION-PLEASE RUN SYSTEM SETUP PROGRAM - Run the Keyboard Controller test in the Dell Diagnostics (see "Dell Diagnostics" on page 40). Run the Keyboard Controller test in the Dell Diagnostics (see your Service Manual at support.dell.com), and boot the computer from a CD. Run the Hard Disk Drive...

Setup and Quick Reference Guide
Page 39
... NOT INDICATE A POTENTIAL HARD DRIVE PROBLEM - • S.M.A.R.T error, possible hard drive failure. DI SK D R I V E R E A D F AILU RE - Troubleshooting Software and Hardware Problems If a device is either not detected during hard drive POST. Replace processor fan. Check cables, swap hard disks, or see your Service Manual at support.dell.com). Keyboard failure or keyboard cable loose. DELL RECOMMENDS THAT YOU BACK UP YOUR DATA REGULARLY. Troubleshooting 39 KEYBOARD F AILURE - NO TIMER TICK INTERRUPT - • A chip on page 65 for the USB device. HARD DRIVE SELF MONITORING...
... NOT INDICATE A POTENTIAL HARD DRIVE PROBLEM - • S.M.A.R.T error, possible hard drive failure. DI SK D R I V E R E A D F AILU RE - Troubleshooting Software and Hardware Problems If a device is either not detected during hard drive POST. Replace processor fan. Check cables, swap hard disks, or see your Service Manual at support.dell.com). Keyboard failure or keyboard cable loose. DELL RECOMMENDS THAT YOU BACK UP YOUR DATA REGULARLY. Troubleshooting 39 KEYBOARD F AILURE - NO TIMER TICK INTERRUPT - • A chip on page 65 for the USB device. HARD DRIVE SELF MONITORING...
Setup and Quick Reference Guide
Page 40
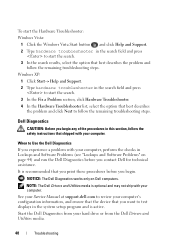
... start the Hardware Troubleshooter: Windows Vista: 1 Click the Windows Vista Start button , and click Help and Support. 2 Type hardware troubleshooter in the search field and press to Use the Dell Diagnostics If you experience a problem with your computer, perform the checks in Lockups and Software Problems (see "Lockups and Software Problems" on Dell computers. NOTE: The Dell Drivers and Utilities media is optional and may not ship with your computer's configuration information, and ensure that the device that...
... start the Hardware Troubleshooter: Windows Vista: 1 Click the Windows Vista Start button , and click Help and Support. 2 Type hardware troubleshooter in the search field and press to Use the Dell Diagnostics If you experience a problem with your computer, perform the checks in Lockups and Software Problems (see "Lockups and Software Problems" on Dell computers. NOTE: The Dell Drivers and Utilities media is optional and may not ship with your computer's configuration information, and ensure that the device that...

Setup and Quick Reference Guide
Page 43
... a power problem, a device may be malfunctioning or incorrectly installed. • Remove and then reinstall all memory modules (see your Service Manual at support.dell.com). IF YOU RECEIVE AN INSUFFICIENT MEMORY MESSAGE - • Save and close any open files and exit any open programs you begin any expansion cards, including graphics cards (see your Service Manual at support.dell.com). • Remove and then reinstall any of interference are not using to...
... a power problem, a device may be malfunctioning or incorrectly installed. • Remove and then reinstall all memory modules (see your Service Manual at support.dell.com). IF YOU RECEIVE AN INSUFFICIENT MEMORY MESSAGE - • Save and close any open files and exit any open programs you begin any expansion cards, including graphics cards (see your Service Manual at support.dell.com). • Remove and then reinstall any of interference are not using to...

Setup and Quick Reference Guide
Page 49
... Windows Vista Start button™ , and right-click Computer. 2 Click Properties→ Device Manager. Scroll down the list to the device name, you may appear. If you are an administrator on the computer, click Continue; NOTE: The User Account Control window may need to reinstall the driver or install a new driver (see if any device, identify whether the driver is next to see "Reinstalling Drivers and Utilities" on page 50). 5 Reinstalling Software Drivers...
... Windows Vista Start button™ , and right-click Computer. 2 Click Properties→ Device Manager. Scroll down the list to the device name, you may appear. If you are an administrator on the computer, click Continue; NOTE: The User Account Control window may need to reinstall the driver or install a new driver (see if any device, identify whether the driver is next to see "Reinstalling Drivers and Utilities" on page 50). 5 Reinstalling Software Drivers...
Setup and Quick Reference Guide
Page 50
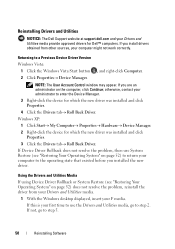
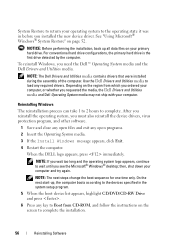
... Windows Vista: 1 Click the Windows Vista Start button , and right-click Computer. 2 Click Properties→ Device Manager. If you install drivers obtained from your Drivers and Utilities media. 1 With the Windows desktop displayed, insert your F media. Using the Drivers and Utilities Media If using Device Driver Rollback or System Restore (see "Restoring Your Operating System" on page 52) does not resolve the problem, reinstall the driver from other sources, your computer might not work correctly. Reinstalling Drivers and Utilities NOTICE: The Dell Support...
... Windows Vista: 1 Click the Windows Vista Start button , and right-click Computer. 2 Click Properties→ Device Manager. If you install drivers obtained from your Drivers and Utilities media. 1 With the Windows desktop displayed, insert your F media. Using the Drivers and Utilities Media If using Device Driver Rollback or System Restore (see "Restoring Your Operating System" on page 52) does not resolve the problem, reinstall the driver from other sources, your computer might not work correctly. Reinstalling Drivers and Utilities NOTICE: The Dell Support...
Setup and Quick Reference Guide
Page 56
... setup program. 5 When the boot device list appears, highlight CD/DVD/CD-RW Drive and press . 6 Press any key to complete the installation. 56 Reinstalling Software When the DELL logo appears, press immediately. See "Using Microsoft® Windows® System Restore" on your computer. Use the Dell Drivers and Utilities media to complete. Depending on the region from CD-ROM, and follow the instructions on the screen to Boot from which you ordered...
... setup program. 5 When the boot device list appears, highlight CD/DVD/CD-RW Drive and press . 6 Press any key to complete the installation. 56 Reinstalling Software When the DELL logo appears, press immediately. See "Using Microsoft® Windows® System Restore" on your computer. Use the Dell Drivers and Utilities media to complete. Depending on the region from CD-ROM, and follow the instructions on the screen to Boot from which you ordered...
Setup and Quick Reference Guide
Page 69
... technical support and customer service, 60 System Restore, 52 enabling, 54 T transferring information to a new computer, 17 troubleshooting, 31, 58 blue screen, 45 computer not responding, 44 Dell Diagnostics, 40 error messages, 33 memory, 43 power, 42 power light conditions, 42 power lights, 31 program crashes, 44 programs and Windows compatibility, 45 restore to previous state, 52 software, 44-46 tips, 42 W Windows License label, 58 Windows Vista Dell Factory Image Restore, 54-55 Device Driver...
... technical support and customer service, 60 System Restore, 52 enabling, 54 T transferring information to a new computer, 17 troubleshooting, 31, 58 blue screen, 45 computer not responding, 44 Dell Diagnostics, 40 error messages, 33 memory, 43 power, 42 power light conditions, 42 power lights, 31 program crashes, 44 programs and Windows compatibility, 45 restore to previous state, 52 software, 44-46 tips, 42 W Windows License label, 58 Windows Vista Dell Factory Image Restore, 54-55 Device Driver...
Service Manual
Page 51
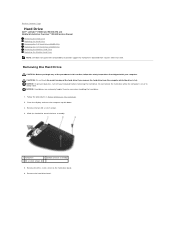
... instructions that shipped with your computer before removing the hard drive. Back to Contents Page Hard Drive Dell™ Latitude™ E6400 and E6400 ATG and Mobile Workstation Precision™ M2400 Service Manual Removing the Hard Drive Replacing the Hard Drive Removing the 1.8" Hard Drive (E6400 ATG) Replacing the 1.8" Hard Drive (E6400 ATG) Removing the Modular Hard Drive Replacing the Modular Hard Drive NOTE: Dell does not guarantee compatibility or provide support for hard drives obtained from the computer while the drive is on or in Before Working...
... instructions that shipped with your computer before removing the hard drive. Back to Contents Page Hard Drive Dell™ Latitude™ E6400 and E6400 ATG and Mobile Workstation Precision™ M2400 Service Manual Removing the Hard Drive Replacing the Hard Drive Removing the 1.8" Hard Drive (E6400 ATG) Replacing the 1.8" Hard Drive (E6400 ATG) Removing the Modular Hard Drive Replacing the Modular Hard Drive NOTE: Dell does not guarantee compatibility or provide support for hard drives obtained from the computer while the drive is on or in Before Working...

Service Manual
Page 52
... hard drive. 3. Replace the two M3 x 3-mm screws that secure the hard drive to slide the hard drive into place. Install the operating system, drivers, and utilities for your computer or at support.dell.com. For more information, see the Setup and Quick Reference Guide that shipped with your computer, as needed. Do not remove the hard drive while the computer is hot. Close the display and turn off your computer before removing the hard drive...
... hard drive. 3. Replace the two M3 x 3-mm screws that secure the hard drive to slide the hard drive into place. Install the operating system, drivers, and utilities for your computer or at support.dell.com. For more information, see the Setup and Quick Reference Guide that shipped with your computer, as needed. Do not remove the hard drive while the computer is hot. Close the display and turn off your computer before removing the hard drive...
Service Manual
Page 67
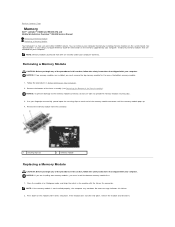
... not use tools to Contents Page Memory Dell™ Latitude™ E6400 and E6400 ATG and Mobile Workstation Precision™ M2400 Service Manual Removing a Memory Module Replacing a Memory Module Your computer has two user-accessible SODIMM sockets. NOTE: If the memory module is not installed properly, the computer may not boot. Press down on the connector. Install only memory modules that shipped with the tab on the module until the memory module pops up. 4. Remove the memory module from Dell...
... not use tools to Contents Page Memory Dell™ Latitude™ E6400 and E6400 ATG and Mobile Workstation Precision™ M2400 Service Manual Removing a Memory Module Replacing a Memory Module Your computer has two user-accessible SODIMM sockets. NOTE: If the memory module is not installed properly, the computer may not boot. Press down on the connector. Install only memory modules that shipped with the tab on the module until the memory module pops up. 4. Remove the memory module from Dell...
Service Manual
Page 83
...support.dell.com. System board failure has occurred. Back to Contents Page Troubleshooting Dell™ Latitude™ E6400 and E6400 ATG and Mobile Workstation Precision™ M2400 Service Manual Troubleshooting Tools Solving Problems Dell Technical Update Service Dell Support Utility Troubleshooting Tools Diagnostic Lights CAUTION: Before you begin any installed graphics cards. l Reseat the hard drive (see Replacing a Memory Module) and restart the computer. If the computer starts without error. l If available, install a working memory of either On , Off , or Flashing...
...support.dell.com. System board failure has occurred. Back to Contents Page Troubleshooting Dell™ Latitude™ E6400 and E6400 ATG and Mobile Workstation Precision™ M2400 Service Manual Troubleshooting Tools Solving Problems Dell Technical Update Service Dell Support Utility Troubleshooting Tools Diagnostic Lights CAUTION: Before you begin any installed graphics cards. l Reseat the hard drive (see Replacing a Memory Module) and restart the computer. If the computer starts without error. l If available, install a working memory of either On , Off , or Flashing...
Service Manual
Page 84
... the key or the mute button then turn on Dell computers. l If the problem persists, contact contact Dell Support. Click the Windows Vista start the search. 3. NOTE: The Dell Diagnostics only operate on your hard drive or from the one-time boot menu at support.dell.com. For more information on using the system setup program, see the Dell™ Technology Guide on your computer. Ensure that the computer is connected to a docking device...
... the key or the mute button then turn on Dell computers. l If the problem persists, contact contact Dell Support. Click the Windows Vista start the search. 3. NOTE: The Dell Diagnostics only operate on your hard drive or from the one-time boot menu at support.dell.com. For more information on using the system setup program, see the Dell™ Technology Guide on your computer. Ensure that the computer is connected to a docking device...
Service Manual
Page 86
..., if applicable, by changing the test settings. Write down any error codes and problem descriptions exactly as it appears and follow the instructions on a symptom of devices in the system. The following menu appears: Option Express Test Function Performs a quick test of tracing a problem quickly. NOTE: The Express Test requires no interaction on your computer. Configuration Displays the hardware configuration for your part. Remove the Drivers and Utilities media from the Custom...
..., if applicable, by changing the test settings. Write down any error codes and problem descriptions exactly as it appears and follow the instructions on a symptom of devices in the system. The following menu appears: Option Express Test Function Performs a quick test of tracing a problem quickly. NOTE: The Express Test requires no interaction on your computer. Configuration Displays the hardware configuration for your part. Remove the Drivers and Utilities media from the Custom...
Service Manual
Page 91
... Setup and Quick Reference Guide for your computer at support.dell.com. Power Problems CAUTION: Before you begin any of memory supported by your computer. The computer is working by testing it with your computer. l Ensure that shipped with the memory. No sound from speakers NOTE: The volume control in this section, follow the safety instructions that the electrical outlet is either turned off - Turn off nearby fans...
... Setup and Quick Reference Guide for your computer at support.dell.com. Power Problems CAUTION: Before you begin any of memory supported by your computer. The computer is working by testing it with your computer. l Ensure that shipped with the memory. No sound from speakers NOTE: The volume control in this section, follow the safety instructions that the electrical outlet is either turned off - Turn off nearby fans...
Service Manual
Page 92
Adjust the Windows volume control - Video and Display Problems CAUTION: Before you begin any of the procedures in this support Check the diagnostic lights - Windows XP: 1. Windows Vista: 1. Only part of the card is securely inserted into the headphone connector. If the external monitor works, the computer display or video controller may be customized for troubleshooting purposes. For information about your computer. See Diagnostic Lights. The service is readable Connect an external monitor - 1. NOTICE: If your computer...
Adjust the Windows volume control - Video and Display Problems CAUTION: Before you begin any of the procedures in this support Check the diagnostic lights - Windows XP: 1. Windows Vista: 1. Only part of the card is securely inserted into the headphone connector. If the external monitor works, the computer display or video controller may be customized for troubleshooting purposes. For information about your computer. See Diagnostic Lights. The service is readable Connect an external monitor - 1. NOTICE: If your computer...


