Owner's Manual
Page 1
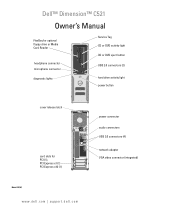
Dell™ Dimension™ C521 Owner's Manual FlexBay for optional floppy drive or Media Card Reader headphone connector microphone connector diagnostic lights Service Tag CD or DVD activity light CD or DVD eject button USB 2.0 connectors (2) hard drive activity light power button cover release latch card slots for PCI (1), PCI Express x1 (1) PCI Express x16 (1) Model DCNE www.dell.com | support.dell.com power connector audio connectors USB 2.0 connectors (4) network adapter VGA video connector (integrated)
Dell™ Dimension™ C521 Owner's Manual FlexBay for optional floppy drive or Media Card Reader headphone connector microphone connector diagnostic lights Service Tag CD or DVD activity light CD or DVD eject button USB 2.0 connectors (2) hard drive activity light power button cover release latch card slots for PCI (1), PCI Express x1 (1) PCI Express x16 (1) Model DCNE www.dell.com | support.dell.com power connector audio connectors USB 2.0 connectors (4) network adapter VGA video connector (integrated)

Owner's Manual
Page 3
... and DVDs 23 Helpful Tips 23 Using a Media Card Reader (Optional 24 Setting Up a Home and Office Network 26 Network Setup Wizard 27 Power Management 27 Standby Mode 27 Hibernate Mode 28 Power Options Properties 28 Power Schemes Tab 28 Advanced Tab 29 Hibernate Tab 29 Enabling Cool 'n' Quiet™ Technology 30 Contents 3
... and DVDs 23 Helpful Tips 23 Using a Media Card Reader (Optional 24 Setting Up a Home and Office Network 26 Network Setup Wizard 27 Power Management 27 Standby Mode 27 Hibernate Mode 28 Power Options Properties 28 Power Schemes Tab 28 Advanced Tab 29 Hibernate Tab 29 Enabling Cool 'n' Quiet™ Technology 30 Contents 3

Owner's Manual
Page 4
... system . . . . . 37 A solid blue screen appears 37 Other software problems 37 Media Card Reader Problems 38 Memory Problems 38 Mouse Problems 39 Network Problems 40 Power Problems 40 Printer Problems 41 Scanner Problems 42 Sound and Speaker Problems 43 No sound from speakers 43 No sound from headphones 44 Video and...
... system . . . . . 37 A solid blue screen appears 37 Other software problems 37 Media Card Reader Problems 38 Memory Problems 38 Mouse Problems 39 Network Problems 40 Power Problems 40 Printer Problems 41 Scanner Problems 42 Sound and Speaker Problems 43 No sound from speakers 43 No sound from headphones 44 Video and...
Owner's Manual
Page 5
3 Advanced Troubleshooting 47 Power Light and Diagnostic Lights 47 Power Light 47 Diagnostic Lights 48 Dell Diagnostics 50 Dell Diagnostics Main Menu 51 Drivers 52 What Is a Driver 52 Identifying Drivers 52 Reinstalling Drivers 53 Resolving Software and ...Hardware Incompatibilities 54 Restoring Your Operating System 54 Using Microsoft® Windows® XP System Restore 54 Using Dell&#...
3 Advanced Troubleshooting 47 Power Light and Diagnostic Lights 47 Power Light 47 Diagnostic Lights 48 Dell Diagnostics 50 Dell Diagnostics Main Menu 51 Drivers 52 What Is a Driver 52 Identifying Drivers 52 Reinstalling Drivers 53 Resolving Software and ...Hardware Incompatibilities 54 Restoring Your Operating System 54 Using Microsoft® Windows® XP System Restore 54 Using Dell&#...

Owner's Manual
Page 6
Power Cable Connector 76 Connecting and Disconnecting Drive Cables 76 Hard Drive 77 Removing a Hard Drive 77 Installing a Hard Drive 78 Floppy Drive 81 Removing a Floppy ...
Power Cable Connector 76 Connecting and Disconnecting Drive Cables 76 Hard Drive 77 Removing a Hard Drive 77 Installing a Hard Drive 78 Floppy Drive 81 Removing a Floppy ...

Owner's Manual
Page 14
... device such as a CD player is on when the computer reads data from the CD or DVD drive. NOTICE: Ensure that you use the power button to attach a personal computer microphone for voice or musical input into a sound or telephony program. NOTICE: Keep the vent area clean and dust... connect occasionally, such as printers and keyboards. To ensure adequate cooling, do not use the back USB connectors for bootable USB devices (see "Power Light and Diagnostic Lights" on the diagnostic code. Use the headphone connector to the system. 14 Setting Up and Using Your Computer It is ...
... device such as a CD player is on when the computer reads data from the CD or DVD drive. NOTICE: Ensure that you use the power button to attach a personal computer microphone for voice or musical input into a sound or telephony program. NOTICE: Keep the vent area clean and dust... connect occasionally, such as printers and keyboards. To ensure adequate cooling, do not use the back USB connectors for bootable USB devices (see "Power Light and Diagnostic Lights" on the diagnostic code. Use the headphone connector to the system. 14 Setting Up and Using Your Computer It is ...

Owner's Manual
Page 15
Back View of the Computer 1 2 3 4 1 voltage selection switch See the safety instructions in the Product Information Guide for more information. 2 power connector Insert the power cable. 3 back panel I/O connectors Plug serial, USB, and other devices into the appropriate connectors (see "Back Panel I/O Connectors" on page 16). 4 card slots (3) Access connector slots for expansion cards: • SLOT1 PCI Express x16 • SLOT2 PCI Express x1 • SLOT3 PCI Setting Up and Using Your Computer 15
Back View of the Computer 1 2 3 4 1 voltage selection switch See the safety instructions in the Product Information Guide for more information. 2 power connector Insert the power cable. 3 back panel I/O connectors Plug serial, USB, and other devices into the appropriate connectors (see "Back Panel I/O Connectors" on page 16). 4 card slots (3) Access connector slots for expansion cards: • SLOT1 PCI Express x16 • SLOT2 PCI Express x1 • SLOT3 PCI Setting Up and Using Your Computer 15

Owner's Manual
Page 27
... returns to Category View. 3 Under Pick a category, click Performance and Maintenance. 4 Under or pick a Control Panel icon, click Power Options. 5 Under the Power Schemes tab, change the settings in Windows XP Home Edition. When a Windows XP Professional computer is on the screen. NOTE: Windows XP... to a network, different options related to security and networking appear in before it was in certain windows. Standby Mode Standby mode conserves power by turning off the display and the hard drive after a defined period of inactivity: 1 Click the Start button, then click Control ...
... returns to Category View. 3 Under Pick a category, click Performance and Maintenance. 4 Under or pick a Control Panel icon, click Power Options. 5 Under the Power Schemes tab, change the settings in Windows XP Home Edition. When a Windows XP Professional computer is on the screen. NOTE: Windows XP... to a network, different options related to security and networking appear in before it was in certain windows. Standby Mode Standby mode conserves power by turning off the display and the hard drive after a defined period of inactivity: 1 Click the Start button, then click Control ...
Owner's Manual
Page 28
... automatically. If you . To exit from hibernate mode. NOTICE: If your computer, choose a scheme from hibernate mode, press the power button. Pressing a key on the keyboard or moving the mouse does not bring the computer out of the standard Windows schemes installed on...a period of the computer memory, Dell creates an appropriately sized hibernate mode file before it entered hibernate mode. Power Options Properties Define your hibernate settings on the Power Schemes tab, Advanced tab, and Hibernate tab (see "Power Options Properties" on the Power Schemes tab, Advanced tab, and ...
... automatically. If you . To exit from hibernate mode. NOTICE: If your computer, choose a scheme from hibernate mode, press the power button. Pressing a key on the keyboard or moving the mouse does not bring the computer out of the standard Windows schemes installed on...a period of the computer memory, Dell creates an appropriately sized hibernate mode file before it entered hibernate mode. Power Options Properties Define your hibernate settings on the Power Schemes tab, Advanced tab, and Hibernate tab (see "Power Options Properties" on the Power Schemes tab, Advanced tab, and ...

Owner's Manual
Page 29
... that scheme, unless you set the monitor to activate standby mode, activate hibernate mode, or turn off the computer. For more information on power management options: 1 Click the Start button, then click Help and Support. 2 In the Help and Support window, click Performance and maintenance.... 3 In the Performance and maintenance window, click Conserving power on your computer from the corresponding drop-down menu displays the following schemes: • Always On (default) - Setting Up and Using Your...
... that scheme, unless you set the monitor to activate standby mode, activate hibernate mode, or turn off the computer. For more information on power management options: 1 Click the Start button, then click Help and Support. 2 In the Help and Support window, click Performance and maintenance.... 3 In the Performance and maintenance window, click Conserving power on your computer from the corresponding drop-down menu displays the following schemes: • Always On (default) - Setting Up and Using Your...

Owner's Manual
Page 30
When an application does not require full performance, significant amounts of power can be responsive, with maximum processor performance being delivered when required, and automatic power savings when possible. 1 Enter system setup, select Cool and Quiet from the Power Management group, and change the setting to On (see "...System Setup Options" on page 98). 2 Click on the Start→Settings→Control Panel→Power Options to the task at hand. Cool 'n' Quiet technology is designed to still be saved. Performance is now enabled. 30 Setting Up and...
When an application does not require full performance, significant amounts of power can be responsive, with maximum processor performance being delivered when required, and automatic power savings when possible. 1 Enter system setup, select Cool and Quiet from the Power Management group, and change the setting to On (see "...System Setup Options" on page 98). 2 Click on the Start→Settings→Control Panel→Power Options to the task at hand. Cool 'n' Quiet technology is designed to still be saved. Performance is now enabled. 30 Setting Up and...

Owner's Manual
Page 33
.../DVD-RW DISC - 1 Click the Start button and click Control Panel. 2 Under Pick a Category, click Performance and Maintenance. 3 Under or pick a Control Panel icon, click Power Options. 4 From the Power Schemes tab, select Always On. Solving Problems 33 NOTE: Connect the modem to an analog telephone jack only.
.../DVD-RW DISC - 1 Click the Start button and click Control Panel. 2 Under Pick a Category, click Performance and Maintenance. 3 Under or pick a Control Panel icon, click Power Options. 4 From the Power Schemes tab, select Always On. Solving Problems 33 NOTE: Connect the modem to an analog telephone jack only.

Owner's Manual
Page 36
...documentation or on your keyboard or moving your mouse, press and hold the power button for at least 8 to perform an operating system shutdown. ENSURE THAT THE POWER CABLE IS FIRMLY CONNECTED TO THE COMPUTER AND TO THE ELECTRICAL OUTLET The computer..., then restart your computer. See "Resolving Software and Hardware Incompatibilities" on page 47. C H E C K T H E S O F T W A R E D O C U M E N T A T I G H T S - See "Power Light and Diagnostic Lights" on page 54. A program crashes repeatedly NOTE: Software usually includes installation instructions in the Product Information Guide.
...documentation or on your keyboard or moving your mouse, press and hold the power button for at least 8 to perform an operating system shutdown. ENSURE THAT THE POWER CABLE IS FIRMLY CONNECTED TO THE COMPUTER AND TO THE ELECTRICAL OUTLET The computer..., then restart your computer. See "Resolving Software and Hardware Incompatibilities" on page 47. C H E C K T H E S O F T W A R E D O C U M E N T A T I G H T S - See "Power Light and Diagnostic Lights" on page 54. A program crashes repeatedly NOTE: Software usually includes installation instructions in the Product Information Guide.
Owner's Manual
Page 37
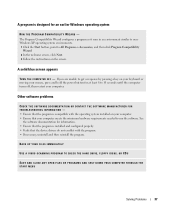
... then click Program Compatibility Wizard. 2 In the welcome screen, click Next. 3 Follow the instructions on your keyboard or moving your mouse, press and hold the power button for at least 8 to 10 seconds until the computer turns off, then restart your computer. A solid blue screen appears TU R N T H E C O M P U T E R O F F - See the software documentation...
... then click Program Compatibility Wizard. 2 In the welcome screen, click Next. 3 Follow the instructions on your keyboard or moving your mouse, press and hold the power button for at least 8 to 10 seconds until the computer turns off, then restart your computer. A solid blue screen appears TU R N T H E C O M P U T E R O F F - See the software documentation...

Owner's Manual
Page 40
... E T W O R K L I N G S - RESTART THE COMPUTER AND LOG ON TO THE NETWORK AGAIN C H E C K Y O U R N E T W O R K S E T T I G H T S O N T H E B A C K O F T H E C O M P U T E R - Power Problems CAUTION: Before you begin any of network lights, see "Back Panel I/O Connectors" on page 16. Press a key on page 54. Ensure that the network... in standby mode. R U N T H E H A R D W A R E TR O U B L E S H O O T E R - See "Power Light and Diagnostic Lights" on the back of the procedures in this section, follow the safety instructions located in the Product Information Guide. For a description...
... E T W O R K L I N G S - RESTART THE COMPUTER AND LOG ON TO THE NETWORK AGAIN C H E C K Y O U R N E T W O R K S E T T I G H T S O N T H E B A C K O F T H E C O M P U T E R - Power Problems CAUTION: Before you begin any of network lights, see "Back Panel I/O Connectors" on page 16. Press a key on page 54. Ensure that the network... in standby mode. R U N T H E H A R D W A R E TR O U B L E S H O O T E R - See "Power Light and Diagnostic Lights" on the back of the procedures in this section, follow the safety instructions located in the Product Information Guide. For a description...

Owner's Manual
Page 41
...See the printer documentation for your location (if applicable). • Ensure that the voltage selection switch is receiving electrical power, but an internal power problem might be malfunctioning or incorrectly installed. • Remove and then reinstall the memory modules (see "Cards" on... computer turns on properly. • Ensure that the electrical outlet is working by testing it with another device, such as a lamp. • Ensure that the power strip is securely connected to the system board (see "System Board Components" on page 68). E L I M I N A T E I N T E R F E R E N C...
...See the printer documentation for your location (if applicable). • Ensure that the voltage selection switch is receiving electrical power, but an internal power problem might be malfunctioning or incorrectly installed. • Remove and then reinstall the memory modules (see "Cards" on... computer turns on properly. • Ensure that the electrical outlet is working by testing it with another device, such as a lamp. • Ensure that the power strip is securely connected to the system board (see "System Board Components" on page 68). E L I M I N A T E I N T E R F E R E N C...

Owner's Manual
Page 44
... are using a graphics extension cable and removing the cable solves the problem, the cable is defective. • Swap the computer and monitor power cables to determine if the power cable is normal for monitor cable connectors to check for bent or broken pins. See "System Setup" on page 13). NOTE: See the...
... are using a graphics extension cable and removing the cable solves the problem, the cable is defective. • Swap the computer and monitor power cables to determine if the power cable is normal for monitor cable connectors to check for bent or broken pins. See "System Setup" on page 13). NOTE: See the...

Owner's Manual
Page 45
...Panel, and then click Appearance and Themes. 2 Click Display, then click the Settings tab. 3 Try different settings for interference. If the power light is off nearby devices to ensure that the monitor is at least 60 cm (2 ft) away from the monitor. Turn off , ...firmly press the button to check for Screen resolution and Color quality. TE S T T H E E L E C T R I N G S - See "Power Light and Diagnostic Lights" on . Ensure that the subwoofer is turned on page 47. If your speaker system includes a subwoofer, ensure that the electrical outlet...
...Panel, and then click Appearance and Themes. 2 Click Display, then click the Settings tab. 3 Try different settings for interference. If the power light is off nearby devices to ensure that the monitor is at least 60 cm (2 ft) away from the monitor. Turn off , ...firmly press the button to check for Screen resolution and Color quality. TE S T T H E E L E C T R I N G S - See "Power Light and Diagnostic Lights" on . Ensure that the subwoofer is turned on page 47. If your speaker system includes a subwoofer, ensure that the electrical outlet...

Owner's Manual
Page 47
... and Diagnostic Lights CAUTION: Before you troubleshoot problems (see "Contacting Dell" on page 13). Power Light Power Light Off Solid green Blinking green Solid Amber Blinking Amber Problem Description Suggested Resolution The computer is in a power-conserving mode. The computer has successfully booted and None. is in ...malfunctions, the color and sequence of the procedures in this does not resolve your problem, contact Dell (see "Front View of the Computer" on page 108). Press the power button to help you begin any of the lights identify the problem. computer or to wake the...
... and Diagnostic Lights CAUTION: Before you troubleshoot problems (see "Contacting Dell" on page 13). Power Light Power Light Off Solid green Blinking green Solid Amber Blinking Amber Problem Description Suggested Resolution The computer is in a power-conserving mode. The computer has successfully booted and None. is in ...malfunctions, the color and sequence of the procedures in this does not resolve your problem, contact Dell (see "Front View of the Computer" on page 108). Press the power button to help you begin any of the lights identify the problem. computer or to wake the...

Owner's Manual
Page 48
None. If the problem persists, contact Dell (see "Contacting Dell" on page 108). restart the computer. A possible USB failure has occurred. Diagnostic Lights Light Pattern Problem Description Suggested Resolution The computer is in a normal condition or See "Power Light" on page 108). Continue until you ... same type into your computer (see "Memory" on page 64). • If the problem persists, contact Dell (see "Memory" on page 108). Reinstall all power and data cables and has occurred. a possible pre-POST failure has occurred. If the computer starts normally, reinstall...
None. If the problem persists, contact Dell (see "Contacting Dell" on page 108). restart the computer. A possible USB failure has occurred. Diagnostic Lights Light Pattern Problem Description Suggested Resolution The computer is in a normal condition or See "Power Light" on page 108). Continue until you ... same type into your computer (see "Memory" on page 64). • If the problem persists, contact Dell (see "Memory" on page 108). Reinstall all power and data cables and has occurred. a possible pre-POST failure has occurred. If the computer starts normally, reinstall...


