Owner's Manual
Page 1
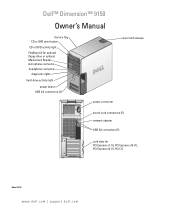
Dell™ Dimension™ 9150 Owner's Manual Service Tag CD or DVD eject button CD or DVD activity light FlexBays (2) for optional floppy drive or optional Media Card Reader microphone connector headphone connector diagnostic lights hard-drive activity light power button USB 2.0 connectors (2) cover latch release power connector sound-card connectors (5) network adapter USB 2.0 connectors (5) card slots for PCI Express x1 (1), PCI Express x16 (1), PCI Express x4 (1), PCI (3) Model DCTA www.dell.com | support.dell.com
Dell™ Dimension™ 9150 Owner's Manual Service Tag CD or DVD eject button CD or DVD activity light FlexBays (2) for optional floppy drive or optional Media Card Reader microphone connector headphone connector diagnostic lights hard-drive activity light power button USB 2.0 connectors (2) cover latch release power connector sound-card connectors (5) network adapter USB 2.0 connectors (5) card slots for PCI Express x1 (1), PCI Express x16 (1), PCI Express x4 (1), PCI (3) Model DCTA www.dell.com | support.dell.com
Owner's Manual
Page 4
... in System Setup 36 Enabling the QRT feature in the Operating system 36 2 Solving Problems 37 Troubleshooting Tips 37 Battery Problems 37 Drive Problems 38 CD and DVD drive problems 38 Hard drive problems 39 E-Mail, Modem, and Internet Problems 39 Error Messages 41 Media Card Reader Problems 42 Keyboard Problems 42 Lockups and...
... in System Setup 36 Enabling the QRT feature in the Operating system 36 2 Solving Problems 37 Troubleshooting Tips 37 Battery Problems 37 Drive Problems 38 CD and DVD drive problems 38 Hard drive problems 39 E-Mail, Modem, and Internet Problems 39 Error Messages 41 Media Card Reader Problems 42 Keyboard Problems 42 Lockups and...
Owner's Manual
Page 6
... 77 PCI Express Cards 81 Drive Panels 89 Removing the Drive Panel 89 Removing the Drive-Panel Insert 90 Replacing the Drive-Panel Insert 90 Replacing the Drive Panel 91 Drives 92 General Installation Guidelines 92 Hard Drive 92 Removing a Hard Drive 93 Installing a Hard Drive 94 Adding a Second Hard Drive 95 Floppy Drive 96 Removing a Floppy Drive 96 Installing a Floppy Drive 98 Media Card Reader 99...
... 77 PCI Express Cards 81 Drive Panels 89 Removing the Drive Panel 89 Removing the Drive-Panel Insert 90 Replacing the Drive-Panel Insert 90 Replacing the Drive Panel 91 Drives 92 General Installation Guidelines 92 Hard Drive 92 Removing a Hard Drive 93 Installing a Hard Drive 94 Adding a Second Hard Drive 95 Floppy Drive 96 Removing a Floppy Drive 96 Installing a Floppy Drive 98 Media Card Reader 99...
Owner's Manual
Page 11
..., government, and education customers customers can also use the customized Dell Premier Support website • Upgrades - DSS is necessary for Dell™ 3.5-inch USB floppy drives, Intel® Pentium® M processors, optical drives, and USB devices. The website may not be as memory, the hard drive, and the operating system available in all regions. • Customer...
..., government, and education customers customers can also use the customized Dell Premier Support website • Upgrades - DSS is necessary for Dell™ 3.5-inch USB floppy drives, Intel® Pentium® M processors, optical drives, and USB devices. The website may not be as memory, the hard drive, and the operating system available in all regions. • Customer...
Owner's Manual
Page 19
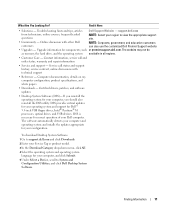
..."finalized" or "closed" during the final stage of information. When prompted, insert a blank CD or DVD into the drive and click OK. • If you have two CD or DVD drives, select the drive into which you have inserted your source CD or DVD and copies the data to record music or permanently... store data files. After you create a DVD+/-R disc, you may not be used to erase, rewrite, or update information on your computer hard drive. The computer reads your source CD or DVD and click the Disc Copy button. Use blank CD-Rs to a temporary folder on that the settings...
..."finalized" or "closed" during the final stage of information. When prompted, insert a blank CD or DVD into the drive and click OK. • If you have two CD or DVD drives, select the drive into which you have inserted your source CD or DVD and copies the data to record music or permanently... store data files. After you create a DVD+/-R disc, you may not be used to erase, rewrite, or update information on your computer hard drive. The computer reads your source CD or DVD and click the Disc Copy button. Use blank CD-Rs to a temporary folder on that the settings...
Owner's Manual
Page 24
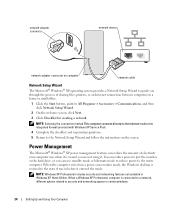
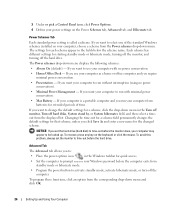
You can reduce power to just the monitor or the hard drive, or you through the process of electricity your computer uses when it is restored to the state it was in a home or small office. 1 Click ...
You can reduce power to just the monitor or the hard drive, or you through the process of electricity your computer uses when it is restored to the state it was in a home or small office. 1 Click ...
Owner's Manual
Page 25
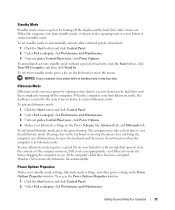
...lose data. To immediately activate standby mode without a period of the computer memory, Dell creates an appropriately sized hibernate mode file before it entered standby mode. If the computer's hard drive becomes corrupted, Windows XP recreates the hibernate file automatically. Setting Up and Using Your...2 Under Pick a category, click Performance and Maintenance. 3 Under or pick a Control Panel icon, click Power Options. 4 Define your hard drive with enough disk space to store the contents of inactivity, click the Start button, click Turn Off Computer, and then click Stand by copying...
...lose data. To immediately activate standby mode without a period of the computer memory, Dell creates an appropriately sized hibernate mode file before it entered standby mode. If the computer's hard drive becomes corrupted, Windows XP recreates the hibernate file automatically. Setting Up and Using Your...2 Under Pick a category, click Performance and Maintenance. 3 Under or pick a Control Panel icon, click Power Options. 4 Define your hard drive with enough disk space to store the contents of inactivity, click the Start button, click Turn Off Computer, and then click Stand by copying...
Owner's Manual
Page 26
... settings for a scheme, click the drop-down menu in the fields below the scheme name. To avoid this problem, always set the hard drive (hard disk) to time-out before the computer exits from the displayed list. To program these functions, click an option from batteries for starting ... displays the following schemes: • Always On (default) - If you want to activate standby mode, activate hibernate mode, or turn off the hard drive. If you want to be locked up. NOTICE: If you want your computer to run without interruption (using no power conservation. • Home/...
... settings for a scheme, click the drop-down menu in the fields below the scheme name. To avoid this problem, always set the hard drive (hard disk) to time-out before the computer exits from the displayed list. To program these functions, click an option from batteries for starting ... displays the following schemes: • Always On (default) - If you want to activate standby mode, activate hibernate mode, or turn off the hard drive. If you want to be locked up. NOTICE: If you want your computer to run without interruption (using no power conservation. • Home/...
Owner's Manual
Page 28
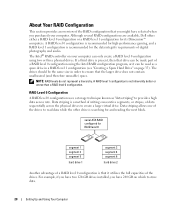
...and audio. Although several RAID configurations are available, Dell offers either a RAID level 0 configuration or a RAID level 1 configuration for RAID level 0 segment 1 segment 3 segment 5 hard drive 1 segment 2 segment 4 segment 6 hard drive 2 Another advantage of a RAID level 0 ...configuration is not inherently better or worse than a RAID level 0 configuration. The drives should be used as "data striping" to create a large virtual drive. serial ATA RAID configured for its Dimension™...
...and audio. Although several RAID configurations are available, Dell offers either a RAID level 0 configuration or a RAID level 1 configuration for RAID level 0 segment 1 segment 3 segment 5 hard drive 1 segment 2 segment 4 segment 6 hard drive 2 Another advantage of a RAID level 0 ...configuration is not inherently better or worse than a RAID level 0 configuration. The drives should be used as "data striping" to create a large virtual drive. serial ATA RAID configured for its Dimension™...

Owner's Manual
Page 29
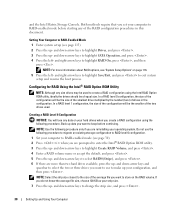
... your computer to set up a RAID configuration. For instructions on how to configure your computer for RAID At some point you may want to install a hard drive, see page 92. One method uses the Intel® RAID Option ROM utility and is then duplicated, or mirrored, on the other...
... your computer to set up a RAID configuration. For instructions on how to configure your computer for RAID At some point you may want to install a hard drive, see page 92. One method uses the Intel® RAID Option ROM utility and is then duplicated, or mirrored, on the other...
Owner's Manual
Page 30
and down -arrow keys to make up - NOTE: For more than two hard drives available, press the up - Configuring for RAID Using the Intel® RAID Option ROM Utility NOTE: Although any size drives may be used . NOTE: Use the following procedure only if you are more information about RAID options...file size, choose 128 KB as your strip size. 7 Press the up your hard drives when you create a RAID configuration using the Intel RAID Option ROM utility, ideally the drives should be the size of the smallest drive multiplied by the number (two) of equal size. and the Intel Matrix Storage ...
and down -arrow keys to make up - NOTE: For more than two hard drives available, press the up - Configuring for RAID Using the Intel® RAID Option ROM Utility NOTE: Although any size drives may be used . NOTE: Use the following procedure only if you are more information about RAID options...file size, choose 128 KB as your strip size. 7 Press the up your hard drives when you create a RAID configuration using the Intel RAID Option ROM utility, ideally the drives should be the size of the smallest drive multiplied by the number (two) of equal size. and the Intel Matrix Storage ...
Owner's Manual
Page 31
...to enter the Intel RAID Option ROM utility. 3 Use the up - Deleting a RAID Volume NOTE: When you perform this operation, all data on the RAID drives will become unbootable. 1 Press when you delete the RAID volume in the Intel RAID Option ROM utility, your volume, and then press . 7 Select the ... capacity for the volume, and press . NOTE: If your computer currently boots to select RAID1(Mirror), and press . 6 If there are more than two hard drives available, press the up - and down -arrow keys to RAID and you are prompted to enter the Intel RAID Option ROM utility. 2 Use the up...
...to enter the Intel RAID Option ROM utility. 3 Use the up - Deleting a RAID Volume NOTE: When you perform this operation, all data on the RAID drives will become unbootable. 1 Press when you delete the RAID volume in the Intel RAID Option ROM utility, your volume, and then press . 7 Select the ... capacity for the volume, and press . NOTE: If your computer currently boots to select RAID1(Mirror), and press . 6 If there are more than two hard drives available, press the up - and down -arrow keys to RAID and you are prompted to enter the Intel RAID Option ROM utility. 2 Use the up...
Owner's Manual
Page 32
...Create RAID Volume Wizard, and then click Next. 4 On the Select Volume Location screen, click the first hard drive you have one hard drive with the operating system installed on the third drive until three drives appear in your computer to RAID-enabled mode (see "Migrating to a RAID Level 0 Configuration" on page... have not yet set your RAID level 0 volume, click the right arrow and click on it, and you want to add a second hard drive and reconfigure both drives into a volume, but you perform this operation, all data on page 34). 4 Press to confirm the deletion of the RAID volume. ...
...Create RAID Volume Wizard, and then click Next. 4 On the Select Volume Location screen, click the first hard drive you have one hard drive with the operating system installed on the third drive until three drives appear in your computer to RAID-enabled mode (see "Migrating to a RAID Level 0 Configuration" on page... have not yet set your RAID level 0 volume, click the right arrow and click on it, and you want to add a second hard drive and reconfigure both drives into a volume, but you perform this operation, all data on page 34). 4 Press to confirm the deletion of the RAID volume. ...
Owner's Manual
Page 33
... the volume name, select RAID 1 as the RAID level, and then click Next to continue. 6 On the Select Volume Location screen, click the first hard drive you want to use to create your computer to RAID-enabled mode (see page 30). 3 On the Actions menu, select Create RAID Volume From Existing... Hard Drive to launch the Migration Wizard. 4 Click Next on the volume. 1 Click the Start button and point to Programs→ Intel(R) Application Accelerator→...
... the volume name, select RAID 1 as the RAID level, and then click Next to continue. 6 On the Select Volume Location screen, click the first hard drive you want to use to create your computer to RAID-enabled mode (see page 30). 3 On the Actions menu, select Create RAID Volume From Existing... Hard Drive to launch the Migration Wizard. 4 Click Next on the volume. 1 Click the Start button and point to Programs→ Intel(R) Application Accelerator→...

Owner's Manual
Page 34
...→ Intel Matrix Storage Manager to launch the Migration Wizard. 4 Click Next on the RAID volume). 7 On the Select Source Hard Drive screen, double-click the hard drive from the drop-down box, and then click Next. You can use your computer to RAID-enabled mode (see an Actions menu ...option, you want to migrate, and click Next. 9 On the Select Member Hard Drive screen, double-click the hard drive(s) to select the member drive(s) to make changes. 6 From the drop-down box, select RAID 1 as the RAID level. NOTE: Select the strip...
...→ Intel Matrix Storage Manager to launch the Migration Wizard. 4 Click Next on the RAID volume). 7 On the Select Source Hard Drive screen, double-click the hard drive from the drop-down box, and then click Next. You can use your computer to RAID-enabled mode (see an Actions menu ...option, you want to migrate, and click Next. 9 On the Select Member Hard Drive screen, double-click the hard drive(s) to select the member drive(s) to make changes. 6 From the drop-down box, select RAID 1 as the RAID level. NOTE: Select the strip...
Owner's Manual
Page 35
...home enthusiast that are ordered with a RAID level 1 configuration. To Remove Spare Marking From a Spare Hard Drive: 1 Right-click the spare hard drive icon. 2 Click Reset Hard Drive to Non-RAID Rebuilding a Degraded RAID Level 1 Configuration If your computer while the computer is an ...™ Technology (Optional) Intel Viiv technology is broken, the computer automatically rebuilds the mirror configuration using the spare hard drive as a Spare Hard Drive: 1 Click the Start button and point to Programs→ Intel(R) Application Accelerator→ Intel Matrix Storage Manager ...
...home enthusiast that are ordered with a RAID level 1 configuration. To Remove Spare Marking From a Spare Hard Drive: 1 Right-click the spare hard drive icon. 2 Click Reset Hard Drive to Non-RAID Rebuilding a Degraded RAID Level 1 Configuration If your computer while the computer is an ...™ Technology (Optional) Intel Viiv technology is broken, the computer automatically rebuilds the mirror configuration using the spare hard drive as a Spare Hard Drive: 1 Click the Start button and point to Programs→ Intel(R) Application Accelerator→ Intel Matrix Storage Manager ...
Owner's Manual
Page 36
Also, you may blink when the hard drive is being lit. and down menu, select Do Nothing. 36 Setting Up and Using Your Computer Enabling the QRT Feature in system setup when this ... Control Panel. 2 Under Pick a category, click Performance and Maintenance. 3 Under or pick a Control Panel icon, click Power Options. 4 Click the Away tab. 5 Ensure that the hard drive indicator may notice that the check boxes for Enable away mode and Options are installed when this feature is ordered. 1 Enter system setup (see page...
Also, you may blink when the hard drive is being lit. and down menu, select Do Nothing. 36 Setting Up and Using Your Computer Enabling the QRT Feature in system setup when this ... Control Panel. 2 Under Pick a category, click Performance and Maintenance. 3 Under or pick a Control Panel icon, click Power Options. 4 Click the Away tab. 5 Ensure that the hard drive indicator may notice that the check boxes for Enable away mode and Options are installed when this feature is ordered. 1 Enter system setup (see page...
Owner's Manual
Page 39
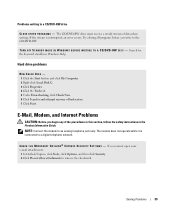
If the stream is connected to a CD/DVD-RW drive C L O S E O T H E R P R O G R A M S - The CD/DVD-RW drive must receive a steady stream of the procedures in this section, follow the safety instructions in... Options, and then click Security. 2 Click Do not allow attachments to an analog telephone jack only. TU R N O F F S T A N D B Y M O D E I N W I N D O W S B E F O R E W R I T I N G S - R W D I S C - Hard drive problems RUN CHECK DISK - 1 Click the Start button and click My Computer. 2 Right-click Local Disk C:. 3 Click Properties. 4 Click the Tools tab. 5 Under Error-checking...
If the stream is connected to a CD/DVD-RW drive C L O S E O T H E R P R O G R A M S - The CD/DVD-RW drive must receive a steady stream of the procedures in this section, follow the safety instructions in... Options, and then click Security. 2 Click Do not allow attachments to an analog telephone jack only. TU R N O F F S T A N D B Y M O D E I N W I N D O W S B E F O R E W R I T I N G S - R W D I S C - Hard drive problems RUN CHECK DISK - 1 Click the Start button and click My Computer. 2 Right-click Local Disk C:. 3 Click Properties. 4 Click the Tools tab. 5 Under Error-checking...
Owner's Manual
Page 44
BACK UP YOUR FILES IMMEDIATELY USE A VIRUS-SCANNING PROGRAM TO CHECK THE HARD DRIVE, FLOPPY DISKS, OR CDS SAVE AND CLOSE ANY OPEN FILES OR PROGRAMS AND SHUT DOWN YOUR COMPUTER THROUGH THE START MENU 44 Solving Problems The ...
BACK UP YOUR FILES IMMEDIATELY USE A VIRUS-SCANNING PROGRAM TO CHECK THE HARD DRIVE, FLOPPY DISKS, OR CDS SAVE AND CLOSE ANY OPEN FILES OR PROGRAMS AND SHUT DOWN YOUR COMPUTER THROUGH THE START MENU 44 Solving Problems The ...
Owner's Manual
Page 54
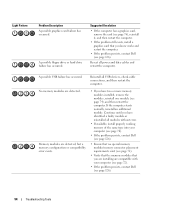
..., install a graphics card that you know works and restart the computer. • If the problem persists, contact Dell (see page 72). • Verify that the memory modules that no special memory module/memory connector placement requirements exist...Dell (see page 126). • Ensure that you have two or more memory modules installed, remove the modules, reinstall one module (see page 126). 54 Troubleshooting Tools Light Pattern Problem Description A possible graphics card failure has occurred. Continue until you are installing are detected. A possible floppy drive or hard drive...
..., install a graphics card that you know works and restart the computer. • If the problem persists, contact Dell (see page 72). • Verify that the memory modules that no special memory module/memory connector placement requirements exist...Dell (see page 126). • Ensure that you have two or more memory modules installed, remove the modules, reinstall one module (see page 126). 54 Troubleshooting Tools Light Pattern Problem Description A possible graphics card failure has occurred. Continue until you are installing are detected. A possible floppy drive or hard drive...


