Owner's Manual
Page 1
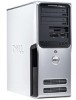
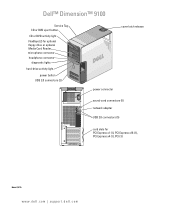
Dell™ Dimension™ 9100 Service Tag CD or DVD eject button CD or DVD activity light FlexBays (2) for optional floppy drive or optional Media Card Reader microphone connector headphone connector diagnostic lights hard-drive activity light power button USB 2.0 connectors (2) cover latch release power connector sound-card connectors (5) network adapter USB 2.0 connectors (5) card slots for PCI Express x1 (1), PCI Express x16 (1), PCI Express x4 (1), PCI (3) Model DCTA www.dell.com | support.dell.com
Dell™ Dimension™ 9100 Service Tag CD or DVD eject button CD or DVD activity light FlexBays (2) for optional floppy drive or optional Media Card Reader microphone connector headphone connector diagnostic lights hard-drive activity light power button USB 2.0 connectors (2) cover latch release power connector sound-card connectors (5) network adapter USB 2.0 connectors (5) card slots for PCI Express x1 (1), PCI Express x16 (1), PCI Express x4 (1), PCI (3) Model DCTA www.dell.com | support.dell.com

Owner's Manual
Page 3
Contents Finding Information 9 1 Setting Up and Using Your Computer Setting Up a Printer 13 Printer Cable 13 Connecting a USB Printer 14 Connecting to the Internet 14 Setting Up Your Internet Connection 15 Playing CDs and DVDs 16 Adjusting the Volume 17 Adjusting the Picture ...
Contents Finding Information 9 1 Setting Up and Using Your Computer Setting Up a Printer 13 Printer Cable 13 Connecting a USB Printer 14 Connecting to the Internet 14 Setting Up Your Internet Connection 15 Playing CDs and DVDs 16 Adjusting the Volume 17 Adjusting the Picture ...
Owner's Manual
Page 11
... system and installs the updates appropriate for your operating system and support for Dell™ 3.5-inch USB floppy drives, Intel® Pentium® M processors, optical drives, and USB devices. What Are You Looking For? DSS provides critical updates for your Dell computer. Online discussion with technical support • Reference - If you should also reinstall...
... system and installs the updates appropriate for your operating system and support for Dell™ 3.5-inch USB floppy drives, Intel® Pentium® M processors, optical drives, and USB devices. What Are You Looking For? DSS provides critical updates for your Dell computer. Online discussion with technical support • Reference - If you should also reinstall...
Owner's Manual
Page 13
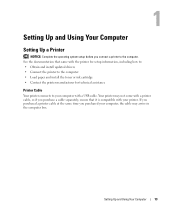
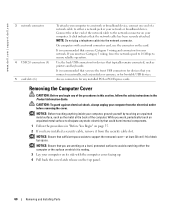
... Computer 13 Setting Up and Using Your Computer Setting Up a Printer NOTICE: Complete the operating system setup before you connect a printer to your computer with a USB cable.
... Computer 13 Setting Up and Using Your Computer Setting Up a Printer NOTICE: Complete the operating system setup before you connect a printer to your computer with a USB cable.
Owner's Manual
Page 14
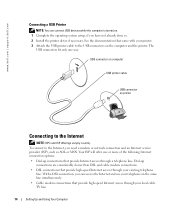
...came with your printer. 3 Attach the USB printer cable to the USB connectors on . 1 Complete the operating system setup, if you have not already done so. 2 Install the printer driver if necessary. www.dell.com | support.dell.com Connecting a USB Printer NOTE: You can access the Internet... and use your telephone on printer Connecting to the Internet NOTE: ISPs and ISP offerings vary by country. USB connector on computer USB printer cable USB connector on the same line ...
...came with your printer. 3 Attach the USB printer cable to the USB connectors on . 1 Complete the operating system setup, if you have not already done so. 2 Install the printer driver if necessary. www.dell.com | support.dell.com Connecting a USB Printer NOTE: You can access the Internet... and use your telephone on printer Connecting to the Internet NOTE: ISPs and ISP offerings vary by country. USB connector on computer USB printer cable USB connector on the same line ...
Owner's Manual
Page 40
... RECOGNIZED BY WINDOWS - 1 Click the Start button, click Control Panel, and then click Printers and Other Hardware. 2 Click View installed printers or fax printers. For a USB printer, ensure that your printer, contact the printer's manufacturer. R E I N S T A L L T H E P R I N T E R D R I C A L O U T L E T - U N L O C K T H E S C A N N E R - ...any of the procedures in this section, follow the safety instructions in the Product Information Guide. www.dell.com | support.dell.com Printer Problems CAUTION: Before you begin any of the procedures in this section, follow the safety...
... RECOGNIZED BY WINDOWS - 1 Click the Start button, click Control Panel, and then click Printers and Other Hardware. 2 Click View installed printers or fax printers. For a USB printer, ensure that your printer, contact the printer's manufacturer. R E I N S T A L L T H E P R I N T E R D R I C A L O U T L E T - U N L O C K T H E S C A N N E R - ...any of the procedures in this section, follow the safety instructions in the Product Information Guide. www.dell.com | support.dell.com Printer Problems CAUTION: Before you begin any of the procedures in this section, follow the safety...
Owner's Manual
Page 46
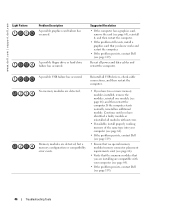
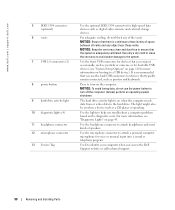
...Continue until you know works and restart the computer. • If the problem persists, contact Dell (see page 66), and then restart the computer. Reseat all USB devices, check cable connections, and then restart the computer. No memory modules are compatible with ...modules installed, remove the modules, reinstall one module (see page 119). A possible USB failure has occurred. If the computer starts normally, reinstall an additional module. www.dell.com | support.dell.com Light Pattern Problem Description A possible graphics card failure has occurred. A possible ...
...Continue until you know works and restart the computer. • If the problem persists, contact Dell (see page 66), and then restart the computer. Reseat all USB devices, check cable connections, and then restart the computer. No memory modules are compatible with ...modules installed, remove the modules, reinstall one module (see page 119). A possible USB failure has occurred. If the computer starts normally, reinstall an additional module. www.dell.com | support.dell.com Light Pattern Problem Description A possible graphics card failure has occurred. A possible ...
Owner's Manual
Page 58
...the computer reads data from or writes data to turn on the diagnostic code. Used to the system. www.dell.com | support.dell.com 5 IEEE 1394 connector (optional) 6 vents 7 USB 2.0 connectors (2) 8 power button 9 hard-drive activity light 10 diagnostic lights (4) 11 headphone connector 12 ... the computer. The hard drive activity light is operating. For adequate cooling, do not use the back USB connectors for devices that you access the Dell Support website or call technical support. 58 Removing and Installing Parts NOTICE: Ensure that you troubleshoot a computer...
...the computer reads data from or writes data to turn on the diagnostic code. Used to the system. www.dell.com | support.dell.com 5 IEEE 1394 connector (optional) 6 vents 7 USB 2.0 connectors (2) 8 power button 9 hard-drive activity light 10 diagnostic lights (4) 11 headphone connector 12 ... the computer. The hard drive activity light is operating. For adequate cooling, do not use the back USB connectors for devices that you access the Dell Support website or call technical support. 58 Removing and Installing Parts NOTICE: Ensure that you troubleshoot a computer...
Owner's Manual
Page 60
... use Category 5 wiring and connectors for your network. While you use the connector on the card. Use the back USB connectors for bootable USB devices. NOTICE: Before touching anything inside your computer, ground yourself by touching an unpainted metal surface, such as the ...network or broadband device. CAUTION: To guard against electrical shock, always unplug your computer from the security cable slot. www.dell.com | support.dell.com 3 network connector 4 USB 2.0 connectors (5) 5 card slots (6) To attach your computer to a network or broadband device, connect one end of a...
... use Category 5 wiring and connectors for your network. While you use the connector on the card. Use the back USB connectors for bootable USB devices. NOTICE: Before touching anything inside your computer, ground yourself by touching an unpainted metal surface, such as the ...network or broadband device. CAUTION: To guard against electrical shock, always unplug your computer from the security cable slot. www.dell.com | support.dell.com 3 network connector 4 USB 2.0 connectors (5) 5 card slots (6) To attach your computer to a network or broadband device, connect one end of a...
Owner's Manual
Page 63
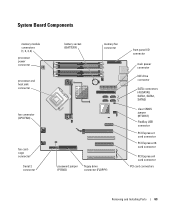
... (PSWD) floppy drive connector (FLOPPY) front panel I/O connector main power connector IDE drive connector SATA connectors (4) (SATA0, SATA1, SATA2, SATA3) clear CMOS jumper (RTCRST) FlexBay USB connector PCI Express x1 card connector PCI Express x16 card connector PCI Express x4 card connector PCI card connectors Removing and Installing Parts 63
... (PSWD) floppy drive connector (FLOPPY) front panel I/O connector main power connector IDE drive connector SATA connectors (4) (SATA0, SATA1, SATA2, SATA3) clear CMOS jumper (RTCRST) FlexBay USB connector PCI Express x1 card connector PCI Express x16 card connector PCI Express x4 card connector PCI card connectors Removing and Installing Parts 63

Owner's Manual
Page 94
www.dell.com | support.dell.com NOTICE: To prevent static damage to components inside of your body before you touch any of the computer. 3 Remove the computer cover (see page 60). 4 Remove the drive panel (see page 82). USB cable *Media Card Reader *Not present on the bottom of the inside your computer, discharge...
www.dell.com | support.dell.com NOTICE: To prevent static damage to components inside of your body before you touch any of the computer. 3 Remove the computer cover (see page 60). 4 Remove the drive panel (see page 82). USB cable *Media Card Reader *Not present on the bottom of the inside your computer, discharge...

Owner's Manual
Page 95
... lever sliding plate *Media Card Reader *Not present on all computers. 6 While pushing on the back of the Media Card Reader to the front panel USB connector on the system board (see page 63) and route the cable through the clip on the back of the drive, remove the Media Card...
... lever sliding plate *Media Card Reader *Not present on all computers. 6 While pushing on the back of the Media Card Reader to the front panel USB connector on the system board (see page 63) and route the cable through the clip on the back of the drive, remove the Media Card...

Owner's Manual
Page 96
www.dell.com | support.dell.com NOTICE: To prevent static damage to the Media Card Reader connector on the system board (see page 82). 5 Remove the Media Card Reader from ... Begin" on the bottom of the inside your computer, discharge static electricity from its side so that the system board is connected. 7 Connect the FlexBay USB cable to the back of the Media Card Reader and to components inside of your body before the FlexBay cable is on page 55. Ensure...
www.dell.com | support.dell.com NOTICE: To prevent static damage to the Media Card Reader connector on the system board (see page 82). 5 Remove the Media Card Reader from ... Begin" on the bottom of the inside your computer, discharge static electricity from its side so that the system board is connected. 7 Connect the FlexBay USB cable to the back of the Media Card Reader and to components inside of your body before the FlexBay cable is on page 55. Ensure...

Owner's Manual
Page 97
CD/DVD Drive CAUTION: Before you begin any of the procedures in this section, follow the safety instructions in the computer. 9 Route the USB cable through the cable routing clip. 10 Replace the computer cover (see page 102). Removing and Installing Parts 97 USB cable *Media Card Reader *Not present on all computers. 8 Insert the Media Card Reader into the bay and slide the drive in to seat it in the Product Information Guide. CAUTION: To guard against electrical shock, always unplug your computer from the electrical outlet before opening the cover.
CD/DVD Drive CAUTION: Before you begin any of the procedures in this section, follow the safety instructions in the computer. 9 Route the USB cable through the cable routing clip. 10 Replace the computer cover (see page 102). Removing and Installing Parts 97 USB cable *Media Card Reader *Not present on all computers. 8 Insert the Media Card Reader into the bay and slide the drive in to seat it in the Product Information Guide. CAUTION: To guard against electrical shock, always unplug your computer from the electrical outlet before opening the cover.

Owner's Manual
Page 105
...PCI PCI Express x1 PCI Express x4 PCI Express x16 two 3.5-inch drive bays (FlexBay) two 5.25-inch drive bays serial ATA drives (2), floppy drive, USB memory devices, CD drive, CD-RW drive, DVD drive, DVD-RW drive, Media Card Reader, and DVD/CD-RW combo drive two 3.5-inch hard-...panel 6-pin serial connector (with optional card) 15-pin VGA connector 28-pin DVI connector RJ-45 connector two front-panel and five back-panel USB 2.0-compliant connectors five back-panel connectors for optional floppy drive or optional Media Card Reader (3.5-inch bay devices) 5-pin connector three 120-pin connectors ...
...PCI PCI Express x1 PCI Express x4 PCI Express x16 two 3.5-inch drive bays (FlexBay) two 5.25-inch drive bays serial ATA drives (2), floppy drive, USB memory devices, CD drive, CD-RW drive, DVD drive, DVD-RW drive, Media Card Reader, and DVD/CD-RW combo drive two 3.5-inch hard-...panel 6-pin serial connector (with optional card) 15-pin VGA connector 28-pin DVI connector RJ-45 connector two front-panel and five back-panel USB 2.0-compliant connectors five back-panel connectors for optional floppy drive or optional Media Card Reader (3.5-inch bay devices) 5-pin connector three 120-pin connectors ...

Owner's Manual
Page 110
...active (available only for the future boot process), the computer prompts you to display that USB devices will be detected and supported in the operating system. 110 Appendix www.dell.com | support.dell.com System Setup Options NOTE: Depending on your computer and installed devices, the items ...listed in this section may not appear, or may not appear exactly as Off, USB, Internal, or Read Only. System System ...
...active (available only for the future boot process), the computer prompts you to display that USB devices will be detected and supported in the operating system. 110 Appendix www.dell.com | support.dell.com System Setup Options NOTE: Depending on your computer and installed devices, the items ...listed in this section may not appear, or may not appear exactly as Off, USB, Internal, or Read Only. System System ...
Owner's Manual
Page 111
... video controller is No Boot. The hard drive operates at the level suggested by pressing when the computer starts. Off = Internal USB for the integrated video controller. Your computer does not test or change the current acoustics mode setting. • Quiet - The hard... drive operates at its most quiet setting. • Suggested - Appendix 111 USB for FlexBay Video Primary Video Video Memory Size Performance SpeedStep HyperThreading Hard Drive Acoustics Security Admin Password System Password Password Status Power Management ...
... video controller is No Boot. The hard drive operates at the level suggested by pressing when the computer starts. Off = Internal USB for the integrated video controller. Your computer does not test or change the current acoustics mode setting. • Quiet - The hard... drive operates at its most quiet setting. • Suggested - Appendix 111 USB for FlexBay Video Primary Video Video Memory Size Performance SpeedStep HyperThreading Hard Drive Acoustics Security Admin Password System Password Password Status Power Management ...
Owner's Manual
Page 113
...Menu appears in the drive is in the upper-right corner of the screen, press . The computer attempts to enter the setup utility. • USB Flash Device - Changing Boot Sequence for the Current Boot You can use this feature, for devices. Appendix 113 When F12 = Boot Menu appears in... allows you to change the boot sequence for example, to restart your computer (see page 55) and try again. The computer attempts to a USB connector (see the Microsoft Windows desktop. If no bootable device is bootable, check the device documentation. NOTE: The computer attempts to boot to all...
...Menu appears in the drive is in the upper-right corner of the screen, press . The computer attempts to enter the setup utility. • USB Flash Device - Changing Boot Sequence for the Current Boot You can use this feature, for devices. Appendix 113 When F12 = Boot Menu appears in... allows you to change the boot sequence for example, to restart your computer (see page 55) and try again. The computer attempts to a USB connector (see the Microsoft Windows desktop. If no bootable device is bootable, check the device documentation. NOTE: The computer attempts to boot to all...

Owner's Manual
Page 114
www.dell.com | support.dell.com NOTE: To boot to access the menu. Changing Boot Sequence for Future Boots 1 Enter system setup (see page 108). 2 Use the arrow keys to highlight the Boot Sequence menu option and press to a USB device, the device must be bootable. NOTE: Write down your device is bootable, check...
www.dell.com | support.dell.com NOTE: To boot to access the menu. Changing Boot Sequence for Future Boots 1 Enter system setup (see page 108). 2 Use the arrow keys to highlight the Boot Sequence menu option and press to a USB device, the device must be bootable. NOTE: Write down your device is bootable, check...

Owner's Manual
Page 137
... See sound B battery problems, 29 replacing, 101 BIOS, 107 boot sequence about, 113 changing, 113-114 option settings, 113 booting to a USB device, 113 C cards installing PCI Express, 74 PCI Express, 73 removing PCI, 72 removing PCI Express, 79 slots, 60 CD/DVD drive ...-59 network adapter, 60 power, 59 sound, 59 surround, 59 USB, 58, 60 copying CDs and DVDs, 18 cover replacing, 102 D Dell Dell Diagnostics, 48 support policy, 117 support site, 11 Dell Premier Support website, 9, 11 diagnostic lights, 45 diagnostics Dell, 48 lights, 45, 58 documentation online, 11 Product Information Guide...
... See sound B battery problems, 29 replacing, 101 BIOS, 107 boot sequence about, 113 changing, 113-114 option settings, 113 booting to a USB device, 113 C cards installing PCI Express, 74 PCI Express, 73 removing PCI, 72 removing PCI Express, 79 slots, 60 CD/DVD drive ...-59 network adapter, 60 power, 59 sound, 59 surround, 59 USB, 58, 60 copying CDs and DVDs, 18 cover replacing, 102 D Dell Dell Diagnostics, 48 support policy, 117 support site, 11 Dell Premier Support website, 9, 11 diagnostic lights, 45 diagnostics Dell, 48 lights, 45, 58 documentation online, 11 Product Information Guide...

