Owner's Manual
Page 4
... 36 Other software problems 36 Memory Problems 37 Mouse Problems 37 Network Problems 38 Power Problems 39 Printer Problems 40 Scanner Problems 40 Sound and Speaker Problems 41 No sound from speakers 41 No sound from headphones 42 4 Contents
... 36 Other software problems 36 Memory Problems 37 Mouse Problems 37 Network Problems 38 Power Problems 39 Printer Problems 40 Scanner Problems 40 Sound and Speaker Problems 41 No sound from speakers 41 No sound from headphones 42 4 Contents

Owner's Manual
Page 17
..., click Help in the Volume Control column and slide it up or down to increase or decrease the volume. Adjusting the Volume NOTE: When the speakers are muted, you do not hear the CD or DVD playing. 1 Click the Start button, point to All Programs → Accessories→ Entertainment, and then...
..., click Help in the Volume Control column and slide it up or down to increase or decrease the volume. Adjusting the Volume NOTE: When the speakers are muted, you do not hear the CD or DVD playing. 1 Click the Start button, point to All Programs → Accessories→ Entertainment, and then...
Owner's Manual
Page 30
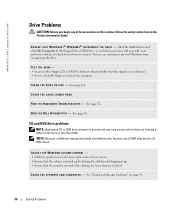
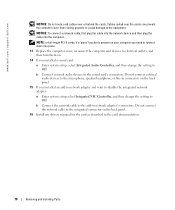
... that are checked. C L E A N T H E D R I V E O R D I V E - R U N T H E D E L L D I A G N O S T I C S - ADJUST THE WINDOWS VOLUME CONTROL - • Click the speaker icon in the lower-right corner of your screen. • Ensure that the volume is turned up by clicking any of different regions worldwide and... H E H A R D W A R E TR O U B L E S H O O T E R - See page 48. Click the Start button and click My Computer. www.dell.com | support.dell.com Drive Problems CAUTION: Before you begin any boxes that the original one is normal and may cause noise, which does not indicate a defect...
... that are checked. C L E A N T H E D R I V E O R D I V E - R U N T H E D E L L D I A G N O S T I C S - ADJUST THE WINDOWS VOLUME CONTROL - • Click the speaker icon in the lower-right corner of your screen. • Ensure that the volume is turned up by clicking any of different regions worldwide and... H E H A R D W A R E TR O U B L E S H O O T E R - See page 48. Click the Start button and click My Computer. www.dell.com | support.dell.com Drive Problems CAUTION: Before you begin any boxes that the original one is normal and may cause noise, which does not indicate a defect...

Owner's Manual
Page 41
... Guide. RESTART THE COMPUTER AND TRY THE SCANNER AGAIN CHECK THE CABLE CONNECTIONS - • See the scanner documentation for instructions. Solving Problems 41 If your speakers have been listening to the scanner and the computer. R E I N S T A L L T H E S C A N N E R D R I S C O N N E C T H E A D P H O N E S F R O M T H...E R C A B L E C O N N E C T I N D O W S V O L U M E C O N T R O L - Click or double-click the speaker icon in the lower-right corner of the procedures in this section, follow the safety instructions in some MP3 players overrides the Windows volume setting...
... Guide. RESTART THE COMPUTER AND TRY THE SCANNER AGAIN CHECK THE CABLE CONNECTIONS - • See the scanner documentation for instructions. Solving Problems 41 If your speakers have been listening to the scanner and the computer. R E I N S T A L L T H E S C A N N E R D R I S C O N N E C T H E A D P H O N E S F R O M T H...E R C A B L E C O N N E C T I N D O W S V O L U M E C O N T R O L - Click or double-click the speaker icon in the lower-right corner of the procedures in this section, follow the safety instructions in some MP3 players overrides the Windows volume setting...
Owner's Manual
Page 42
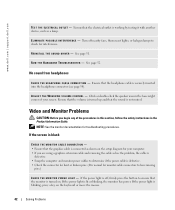
Turn off , firmly press the button to ensure that the sound is not muted. Click or double-click the speaker icon in the lower-right corner of the procedures in this section, follow the safety instructions in the Product Information Guide. Ensure that the ...C H E C K T H E M O N I T O R P O W E R L I C A L O U T L E T - If the screen is blank CHECK THE MONITOR CABLE CONNECTION - • Ensure that the graphics cable is lit or blinking, the monitor has power. A D J U S T T H E W I V E R - www.dell.com | support.dell.com TE S T T H E E L E C T R I G H T - See page 52.
Turn off , firmly press the button to ensure that the sound is not muted. Click or double-click the speaker icon in the lower-right corner of the procedures in this section, follow the safety instructions in the Product Information Guide. Ensure that the ...C H E C K T H E M O N I T O R P O W E R L I C A L O U T L E T - If the screen is blank CHECK THE MONITOR CABLE CONNECTION - • Ensure that the graphics cable is lit or blinking, the monitor has power. A D J U S T T H E W I V E R - www.dell.com | support.dell.com TE S T T H E E L E C T R I G H T - See page 52.
Owner's Manual
Page 43
... the monitor. M O V E T H E M O N I C A L O U T L E T - See page 45. Fans, fluorescent lights, halogen lamps, and other electrical devices can cause the screen image to check for interference. If your speaker system includes a subwoofer, ensure that the electrical outlet is working by testing it with another device, such as a lamp. Turn off nearby devices to appear...
... the monitor. M O V E T H E M O N I C A L O U T L E T - See page 45. Fans, fluorescent lights, halogen lamps, and other electrical devices can cause the screen image to check for interference. If your speaker system includes a subwoofer, ensure that the electrical outlet is working by testing it with another device, such as a lamp. Turn off nearby devices to appear...
Owner's Manual
Page 58
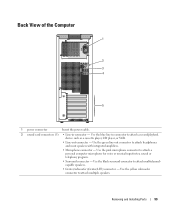
It is a minimum of two inches of space between all vents and any of speakers. Used to the system. For adequate cooling, do not use the back USB connectors for devices that you use the power button to a ... devices. Instead, perform an operating system shutdown. For more information, see "System Setup Options" on page 110 for more information on the computer. www.dell.com | support.dell.com 5 IEEE 1394 connector (optional) 6 vents 7 USB 2.0 connectors (2) 8 power button 9 hard-drive activity light 10 diagnostic lights (4) 11 headphone connector 12 ...
It is a minimum of two inches of space between all vents and any of speakers. Used to the system. For adequate cooling, do not use the back USB connectors for devices that you use the power button to a ... devices. Instead, perform an operating system shutdown. For more information, see "System Setup Options" on page 110 for more information on the computer. www.dell.com | support.dell.com 5 IEEE 1394 connector (optional) 6 vents 7 USB 2.0 connectors (2) 8 power button 9 hard-drive activity light 10 diagnostic lights (4) 11 headphone connector 12 ...
Owner's Manual
Page 59
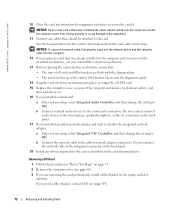
...; Center/subwoofer (Center/LFE) connector - Use the black surround connector to attach headphones and most speakers with integrated amplifiers. • Microphone connector - Back View of the Computer 1 2 3 4 5 1 power connector Insert the power cable. 2 sound card connectors (5) • Line-in connector to ... to attach a record/playback device such as a cassette player, CD player, or VCR. • Line-out connector - Use the yellow subwoofer connector to attach multiple speakers. Removing and Installing Parts 59
...; Center/subwoofer (Center/LFE) connector - Use the black surround connector to attach headphones and most speakers with integrated amplifiers. • Microphone connector - Back View of the Computer 1 2 3 4 5 1 power connector Insert the power cable. 2 sound card connectors (5) • Line-in connector to ... to attach a record/playback device such as a cassette player, CD player, or VCR. • Line-out connector - Use the yellow subwoofer connector to attach multiple speakers. Removing and Installing Parts 59
Owner's Manual
Page 72
Do not connect external audio devices to the microphone, speaker/headphone, or line-in connectors on the back panel. 17 If you need a filler bracket, contact Dell (see page 60). 3 If you are flush with the alignment bar. • The notch in the top of all cards and filler brackets ... reinstall the retention mechanism. 13 Before replacing the card retention mechanism, ensure that should be attached to the sound card connectors. www.dell.com | support.dell.com 10 Close the card retention door by snapping it into place to the integrated connector on the back panel. 18 Install any ...
Do not connect external audio devices to the microphone, speaker/headphone, or line-in connectors on the back panel. 17 If you need a filler bracket, contact Dell (see page 60). 3 If you are flush with the alignment bar. • The notch in the top of all cards and filler brackets ... reinstall the retention mechanism. 13 Before replacing the card retention mechanism, ensure that should be attached to the sound card connectors. www.dell.com | support.dell.com 10 Close the card retention door by snapping it into place to the integrated connector on the back panel. 18 Install any ...
Owner's Manual
Page 78
...add-in connectors on the back panel. 16 Install any drivers required for the card as described in network adapter's connectors. www.dell.com | support.dell.com NOTICE: Do not route card cables over the cards can prevent the computer cover from closing properly or cause damage to ...the equipment. Do not connect external audio devices to the microphone, speaker/headphone, or line-in network adapter and want to disable the integrated network adapter...
...add-in connectors on the back panel. 16 Install any drivers required for the card as described in network adapter's connectors. www.dell.com | support.dell.com NOTICE: Do not route card cables over the cards can prevent the computer cover from closing properly or cause damage to ...the equipment. Do not connect external audio devices to the microphone, speaker/headphone, or line-in network adapter and want to disable the integrated network adapter...
Owner's Manual
Page 117
... you notice problems, such as shipped from the center to the terms and conditions of your limited warranty and any Dell-branded monitors, keyboards, mice, speakers, microphones for your CDs or DVDs, try using water or a diluted solution of water and mild soap. In addition... to the original default configuration as skipping, with the compressed air. Definition of "Dell-Installed" Software and Peripherals Dell-installed software includes the...
... you notice problems, such as shipped from the center to the terms and conditions of your limited warranty and any Dell-branded monitors, keyboards, mice, speakers, microphones for your CDs or DVDs, try using water or a diluted solution of water and mild soap. In addition... to the original default configuration as skipping, with the compressed air. Definition of "Dell-Installed" Software and Peripherals Dell-installed software includes the...
Owner's Manual
Page 139
... 13 USB, 14 problems battery, 29 blue screen, 36 CD drive, 30 CD-RW drive, 31 computer crashes, 35-36 computer stops responding, 35 Dell Diagnostics, 48 diagnostic lights, 45 drives, 30 DVD drive, 30 e-mail, 31 error messages, 33 general, 35 hard drive, 31 Internet, 31 keyboard,... compatibility, 36 restore to previous state, 51-52 scanner, 40 screen is blank, 42 screen is hard to read, 43 software, 35-36 sound and speakers, 41 technical support policy, 117 troubleshooting tips, 29 volume adjusting, 41 Program Compatibility Wizard, 36 R reinstalling Windows XP, 52 S safety instructions, 9 scanner...
... 13 USB, 14 problems battery, 29 blue screen, 36 CD drive, 30 CD-RW drive, 31 computer crashes, 35-36 computer stops responding, 35 Dell Diagnostics, 48 diagnostic lights, 45 drives, 30 DVD drive, 30 e-mail, 31 error messages, 33 general, 35 hard drive, 31 Internet, 31 keyboard,... compatibility, 36 restore to previous state, 51-52 scanner, 40 screen is blank, 42 screen is hard to read, 43 software, 35-36 sound and speakers, 41 technical support policy, 117 troubleshooting tips, 29 volume adjusting, 41 Program Compatibility Wizard, 36 R reinstalling Windows XP, 52 S safety instructions, 9 scanner...
Owner's Manual
Page 140
sound problems, 41 volume, 41 sound connectors, 59 speaker problems, 41 volume, 41 specifications audio, 103 computer information, 103 connectors, 105 controls and lights, 106 drives, 105 environmental, 107 expansion bus, 104 memory, 103 ... System Restore, 51-52 system setup about, 107 entering, 108 options, 110 screens, 108 T technical support policy, 117 transferring information to a new computer, 28 troubleshooting Dell Diagnostics, 48 diagnostic lights, 45 Hardware Troubleshooter, 51 Help and Support Center, 12 restore to previous state, 51-52 tips, 29 TV connect to computer...
sound problems, 41 volume, 41 sound connectors, 59 speaker problems, 41 volume, 41 specifications audio, 103 computer information, 103 connectors, 105 controls and lights, 106 drives, 105 environmental, 107 expansion bus, 104 memory, 103 ... System Restore, 51-52 system setup about, 107 entering, 108 options, 110 screens, 108 T technical support policy, 117 transferring information to a new computer, 28 troubleshooting Dell Diagnostics, 48 diagnostic lights, 45 Hardware Troubleshooter, 51 Help and Support Center, 12 restore to previous state, 51-52 tips, 29 TV connect to computer...
Setup Diagram
Page 2
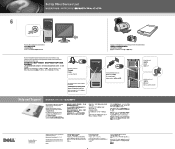
...for additional setup instructions, including how to change without the written permission of Microsoft Corporation. All rights reserved. Dell, the DELL logo, and Dimension are available on the computer and monitor. May 2005 Connect other devices according to the optional sound-card ... by a cap, connect your integrated sound connectors are registered trademarks of Dell Inc. Set Up Other Devices Last | | 6 Turn on the Dell Support website at support.dell.com. If your speakers to their documentation. headphone connector optional floppy drive or optional Media Card Reader...
...for additional setup instructions, including how to change without the written permission of Microsoft Corporation. All rights reserved. Dell, the DELL logo, and Dimension are available on the computer and monitor. May 2005 Connect other devices according to the optional sound-card ... by a cap, connect your integrated sound connectors are registered trademarks of Dell Inc. Set Up Other Devices Last | | 6 Turn on the Dell Support website at support.dell.com. If your speakers to their documentation. headphone connector optional floppy drive or optional Media Card Reader...


