Owner's Manual
Page 1
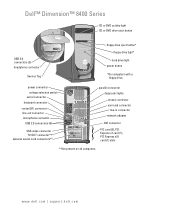
www.dell.com | support.dell.com power connector voltage selection switch serial connector keyboard connector center/LFE connector line-out connector microphone connector USB 2.0 connectors (6) VGA video connector TV-... DVI connector PCI card (3), PCI Express x1 card (1), PCI Express x16 card (1) slots **Not present on all computers. Dell™ Dimension™ 8400 Series CD or DVD activity light CD or DVD drive eject button USB 2.0 connectors (2) headphone connector Service Tag floppy drive eject button* floppy drive light* hard drive light power button *On computers with a floppy...
www.dell.com | support.dell.com power connector voltage selection switch serial connector keyboard connector center/LFE connector line-out connector microphone connector USB 2.0 connectors (6) VGA video connector TV-... DVI connector PCI card (3), PCI Express x1 card (1), PCI Express x16 card (1) slots **Not present on all computers. Dell™ Dimension™ 8400 Series CD or DVD activity light CD or DVD drive eject button USB 2.0 connectors (2) headphone connector Service Tag floppy drive eject button* floppy drive light* hard drive light power button *On computers with a floppy...
Owner's Manual
Page 4
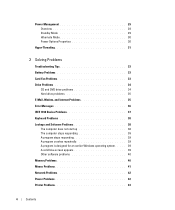
... Hibernate Mode 30 Power Options Properties 30 Hyper-Threading 31 2 Solving Problems Troubleshooting Tips 33 Battery Problems 33 Card Fan Problems 33 Drive Problems 34 CD and DVD drive problems 34 Hard drive problems 35 E-Mail, Modem, and Internet Problems 35 Error Messages 36 IEEE 1394 Device Problems 37 Keyboard Problems 38 Lockups and...
... Hibernate Mode 30 Power Options Properties 30 Hyper-Threading 31 2 Solving Problems Troubleshooting Tips 33 Battery Problems 33 Card Fan Problems 33 Drive Problems 34 CD and DVD drive problems 34 Hard drive problems 35 E-Mail, Modem, and Internet Problems 35 Error Messages 36 IEEE 1394 Device Problems 37 Keyboard Problems 38 Lockups and...
Owner's Manual
Page 6
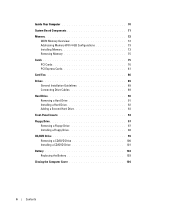
... Express Cards 81 Card Fan 86 Drives 89 General Installation Guidelines 89 Connecting Drive Cables 89 Hard Drive 90 Removing a Hard Drive 91 Installing a Hard Drive 92 Adding a Second Hard Drive 93 Front-Panel Inserts 94 Floppy Drive 97 Removing a Floppy Drive 97 Installing a Floppy Drive 98 CD/DVD Drive 99 Removing a CD/DVD Drive 100 Installing a CD/DVD Drive 101 Battery 103 Replacing the Battery...
... Express Cards 81 Card Fan 86 Drives 89 General Installation Guidelines 89 Connecting Drive Cables 89 Hard Drive 90 Removing a Hard Drive 91 Installing a Hard Drive 92 Adding a Second Hard Drive 93 Front-Panel Inserts 94 Floppy Drive 97 Removing a Floppy Drive 97 Installing a Floppy Drive 98 CD/DVD Drive 99 Removing a CD/DVD Drive 100 Installing a CD/DVD Drive 101 Battery 103 Replacing the Battery...
Owner's Manual
Page 10
... information • Downloads - Upgrade information for devices (such as memory, the hard drive, and the operating system • Customer Care - Drivers, patches, and software updates • Reference - The Express Service Code is not available in all countries. www.dell.com | support.dell.com What Are You Looking For? • Service Tag and Express Service...
... information • Downloads - Upgrade information for devices (such as memory, the hard drive, and the operating system • Customer Care - Drivers, patches, and software updates • Reference - The Express Service Code is not available in all countries. www.dell.com | support.dell.com What Are You Looking For? • Service Tag and Express Service...
Owner's Manual
Page 18
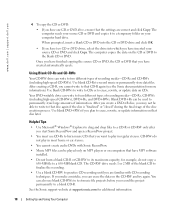
.... • You cannot create audio DVDs with CD recording techniques. The CD-RW drive needs 1 or 2 MB of information. After creating a CD-R, you may not...MP3 files can erase the data on that you have inserted your computer hard drive. www.dell.com | support.dell.com 4 To copy the CD or DVD: • If you have... MP3 software installed. • Do not burn a blank CD-R or CD-RW to its maximum capacity; Use blank CD-RWs to write to CDs or to erase, rewrite, or update data on computers that have one CD or DVD drive...
.... • You cannot create audio DVDs with CD recording techniques. The CD-RW drive needs 1 or 2 MB of information. After creating a CD-R, you may not...MP3 files can erase the data on that you have inserted your computer hard drive. www.dell.com | support.dell.com 4 To copy the CD or DVD: • If you have... MP3 software installed. • Do not burn a blank CD-R or CD-RW to its maximum capacity; Use blank CD-RWs to write to CDs or to erase, rewrite, or update data on computers that have one CD or DVD drive...
Owner's Manual
Page 20
The Intel RAID controller on the computer. If a third drive is not included with your graphics card, see "Creating a Spare Hard Drive" on page 27). However, if four drives are available, Dell offers either RAID level 0 or RAID level 1 for your TV. 4 Connect the VGA or DVI monitor. Connecting a TV NOTE...be used as a spare drive in a RAID 1 configuration (see the user's guide in the Help and Support Center (click the Start button, click Help and Support, click User and system guides, click Device guides, and then click the guide for its Dimension computers. Although several RAID...
The Intel RAID controller on the computer. If a third drive is not included with your graphics card, see "Creating a Spare Hard Drive" on page 27). However, if four drives are available, Dell offers either RAID level 0 or RAID level 1 for your TV. 4 Connect the VGA or DVI monitor. Connecting a TV NOTE...be used as a spare drive in a RAID 1 configuration (see the user's guide in the Help and Support Center (click the Start button, click Help and Support, click User and system guides, click Device guides, and then click the guide for its Dimension computers. Although several RAID...
Owner's Manual
Page 21
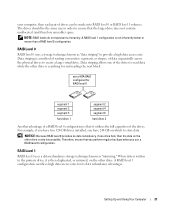
... unallocated (and therefore unusable) space. A RAID level 1 configuration sacrifices high data access rates for RAID level 0 segment 1 segment 3 segment 5 hard drive 1 segment 2 segment 4 segment 6 hard drive 2 Another advantage of data sequentially across the physical drives to store data. Data striping is also inaccessible. RAID Level 0 RAID level 0 uses a storage technique known as "mirroring." Setting Up...
... unallocated (and therefore unusable) space. A RAID level 1 configuration sacrifices high data access rates for RAID level 0 segment 1 segment 3 segment 5 hard drive 1 segment 2 segment 4 segment 6 hard drive 2 Another advantage of data sequentially across the physical drives to store data. Data striping is also inaccessible. RAID Level 0 RAID level 0 uses a storage technique known as "mirroring." Setting Up...
Owner's Manual
Page 22
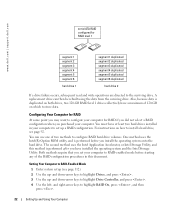
www.dell.com | support.dell.com serial ATA RAID configured for RAID level 1 segment 1 segment 2 segment 3 segment 4 segment 5 segment 6 hard drive 1 segment 1 duplicated segment 2 duplicated segment 3 duplicated segment 4 duplicated segment 5 duplicated segment 6 duplicated hard drive 2 If a drive failure occurs, subsequent read and write operations are directed to set your computer to RAID-enabled mode before you may want...
www.dell.com | support.dell.com serial ATA RAID configured for RAID level 1 segment 1 segment 2 segment 3 segment 4 segment 5 segment 6 hard drive 1 segment 1 duplicated segment 2 duplicated segment 3 duplicated segment 4 duplicated segment 5 duplicated segment 6 duplicated hard drive 2 If a drive failure occurs, subsequent read and write operations are directed to set your computer to RAID-enabled mode before you may want...
Owner's Manual
Page 23
... following procedure should only be used to migrate an existing storage configuration to RAID 0. 1 Set your hard drives when you create a RAID configuration using the Intel Option ROM utility, ideally the drives should not be the size of the smallest disk multiplied by the number (two) of the array...you are prompted to select Exit, and press . 13 Install the operating system. Creating a RAID Level 0 Configuration NOTICE: You will lose any size drives may be of the average file you want to highlight Create RAID Volume, and press . 4 Enter a RAID volume name or accept the default,...
... following procedure should only be used to migrate an existing storage configuration to RAID 0. 1 Set your hard drives when you create a RAID configuration using the Intel Option ROM utility, ideally the drives should not be the size of the smallest disk multiplied by the number (two) of the array...you are prompted to select Exit, and press . 13 Install the operating system. Creating a RAID Level 0 Configuration NOTICE: You will lose any size drives may be of the average file you want to highlight Create RAID Volume, and press . 4 Enter a RAID volume name or accept the default,...
Owner's Manual
Page 24
...dell.com | support.dell.com 4 Enter a RAID volume name or accept the default, and press . 5 Use the up - Deleting a RAID Volume NOTE: When you perform this operation, all data on the array that the correct volume configuration is on the single drive), and you want to add a second hard drive and reconfigure both drives... into an array, but you still have a two-hard drive computer configured into a RAID volume without losing the existing operating...
...dell.com | support.dell.com 4 Enter a RAID volume name or accept the default, and press . 5 Use the up - Deleting a RAID Volume NOTE: When you perform this operation, all data on the array that the correct volume configuration is on the single drive), and you want to add a second hard drive and reconfigure both drives... into an array, but you still have a two-hard drive computer configured into a RAID volume without losing the existing operating...
Owner's Manual
Page 25
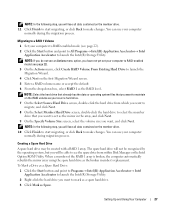
...volume name, select RAID 1 as the RAID level, and then click Next to continue. 6 On the Select Volume Location screen, click the first hard drive you want to include in your RAID 0 volume, and then click the right arrow. Creating a RAID 0 Volume NOTE: When you perform this ... button and point to Programs→ Intel(R) Application Accelerator→ Intel Application Accelerator to launch the Intel(R) Storage Utility. Click a second hard drive until two drives appear in the Selected window, and then click Next. 5 In the Specify Volume Size window, click the Volume Size desired, and then...
...volume name, select RAID 1 as the RAID level, and then click Next to continue. 6 On the Select Volume Location screen, click the first hard drive you want to include in your RAID 0 volume, and then click the right arrow. Creating a RAID 0 Volume NOTE: When you perform this ... button and point to Programs→ Intel(R) Application Accelerator→ Intel Application Accelerator to launch the Intel(R) Storage Utility. Click a second hard drive until two drives appear in the Selected window, and then click Next. 5 In the Specify Volume Size window, click the Volume Size desired, and then...
Owner's Manual
Page 26
..., double-click the hard drive to select the member drive to span the stripe array, and click Next. 10 On the Specify Volume Size screen, select the Volume Size you want, and click Next. 26 Setting Up and Using Your Computer www.dell.com | support.dell.com Deleting a RAID Volume NOTE: While ...this procedure deletes the RAID 1 volume, it should be the hard drive containing the data or operating system files that you want to keep on the volume. 1...
..., double-click the hard drive to select the member drive to span the stripe array, and click Next. 10 On the Specify Volume Size screen, select the Volume Size you want, and click Next. 26 Setting Up and Using Your Computer www.dell.com | support.dell.com Deleting a RAID Volume NOTE: While ...this procedure deletes the RAID 1 volume, it should be the hard drive containing the data or operating system files that you want to keep on the volume. 1...
Owner's Manual
Page 27
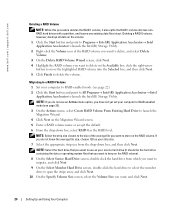
... Your Computer 27 NOTE: In the following step, you will lose all data contained on the RAID volume as your source hard drive. 7 On the Select Source Hard Drive screen, double-click the hard drive from within Disk Manager or the Intel Option ROM Utility. NOTE: If you do not see an Actions menu option, you...
... Your Computer 27 NOTE: In the following step, you will lose all data contained on the RAID volume as your source hard drive. 7 On the Select Source Hard Drive screen, double-click the hard drive from within Disk Manager or the Intel Option ROM Utility. NOTE: If you do not see an Actions menu option, you...
Owner's Manual
Page 28
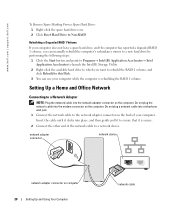
... connector on the back of your computer does not have a spare hard drive, and the computer has reported a degraded RAID 1 volume, you can manually rebuild the computer's redundancy mirror to a new hard drive by performing the following steps: 1 Click the Start button and point... Network Adapter NOTE: Plug the network cable into the network adapter connector on the computer. www.dell.com | support.dell.com To Remove Spare Marking From a Spare Hard Drive: 1 Right-click the spare hard drive icon. 2 Click Reset Hard Drive to Non-RAID Rebuilding a Degraded RAID 1 Volume If your computer.
... connector on the back of your computer does not have a spare hard drive, and the computer has reported a degraded RAID 1 volume, you can manually rebuild the computer's redundancy mirror to a new hard drive by performing the following steps: 1 Click the Start button and point... Network Adapter NOTE: Plug the network cable into the network adapter connector on the computer. www.dell.com | support.dell.com To Remove Spare Marking From a Spare Hard Drive: 1 Right-click the spare hard drive icon. 2 Click Reset Hard Drive to Non-RAID Rebuilding a Degraded RAID 1 Volume If your computer.
Owner's Manual
Page 29
...standby mode without a period of inactivity, click the Start button, click Turn Off Computer, and then click Stand by turning off the display and the hard drive after a defined period of inactivity: 1 Click the Start button and click Control Panel. 2 Under Pick a category, click Performance and Maintenance. 3 ...click Power Options. To set standby mode to automatically activate after a time-out. You can reduce power to just the monitor or the hard drive, or you can reduce the amount of sharing files, printers, or an Internet connection between computers in Windows XP Home Edition. NOTE:...
...standby mode without a period of inactivity, click the Start button, click Turn Off Computer, and then click Stand by turning off the display and the hard drive after a defined period of inactivity: 1 Click the Start button and click Control Panel. 2 Under Pick a category, click Performance and Maintenance. 3 ...click Power Options. To set standby mode to automatically activate after a time-out. You can reduce power to just the monitor or the hard drive, or you can reduce the amount of sharing files, printers, or an Internet connection between computers in Windows XP Home Edition. NOTE:...
Owner's Manual
Page 30
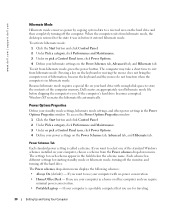
... file before it was in the fields below the scheme name. www.dell.com | support.dell.com Hibernate Mode Hibernate mode conserves power by copying system data to a reserved area on the hard drive and then completely turning off the hard drive. If the computer's hard drive becomes corrupted, Windows XP recreates the hibernate file automatically. Because hibernate...
... file before it was in the fields below the scheme name. www.dell.com | support.dell.com Hibernate Mode Hibernate mode conserves power by copying system data to a reserved area on the hard drive and then completely turning off the hard drive. If the computer's hard drive becomes corrupted, Windows XP recreates the hibernate file automatically. Because hibernate...

Owner's Manual
Page 31
... the power button to time-out before the monitor does, your computer. It is a portable computer and you want your Windows password before the hard drive. NOTICE: If you for your computer to run with minimal power conservation. • Max Battery - To avoid this problem, always set the... hard drive (hard disk) to activate standby mode, activate hibernate mode, or turn off the computer. Advanced Tab The Advanced tab allows you to: • Place the ...
... the power button to time-out before the monitor does, your computer. It is a portable computer and you want your Windows password before the hard drive. NOTICE: If you for your computer to run with minimal power conservation. • Max Battery - To avoid this problem, always set the... hard drive (hard disk) to activate standby mode, activate hibernate mode, or turn off the computer. Advanced Tab The Advanced tab allows you to: • Place the ...
Owner's Manual
Page 35
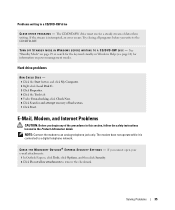
... checkmark. E-Mail, Modem, and Internet Problems CAUTION: Before you begin any of bad sectors. 7 Click Start. If the stream is connected to a CD/DVD-RW drive C L O S E O T H E R P R O G R A M S - Hard drive problems RUN CHECK DISK - 1 Click the Start button and click My Computer. 2 Right-click Local Disk C:. 3 Click Properties. 4 Click the Tools tab. 5 Under... Guide. If you write to an analog telephone jack only. NOTE: Connect the modem to the CD/DVD-RW. The CD/DVD-RW drive must receive a steady stream of data when writing. C H E C K T H E M I C R O S O F T O U T L O O K ®...
... checkmark. E-Mail, Modem, and Internet Problems CAUTION: Before you begin any of bad sectors. 7 Click Start. If the stream is connected to a CD/DVD-RW drive C L O S E O T H E R P R O G R A M S - Hard drive problems RUN CHECK DISK - 1 Click the Start button and click My Computer. 2 Right-click Local Disk C:. 3 Click Properties. 4 Click the Tools tab. 5 Under... Guide. If you write to an analog telephone jack only. NOTE: Connect the modem to the CD/DVD-RW. The CD/DVD-RW drive must receive a steady stream of data when writing. C H E C K T H E M I C R O S O F T O U T L O O K ®...

Owner's Manual
Page 40
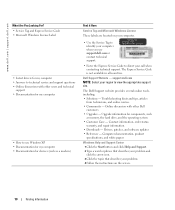
...memory modules (see page 72) to see page 52). 40 Solving Problems See the software documentation for minimum memory requirements. www.dell.com | support.dell.com Other software problems CHECK THE SOFTWARE DOCUMENTATION OR CONTACT THE SOFTWARE MANUFACTURER FOR TROUBLESHOOTING INFORMATION - • Ensure that your computer...8226; If necessary, uninstall and then reinstall the program. BACK UP YOUR FILES IMMEDIATELY USE A VIRUS-SCANNING PROGRAM TO CHECK THE HARD DRIVE, FLOPPY DISKS, OR CDS SAVE AND CLOSE ANY OPEN FILES OR PROGRAMS AND SHUT DOWN YOUR COMPUTER THROUGH THE START MENU Memory...
...memory modules (see page 72) to see page 52). 40 Solving Problems See the software documentation for minimum memory requirements. www.dell.com | support.dell.com Other software problems CHECK THE SOFTWARE DOCUMENTATION OR CONTACT THE SOFTWARE MANUFACTURER FOR TROUBLESHOOTING INFORMATION - • Ensure that your computer...8226; If necessary, uninstall and then reinstall the program. BACK UP YOUR FILES IMMEDIATELY USE A VIRUS-SCANNING PROGRAM TO CHECK THE HARD DRIVE, FLOPPY DISKS, OR CDS SAVE AND CLOSE ANY OPEN FILES OR PROGRAMS AND SHUT DOWN YOUR COMPUTER THROUGH THE START MENU Memory...
Owner's Manual
Page 50
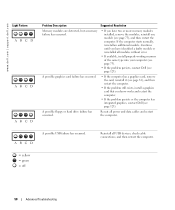
... works and restart the computer. • If the problem persists or the computer has integrated graphics, contact Dell (see page 123). A possible floppy or hard drive failure has occurred. ABCD A possible USB failure has occurred. Continue until you have two or more memory ...the computer. = yellow = green = off 50 Advanced Troubleshooting If the computer starts normally, reinstall an additional module. www.dell.com | support.dell.com Light Pattern ABCD ABCD ABCD Problem Description Suggested Resolution Memory modules are detected, but a memory failure has occurred. •...
... works and restart the computer. • If the problem persists or the computer has integrated graphics, contact Dell (see page 123). A possible floppy or hard drive failure has occurred. ABCD A possible USB failure has occurred. Continue until you have two or more memory ...the computer. = yellow = green = off 50 Advanced Troubleshooting If the computer starts normally, reinstall an additional module. www.dell.com | support.dell.com Light Pattern ABCD ABCD ABCD Problem Description Suggested Resolution Memory modules are detected, but a memory failure has occurred. •...


