Owner's Manual
Page 4
Power Management 29 Overview 29 Standby Mode 29 Hibernate Mode 30 Power Options Properties 30 Hyper-Threading 31 2 Solving Problems Troubleshooting Tips 33 Battery Problems 33 Card Fan Problems 33 Drive Problems 34 CD and DVD drive problems 34 Hard drive problems 35 E-Mail, Modem, and Internet Problems 35 ...
Power Management 29 Overview 29 Standby Mode 29 Hibernate Mode 30 Power Options Properties 30 Hyper-Threading 31 2 Solving Problems Troubleshooting Tips 33 Battery Problems 33 Card Fan Problems 33 Drive Problems 34 CD and DVD drive problems 34 Hard drive problems 35 E-Mail, Modem, and Internet Problems 35 ...
Owner's Manual
Page 6
... Floppy Drive 97 Removing a Floppy Drive 97 Installing a Floppy Drive 98 CD/DVD Drive 99 Removing a CD/DVD Drive 100 Installing a CD/DVD Drive 101 Battery 103 Replacing the Battery 103 Closing the Computer Cover 104 6 Contents
... Floppy Drive 97 Removing a Floppy Drive 97 Installing a Floppy Drive 98 CD/DVD Drive 99 Removing a CD/DVD Drive 100 Installing a CD/DVD Drive 101 Battery 103 Replacing the Battery 103 Closing the Computer Cover 104 6 Contents

Owner's Manual
Page 31
... click an option from standby mode or hibernate mode. • Program the power button to run with minimal power conservation. • Max Battery - It is an Intel® technology that scheme, unless you use the hibernate settings you set the monitor to change the default settings ...for extended periods of performing certain tasks simultaneously. If you want your computer from batteries for a scheme, click the drop-down menu and click OK. Advanced Tab The Advanced tab allows you for the changed scheme. Hyper...
... click an option from standby mode or hibernate mode. • Program the power button to run with minimal power conservation. • Max Battery - It is an Intel® technology that scheme, unless you use the hibernate settings you set the monitor to change the default settings ...for extended periods of performing certain tasks simultaneously. If you want your computer from batteries for a scheme, click the drop-down menu and click OK. Advanced Tab The Advanced tab allows you for the changed scheme. Hyper...
Owner's Manual
Page 33
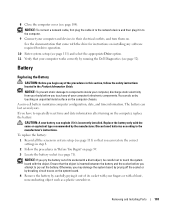
... the procedures in this section, follow the safety instructions located in a program, see the program's documentation. Discard used batteries according to repeatedly reset time and date information after turning on the computer, or if an incorrect time or date displays...the part is correctly installed. • If a peripheral device does not work properly, contact Dell (see page 123). If you have to the manufacturer's instructions. C H E C K T H E C A B L E C O N N E C T I O N S - Battery Problems CAUTION: There is a danger of the procedures in this section, follow the safety ...
... the procedures in this section, follow the safety instructions located in a program, see the program's documentation. Discard used batteries according to repeatedly reset time and date information after turning on the computer, or if an incorrect time or date displays...the part is correctly installed. • If a peripheral device does not work properly, contact Dell (see page 123). If you have to the manufacturer's instructions. C H E C K T H E C A B L E C O N N E C T I O N S - Battery Problems CAUTION: There is a danger of the procedures in this section, follow the safety ...
Owner's Manual
Page 71
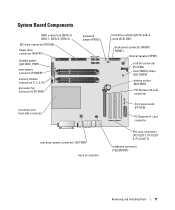
... for add-in cards (SCSI LED) front-panel connector (FRONT PANEL) internal speaker (SPKR) card fan connector (PCI FAN) clear CMOS jumper (CLR CMOS) battery socket (BATTERY) PCI Express x16 card connector front panel audio (FP AUD) PCI Express x1 card connector PCI card connectors (PCI SLOT 1, PCI SLOT 2, PCI SLOT 3) telephony...
... for add-in cards (SCSI LED) front-panel connector (FRONT PANEL) internal speaker (SPKR) card fan connector (PCI FAN) clear CMOS jumper (CLR CMOS) battery socket (BATTERY) PCI Express x16 card connector front panel audio (FP AUD) PCI Express x1 card connector PCI card connectors (PCI SLOT 1, PCI SLOT 2, PCI SLOT 3) telephony...
Owner's Manual
Page 103
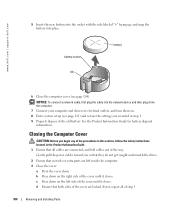
... information. Replace the battery only with the same or equivalent type recommended by carefully prying it out of the procedures in this section, follow the safety instructions located in the Product Information Guide. NOTICE: If you touch any of its socket with your computer works correctly by running the Dell Diagnostics (see...
... information. Replace the battery only with the same or equivalent type recommended by carefully prying it out of the procedures in this section, follow the safety instructions located in the Product Information Guide. NOTICE: If you touch any of its socket with your computer works correctly by running the Dell Diagnostics (see...
Owner's Manual
Page 104
... cables out of the cover are left side of the cover until it into place. www.dell.com | support.dell.com 5 Insert the new battery into the socket with the side labeled "+" facing up, and snap the battery into the computer. 7 Connect your computer and devices to electrical outlets, and turn them on the...
... cables out of the cover are left side of the cover until it into place. www.dell.com | support.dell.com 5 Insert the new battery into the socket with the side labeled "+" facing up, and snap the battery into the computer. 7 Connect your computer and devices to electrical outlets, and turn them on the...
Owner's Manual
Page 110
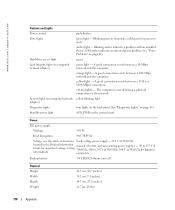
...between a 100-Mbps network and the computer. A good connection exists between a 1 Gb (or 1000-Mbps) connection. www.dell.com | support.dell.com Controls and Lights Power control Power light Hard-drive access light Link integrity light (on integrated network adapter) Activity light (...on state. solid green for Japanese information) computers Backup battery 3-V CR2032 lithium coin cell Physical Height Width Depth Weight 42.5 cm...
...between a 100-Mbps network and the computer. A good connection exists between a 1 Gb (or 1000-Mbps) connection. www.dell.com | support.dell.com Controls and Lights Power control Power light Hard-drive access light Link integrity light (on integrated network adapter) Activity light (...on state. solid green for Japanese information) computers Backup battery 3-V CR2032 lithium coin cell Physical Height Width Depth Weight 42.5 cm...
Owner's Manual
Page 141
See sound B battery problems, 33 replacing, 103 BIOS, 111 boot sequence about, 116 changing, 116-117 option settings, 116 booting to a USB device, 116 C card fan installing, 86 ... sound, 64-65 surround, 64 TV-OUT, 64 USB, 62, 65 VGA, 64 video, 64 copying CDs and DVDs, 17 cover closing, 104 opening, 69 D Dell contacting, 123 Dell Diagnostics, 52 support policy, 119 support site, 10 diagnostic lights, 49 diagnostics Dell, 52 lights, 49, 63 display. Index A audio. See monitor Index 141
See sound B battery problems, 33 replacing, 103 BIOS, 111 boot sequence about, 116 changing, 116-117 option settings, 116 booting to a USB device, 116 C card fan installing, 86 ... sound, 64-65 surround, 64 TV-OUT, 64 USB, 62, 65 VGA, 64 video, 64 copying CDs and DVDs, 17 cover closing, 104 opening, 69 D Dell contacting, 123 Dell Diagnostics, 52 support policy, 119 support site, 10 diagnostic lights, 49 diagnostics Dell, 52 lights, 49, 63 display. Index A audio. See monitor Index 141

Owner's Manual
Page 143
... mode, 29 power light conditions, 42 Power Options Properties, 30 printer cable, 11 connecting, 11 parallel, 12 problems, 43 setting up, 11 USB, 11 problems battery, 33 blue screen, 39 card fan, 33 Index 143
... mode, 29 power light conditions, 42 Power Options Properties, 30 printer cable, 11 connecting, 11 parallel, 12 problems, 43 setting up, 11 USB, 11 problems battery, 33 blue screen, 39 card fan, 33 Index 143


