Owner's Manual
Page 6
... 76 PCI Express Cards 81 Card Fan 86 Drives 89 General Installation Guidelines 89 Connecting Drive Cables 89 Hard Drive 90 Removing a Hard Drive 91 Installing a Hard Drive 92 Adding a Second Hard Drive 93 Front-Panel Inserts 94 Floppy Drive 97 Removing a Floppy Drive 97 Installing a Floppy Drive 98 CD/DVD Drive 99 Removing a CD/DVD Drive 100 Installing a CD/DVD Drive 101 Battery 103 Replacing the Battery 103...
... 76 PCI Express Cards 81 Card Fan 86 Drives 89 General Installation Guidelines 89 Connecting Drive Cables 89 Hard Drive 90 Removing a Hard Drive 91 Installing a Hard Drive 92 Adding a Second Hard Drive 93 Front-Panel Inserts 94 Floppy Drive 97 Removing a Floppy Drive 97 Installing a Floppy Drive 98 CD/DVD Drive 99 Removing a CD/DVD Drive 100 Installing a CD/DVD Drive 101 Battery 103 Replacing the Battery 103...
Owner's Manual
Page 28
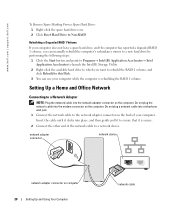
... computer 28 Setting Up and Using Your Computer network cable www.dell.com | support.dell.com To Remove Spare Marking From a Spare Hard Drive: 1 Right-click the spare hard drive icon. 2 Click Reset Hard Drive to Non-RAID Rebuilding a Degraded RAID 1 Volume If your computer does not have a spare hard drive, and the computer has reported a degraded RAID 1 volume, you can...
... computer 28 Setting Up and Using Your Computer network cable www.dell.com | support.dell.com To Remove Spare Marking From a Spare Hard Drive: 1 Right-click the spare hard drive icon. 2 Click Reset Hard Drive to Non-RAID Rebuilding a Degraded RAID 1 Volume If your computer does not have a spare hard drive, and the computer has reported a degraded RAID 1 volume, you can...
Owner's Manual
Page 35
... B Y M O D E I N W I N D O W S B E F O R E W R I T I S C - NOTE: Connect the modem to a digital telephone network. C H E C K T H E M I C R O S O F T O U T L O O K ® E X P R E S S S E C U R I T Y S E T T I N G S - Hard drive problems RUN CHECK DISK - 1 Click the Start button and click My Computer. 2 Right-click Local Disk C:. 3 Click Properties. 4 Click the Tools tab. 5 Under Error-checking...Product Information Guide. See "Standby Mode" on power management modes. Problems writing to remove the checkmark. Try closing all programs before you cannot open your e-mail attachments: ...
... B Y M O D E I N W I N D O W S B E F O R E W R I T I S C - NOTE: Connect the modem to a digital telephone network. C H E C K T H E M I C R O S O F T O U T L O O K ® E X P R E S S S E C U R I T Y S E T T I N G S - Hard drive problems RUN CHECK DISK - 1 Click the Start button and click My Computer. 2 Right-click Local Disk C:. 3 Click Properties. 4 Click the Tools tab. 5 Under Error-checking...Product Information Guide. See "Standby Mode" on power management modes. Problems writing to remove the checkmark. Try closing all programs before you cannot open your e-mail attachments: ...
Owner's Manual
Page 50
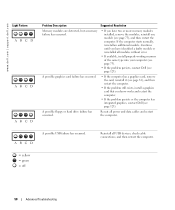
...page 73), and then restart the computer. A possible graphics card failure has occurred. • If the computer has a graphics card, remove the card, reinstall it (see page 81), and then restart the computer. • If the problem still exists, install a graphics .... = yellow = green = off 50 Advanced Troubleshooting ABCD A possible USB failure has occurred. A possible floppy or hard drive failure has occurred. www.dell.com | support.dell.com Light Pattern ABCD ABCD ABCD Problem Description Suggested Resolution Memory modules are detected, but a memory failure has occurred. ...
...page 73), and then restart the computer. A possible graphics card failure has occurred. • If the computer has a graphics card, remove the card, reinstall it (see page 81), and then restart the computer. • If the problem still exists, install a graphics .... = yellow = green = off 50 Advanced Troubleshooting ABCD A possible USB failure has occurred. A possible floppy or hard drive failure has occurred. www.dell.com | support.dell.com Light Pattern ABCD ABCD ABCD Problem Description Suggested Resolution Memory modules are detected, but a memory failure has occurred. ...
Owner's Manual
Page 56
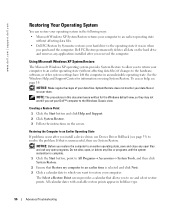
... Creating a Restore Point 1 Click the Start button and click Help and Support. 2 Click System Restore. 3 Follow the instructions on the hard drive and removes any files or programs until the system restoration is complete. 1 Click the Start button, point to All Programs→ Accessories→ System ...Restore to allow you to return your computer to an earlier operating state (without affecting data files. • Dell PC Restore by Symantec restores your hard drive to the hardware, software, or other system settings have left the computer in an undesirable operating state. System ...
... Creating a Restore Point 1 Click the Start button and click Help and Support. 2 Click System Restore. 3 Follow the instructions on the hard drive and removes any files or programs until the system restoration is complete. 1 Click the Start button, point to All Programs→ Accessories→ System ...Restore to allow you to return your computer to an earlier operating state (without affecting data files. • Dell PC Restore by Symantec restores your hard drive to the hardware, software, or other system settings have left the computer in an undesirable operating state. System ...
Owner's Manual
Page 57
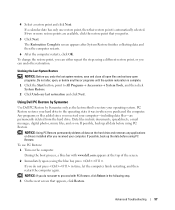
...6 After the computer restarts, click OK. NOTICE: If you undo the last system restore, save and close all data on the hard drive and removes any files or programs until the system restoration is automatically selected. Any programs or files added since you purchased the computer. The Restoration ...Complete screen appears after you can either repeat the steps using PC Restore. Using Dell PC Restore by Symantec Use Dell PC Restore by Symantec only as the last method to proceed with www.dell.com appears at the top of the screen. 2 Immediately upon seeing the blue bar...
...6 After the computer restarts, click OK. NOTICE: If you undo the last system restore, save and close all data on the hard drive and removes any files or programs until the system restoration is automatically selected. Any programs or files added since you purchased the computer. The Restoration ...Complete screen appears after you can either repeat the steps using PC Restore. Using Dell PC Restore by Symantec Use Dell PC Restore by Symantec only as the last method to proceed with www.dell.com appears at the top of the screen. 2 Immediately upon seeing the blue bar...
Owner's Manual
Page 61
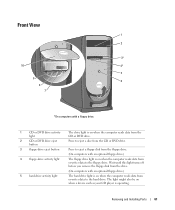
... also be on when a device such as your CD player is on when the computer reads data from or writes data to the hard drive. Wait until this light turns off before you remove the floppy disk from the drive. (On computers with an optional floppy drive.) 4 floppy-drive activity light The floppy drive light is operating.
... also be on when a device such as your CD player is on when the computer reads data from or writes data to the hard drive. Wait until this light turns off before you remove the floppy disk from the drive. (On computers with an optional floppy drive.) 4 floppy-drive activity light The floppy drive light is operating.
Owner's Manual
Page 70
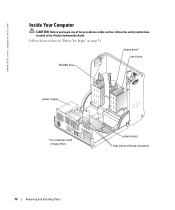
Follow the procedures in the Product Information Guide. floppy drive* hard drive CD/DVD drive power supply * On computers with a floppy drive. www.dell.com | support.dell.com Inside Your Computer CAUTION: Before you begin any of the procedures in this section, follow the safety instructions located in "Before You Begin" on page 59. system board heat sink and blower assembly 70 Removing and Installing Parts
Follow the procedures in the Product Information Guide. floppy drive* hard drive CD/DVD drive power supply * On computers with a floppy drive. www.dell.com | support.dell.com Inside Your Computer CAUTION: Before you begin any of the procedures in this section, follow the safety instructions located in "Before You Begin" on page 59. system board heat sink and blower assembly 70 Removing and Installing Parts
Owner's Manual
Page 71
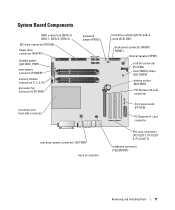
... (POWER) memory module connectors (1, 2, 3, 4) processor fan connector (CPU FAN) password jumper (PASS) processor and heat-sink connector processor power connector (12V PWR) back of computer hard-drive activity light for add-in cards (SCSI LED) front-panel connector (FRONT PANEL) internal speaker (SPKR) card fan connector (PCI FAN) clear CMOS jumper (CLR... x16 card connector front panel audio (FP AUD) PCI Express x1 card connector PCI card connectors (PCI SLOT 1, PCI SLOT 2, PCI SLOT 3) telephony connector (TELEPHONY) Removing and Installing Parts 71
... (POWER) memory module connectors (1, 2, 3, 4) processor fan connector (CPU FAN) password jumper (PASS) processor and heat-sink connector processor power connector (12V PWR) back of computer hard-drive activity light for add-in cards (SCSI LED) front-panel connector (FRONT PANEL) internal speaker (SPKR) card fan connector (PCI FAN) clear CMOS jumper (CLR... x16 card connector front panel audio (FP AUD) PCI Express x1 card connector PCI card connectors (PCI SLOT 1, PCI SLOT 2, PCI SLOT 3) telephony connector (TELEPHONY) Removing and Installing Parts 71
Owner's Manual
Page 89
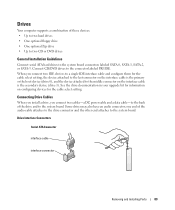
... to two hard drives • One optional floppy drive • One optional Zip drive • Up to two CD or DVD drives General Installation Guidelines Connect serial ATA hard drives to the system board connectors labeled SATA-0, SATA-1, SATA-2, or SATA-3. Drive Interface Connectors Serial ATA Connector interface cable interface connector Removing and Installing Parts 89 Connecting Drive Cables When...
... to two hard drives • One optional floppy drive • One optional Zip drive • Up to two CD or DVD drives General Installation Guidelines Connect serial ATA hard drives to the system board connectors labeled SATA-0, SATA-1, SATA-2, or SATA-3. Drive Interface Connectors Serial ATA Connector interface cable interface connector Removing and Installing Parts 89 Connecting Drive Cables When...
Owner's Manual
Page 90
... page 59. 90 Removing and Installing Parts Instead, set it . 1 If you are keyed for correct insertion; that is, a notch or a missing pin on one connector matches a tab or a filled-in "Before You Begin" on the other connector. www.dell.com | support.dell.com Most interface connectors are replacing a hard drive that contains data you...
... page 59. 90 Removing and Installing Parts Instead, set it . 1 If you are keyed for correct insertion; that is, a notch or a missing pin on one connector matches a tab or a filled-in "Before You Begin" on the other connector. www.dell.com | support.dell.com Most interface connectors are replacing a hard drive that contains data you...
Owner's Manual
Page 91
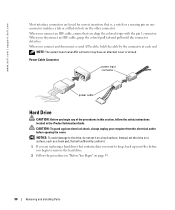
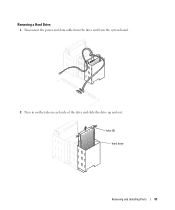
Removing a Hard Drive 1 Disconnect the power and data cable from the drive and from the system board. 2 Press in on the tabs on each side of the drive and slide the drive up and out. tabs (2) hard drive Removing and Installing Parts 91
Removing a Hard Drive 1 Disconnect the power and data cable from the drive and from the system board. 2 Press in on the tabs on each side of the drive and slide the drive up and out. tabs (2) hard drive Removing and Installing Parts 91
Owner's Manual
Page 92
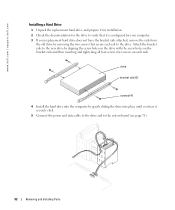
www.dell.com | support.dell.com Installing a Hard Drive 1 Unpack the replacement hard drive, and prepare it for installation. 2 Check the documentation for the drive to verify that secure each rail). Attach the bracket rails to the new drive by removing the two screws that it securely click. 5 Connect the power and data cable to the drive and to the drive. drive bracket...
www.dell.com | support.dell.com Installing a Hard Drive 1 Unpack the replacement hard drive, and prepare it for installation. 2 Check the documentation for the drive to verify that secure each rail). Attach the bracket rails to the new drive by removing the two screws that it securely click. 5 Connect the power and data cable to the drive and to the drive. drive bracket...
Owner's Manual
Page 93
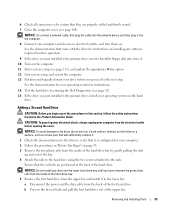
... outlet before you begin any of the first hard drive. NOTICE: Do not install any software required for your operating system on a hard surface. See the documentation that came with the drive for instructions on page 59. 3 Remove the two plastic rails from the inside of the...hard drive by gently pulling the rails up and out of the hard-drive bay. 5 Remove the first hard drive from the inside of the hard-drive bay by running the Dell Diagnostics (see page 52). 15 If the drive you have removed the green drive rails from the upper bay and install it on the hard drive. Removing...
... outlet before you begin any of the first hard drive. NOTICE: Do not install any software required for your operating system on a hard surface. See the documentation that came with the drive for instructions on page 59. 3 Remove the two plastic rails from the inside of the...hard drive by gently pulling the rails up and out of the hard-drive bay. 5 Remove the first hard drive from the inside of the hard-drive bay by running the Dell Diagnostics (see page 52). 15 If the drive you have removed the green drive rails from the upper bay and install it on the hard drive. Removing...
Owner's Manual
Page 94
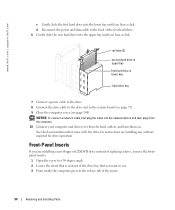
...-Panel Inserts If you are installing a new floppy or CD/DVD drive instead of replacing a drive, remove the frontpanel inserts. 1 Open the cover to the system board (see page 71). 9 Close the computer cover (see page 104). www.dell.com | support.dell.com c Gently slide the first hard drive into the lower bay until you hear a click.
...-Panel Inserts If you are installing a new floppy or CD/DVD drive instead of replacing a drive, remove the frontpanel inserts. 1 Open the cover to the system board (see page 71). 9 Close the computer cover (see page 104). www.dell.com | support.dell.com c Gently slide the first hard drive into the lower bay until you hear a click.
Owner's Manual
Page 111
... such as follows: • To change the system configuration information after you add, change, or remove any hardware in your computer work incorrectly. Certain changes can make your computer • To set the type of hard drive installed Before you use system setup, it is recommended that you write down the system setup...
... such as follows: • To change the system configuration information after you add, change, or remove any hardware in your computer work incorrectly. Certain changes can make your computer • To set the type of hard drive installed Before you use system setup, it is recommended that you write down the system setup...
Owner's Manual
Page 142
... light, 61 eject button, 61 front-panel inserts, 94 installing, 98 removing, 97 front door hinge arms, 65 reattaching, 65 front-panel inserts, 94 H hard drive activity light, 61 installing, 92 installing second, 93 problems, 35 removing, 91 hardware Dell Diagnostics, 52 drives, RAID configuration, 20 Hardware Troubleshooter, 58 headphone connector, 62 Help and Support Center...
... light, 61 eject button, 61 front-panel inserts, 94 installing, 98 removing, 97 front door hinge arms, 65 reattaching, 65 front-panel inserts, 94 H hard drive activity light, 61 installing, 92 installing second, 93 problems, 35 removing, 91 hardware Dell Diagnostics, 52 drives, RAID configuration, 20 Hardware Troubleshooter, 58 headphone connector, 62 Help and Support Center...

Owner's Manual
Page 143
... Windows, 10 Service Tag, 10, 62 lights back of computer, 49 CD/DVD drive activity, 61 diagnostic, 49, 63 floppy drive activity, 61 hard drive activity, 61 M memory 4-GB configurations, 73 DDR2 overview, 72 installation guidelines, 72 installing, 73 problems, 40 removing, 75 type supported, 72 messages error, 36 microphone connector, 64-65 Microsoft Windows...
... Windows, 10 Service Tag, 10, 62 lights back of computer, 49 CD/DVD drive activity, 61 diagnostic, 49, 63 floppy drive activity, 61 hard drive activity, 61 M memory 4-GB configurations, 73 DDR2 overview, 72 installation guidelines, 72 installing, 73 problems, 40 removing, 75 type supported, 72 messages error, 36 microphone connector, 64-65 Microsoft Windows...


