Dell Dimension 8200 Systems Solutions Guide
Page 3
Contents Safety Instructions 9 When Using Your Computer 9 Ergonomic Computing Habits 10 When Working Inside Your Computer 12 Protecting Against Electrostatic Discharge 13 Battery Disposal 14 1 Setting Up Connecting a Printer 16 Parallel Printer 16 USB Printer 17 Installing the Printer Driver 18 Transferring Information to a New Computer (Windows XP Only 19 Setting Up a Home and Office Network (Windows XP Only 19 Turning Off the Computer 20 Windows XP 20 Windows Me and Windows 2000 20 2 Solving Problems Finding Solutions 22 Accessing Help Files 24 Power Problems 25 Contents 3
Contents Safety Instructions 9 When Using Your Computer 9 Ergonomic Computing Habits 10 When Working Inside Your Computer 12 Protecting Against Electrostatic Discharge 13 Battery Disposal 14 1 Setting Up Connecting a Printer 16 Parallel Printer 16 USB Printer 17 Installing the Printer Driver 18 Transferring Information to a New Computer (Windows XP Only 19 Setting Up a Home and Office Network (Windows XP Only 19 Turning Off the Computer 20 Windows XP 20 Windows Me and Windows 2000 20 2 Solving Problems Finding Solutions 22 Accessing Help Files 24 Power Problems 25 Contents 3
Dell Dimension 8200 Systems Solutions Guide
Page 9
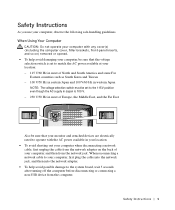
...then into the network adapter. • To help avoid damaging your computer, be sure that the voltage selection switch is set to match the AC power available at your location: - 115 V/60 Hz in most of North and South America and some Far Eastern countries such as South Korea and ...the computer cover, filler brackets, front-panel inserts, and so on) removed or opened. • To help avoid possible damage to operate with the AC power available in most of your computer, and then from the computer. When Using Your Computer CAUTION: Do not operate your computer, observe the following safe...
...then into the network adapter. • To help avoid damaging your computer, be sure that the voltage selection switch is set to match the AC power available at your location: - 115 V/60 Hz in most of North and South America and some Far Eastern countries such as South Korea and ...the computer cover, filler brackets, front-panel inserts, and so on) removed or opened. • To help avoid possible damage to operate with the AC power available in most of your computer, and then from the computer. When Using Your Computer CAUTION: Do not operate your computer, observe the following safe...
Dell Dimension 8200 Systems Solutions Guide
Page 10
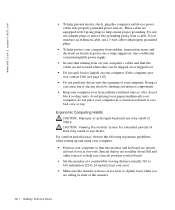
... periods of the monitor. 10 Safet y Ins tr uct ions If the computer gets wet, contact Dell (see page 102). • Do not push any objects into properly grounded power sources. do not block cooling vents. For comfort and efficiency, observe the following ergonomic guidelines when setting... computer so that the cables are directly in electrical power, use adapter plugs or remove the grounding prong from radiators and heat sources. www.dell.com | support.dell.com • To help prevent electric shock, plug the computer and device power cables into the openings of you as you work...
... periods of the monitor. 10 Safet y Ins tr uct ions If the computer gets wet, contact Dell (see page 102). • Do not push any objects into properly grounded power sources. do not block cooling vents. For comfort and efficiency, observe the following ergonomic guidelines when setting... computer so that the cables are directly in electrical power, use adapter plugs or remove the grounding prong from radiators and heat sources. www.dell.com | support.dell.com • To help prevent electric shock, plug the computer and device power cables into the openings of you as you work...

Dell Dimension 8200 Systems Solutions Guide
Page 13
...disconnect a cable, pull on a card. You can also take note of a new battery exploding if it in your computer, and then press the power button to reduce the potential for personal injury or shock. Saf et y I n s tr uc t ion s 13 As you pull connectors apart.... In addition, take the following steps to prevent static damage: • Do not remove items from the computer. 5 Disconnect the power cable to discharge static electricity from your computer. Protecting Against Electrostatic Discharge To prevent static damage, discharge static electricity from their antistatic packing ...
...disconnect a cable, pull on a card. You can also take note of a new battery exploding if it in your computer, and then press the power button to reduce the potential for personal injury or shock. Saf et y I n s tr uc t ion s 13 As you pull connectors apart.... In addition, take the following steps to prevent static damage: • Do not remove items from the computer. 5 Disconnect the power cable to discharge static electricity from your computer. Protecting Against Electrostatic Discharge To prevent static damage, discharge static electricity from their antistatic packing ...
Dell Dimension 8200 Systems Solutions Guide
Page 20
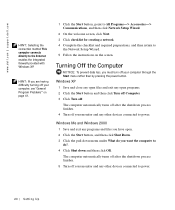
... close any open files and exit any programs and files you want the computer to power. HINT: If you must turn off your computer through the Start menu rather than by pressing the power button. Turning Off the Computer NOTICE: To prevent data loss, you are having difficulty... programs. 2 Click the Start button and then click Turn off Computer. 3 Click Turn off. www.dell.com | support.dell.com HINT: Selecting the connection method This computer connects directly to power. 20 Sett ing Up The computer automatically turns off after the shutdown process finishes. 5 Turn off your...
... close any open files and exit any programs and files you want the computer to power. HINT: If you must turn off your computer through the Start menu rather than by pressing the power button. Turning Off the Computer NOTICE: To prevent data loss, you are having difficulty... programs. 2 Click the Start button and then click Turn off Computer. 3 Click Turn off. www.dell.com | support.dell.com HINT: Selecting the connection method This computer connects directly to power. 20 Sett ing Up The computer automatically turns off after the shutdown process finishes. 5 Turn off your...

Dell Dimension 8200 Systems Solutions Guide
Page 21
SECTION 2 Solving Problems Finding Solutions Accessing Help Files Power Problems Start-Up Error Messages Video and Monitor Problems Sound and Speaker Problems Printer Problems Scanner Problems Modem Problems Mouse Problems Keyboard Problems Drive Problems Network Problems Microsoft® Windows® Error Messages General Program Problems Internet Connection Problems E-Mail Problems Resolving Other Technical Problems Reinstalling Drivers Resolving Software and Hardware Incompatibilities Using System Restore Reinstalling Windows XP Reinstalling Windows Me Reinstalling Windows 2000
SECTION 2 Solving Problems Finding Solutions Accessing Help Files Power Problems Start-Up Error Messages Video and Monitor Problems Sound and Speaker Problems Printer Problems Scanner Problems Modem Problems Mouse Problems Keyboard Problems Drive Problems Network Problems Microsoft® Windows® Error Messages General Program Problems Internet Connection Problems E-Mail Problems Resolving Other Technical Problems Reinstalling Drivers Resolving Software and Hardware Incompatibilities Using System Restore Reinstalling Windows XP Reinstalling Windows Me Reinstalling Windows 2000
Dell Dimension 8200 Systems Solutions Guide
Page 25
... Me (Help in standby mode-press a key on . Be sure that the power cable is defective. Swap the computer and monitor power cables to the same electrical outlet. Call Dell for information on or is lit or blinking, the computer has power. TE S T T H E E L E C T R I N T E R F E R E NC E - C H E C K T H E PO W E R P R O P E R T I T O R P O W E R C A B L E S - Start-Up Error Messages O P E R A T IN G S Y S T E M N O T F O U N D - CONNECT THE COMPUTER DIRECTLY...
... Me (Help in standby mode-press a key on . Be sure that the power cable is defective. Swap the computer and monitor power cables to the same electrical outlet. Call Dell for information on or is lit or blinking, the computer has power. TE S T T H E E L E C T R I N T E R F E R E NC E - C H E C K T H E PO W E R P R O P E R T I T O R P O W E R C A B L E S - Start-Up Error Messages O P E R A T IN G S Y S T E M N O T F O U N D - CONNECT THE COMPUTER DIRECTLY...
Dell Dimension 8200 Systems Solutions Guide
Page 26
...dell.com | support.dell.com I G HT - Remove the floppy disk and restart the computer. Ensure that you are using a video extension cable and removing the cable solves the problem, the cable is defective. C H E C K T H E PO W E R L I NS E R T B O O T A B L E M E DI A - TE S T T H E V I D E O EX T E N S I O N C A B L E ( I T O R P O W E R C A B L E S - If you firmly pressed the monitor power...cable connectors have missing pins, but not bent pins). P R E S S T HE M O N I C A L O U T L E T - When the power light is blank C H E C K T H E V I D E O C A B L E C O N N E C T I O N - ...
...dell.com | support.dell.com I G HT - Remove the floppy disk and restart the computer. Ensure that you are using a video extension cable and removing the cable solves the problem, the cable is defective. C H E C K T H E PO W E R L I NS E R T B O O T A B L E M E DI A - TE S T T H E V I D E O EX T E N S I O N C A B L E ( I T O R P O W E R C A B L E S - If you firmly pressed the monitor power...cable connectors have missing pins, but not bent pins). P R E S S T HE M O N I C A L O U T L E T - When the power light is blank C H E C K T H E V I D E O C A B L E C O N N E C T I O N - ...

Dell Dimension 8200 Systems Solutions Guide
Page 27
...60 cm) away from the monitor. MOVE THE MONITOR AWAY FROM EXTERNAL POWER SOURCES - Turn off nearby devices to appear "shaky." See the ...- See the documentation that the subwoofer is difficult to read A D J U S T T H E C O N T R A S T A N D B R I T O R S E L F - If all four lights below the serial connector are not green, call Dell for interference. See the documentation that came with your speaker system includes a subwoofer, ensure that came with your monitor. RO T A T E T H E M O N I T O R T O F A C E A D I F F E R E N T D I R E C T I G H T S -
...60 cm) away from the monitor. MOVE THE MONITOR AWAY FROM EXTERNAL POWER SOURCES - Turn off nearby devices to appear "shaky." See the ...- See the documentation that the subwoofer is difficult to read A D J U S T T H E C O N T R A S T A N D B R I T O R S E L F - If all four lights below the serial connector are not green, call Dell for interference. See the documentation that came with your speaker system includes a subwoofer, ensure that came with your monitor. RO T A T E T H E M O N I T O R T O F A C E A D I F F E R E N T D I R E C T I G H T S -
Dell Dimension 8200 Systems Solutions Guide
Page 31
... Print to the following port(s): setting is unlocked if it with the scanner for the correct phone number). See page 18. Ensure that the scanner power cable is firmly connected to the following port(s): setting is turned on. C H E C K T H E S C A N N E R C A B L E C O N N...T I O N - S olving Pr oblems 31 Ensure that the electrical outlet is firmly connected to the computer and to Settings, and then click Printers. Dell does not cover the scanner's warranty. Ensure that the scanner cable is working electrical power source and that came with another device, such as a lamp.
... Print to the following port(s): setting is unlocked if it with the scanner for the correct phone number). See page 18. Ensure that the scanner power cable is firmly connected to the following port(s): setting is turned on. C H E C K T H E S C A N N E R C A B L E C O N N...T I O N - S olving Pr oblems 31 Ensure that the electrical outlet is firmly connected to the computer and to Settings, and then click Printers. Dell does not cover the scanner's warranty. Ensure that the scanner cable is working electrical power source and that came with another device, such as a lamp.
Dell Dimension 8200 Systems Solutions Guide
Page 34
... MOUSE BEFORE TURNING ON THE C O M P U T E R, R E C O N N E C T T H E M O U S E C A B L E 1 Press to subscribe. If the mouse is connected after the power is turned on , the mouse will appear to the front of the computer may cause erratic operation, and an error message may appear when the....dell.com BE SURE THAT YOU HAVE SUBSCRIBED TO AN INTERNET SERVICE P RO VI DE R - Contact an Internet service provider to display the Start menu. 2 In Windows XP, type u, and then type u again. C H E C K F O R I N T E R R U P T R E Q U E S T C O N F L I N G O N T H E C OM P U T ER, REMOVE THE POWER ...
... MOUSE BEFORE TURNING ON THE C O M P U T E R, R E C O N N E C T T H E M O U S E C A B L E 1 Press to subscribe. If the mouse is connected after the power is turned on , the mouse will appear to the front of the computer may cause erratic operation, and an error message may appear when the....dell.com BE SURE THAT YOU HAVE SUBSCRIBED TO AN INTERNET SERVICE P RO VI DE R - Contact an Internet service provider to display the Start menu. 2 In Windows XP, type u, and then type u again. C H E C K F O R I N T E R R U P T R E Q U E S T C O N F L I N G O N T H E C OM P U T ER, REMOVE THE POWER ...

Dell Dimension 8200 Systems Solutions Guide
Page 41
...up and you are unable to get a response by pressing a key on your keyboard or moving your mouse, press and hold the power button for at least 8 to solve the problem. Many software manufacturers maintain websites with information that may run when you to 10 ...seconds until the computer turns off . A solid blue screen appears TU R N T H E C O MP U T E R O F F - If your mouse, press and hold the power button for at least 8 to perform a Microsoft Windows shutdown. The solid blue screen appears because you restart the computer. HINT: ScanDisk may help you restart...
...up and you are unable to get a response by pressing a key on your keyboard or moving your mouse, press and hold the power button for at least 8 to solve the problem. Many software manufacturers maintain websites with information that may run when you to 10 ...seconds until the computer turns off . A solid blue screen appears TU R N T H E C O MP U T E R O F F - If your mouse, press and hold the power button for at least 8 to perform a Microsoft Windows shutdown. The solid blue screen appears because you restart the computer. HINT: ScanDisk may help you restart...
Dell Dimension 8200 Systems Solutions Guide
Page 62
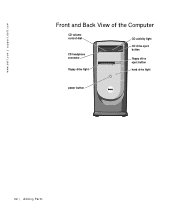
www.dell.com | support.dell.com Front and Back View of the Computer CD volume control dial CD headphone connector floppy drive light CD activity light CD drive eject button floppy drive eject button hard drive light power button 62 Adding Parts
www.dell.com | support.dell.com Front and Back View of the Computer CD volume control dial CD headphone connector floppy drive light CD activity light CD drive eject button floppy drive eject button hard drive light power button 62 Adding Parts

Dell Dimension 8200 Systems Solutions Guide
Page 63
Windows license label* USB 1.1 connectors service tag headphone connector *The label may be located on how to "break away" if it is lifted up too far. HINT: To prevent damage to your computer power connector voltage selection switch parallel connector serial connector keyboard connector USB 1.1 connectors microphone connector line-out connector line-in connector mouse connector video connector Addi ng Part s 63 For instructions on the side of your computer, the front door is designed to reattach the door, see page 64.
Windows license label* USB 1.1 connectors service tag headphone connector *The label may be located on how to "break away" if it is lifted up too far. HINT: To prevent damage to your computer power connector voltage selection switch parallel connector serial connector keyboard connector USB 1.1 connectors microphone connector line-out connector line-in connector mouse connector video connector Addi ng Part s 63 For instructions on the side of your computer, the front door is designed to reattach the door, see page 64.
Dell Dimension 8200 Systems Solutions Guide
Page 65
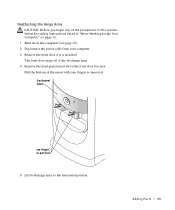
... this section, follow the safety instructions listed in "When Working Inside Your Computer" on page 12. 1 Shut down the computer (see page 20). 2 Disconnect the power cable from your fingers to the horizontal position. The front door snaps off of the insert with your computer. 3 Remove the front door, if it...
... this section, follow the safety instructions listed in "When Working Inside Your Computer" on page 12. 1 Shut down the computer (see page 20). 2 Disconnect the power cable from your fingers to the horizontal position. The front door snaps off of the insert with your computer. 3 Remove the front door, if it...

Dell Dimension 8200 Systems Solutions Guide
Page 67
10 Reconnect the power cable to ground the system board. CAUTION: To guard against electrical shock, always unplug your computer. 11 Reattach the front door as described on page ... hand. Opening the Computer Cover CAUTION: Before you begin any attached devices and disconnect them from their electrical outlets. 3 Disconnect the computer power cable from the wall outlet, and then press the power button to your computer from the electrical outlet before opening the cover. 1 Shut down the computer (see page 20).
10 Reconnect the power cable to ground the system board. CAUTION: To guard against electrical shock, always unplug your computer. 11 Reattach the front door as described on page ... hand. Opening the Computer Cover CAUTION: Before you begin any attached devices and disconnect them from their electrical outlets. 3 Disconnect the computer power cable from the wall outlet, and then press the power button to your computer from the electrical outlet before opening the cover. 1 Shut down the computer (see page 20).

Dell Dimension 8200 Systems Solutions Guide
Page 69
Addi ng Part s 69 drive cables (page 84) power cables (page 84) power supply computer cover* (page 67 and page 90) hard drive (page 81) back of computer system board (page 70) filler brackets for empty card-cage slots (4) (page 71 and page 73) * Depending on the types of drives installed in your computer, the cover may not open as widely as shown in the figure.
Addi ng Part s 69 drive cables (page 84) power cables (page 84) power supply computer cover* (page 67 and page 90) hard drive (page 81) back of computer system board (page 70) filler brackets for empty card-cage slots (4) (page 71 and page 73) * Depending on the types of drives installed in your computer, the cover may not open as widely as shown in the figure.

Dell Dimension 8200 Systems Solutions Guide
Page 70
www.dell.com | support.dell.com floppy drive connector (FLOPPY) main power connector (MAIN POWER) memory module connectors (RIMM3, RIMM4) page 75 microprocessor fan connector (FAN2) memory module connectors (RIMM1, RIMM2) page 75 System Board CD drive connector (IDE SEC) ... 81 password jumper (PSWD) page 98 configuration jumper (CLR CM) AGP slot connector (J7C1) page 80 PCI card connectors (PCI1-PCI4) page 71 system board power light (PWR LED) front panel audio cable connector (FNT PNL AUD) telephony voice modem connector (TELE)* CD audio connector (CD)* back of computer *On computers...
www.dell.com | support.dell.com floppy drive connector (FLOPPY) main power connector (MAIN POWER) memory module connectors (RIMM3, RIMM4) page 75 microprocessor fan connector (FAN2) memory module connectors (RIMM1, RIMM2) page 75 System Board CD drive connector (IDE SEC) ... 81 password jumper (PSWD) page 98 configuration jumper (CLR CM) AGP slot connector (J7C1) page 80 PCI card connectors (PCI1-PCI4) page 71 system board power light (PWR LED) front panel audio cable connector (FNT PNL AUD) telephony voice modem connector (TELE)* CD audio connector (CD)* back of computer *On computers...

Dell Dimension 8200 Systems Solutions Guide
Page 71
... page 67). 5 To raise the securing lever, press the tab until it from the network wall jack. 3 Disconnect the computer power cable from the wall outlet, and then press the power button to provide a better view of the inside of the procedures in this section, follow the safety instructions listed in "When...
... page 67). 5 To raise the securing lever, press the tab until it from the network wall jack. 3 Disconnect the computer power cable from the wall outlet, and then press the power button to provide a better view of the inside of the procedures in this section, follow the safety instructions listed in "When...
Dell Dimension 8200 Systems Solutions Guide
Page 73
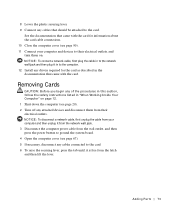
... the card. 6 To raise the securing lever, press the tab until it from the network wall jack. 3 Disconnect the computer power cable from the wall outlet, and then press the power button to their electrical outlets. Removing Cards CAUTION: Before you begin any of the procedures in this section, follow the safety...
... the card. 6 To raise the securing lever, press the tab until it from the network wall jack. 3 Disconnect the computer power cable from the wall outlet, and then press the power button to their electrical outlets. Removing Cards CAUTION: Before you begin any of the procedures in this section, follow the safety...


