Dell Dimension 8200 Systems Solutions Guide
Page 6
...Party" Software and Peripherals 102 Contacting Dell 102 Returning Items for Warranty Repair or Credit 117 Regulatory Information 117 NOM Information (Mexico Only 119 Limited Warranties and Return Policy 120 One-Year Limited Warranty (U.S. Only 120 Two-Year Limited Warranty (U.S. Removing Cards 73 Adding Memory 75 RDRAM Overview 76 Replacing the AGP... Cover 90 4 Appendix Specifications 92 Standard Settings 96 Viewing Settings 97 System Setup Program Screens 98 Clearing Forgotten Passwords 98 Replacing the Battery 99 Dell Technical Support Policy (U.S. Only 122 6 Contents
...Party" Software and Peripherals 102 Contacting Dell 102 Returning Items for Warranty Repair or Credit 117 Regulatory Information 117 NOM Information (Mexico Only 119 Limited Warranties and Return Policy 120 One-Year Limited Warranty (U.S. Only 120 Two-Year Limited Warranty (U.S. Removing Cards 73 Adding Memory 75 RDRAM Overview 76 Replacing the AGP... Cover 90 4 Appendix Specifications 92 Standard Settings 96 Viewing Settings 97 System Setup Program Screens 98 Clearing Forgotten Passwords 98 Replacing the Battery 99 Dell Technical Support Policy (U.S. Only 122 6 Contents
Dell Dimension 8200 Systems Solutions Guide
Page 40
A FILENAME CANNOT CONTAIN ANY OF THE FOLLOWING CH A RAC T ER S Do not use a larger-capacity disk. NOT ENOUGH MEMORY OR RESOURCES. In some cases, you might have too many programs open. If so, try again. A R E Q U I B L E ..... 2 Double-click the Add/Remove Programs icon. 3 Select the program that you want to remove. 4 Click Add/Remove (click Change/Remove in filenames. www.dell.com | support.dell.com Microsoft® Windows® Error Messages x: \ I S N O T A C C E S S I R E D . T H E D E V I C E I VE - THE FILE BEING COPIED IS TOO LARGE FOR THE DESTINATION DR I S N O T R...
A FILENAME CANNOT CONTAIN ANY OF THE FOLLOWING CH A RAC T ER S Do not use a larger-capacity disk. NOT ENOUGH MEMORY OR RESOURCES. In some cases, you might have too many programs open. If so, try again. A R E Q U I B L E ..... 2 Double-click the Add/Remove Programs icon. 3 Select the program that you want to remove. 4 Click Add/Remove (click Change/Remove in filenames. www.dell.com | support.dell.com Microsoft® Windows® Error Messages x: \ I S N O T A C C E S S I R E D . T H E D E V I C E I VE - THE FILE BEING COPIED IS TOO LARGE FOR THE DESTINATION DR I S N O T R...
Dell Dimension 8200 Systems Solutions Guide
Page 48
... tab. 4 In the Device Manager list, check for the specific device in the Device Manager list. 7 Double-click the icon for conflicts with ? www.dell.com | support.dell.com You can also use the Windows Me Hardware Troubleshooter. Resolve these conflicts before checking specific devices. 6 Double-click the malfunctioning device type in... running Windows Me: 1 Click the Start button, point to be reconfigured or removed from the Device Manager. list, click Hardware & system device problems, click Hardware, memory, & others, and then click Hardware Troubleshooter.
... tab. 4 In the Device Manager list, check for the specific device in the Device Manager list. 7 Double-click the icon for conflicts with ? www.dell.com | support.dell.com You can also use the Windows Me Hardware Troubleshooter. Resolve these conflicts before checking specific devices. 6 Double-click the malfunctioning device type in... running Windows Me: 1 Click the Start button, point to be reconfigured or removed from the Device Manager. list, click Hardware & system device problems, click Hardware, memory, & others, and then click Hardware Troubleshooter.

Dell Dimension 8200 Systems Solutions Guide
Page 61
SECTION 3 Adding Parts Front and Back View of the Computer Reattaching the Front Door and Hinge Arms Opening the Computer Cover Looking Inside Your Computer Adding Cards Removing Cards Adding Memory Replacing the AGP Card Adding a Second Hard Drive Adding Other Drives Closing the Computer Cover
SECTION 3 Adding Parts Front and Back View of the Computer Reattaching the Front Door and Hinge Arms Opening the Computer Cover Looking Inside Your Computer Adding Cards Removing Cards Adding Memory Replacing the AGP Card Adding a Second Hard Drive Adding Other Drives Closing the Computer Cover

Dell Dimension 8200 Systems Solutions Guide
Page 70
www.dell.com | support.dell.com floppy drive connector (FLOPPY) main power connector (MAIN POWER) memory module connectors (RIMM3, RIMM4) page 75 microprocessor fan connector (FAN2) memory module connectors (RIMM1, RIMM2) page 75 System Board CD drive connector (IDE SEC) page 84 battery socket (BATTERY) page 99 microprocessor connector (JE21) front panel ...
www.dell.com | support.dell.com floppy drive connector (FLOPPY) main power connector (MAIN POWER) memory module connectors (RIMM3, RIMM4) page 75 microprocessor fan connector (FAN2) memory module connectors (RIMM1, RIMM2) page 75 System Board CD drive connector (IDE SEC) page 84 battery socket (BATTERY) page 99 microprocessor connector (JE21) front panel ...
Dell Dimension 8200 Systems Solutions Guide
Page 75
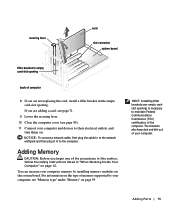
...Part s 75 If you are not replacing the card, install a filler bracket in "When Working Inside Your Computer" on page 12. Adding Memory CAUTION: Before you begin any of the procedures in this section, follow the safety instructions listed in the empty card-slot opening back of computer... 8 If you are adding a card, see page 71. 9 Lower the securing lever. 10 Close the computer cover (see "Memory type" under "Memory" on page 93. HINT: Installing filler brackets over empty cardslot openings is necessary to their electrical outlets, and turn them on. securing lever ...
...Part s 75 If you are not replacing the card, install a filler bracket in "When Working Inside Your Computer" on page 12. Adding Memory CAUTION: Before you begin any of the procedures in this section, follow the safety instructions listed in the empty card-slot opening back of computer... 8 If you are adding a card, see page 71. 9 Lower the securing lever. 10 Close the computer cover (see "Memory type" under "Memory" on page 93. HINT: Installing filler brackets over empty cardslot openings is necessary to their electrical outlets, and turn them on. securing lever ...
Dell Dimension 8200 Systems Solutions Guide
Page 76
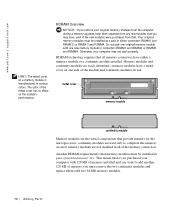
.... metal cover memory module continuity module Memory modules are easily identified-memory modules have a metal cover on one new memory module in connectors RIMM1 and RIMM2 or RIMM3 and RIMM4. www.dell.com | support.dell.com HINT: The metal cover on a memory module is that memory modules must be... installed as a pair in either a memory module or a continuity module installed. Another RDRAM requirement is manufactured in all memory connectors have , even if ...
.... metal cover memory module continuity module Memory modules are easily identified-memory modules have a metal cover on one new memory module in connectors RIMM1 and RIMM2 or RIMM3 and RIMM4. www.dell.com | support.dell.com HINT: The metal cover on a memory module is that memory modules must be... installed as a pair in either a memory module or a continuity module installed. Another RDRAM requirement is manufactured in all memory connectors have , even if ...

Dell Dimension 8200 Systems Solutions Guide
Page 77
...RIMM3 and RIMM4 or • A pair of matched memory modules installed in connectors RIMM1 and RIMM2 and another matched pair installed in connectors RIMM3 and RIMM4 continuity modules in connectors RIMM3 and RIMM4 matched pair of memory modules in connectors RIMM1 and RIMM2 back of computer matched... pair of memory modules in connectors RIMM3 and RIMM4 matched pair of memory modules in connectors RIMM1 and RIMM2 back of computer Addi ng Part ...
...RIMM3 and RIMM4 or • A pair of matched memory modules installed in connectors RIMM1 and RIMM2 and another matched pair installed in connectors RIMM3 and RIMM4 continuity modules in connectors RIMM3 and RIMM4 matched pair of memory modules in connectors RIMM1 and RIMM2 back of computer matched... pair of memory modules in connectors RIMM3 and RIMM4 matched pair of memory modules in connectors RIMM1 and RIMM2 back of computer Addi ng Part ...
Dell Dimension 8200 Systems Solutions Guide
Page 78
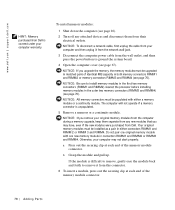
... up. NOTICE: To disconnect a network cable, first unplug the cable from your original memory modules from the computer during a memory upgrade, keep them from Dell. NOTICE: If you upgrade the memory, the memory modules must be upgraded in either a memory module or a continuity module. To install memory modules: 1 Shut down the computer (see page 67). NOTICE: All...
... up. NOTICE: To disconnect a network cable, first unplug the cable from your original memory modules from the computer during a memory upgrade, keep them from Dell. NOTICE: If you upgrade the memory, the memory modules must be upgraded in either a memory module or a continuity module. To install memory modules: 1 Shut down the computer (see page 67). NOTICE: All...

Dell Dimension 8200 Systems Solutions Guide
Page 79
... RIMM1 and RIMM2 securing clips (2) notches (2) memory or continuity module connector cutouts (2) step 6 step 7 step 8 7 Align the notches on the bottom of the module. 9 Close the computer cover (see page 90). 10 ... clips snap into the cutouts at each end of the module with the crossbars in the connector. Press firmly on . NOTICE: To avoid breaking the memory module, do not press near the middle of the module. 8 Insert the module straight down into the connector, ensuring that it snaps into place.
... RIMM1 and RIMM2 securing clips (2) notches (2) memory or continuity module connector cutouts (2) step 6 step 7 step 8 7 Align the notches on the bottom of the module. 9 Close the computer cover (see page 90). 10 ... clips snap into the cutouts at each end of the module with the crossbars in the connector. Press firmly on . NOTICE: To avoid breaking the memory module, do not press near the middle of the module. 8 Insert the module straight down into the connector, ensuring that it snaps into place.
Dell Dimension 8200 Systems Solutions Guide
Page 80
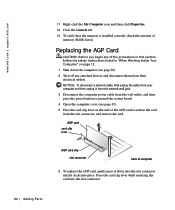
... clip slot connector back of the procedures in this section, follow the safety instructions listed in "When Working Inside Your Computer" on the side of memory (RAM) listed. Press the card clip lever while inserting the card into place. NOTICE: To disconnect a network cable, first unplug the cable from your ... | support.dell.com 11 Right-click the My Computer icon and then click Properties. 12 Click the General tab. 13 To verify that the memory is installed correctly, check the amount of the AGP card to ground the system board. 4 Open the computer cover (see page 67). 5 Press the card ...
... clip slot connector back of the procedures in this section, follow the safety instructions listed in "When Working Inside Your Computer" on the side of memory (RAM) listed. Press the card clip lever while inserting the card into place. NOTICE: To disconnect a network cable, first unplug the cable from your ... | support.dell.com 11 Right-click the My Computer icon and then click Properties. 12 Click the General tab. 13 To verify that the memory is installed correctly, check the amount of the AGP card to ground the system board. 4 Open the computer cover (see page 67). 5 Press the card ...
Dell Dimension 8200 Systems Solutions Guide
Page 93
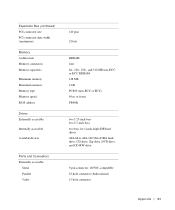
Expansion Bus (continued) PCI connector size PCI connector data width (maximum) Memory Architecture Memory connectors Memory capacities Minimum memory Maximum memory Memory type Memory speed BIOS address Drives Externally accessible Internally accessible Available devices Ports and Connectors Externally accessible: Serial Parallel Video 120 pins 32 bits RDRAM four 64-, ...
Expansion Bus (continued) PCI connector size PCI connector data width (maximum) Memory Architecture Memory connectors Memory capacities Minimum memory Maximum memory Memory type Memory speed BIOS address Drives Externally accessible Internally accessible Available devices Ports and Connectors Externally accessible: Serial Parallel Video 120 pins 32 bits RDRAM four 64-, ...

Dell Dimension 8200 Systems Solutions Guide
Page 146
... adjusting volume, 28 fixing problems, 28 speaker adjusting volume, 28 fixing problems, 28 specifications, 92 system board, 70 146 In d e x See memory reinstalling drivers, 44 Windows 2000, 57 Windows Me, 55 Windows XP, 53 ResourceCD, 44 return policy, 141 S safety instructions, 9 ScanDisk, 39 ...fixing problems, 39 setting up, 19 Network Setup Wizard, 19 I Internet fixing problems, 42 IRQ conflicts, 47 K keyboard fixing problems, 35 M memory adding, 75 connectors, 70 messages start-up, 25 Windows, 40 modem fixing problems, 32 O operating system reinstallation Windows 2000, 57 Windows Me, ...
... adjusting volume, 28 fixing problems, 28 speaker adjusting volume, 28 fixing problems, 28 specifications, 92 system board, 70 146 In d e x See memory reinstalling drivers, 44 Windows 2000, 57 Windows Me, 55 Windows XP, 53 ResourceCD, 44 return policy, 141 S safety instructions, 9 ScanDisk, 39 ...fixing problems, 39 setting up, 19 Network Setup Wizard, 19 I Internet fixing problems, 42 IRQ conflicts, 47 K keyboard fixing problems, 35 M memory adding, 75 connectors, 70 messages start-up, 25 Windows, 40 modem fixing problems, 32 O operating system reinstallation Windows 2000, 57 Windows Me, ...
Dell Dimension 8200 Systems Solutions Guide
Page 147
..., 102 warranty repair or credit, 117 Tell Me How help file accessing, 24 troubleshooting, 22 turning off the computer, 20 V video fixing problems, 26 video memory connector, 70 volume adjusting, 28 W warranty information, 120 Windows 2000 error messages, 40 Help, 24 printer, 30 reinstalling, 57 shutdown, 20 Windows Me error messages...
..., 102 warranty repair or credit, 117 Tell Me How help file accessing, 24 troubleshooting, 22 turning off the computer, 20 V video fixing problems, 26 video memory connector, 70 volume adjusting, 28 W warranty information, 120 Windows 2000 error messages, 40 Help, 24 printer, 30 reinstalling, 57 shutdown, 20 Windows Me error messages...


