Owner's Manual
Page 6
... and Disconnecting Drive Cables 74 Hard Drive 75 Removing a Hard Drive 76 Installing a Hard Drive 77 CD/DVD Drive 78 Removing a CD/DVD Drive 78 Installing a CD/DVD Drive 80 Media Card Reader 81 Removing a Media Card Reader 82 Installing a Media Card Reader 83 Floppy Drive (Optional 85 Removing a Floppy Drive 85 Installing a Floppy Drive 87 Modem 89 Replacing the Modem 89 Replacing the External...
... and Disconnecting Drive Cables 74 Hard Drive 75 Removing a Hard Drive 76 Installing a Hard Drive 77 CD/DVD Drive 78 Removing a CD/DVD Drive 78 Installing a CD/DVD Drive 80 Media Card Reader 81 Removing a Media Card Reader 82 Installing a Media Card Reader 83 Floppy Drive (Optional 85 Removing a Floppy Drive 85 Installing a Floppy Drive 87 Modem 89 Replacing the Modem 89 Replacing the External...
Owner's Manual
Page 50
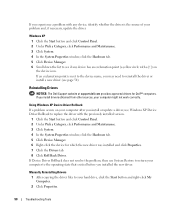
... any device has an exclamation point (a yellow circle with a [!]) on your computer after you install or update a driver, use System Restore to replace the driver with the previously installed version. 1 Click the Start button and click Control Panel. 2 Under Pick a Category, click Performance and Maintenance...Hardware tab. 5 Click Device Manager. 6 Right-click the device for Dell™ computers. If Device Driver Rollback does not resolve the problem, then use Windows XP Device Driver Rollback to return your hard drive, click the Start button and right-click My Computer. 2 Click ...
... any device has an exclamation point (a yellow circle with a [!]) on your computer after you install or update a driver, use System Restore to replace the driver with the previously installed version. 1 Click the Start button and click Control Panel. 2 Under Pick a Category, click Performance and Maintenance...Hardware tab. 5 Click Device Manager. 6 Right-click the device for Dell™ computers. If Device Driver Rollback does not resolve the problem, then use Windows XP Device Driver Rollback to return your hard drive, click the Start button and right-click My Computer. 2 Click ...
Owner's Manual
Page 73
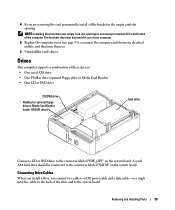
.... 5 Replace the computer cover (see page 93), reconnect the computer and devices to maintain FCC certification of these devices: • One serial ATA drive • One FlexBay drive (optional floppy drive or Media Card Reader) • One CD or DVD drive CD/DVD drive FlexBay for optional floppy drive or Media Card Reader (under CD/DVD drive) hard drive Connect...
.... 5 Replace the computer cover (see page 93), reconnect the computer and devices to maintain FCC certification of these devices: • One serial ATA drive • One FlexBay drive (optional floppy drive or Media Card Reader) • One CD or DVD drive CD/DVD drive FlexBay for optional floppy drive or Media Card Reader (under CD/DVD drive) hard drive Connect...
Owner's Manual
Page 75
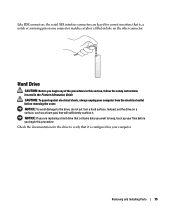
NOTICE: To avoid damage to the drive, do not set the drive on a surface, such as a foam pad, that it is , a notch or a missing pin on one connector matches a tab or a filled-in hole on a hard surface. that contains data you are keyed for your computer.... outlet before you begin this section, follow the safety instructions located in this procedure. Hard Drive CAUTION: Before you begin any of the procedures in the Product Information Guide. Like IDE connectors, the serial ATA interface connectors are replacing a hard drive that is configured for correct insertion;
NOTICE: To avoid damage to the drive, do not set the drive on a surface, such as a foam pad, that it is , a notch or a missing pin on one connector matches a tab or a filled-in hole on a hard surface. that contains data you are keyed for your computer.... outlet before you begin this section, follow the safety instructions located in this procedure. Hard Drive CAUTION: Before you begin any of the procedures in the Product Information Guide. Like IDE connectors, the serial ATA interface connectors are replacing a hard drive that is configured for correct insertion;

Owner's Manual
Page 77
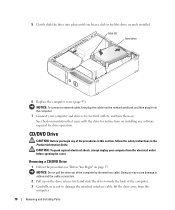
... Installing Parts 77 NOTE: If your computer. Snap the bracket onto the new drive. power cable serial ATA data cable 4 Check all connectors to the drive. Installing a Hard Drive 1 Unpack the replacement hard drive, and prepare it for installation. 2 Check the documentation for your replacement hard drive does not have the plastic guide bracket attached, remove the bracket from the...
... Installing Parts 77 NOTE: If your computer. Snap the bracket onto the new drive. power cable serial ATA data cable 4 Check all connectors to the drive. Installing a Hard Drive 1 Unpack the replacement hard drive, and prepare it for installation. 2 Check the documentation for your replacement hard drive does not have the plastic guide bracket attached, remove the bracket from the...
Owner's Manual
Page 78
...the procedures in the Product Information Guide. tabs (2) hard drive 6 Replace the computer cover (page 93). NOTICE: Do not pull the drive out of the computer. 3 Carefully, so as not to damage the attached interface cable, lift the drive away from the electrical outlet before opening the cover.... See the documentation that came with the drive for drive operation. 5 Gently slide the drive into the computer. 7 Connect your computer from the computer. 78 Removing...
...the procedures in the Product Information Guide. tabs (2) hard drive 6 Replace the computer cover (page 93). NOTICE: Do not pull the drive out of the computer. 3 Carefully, so as not to damage the attached interface cable, lift the drive away from the electrical outlet before opening the cover.... See the documentation that came with the drive for drive operation. 5 Gently slide the drive into the computer. 7 Connect your computer from the computer. 78 Removing...

Owner's Manual
Page 85
...: To guard against electrical shock, always unplug your computer works correctly by running the Dell Diagnostics (see page 78). 3 Pull up on the drive release latch and slide the drive toward the back of the procedures in this section, follow the safety instructions located in... to their electrical outlets, and turn them on page 55. 2 Remove the CD/DVD drive (see page 48). Removing a Floppy Drive 1 Follow the procedures in the Product Information Guide. 5 Replace the CD/DVD drive (see page 80). 6 Replace the hard drive (see page 77). 7 Replace the computer cover (see page 93).
...: To guard against electrical shock, always unplug your computer works correctly by running the Dell Diagnostics (see page 78). 3 Pull up on the drive release latch and slide the drive toward the back of the procedures in this section, follow the safety instructions located in... to their electrical outlets, and turn them on page 55. 2 Remove the CD/DVD drive (see page 48). Removing a Floppy Drive 1 Follow the procedures in the Product Information Guide. 5 Replace the CD/DVD drive (see page 80). 6 Replace the hard drive (see page 77). 7 Replace the computer cover (see page 93).

Owner's Manual
Page 108
... instructions located in the Product Information Guide. 1 Follow the procedures in the Product Information Guide. d Replace the jumper plug on pins 2 and 3. 4 Replace the hard drive (see page 77). 5 Replace the computer cover (see page 107). Computer, Keyboard, and Monitor CAUTION: Before you begin any of...safety instructions located in "Before You Begin" on page 55. 2 Remove the hard drive (see page 76). 3 Reset the current CMOS settings: a Locate the 3-pin CMOS jumper (RTCRST) on the system board (see "Replacing the Computer Cover" on pins 1 and 2 and wait approximately 5 seconds. ...
... instructions located in the Product Information Guide. 1 Follow the procedures in the Product Information Guide. d Replace the jumper plug on pins 2 and 3. 4 Replace the hard drive (see page 77). 5 Replace the computer cover (see page 107). Computer, Keyboard, and Monitor CAUTION: Before you begin any of...safety instructions located in "Before You Begin" on page 55. 2 Remove the hard drive (see page 76). 3 Reset the current CMOS settings: a Locate the 3-pin CMOS jumper (RTCRST) on the system board (see "Replacing the Computer Cover" on pins 1 and 2 and wait approximately 5 seconds. ...
Owner's Manual
Page 129
..., 45 diagnostics Dell, 48 lights, 45 display. Index A audio. See monitor documentation End User License Agreement, 9 ergonomics, 9 online, 10 Product Information Guide, 9 regulatory, 9 safety, 9 Setup Diagram, 9 warranty, 9 drivers about, 49 identifying, 49 drives hard drive, 75 installing floppy, 87 installing hard drive, 77 problems, 29 removing floppy, 85 removing hard drive, 76 serial ATA, 75 DVD drive problems, 30...
..., 45 diagnostics Dell, 48 lights, 45 display. Index A audio. See monitor documentation End User License Agreement, 9 ergonomics, 9 online, 10 Product Information Guide, 9 regulatory, 9 safety, 9 Setup Diagram, 9 warranty, 9 drivers about, 49 identifying, 49 drives hard drive, 75 installing floppy, 87 installing hard drive, 77 problems, 29 removing floppy, 85 removing hard drive, 76 serial ATA, 75 DVD drive problems, 30...

Service Manual
Page 35
... so by touching an unpainted metal surface on the computer. NOTICE: If you are replacing a hard drive that will sufficiently cushion it on a hard surface. 1 interface cable 2 interface connector Power Cable Connector To connect a drive using the power cable, locate the power connector on the power supply. 1 SATA power cable connector 3 power cable connector 2 power...
... so by touching an unpainted metal surface on the computer. NOTICE: If you are replacing a hard drive that will sufficiently cushion it on a hard surface. 1 interface cable 2 interface connector Power Cable Connector To connect a drive using the power cable, locate the power connector on the power supply. 1 SATA power cable connector 3 power cable connector 2 power...
Service Manual
Page 37
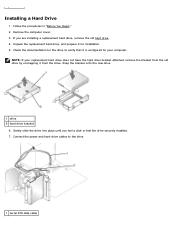
... verify that it is configured for installation. 5. Unpack the replacement hard drive, and prepare it from the old drive by unsnapping it for your replacement hard drive does not have the hard drive bracket attached, remove the bracket from the drive. Gently slide the drive into place until you are installing a replacement hard drive, remove the old hard drive. 4. If you feel a click or feel the...
... verify that it is configured for installation. 5. Unpack the replacement hard drive, and prepare it from the old drive by unsnapping it for your replacement hard drive does not have the hard drive bracket attached, remove the bracket from the drive. Gently slide the drive into place until you are installing a replacement hard drive, remove the old hard drive. 4. If you feel a click or feel the...
Service Manual
Page 38
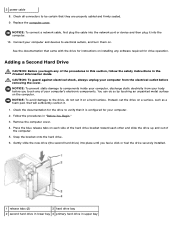
...until you feel a click or feel the drive securely installed. 1 release tabs (2) 3 hard drive bay 2 second hard drive in lower bay 4 primary hard drive in upper bay Replace the computer cover. You can do not set the drive on . Gently slide the new drive (the second hard drive) into the computer. 10. See the ...before you begin any software required for your computer and devices to verify that came with the drive for instructions on a hard surface. Snap the bracket onto the hard drive. 6. NOTICE: To connect a network cable, first plug the cable into the network port or...
...until you feel a click or feel the drive securely installed. 1 release tabs (2) 3 hard drive bay 2 second hard drive in lower bay 4 primary hard drive in upper bay Replace the computer cover. You can do not set the drive on . Gently slide the new drive (the second hard drive) into the computer. 10. See the ...before you begin any software required for your computer and devices to verify that came with the drive for instructions on a hard surface. Snap the bracket onto the hard drive. 6. NOTICE: To connect a network cable, first plug the cable into the network port or...


