Owner's Manual
Page 1
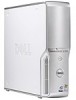
www.dell.com | support.dell.com Dell™ Dimension™ 5100C front-panel door (open) front-panel door (push to open) power button hard-drive light diagnostic lights headphone connector microphone connector IEEE 1394 connector optional floppy drive or media card reader* CD or DVD drive light USB 2.0 ...
www.dell.com | support.dell.com Dell™ Dimension™ 5100C front-panel door (open) front-panel door (push to open) power button hard-drive light diagnostic lights headphone connector microphone connector IEEE 1394 connector optional floppy drive or media card reader* CD or DVD drive light USB 2.0 ...

Owner's Manual
Page 23
The optical drive needs 1 or 2 MB of inactivity: 1 Click the Start button and click Control Panel. 2 Under Pick a category, click Performance and Maintenance. 3 Under or pick a Control Panel icon, click Power Options. When a Windows XP Professional computer is connected to a network, different options related to practice... Microsoft® Windows® XP power management features can use blank CD-RWs to its maximum capacity; When the computer exits from standby mode, press a key on and you can reduce the amount of inactivity, click the Start button, click Turn Off Computer, and ...
The optical drive needs 1 or 2 MB of inactivity: 1 Click the Start button and click Control Panel. 2 Under Pick a category, click Performance and Maintenance. 3 Under or pick a Control Panel icon, click Power Options. When a Windows XP Professional computer is connected to a network, different options related to practice... Microsoft® Windows® XP power management features can use blank CD-RWs to its maximum capacity; When the computer exits from standby mode, press a key on and you can reduce the amount of inactivity, click the Start button, click Turn Off Computer, and ...

Owner's Manual
Page 24
... a scheme from hibernate mode, press the power button. Each scheme has different settings for traveling. 24 Setting Up and Using Your Computer If you use your power settings on the Power Schemes tab, Advanced tab, and Hibernate tab. www.dell.com | support.dell.com Hibernate Mode Hibernate mode conserves power by copying system data to a reserved area...
... a scheme from hibernate mode, press the power button. Each scheme has different settings for traveling. 24 Setting Up and Using Your Computer If you use your power settings on the Power Schemes tab, Advanced tab, and Hibernate tab. www.dell.com | support.dell.com Hibernate Mode Hibernate mode conserves power by copying system data to a reserved area...

Owner's Manual
Page 25
...may appear to change the default settings for that scheme, unless you run your computer. For more information on power management options: 1 Click the Start button and click Help and Support. 2 In the Help and Support window, click Performance and maintenance. 3 In ... - To program these functions, click an option from standby mode or hibernate mode. • Program the power button to run without interruption (using no power conservation). • Minimal Power Management - If you want your Windows password before the monitor does, your computer to activate standby mode,...
...may appear to change the default settings for that scheme, unless you run your computer. For more information on power management options: 1 Click the Start button and click Help and Support. 2 In the Help and Support window, click Performance and maintenance. 3 In ... - To program these functions, click an option from standby mode or hibernate mode. • Program the power button to run without interruption (using no power conservation). • Minimal Power Management - If you want your Windows password before the monitor does, your computer to activate standby mode,...

Owner's Manual
Page 32
... CAUTION: Before you begin any of the IEEE 1394 device. ENSURE THAT THE POWER CABLE IS FIRMLY CONNECTED TO THE COMPUTER AND TO THE ELECTRICAL OUTLET 32 Solving ..., and try using the keyboard. Contact the manufacturer of the procedures in this section, follow the safety instructions located in the Product Information Guide. Contact Dell (see page 108). D E L L I E E E 1 3 9 4 D E V I T H A N O N - Connect a properly working keyboard to the computer. I F Y O U H A V E P R O B L E M S W I T H A D E L L I E E E 1 3 9 4 D E V I G H T S - The computer does not start up C H E ...
... CAUTION: Before you begin any of the IEEE 1394 device. ENSURE THAT THE POWER CABLE IS FIRMLY CONNECTED TO THE COMPUTER AND TO THE ELECTRICAL OUTLET 32 Solving ..., and try using the keyboard. Contact the manufacturer of the procedures in this section, follow the safety instructions located in the Product Information Guide. Contact Dell (see page 108). D E L L I E E E 1 3 9 4 D E V I T H A N O N - Connect a properly working keyboard to the computer. I F Y O U H A V E P R O B L E M S W I T H A D E L L I E E E 1 3 9 4 D E V I G H T S - The computer does not start up C H E ...

Owner's Manual
Page 33
... get a response by pressing a key on your keyboard or moving your mouse, press and hold the power button for at least 8 to 10 seconds until the computer turns off . If you are unable to perform... usually includes installation instructions in an environment similar to non-Windows XP operating system environments. 1 Click the Start button, point to All Programs→ Accessories, and then click Program Compatibility Wizard. 2 In the welcome screen, ... moving your mouse, press and hold the power button for at least 8 to 10 seconds until the computer turns off . Solving Problems 33
... get a response by pressing a key on your keyboard or moving your mouse, press and hold the power button for at least 8 to 10 seconds until the computer turns off . If you are unable to perform... usually includes installation instructions in an environment similar to non-Windows XP operating system environments. 1 Click the Start button, point to All Programs→ Accessories, and then click Program Compatibility Wizard. 2 In the welcome screen, ... moving your mouse, press and hold the power button for at least 8 to 10 seconds until the computer turns off . Solving Problems 33

Owner's Manual
Page 36
... O R - If the link integrity light is firmly inserted into both the network connector on the keyboard, move the mouse, or press the power button to verify that indicates no network communication exists. For a description of the procedures in this section, follow the safety instructions located in the Product ... T I N G - Press a key on the back of the computer and the network jack. See page 49. www.dell.com | support.dell.com Network Problems CAUTION: Before you begin any of the procedures in this section, follow the safety instructions located in the Product Information...
... O R - If the link integrity light is firmly inserted into both the network connector on the keyboard, move the mouse, or press the power button to verify that indicates no network communication exists. For a description of the procedures in this section, follow the safety instructions located in the Product ... T I N G - Press a key on the back of the computer and the network jack. See page 49. www.dell.com | support.dell.com Network Problems CAUTION: Before you begin any of the procedures in this section, follow the safety instructions located in the Product Information...

Owner's Manual
Page 40
www.dell.com | support.dell.com RUN THE SPEAKER DIAGNOSTICS - See page 49. No sound from headphones C H E C K T H E H E A D P H O N E C A B L E C O N N E C T I N D O W S V O L U M E C O N T R O L - Ensure that the sound... for your screen. SEE YOUR SPEAKER DOCUMENTATION FOR MORE INFORMATION. R E I N S T A L L T H E S O U N D D R I G H T - If the power light is off, firmly press the button to have missing pins.) C H E C K T H E M O N I T O R P O W E R L I V E R - If the power light is connected as shown on the keyboard or move the mouse. 40 Solving Problems If the...
www.dell.com | support.dell.com RUN THE SPEAKER DIAGNOSTICS - See page 49. No sound from headphones C H E C K T H E H E A D P H O N E C A B L E C O N N E C T I N D O W S V O L U M E C O N T R O L - Ensure that the sound... for your screen. SEE YOUR SPEAKER DOCUMENTATION FOR MORE INFORMATION. R E I N S T A L L T H E S O U N D D R I G H T - If the power light is off, firmly press the button to have missing pins.) C H E C K T H E M O N I T O R P O W E R L I V E R - If the power light is connected as shown on the keyboard or move the mouse. 40 Solving Problems If the...

Owner's Manual
Page 43
... a possible pre-BIOS failure electrical outlet and press the power has occurred. Continue until you troubleshoot a problem, your computer (see page 63). • If the problem persists, contact Dell (see page 108). Contact Dell (see page 108). Troubleshooting Tools 43 To help you have... two or more memory modules installed, remove the modules, reinstall one module (see page 57). button. If the computer starts normally, reinstall an ...
... a possible pre-BIOS failure electrical outlet and press the power has occurred. Continue until you troubleshoot a problem, your computer (see page 63). • If the problem persists, contact Dell (see page 108). Contact Dell (see page 108). Troubleshooting Tools 43 To help you have... two or more memory modules installed, remove the modules, reinstall one module (see page 57). button. If the computer starts normally, reinstall an ...

Owner's Manual
Page 53
...Computer" on page 53 and "Before Working Inside Your Computer" on page 53. • You have read the safety information in your Dell™ Product Information Guide. • A component can be replaced or-if purchased separately-installed by performing the removal procedure in your computer...following safety guidelines to help protect your computer from potential damage and to help ensure your operating system, press and hold the power button for removing and installing the components in reverse order. Unless otherwise noted, each procedure assumes that the computer and any open ...
...Computer" on page 53 and "Before Working Inside Your Computer" on page 53. • You have read the safety information in your Dell™ Product Information Guide. • A component can be replaced or-if purchased separately-installed by performing the removal procedure in your computer...following safety guidelines to help protect your computer from potential damage and to help ensure your operating system, press and hold the power button for removing and installing the components in reverse order. Unless otherwise noted, each procedure assumes that the computer and any open ...

Owner's Manual
Page 54
...and Installing Parts CAUTION: To guard against electrical shock, always unplug your computer from their electrical outlets, and then press the power button to servicing that both connectors are disconnecting this section, follow the safety instructions in on the locking tabs before you disconnect a..., periodically touch an unpainted metal surface to avoid bending any connector pins. if you are correctly oriented and aligned. www.dell.com | support.dell.com CAUTION: Before you begin working inside your computer, ground yourself by touching an unpainted metal surface, such as a...
...and Installing Parts CAUTION: To guard against electrical shock, always unplug your computer from their electrical outlets, and then press the power button to servicing that both connectors are disconnecting this section, follow the safety instructions in on the locking tabs before you disconnect a..., periodically touch an unpainted metal surface to avoid bending any connector pins. if you are correctly oriented and aligned. www.dell.com | support.dell.com CAUTION: Before you begin working inside your computer, ground yourself by touching an unpainted metal surface, such as a...

Owner's Manual
Page 56
..., the media card reader, and the optional floppy drive. 56 Removing and Installing Parts www.dell.com | support.dell.com 1 CD/DVD drive eject button 2 CD/DVD drive-activity light 3 USB 2.0 connectors (2) 4 IEEE 1394 connector 5 power button 6 power light 7 front-panel door release button 8 microphone connector 9 headphone connector 10 diagnostic lights 11 front-panel door Press this...
..., the media card reader, and the optional floppy drive. 56 Removing and Installing Parts www.dell.com | support.dell.com 1 CD/DVD drive eject button 2 CD/DVD drive-activity light 3 USB 2.0 connectors (2) 4 IEEE 1394 connector 5 power button 6 power light 7 front-panel door release button 8 microphone connector 9 headphone connector 10 diagnostic lights 11 front-panel door Press this...

Owner's Manual
Page 59
... you begin any telephone or telecommunication lines from the computer. 4 Disconnect your computer and all attached devices from their electrical outlets, and then press the power button to ground the system board. The LFE channel drives a subwoofer to the main speakers in the Product Information Guide. 1 Shut down your computer and then...
... you begin any telephone or telecommunication lines from the computer. 4 Disconnect your computer and all attached devices from their electrical outlets, and then press the power button to ground the system board. The LFE channel drives a subwoofer to the main speakers in the Product Information Guide. 1 Shut down your computer and then...

Owner's Manual
Page 61
CD/DVD drive drive release latch power supply and fan hard drive front-panel door power button system board heat sink and blower assembly Removing and Installing Parts 61 Inside View of Your Computer CAUTION: Before you begin any of the procedures in this section, follow the safety instructions in the Product Information Guide. CAUTION: To guard against electrical shock, always unplug your computer from the electrical outlet before opening the cover.
CD/DVD drive drive release latch power supply and fan hard drive front-panel door power button system board heat sink and blower assembly Removing and Installing Parts 61 Inside View of Your Computer CAUTION: Before you begin any of the procedures in this section, follow the safety instructions in the Product Information Guide. CAUTION: To guard against electrical shock, always unplug your computer from the electrical outlet before opening the cover.

Owner's Manual
Page 96
... the back panel (See "Diagnostic Lights" on page 43 for an explanation of the diagnostic light codes.) Standby power light AUX_PWR on page 36). www.dell.com | support.dell.com Controls and Lights Power control push button Power light green light - solid green for Japanese computers Backup battery 3-V CR2032 lithium coin cell 96 Appendix The computer...
... the back panel (See "Diagnostic Lights" on page 43 for an explanation of the diagnostic light codes.) Standby power light AUX_PWR on page 36). www.dell.com | support.dell.com Controls and Lights Power control push button Power light green light - solid green for Japanese computers Backup battery 3-V CR2032 lithium coin cell 96 Appendix The computer...

Owner's Manual
Page 104
...Place the jumper plug on pins 1 and 2. 3 Replace the computer cover (see page 91). b Remove the jumper plug from the electrical outlet, and press the power button to ground the system board. 8 Remove the computer cover (see page 59). 9 Locate the 3-pin password jumper (PSWD) on the system board (see page ...103) and attach the jumper to pins 2 and 3 to re-enable the password feature. 10 Replace the computer cover (see page 91). www.dell.com | support.dell.com 3 Replace the computer cover (see page 91). 4 Connect your computer and monitor to electrical outlets, and turn them on. 5 After the...
...Place the jumper plug on pins 1 and 2. 3 Replace the computer cover (see page 91). b Remove the jumper plug from the electrical outlet, and press the power button to ground the system board. 8 Remove the computer cover (see page 59). 9 Locate the 3-pin password jumper (PSWD) on the system board (see page ...103) and attach the jumper to pins 2 and 3 to re-enable the password feature. 10 Replace the computer cover (see page 91). www.dell.com | support.dell.com 3 Replace the computer cover (see page 91). 4 Connect your computer and monitor to electrical outlets, and turn them on. 5 After the...

