
Owner's Manual
Page 1
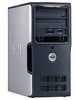
Dell™ Dimension™ 5000 Service Tag CD or DVD eject button CD or DVD activity light FlexBay for optional floppy drive or Media Card Reader microphone connector headphone connector diagnostic lights hard drive activity light power button USB 2.0 connectors (2) cover latch release power connector sound-card connectors card slots for PCI Express x16 (1), PCI (2), PCI Express x1 (1) USB 2.0 connectors (5) network adapter VGA video connector (integrated) serial connector parallel connector Model DCSM www.dell.com | support.dell.com
Dell™ Dimension™ 5000 Service Tag CD or DVD eject button CD or DVD activity light FlexBay for optional floppy drive or Media Card Reader microphone connector headphone connector diagnostic lights hard drive activity light power button USB 2.0 connectors (2) cover latch release power connector sound-card connectors card slots for PCI Express x16 (1), PCI (2), PCI Express x1 (1) USB 2.0 connectors (5) network adapter VGA video connector (integrated) serial connector parallel connector Model DCSM www.dell.com | support.dell.com

Owner's Manual
Page 6
... 77 Replacing the Drive-Panel Insert 77 Replacing the Drive Panel 78 Drives 79 IDE Drive Addressing 79 Connecting Drive Cables 80 Drive Interface Connectors 80 Power Cable Connector 80 Connecting and Disconnecting Drive Cables 81 Hard Drive 81 Removing a Hard Drive 82 Installing a Hard Drive 83 Adding a Second Hard Drive 84 Floppy Drive 85 Removing a Floppy Drive 85 Installing a Floppy Drive 87 Media Card Reader 89 Removing a Media Card Reader 90 Installing a Media Card Reader 92 CD/DVD Drive 93 Removing a CD/DVD Drive 94 Installing a CD/DVD Drive 95 Battery 98 Replacing...
... 77 Replacing the Drive-Panel Insert 77 Replacing the Drive Panel 78 Drives 79 IDE Drive Addressing 79 Connecting Drive Cables 80 Drive Interface Connectors 80 Power Cable Connector 80 Connecting and Disconnecting Drive Cables 81 Hard Drive 81 Removing a Hard Drive 82 Installing a Hard Drive 83 Adding a Second Hard Drive 84 Floppy Drive 85 Removing a Floppy Drive 85 Installing a Floppy Drive 87 Media Card Reader 89 Removing a Media Card Reader 90 Installing a Media Card Reader 92 CD/DVD Drive 93 Removing a CD/DVD Drive 94 Installing a CD/DVD Drive 95 Battery 98 Replacing...

Owner's Manual
Page 10
..., including: • Solutions - Drivers, patches, and software updates • Reference - Contact information, order status, warranty, and repair information • Downloads - Computer documentation, product specifications, and white papers 10 Finding Information Troubleshooting hints and tips, articles from technicians, and online courses • Community - Upgrade information for components, such as memory, the hard drive, and the operating system • Customer Care - support.dell.com NOTE: Select...
..., including: • Solutions - Drivers, patches, and software updates • Reference - Contact information, order status, warranty, and repair information • Downloads - Computer documentation, product specifications, and white papers 10 Finding Information Troubleshooting hints and tips, articles from technicians, and online courses • Community - Upgrade information for components, such as memory, the hard drive, and the operating system • Customer Care - support.dell.com NOTE: Select...

Owner's Manual
Page 13
... using a dial-up connection, connect a telephone line to the modem connector on the computer. Your ISP will offer one or more of the following Internet connection options: • Dial-up connections that provide high-speed Internet access through your printer. If the Add New Hardware Wizard window appears, click Cancel. 5 Install the printer driver if necessary. Connecting to the telephone wall jack before you need a modem or network connection and an Internet service...
... using a dial-up connection, connect a telephone line to the modem connector on the computer. Your ISP will offer one or more of the following Internet connection options: • Dial-up connections that provide high-speed Internet access through your printer. If the Add New Hardware Wizard window appears, click Cancel. 5 Install the printer driver if necessary. Connecting to the telephone wall jack before you need a modem or network connection and an Internet service...

Owner's Manual
Page 20
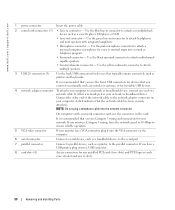
... instructions tell you encounter resistance, do not force the media or card. Connecting Two Monitors With VGA Connectors 1 Follow the procedures in the Product Information Guide. If the integrated video connector is completely seated in addition to the TV. www.dell.com | support.dell.com To use the Media Card Reader: 1 Check the media or card to determine the proper orientation for insertion. 2 Slide the media or card into the appropriate slot...
... instructions tell you encounter resistance, do not force the media or card. Connecting Two Monitors With VGA Connectors 1 Follow the procedures in the Product Information Guide. If the integrated video connector is completely seated in addition to the TV. www.dell.com | support.dell.com To use the Media Card Reader: 1 Check the media or card to determine the proper orientation for insertion. 2 Slide the media or card into the appropriate slot...

Owner's Manual
Page 35
... computer supports DDR2 memory. Connect a properly working mouse to the computer. 2 Reconnect the mouse cable as shown on the on page 101. • Run the Dell Diagnostics (see page 46). For more information about the type of the procedures in this section, follow the safety instructions located in the Product Information Guide. RESTART THE COMPUTER - 1 Simultaneously press to display the Start menu. 2 Type u, press the keyboard arrow keys to highlight...
... computer supports DDR2 memory. Connect a properly working mouse to the computer. 2 Reconnect the mouse cable as shown on the on page 101. • Run the Dell Diagnostics (see page 46). For more information about the type of the procedures in this section, follow the safety instructions located in the Product Information Guide. RESTART THE COMPUTER - 1 Simultaneously press to display the Start menu. 2 Type u, press the keyboard arrow keys to highlight...

Owner's Manual
Page 44
... reinstalled all modules without error. • If available, install properly working memory of the same type into your computer (see page 63). • If the problem persists, contact Dell (see page 118). Continue until you have two or more memory modules installed, remove the modules, reinstall one module (see page 118). 44 Troubleshooting Tools Reseat all USB devices, check cable connections, and then restart the...
... reinstalled all modules without error. • If available, install properly working memory of the same type into your computer (see page 63). • If the problem persists, contact Dell (see page 118). Continue until you have two or more memory modules installed, remove the modules, reinstall one module (see page 118). 44 Troubleshooting Tools Reseat all USB devices, check cable connections, and then restart the...
Owner's Manual
Page 48
... Menu screen. A driver acts like a translator between the device and any device, identify whether the driver is needed. Dell ships your problem and, if necessary, update the driver. Windows XP 1 Click the Start button and click Control Panel. 2 Under Pick a Category, click Performance and Maintenance. 3 Click System. 4 In the System Properties window, click the Hardware tab. 5 Click Device Manager. 6 Scroll down the list to install drivers if you: • Upgrade your operating system • Reinstall your operating...
... Menu screen. A driver acts like a translator between the device and any device, identify whether the driver is needed. Dell ships your problem and, if necessary, update the driver. Windows XP 1 Click the Start button and click Control Panel. 2 Under Pick a Category, click Performance and Maintenance. 3 Click System. 4 In the System Properties window, click the Hardware tab. 5 Click Device Manager. 6 Scroll down the list to install drivers if you: • Upgrade your operating system • Reinstall your operating...
Owner's Manual
Page 49
... Software and Hardware Incompatibilities If a device is either not detected during the operating system setup or is detected but incorrectly configured, you can use System Restore to return your computer to the operating state that existed before you installed the new driver. Using Windows XP Device Driver Rollback If a problem occurs on your computer after you install or update a driver, use Windows XP Device Driver Rollback to replace the driver with the previously installed version. 1 Click the Start button...
... Software and Hardware Incompatibilities If a device is either not detected during the operating system setup or is detected but incorrectly configured, you can use System Restore to return your computer to the operating state that existed before you installed the new driver. Using Windows XP Device Driver Rollback If a problem occurs on your computer after you install or update a driver, use Windows XP Device Driver Rollback to replace the driver with the previously installed version. 1 Click the Start button...
Owner's Manual
Page 50
... the Windows Help and Support Center for the Windows default view, so they may not work if you set your computer. NOTE: The procedures in an undesirable operating state. All calendar dates with available restore points appear in when you to see page 49) to which you install a device driver, use System Restore. Dell PC Restore permanently deletes all data on using System Restore. Creating a Restore Point 1 Click the Start button...
... the Windows Help and Support Center for the Windows default view, so they may not work if you set your computer. NOTE: The procedures in an undesirable operating state. All calendar dates with available restore points appear in when you to see page 49) to which you install a device driver, use System Restore. Dell PC Restore permanently deletes all data on using System Restore. Creating a Restore Point 1 Click the Start button...
Owner's Manual
Page 58
... to a network or broadband device, connect one x1 slot). 58 Removing and Installing Parts NOTE: Do not plug a telephone cable into a USB connector. 8 card slots (4) Access connectors for your computer. www.dell.com | support.dell.com 1 power connector Insert the power cable. 2 sound card connectors (5) • Line-in connector to attach multichannelcapable speakers. • Center/subwoofer connector - A click indicates that you use Category 5 wiring and connectors for any installed PCI cards (two slots) and PCI Express cards (one x16 slot and one end of the network cable to...
... to a network or broadband device, connect one x1 slot). 58 Removing and Installing Parts NOTE: Do not plug a telephone cable into a USB connector. 8 card slots (4) Access connectors for your computer. www.dell.com | support.dell.com 1 power connector Insert the power cable. 2 sound card connectors (5) • Line-in connector to attach multichannelcapable speakers. • Center/subwoofer connector - A click indicates that you use Category 5 wiring and connectors for any installed PCI cards (two slots) and PCI Express cards (one x16 slot and one end of the network cable to...

Owner's Manual
Page 69
... outlets, and then turn them on the back panel. 13 Install any cables that should be attached to the add-in network adapter's connectors. NOTICE: Do not route card cables over empty card-slot openings is captive, it will remain in network adapter and want to disable the integrated network adapter: a Enter system setup (see page 105), select Audio Controller, and then change the setting to Off. Do not connect external audio devices to the microphone, speaker/headphone, or...
... outlets, and then turn them on the back panel. 13 Install any cables that should be attached to the add-in network adapter's connectors. NOTICE: Do not route card cables over empty card-slot openings is captive, it will remain in network adapter and want to disable the integrated network adapter: a Enter system setup (see page 105), select Audio Controller, and then change the setting to Off. Do not connect external audio devices to the microphone, speaker/headphone, or...
Owner's Manual
Page 70
... add-in the next section. If you are replacing a card, remove the current driver for the card from the operating system. 7 If you are installing or replacing a PCI Express card, follow the procedures in network connector: a Enter system setup (see page 105), select Audio Controller, and then change the setting to On. www.dell.com | support.dell.com 6 Remove the card's driver from the operating system. If you removed a sound card: a Enter system setup (see page 105), select Network Controller, and then change the setting...
... add-in the next section. If you are replacing a card, remove the current driver for the card from the operating system. 7 If you are installing or replacing a PCI Express card, follow the procedures in network connector: a Enter system setup (see page 105), select Audio Controller, and then change the setting to On. www.dell.com | support.dell.com 6 Remove the card's driver from the operating system. If you removed a sound card: a Enter system setup (see page 105), select Network Controller, and then change the setting...

Owner's Manual
Page 75
... If you removed a sound card: a Enter system setup (see page 118). b Set the retention mechanism aside in a secure location. 4 If you need a filler bracket, contact Dell (see page 105), select Audio Controller, and then change the setting to pivot the door open position. (See page 66 for the card as described in the card documentation. b Connect external audio devices to the audio connectors on . 8 Remove the card's driver from the inside to On. Removing a PCI Express Card 1 Follow the...
... If you removed a sound card: a Enter system setup (see page 118). b Set the retention mechanism aside in a secure location. 4 If you need a filler bracket, contact Dell (see page 105), select Audio Controller, and then change the setting to pivot the door open position. (See page 66 for the card as described in the card documentation. b Connect external audio devices to the audio connectors on . 8 Remove the card's driver from the inside to On. Removing a PCI Express Card 1 Follow the...
Owner's Manual
Page 84
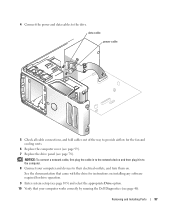
... the drive to the hard drive. 84 Removing and Installing Parts NOTICE: To connect a network cable, first plug the cable into the network wall jack and then plug it into the computer. 7 Connect your computer and devices to electrical outlets, and turn them on installing any of the bay. 4 Snap the bracket to verify that they are properly cabled and firmly seated. 6 Replace the computer cover (page 99). Instead, set it...
... the drive to the hard drive. 84 Removing and Installing Parts NOTICE: To connect a network cable, first plug the cable into the network wall jack and then plug it into the computer. 7 Connect your computer and devices to electrical outlets, and turn them on installing any of the bay. 4 Snap the bracket to verify that they are properly cabled and firmly seated. 6 Replace the computer cover (page 99). Instead, set it...

Owner's Manual
Page 89
... works correctly by running the Dell Diagnostics (see page 46). NOTICE: To connect a network cable, first plug the cable in to the network device and then plug it in to their electrical outlets, and turn them on using the Media Card Reader, see page 99). Removing and Installing Parts 89 Media Card Reader For information on . See the documentation that came with the drive for instructions on installing any software required for the fan and cooling vents. 8 Replace the drive panel...
... works correctly by running the Dell Diagnostics (see page 46). NOTICE: To connect a network cable, first plug the cable in to the network device and then plug it in to their electrical outlets, and turn them on using the Media Card Reader, see page 99). Removing and Installing Parts 89 Media Card Reader For information on . See the documentation that came with the drive for instructions on installing any software required for the fan and cooling vents. 8 Replace the drive panel...
Owner's Manual
Page 97
... computer works correctly by running the Dell Diagnostics (see page 78). Removing and Installing Parts 97 data cable power cable 5 Check all cable connections, and fold cables out of the way to provide airflow for drive operation. 9 Enter system setup (see page 105) and select the appropriate Drive option. 10 Verify that came with the drive for instructions on . See the documentation that your computer and devices to their electrical outlets, and turn...
... computer works correctly by running the Dell Diagnostics (see page 78). Removing and Installing Parts 97 data cable power cable 5 Check all cable connections, and fold cables out of the way to provide airflow for drive operation. 9 Enter system setup (see page 105) and select the appropriate Drive option. 10 Verify that came with the drive for instructions on . See the documentation that your computer and devices to their electrical outlets, and turn...
Owner's Manual
Page 111
... Boot You can use this option activates the cursor-control functions labeled on (or restart) your computer starts more quickly because it skips certain configurations and tests. When F12 = Boot Menu appears in system setup (see page 103). 2 Turn on the bottom of the screen, press . Option Settings • Diskette Drive - POST Behavior Fastboot Numlock Key POST Hotkeys Keyboard Errors When set to a USB device, the device must first set the floppy drive to a USB device...
... Boot You can use this option activates the cursor-control functions labeled on (or restart) your computer starts more quickly because it skips certain configurations and tests. When F12 = Boot Menu appears in system setup (see page 103). 2 Turn on the bottom of the screen, press . Option Settings • Diskette Drive - POST Behavior Fastboot Numlock Key POST Hotkeys Keyboard Errors When set to a USB device, the device must first set the floppy drive to a USB device...

Owner's Manual
Page 135
..., 58 network adapter, 58 parallel, 58 power, 58 serial, 58 sound, 58 surround, 58 USB, 56, 58 VGA, 58 video, 58 copying CDs and DVDs, 17 cover removing, 59 replacing, 99 D Dell Dell Diagnostics, 46 support policy, 116 support site, 10 diagnostic lights, 43 diagnostics Dell, 46 lights, 43, 56 documentation End User License Agreement, 9 ergonomics, 9 Finding Information, 9 online, 10 Product Information Guide, 9 regulatory, 9 safety, 9 Setup Diagram, 9 warranty, 9 drive panel, 56, 76 removing, 76 replacing, 78 drive-panel insert removing, 77 replacing, 77 Index...
..., 58 network adapter, 58 parallel, 58 power, 58 serial, 58 sound, 58 surround, 58 USB, 56, 58 VGA, 58 video, 58 copying CDs and DVDs, 17 cover removing, 59 replacing, 99 D Dell Dell Diagnostics, 46 support policy, 116 support site, 10 diagnostic lights, 43 diagnostics Dell, 46 lights, 43, 56 documentation End User License Agreement, 9 ergonomics, 9 Finding Information, 9 online, 10 Product Information Guide, 9 regulatory, 9 safety, 9 Setup Diagram, 9 warranty, 9 drive panel, 56, 76 removing, 76 replacing, 78 drive-panel insert removing, 77 replacing, 77 Index...

Owner's Manual
Page 137
... setting up, 11 USB, 11 problems battery, 27 blue screen, 33 CD drive, 28 CD-RW drive, 28 computer crashes, 32-33 computer stops responding, 32 Dell Diagnostics, 46 diagnostic lights, 43 drives, 27 DVD drive, 28 e-mail, 29 error messages, 30 general, 32 hard drive, 29 Internet, 29 keyboard, 32 Media Card Reader, 31 memory, 34 modem, 29 monitor is blank, 40 monitor is blank, 40 Index 137 memory (continued) installing, 63 problems, 34 removing, 65 type supported, 62 messages error...
... setting up, 11 USB, 11 problems battery, 27 blue screen, 33 CD drive, 28 CD-RW drive, 28 computer crashes, 32-33 computer stops responding, 32 Dell Diagnostics, 46 diagnostic lights, 43 drives, 27 DVD drive, 28 e-mail, 29 error messages, 30 general, 32 hard drive, 29 Internet, 29 keyboard, 32 Media Card Reader, 31 memory, 34 modem, 29 monitor is blank, 40 monitor is blank, 40 Index 137 memory (continued) installing, 63 problems, 34 removing, 65 type supported, 62 messages error...


