Owner's Manual
Page 1
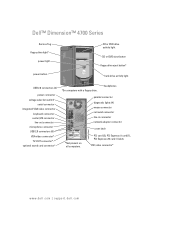
... light CD or DVD eject button floppy drive eject button* hard-drive activity light USB 2.0 connectors (2) power connector voltage selection switch serial connector integrated VGA video connector keyboard connector center/LFE connector line-out connector microphone connector USB 2.0 connectors (6) VGA video connector* TV-OUT connector* optional sound card connector* *On computers with a floppy drive. PCI card (2), PCI Express x1 card (1), PCI Express x16 card (1) slots DVI video connector* www.dell.com | support.dell.com headphones parallel connector diagnostic lights (4) mouse connector...
... light CD or DVD eject button floppy drive eject button* hard-drive activity light USB 2.0 connectors (2) power connector voltage selection switch serial connector integrated VGA video connector keyboard connector center/LFE connector line-out connector microphone connector USB 2.0 connectors (6) VGA video connector* TV-OUT connector* optional sound card connector* *On computers with a floppy drive. PCI card (2), PCI Express x1 card (1), PCI Express x16 card (1) slots DVI video connector* www.dell.com | support.dell.com headphones parallel connector diagnostic lights (4) mouse connector...

Owner's Manual
Page 6
... Guidelines 73 Connecting Drive Cables 73 Hard Drive 74 Removing a Hard Drive 75 Installing a Hard Drive 77 Adding a Second Hard Drive 78 Floppy Drive 81 Removing a Floppy Drive 81 Installing a Floppy Drive 82 CD/DVD Drive 83 Removing a CD/DVD Drive 84 Installing a CD/DVD Drive 85 Adding a Second CD or DVD Drive 85 Battery 88 Replacing the Computer Cover 89 A Appendix Specifications 91 System Setup 95 Overview 95 Entering System Setup 96 System Setup Options 97 Boot Sequence 100 Clearing Forgotten Passwords 101 Clearing CMOS Settings 102 Dell Technical Support Policy...
... Guidelines 73 Connecting Drive Cables 73 Hard Drive 74 Removing a Hard Drive 75 Installing a Hard Drive 77 Adding a Second Hard Drive 78 Floppy Drive 81 Removing a Floppy Drive 81 Installing a Floppy Drive 82 CD/DVD Drive 83 Removing a CD/DVD Drive 84 Installing a CD/DVD Drive 85 Adding a Second CD or DVD Drive 85 Battery 88 Replacing the Computer Cover 89 A Appendix Specifications 91 System Setup 95 Overview 95 Entering System Setup 96 System Setup Options 97 Boot Sequence 100 Clearing Forgotten Passwords 101 Clearing CMOS Settings 102 Dell Technical Support Policy...
Owner's Manual
Page 10
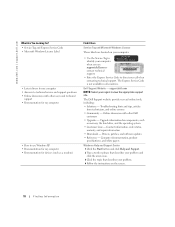
... courses • Community - Drivers, patches, and software updates • Reference - Upgrade information for devices (such as memory, the hard drive, and the operating system • Customer Care - Contact information, order status, warranty, and repair information • Downloads - Computer documentation, product specifications, and white papers Windows Help and Support Center 1 Click the Start button and click Help and Support. 2 Type a word or phrase that describes your problem and click the arrow...
... courses • Community - Drivers, patches, and software updates • Reference - Upgrade information for devices (such as memory, the hard drive, and the operating system • Customer Care - Contact information, order status, warranty, and repair information • Downloads - Computer documentation, product specifications, and white papers Windows Help and Support Center 1 Click the Start button and click Help and Support. 2 Type a word or phrase that describes your problem and click the arrow...
Owner's Manual
Page 13
... the computer. The monitor will not function. If you must have the optional DVI adapter. See the documentation that came with a DVI connector, or a television. If the Add New Hardware Wizard window appears, click Cancel. 5 Install the printer driver if necessary. Setting Up and Using Your Computer 13 parallel connector on computer screws (2) connector on printer clips (2) notches (2) parallel printer cable 4 Turn on the printer and...
... the computer. The monitor will not function. If you must have the optional DVI adapter. See the documentation that came with a DVI connector, or a television. If the Add New Hardware Wizard window appears, click Cancel. 5 Install the printer driver if necessary. Setting Up and Using Your Computer 13 parallel connector on computer screws (2) connector on printer clips (2) notches (2) parallel printer cable 4 Turn on the printer and...
Owner's Manual
Page 15
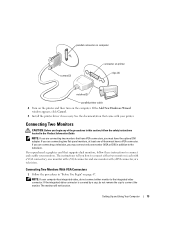
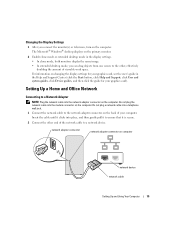
... to a Network Adapter NOTE: Plug the network cable into a telephone wall jack. 1 Connect the network cable to the network adapter connector on the back of your graphics card). network adapter connector network adapter connector on changing the display settings for your graphics card, see the user's guide in the display settings. • In clone mode, both monitors display the same image. • In extended desktop mode, you can drag objects from one screen to the other end of the network cable to a network device. Do not plug a network cable into the network adapter connector on...
... to a Network Adapter NOTE: Plug the network cable into a telephone wall jack. 1 Connect the network cable to the network adapter connector on the back of your graphics card). network adapter connector network adapter connector on changing the display settings for your graphics card, see the user's guide in the display settings. • In clone mode, both monitors display the same image. • In extended desktop mode, you can drag objects from one screen to the other end of the network cable to a network device. Do not plug a network cable into the network adapter connector on...
Owner's Manual
Page 31
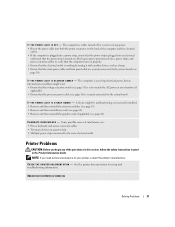
... outlet is working by testing it with another device, such as a lamp. • Ensure that the processor power cable (see page 56). C H E C K T H E P R I N T E R D O C U M E N T A T I N G A M B E R - See the printer documentation for your location (if applicable). • Ensure that the main power cable and front panel cable are : • Power, keyboard, and mouse extension cables • Too many devices on a power strip • Multiple power strips connected to the system board. I F T H E P O W E R L I G H T I S B L I N K I O N - The computer is set to...
... outlet is working by testing it with another device, such as a lamp. • Ensure that the processor power cable (see page 56). C H E C K T H E P R I N T E R D O C U M E N T A T I N G A M B E R - See the printer documentation for your location (if applicable). • Ensure that the main power cable and front panel cable are : • Power, keyboard, and mouse extension cables • Too many devices on a power strip • Multiple power strips connected to the system board. I F T H E P O W E R L I G H T I S B L I N K I O N - The computer is set to...
Owner's Manual
Page 43
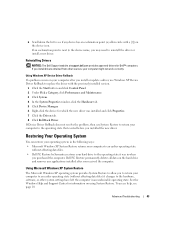
... a problem occurs on the hard drive and removes any device has an exclamation point (a yellow circle with the previously installed version. 1 Click the Start button and click Control Panel. 2 Under Pick a Category, click Performance and Maintenance. 3 Click System. 4 In the System Properties window, click the Hardware tab. 5 Click Device Manager. 6 Right-click the device for which the new driver was in when you received the computer. Dell PC Restore permanently...
... a problem occurs on the hard drive and removes any device has an exclamation point (a yellow circle with the previously installed version. 1 Click the Start button and click Control Panel. 2 Under Pick a Category, click Performance and Maintenance. 3 Click System. 4 In the System Properties window, click the Hardware tab. 5 Click Device Manager. 6 Right-click the device for which the new driver was in when you received the computer. Dell PC Restore permanently...

Owner's Manual
Page 44
... a Restore Point 1 Click the Start button and click Help and Support. 2 Click System Restore. 3 Follow the instructions on the screen. The Select a Restore Point screen provides a calendar that restore point is automatically selected. If a calendar date has only one restore point, then that allows you install a device driver, use System Restore. To change the restore point, you can undo the restoration. 44 Advanced Troubleshooting NOTE: The procedures in boldface type. 4 Select a restore...
... a Restore Point 1 Click the Start button and click Help and Support. 2 Click System Restore. 3 Follow the instructions on the screen. The Select a Restore Point screen provides a calendar that restore point is automatically selected. If a calendar date has only one restore point, then that allows you install a device driver, use System Restore. To change the restore point, you can undo the restoration. 44 Advanced Troubleshooting NOTE: The procedures in boldface type. 4 Select a restore...
Owner's Manual
Page 52
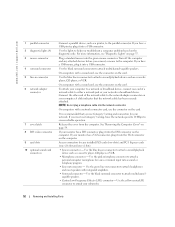
... - Access connectors for your network or broadband device. A click indicates that you must use the connector on the diagnostic code. www.dell.com | support.dell.com 1 parallel connector 2 diagnostic lights (4) 3 mouse connector 4 surround connector 5 line-in connector 6 network adapter connector 7 cover latch 8 DVI video connector 9 card slots 10 optional sound card connectors Connect a parallel device, such as a printer, to the computer. Turn off the computer and any installed PCI cards (two slots) and PC I Express cards (one x16 slot and one end of the network cable to...
... - Access connectors for your network or broadband device. A click indicates that you must use the connector on the diagnostic code. www.dell.com | support.dell.com 1 parallel connector 2 diagnostic lights (4) 3 mouse connector 4 surround connector 5 line-in connector 6 network adapter connector 7 cover latch 8 DVI video connector 9 card slots 10 optional sound card connectors Connect a parallel device, such as a printer, to the computer. Turn off the computer and any installed PCI cards (two slots) and PC I Express cards (one x16 slot and one end of the network cable to...

Owner's Manual
Page 63
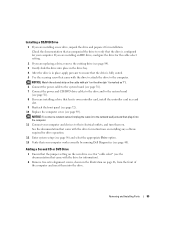
... 2. 5 Connect any cables connected to the card. 3 Remove the securing screw from the operating system. 4 Secure the card bracket with the screw you installed an add-in network adapter and want to disable the integrated network adapter: a Enter system setup (see page 105). If you installed a sound card: a Enter system setup (see page 96), select Audio Controller, and then change the setting to the equipment. 6 If you need a filler bracket, contact Dell (see page 96), select Network Controller, and...
... 2. 5 Connect any cables connected to the card. 3 Remove the securing screw from the operating system. 4 Secure the card bracket with the screw you installed an add-in network adapter and want to disable the integrated network adapter: a Enter system setup (see page 105). If you installed a sound card: a Enter system setup (see page 96), select Audio Controller, and then change the setting to the equipment. 6 If you need a filler bracket, contact Dell (see page 96), select Network Controller, and...
Owner's Manual
Page 64
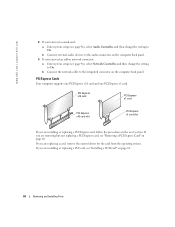
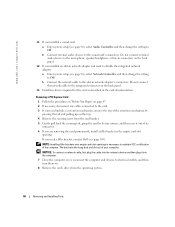
.... If you are installing or replacing a PCI card, see "Installing a PCI Card" on the computer back panel. 9 If you removed a sound card: a Enter system setup (see page 96), select Audio Controller, and then change the setting to the audio connectors on page 61. 64 Removing and Installing Parts If you are removing but not replacing a PCI Express card, see "Removing a PCI Express Card" on the computer back panel. www.dell.com | support.dell.com 8 If you removed an add-in the next section. b Connect external audio devices to On.
.... If you are installing or replacing a PCI card, see "Installing a PCI Card" on the computer back panel. 9 If you removed a sound card: a Enter system setup (see page 96), select Audio Controller, and then change the setting to the audio connectors on page 61. 64 Removing and Installing Parts If you are removing but not replacing a PCI Express card, see "Removing a PCI Express Card" on the computer back panel. www.dell.com | support.dell.com 8 If you removed an add-in the next section. b Connect external audio devices to On.
Owner's Manual
Page 68
b Connect the network cable to maintain FCC certification of the computer. NOTE: Installing filler brackets over empty card-slot openings is necessary to the add-in network adapter's connectors. www.dell.com | support.dell.com 11 If you installed a sound card: a Enter system setup (see page 96), select Audio Controller, and then change the setting to Off. Do not connect external audio devices to the microphone, speaker/headphone, or line-in connectors on the top. 4 Remove the securing screw from the...
b Connect the network cable to maintain FCC certification of the computer. NOTE: Installing filler brackets over empty card-slot openings is necessary to the add-in network adapter's connectors. www.dell.com | support.dell.com 11 If you installed a sound card: a Enter system setup (see page 96), select Audio Controller, and then change the setting to Off. Do not connect external audio devices to the microphone, speaker/headphone, or line-in connectors on the top. 4 Remove the securing screw from the...

Owner's Manual
Page 69
... procedures in this section, follow the safety instructions located in the Product Information Guide. Front Panel CAUTION: Before you removed a sound card: a Enter system setup (see page 96), select Network Controller, and then change the setting to On. b Connect external audio devices to On. Removing and Installing Parts 69 b Connect the network cable to the integrated connector on the computer back panel. 10 If you removed an add-in the card documentation. CAUTION: To guard against electrical shock...
... procedures in this section, follow the safety instructions located in the Product Information Guide. Front Panel CAUTION: Before you removed a sound card: a Enter system setup (see page 96), select Network Controller, and then change the setting to On. b Connect external audio devices to On. Removing and Installing Parts 69 b Connect the network cable to the integrated connector on the computer back panel. 10 If you removed an add-in the card documentation. CAUTION: To guard against electrical shock...
Owner's Manual
Page 85
NOTICE: To connect a network cable, first plug the cable in to the network wall jack and then plug it for your computer works correctly by running Dell Diagnostics (see page 40). Adding a Second CD or DVD Drive 1 Ensure that the jumper setting on the new drive is configured for installation. Check the documentation that accompanied the drive to verify that came with pin 1 on installing any software required for "cable select" (see the documentation that came...
NOTICE: To connect a network cable, first plug the cable in to the network wall jack and then plug it for your computer works correctly by running Dell Diagnostics (see page 40). Adding a Second CD or DVD Drive 1 Ensure that the jumper setting on the new drive is configured for installation. Check the documentation that accompanied the drive to verify that came with pin 1 on installing any software required for "cable select" (see the documentation that came...
Owner's Manual
Page 100
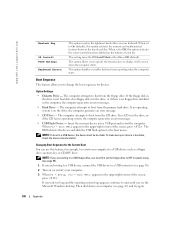
... your keyboard. If no operating system, the computer generates an error message. • USB Flash Device - This option allows you to display on the screen when the computer starts. This option disables or enables keyboard error reporting when the computer starts. NOTE: If you are booting to a USB device, connect the USB device to wait until you see the Microsoft Windows desktop. If you must first set to a USB device, the device must be bootable. This setting turns the OS Install Mode...
... your keyboard. If no operating system, the computer generates an error message. • USB Flash Device - This option allows you to display on the screen when the computer starts. This option disables or enables keyboard error reporting when the computer starts. NOTE: If you are booting to a USB device, connect the USB device to wait until you see the Microsoft Windows desktop. If you must first set to a USB device, the device must be bootable. This setting turns the OS Install Mode...

Owner's Manual
Page 102
... board (see page 56). d Replace the jumper plug on pins 2 and 3 and wait approximately 5 seconds. www.dell.com | support.dell.com 2 Locate the 3-pin password jumper (PSWD) on thesystem board (see page 56), and attach the jumper plug to pins 2 and 3 to electrical outlets, and turn them on. NOTICE: To connect a network cable, first plug the cable into the network wall jack and then plug it into the computer. 4 Connect your computer and devices to clear the password. Clearing CMOS Settings...
... board (see page 56). d Replace the jumper plug on pins 2 and 3 and wait approximately 5 seconds. www.dell.com | support.dell.com 2 Locate the 3-pin password jumper (PSWD) on thesystem board (see page 56), and attach the jumper plug to pins 2 and 3 to electrical outlets, and turn them on. NOTICE: To connect a network cable, first plug the cable into the network wall jack and then plug it into the computer. 4 Connect your computer and devices to clear the password. Clearing CMOS Settings...
Owner's Manual
Page 123
... Dell Dimension Help file, 9 Dell Solution Center, 9 End User License Agreement, 9 ergonomics, 9 Finding Information, 9 online, 10 Product Information Guide, 9 regulatory, 9 safety, 9 Index 123 See sound B battery problems, 21 replacing, 88 bios, 95 boot sequence, 100 changing, 100-101 option settings, 100 booting to a USB device, 100 C cards installing PCI, 61 installing PCI Express, 65 PCI, 61 PCI Express, 64 PCI Express slots, 52 PCI slots, 52 removing PCI, 63 removing PCI Express, 68 slots, 52, 60 types supported, 60 CD/DVD drive activity light, 50 eject button, 50 installing, 85 CD/DVD...
... Dell Dimension Help file, 9 Dell Solution Center, 9 End User License Agreement, 9 ergonomics, 9 Finding Information, 9 online, 10 Product Information Guide, 9 regulatory, 9 safety, 9 Index 123 See sound B battery problems, 21 replacing, 88 bios, 95 boot sequence, 100 changing, 100-101 option settings, 100 booting to a USB device, 100 C cards installing PCI, 61 installing PCI Express, 65 PCI, 61 PCI Express, 64 PCI Express slots, 52 PCI slots, 52 removing PCI, 63 removing PCI Express, 68 slots, 52, 60 types supported, 60 CD/DVD drive activity light, 50 eject button, 50 installing, 85 CD/DVD...

Owner's Manual
Page 124
... button, 50 installing, 82 removing, 81 front panel, 69 insert, 71 removing, 70 H hard drive activity light, 50 installing, 77 installing second, 78 problems, 23 removing, 75 Hardware Troubleshooter, 46 headphone connector, 50 Help and Support Center, 10 help file Dell Dimension Help, 9 Windows Help and Support Center, 10 Hyper-Threading, 19 I IEEE 1394 problems, 25 installing parts before you begin, 47 recommended tools, 47 turning off your computer, 47 internet connection, about, 16 connection, options, 16 connection, setting up, 16 problems, 23 K keyboard connector...
... button, 50 installing, 82 removing, 81 front panel, 69 insert, 71 removing, 70 H hard drive activity light, 50 installing, 77 installing second, 78 problems, 23 removing, 75 Hardware Troubleshooter, 46 headphone connector, 50 Help and Support Center, 10 help file Dell Dimension Help, 9 Windows Help and Support Center, 10 Hyper-Threading, 19 I IEEE 1394 problems, 25 installing parts before you begin, 47 recommended tools, 47 turning off your computer, 47 internet connection, about, 16 connection, options, 16 connection, setting up, 16 problems, 23 K keyboard connector...
Owner's Manual
Page 125
...extended desktop mode, 15 hard to read , 35 problems, 34 motherboard. See system board mouse connector, 52 problems, 29 N network connector, 52 Network Setup Wizard, 16 problems, 30 setting up, 15 Network Setup Wizard, 16 O operating system reinstalling Windows XP, 43 P password clearing, 101 jumper, 101 PCI cards installing, 61 removing, 63 PCI Express cards installing, 65 removing, 68 power button, 50 connector, 53 light, 50 problems, 30 power light conditions, 30 printer cable, 11 connecting, 11 parallel, 12 problems, 31 setting up, 11 USB, 11 problems battery, 21 blue screen, 27 CD drive...
...extended desktop mode, 15 hard to read , 35 problems, 34 motherboard. See system board mouse connector, 52 problems, 29 N network connector, 52 Network Setup Wizard, 16 problems, 30 setting up, 15 Network Setup Wizard, 16 O operating system reinstalling Windows XP, 43 P password clearing, 101 jumper, 101 PCI cards installing, 61 removing, 63 PCI Express cards installing, 65 removing, 68 power button, 50 connector, 53 light, 50 problems, 30 power light conditions, 30 printer cable, 11 connecting, 11 parallel, 12 problems, 31 setting up, 11 USB, 11 problems battery, 21 blue screen, 27 CD drive...

Owner's Manual
Page 126
... Dell, 105 support.dell.com, 10 system board, 56 System Restore, 43 system setup, 95 entering, 96 options, 97 screens, 96 T troubleshooting diagnostic lights, 37 Hardware Troubleshooter, 46 Help and Support Center, 10 restore to previous state, 43 tips, 21 TV connect to computer, 13-14, 53 V video connector, 52-53 problems, 34 voltage selection switch, 53 volume adjusting, 33 W warranty information, 9 Windows XP Device Driver Rollback, 43 Hardware Troubleshooter, 46 Help and Support Center, 10 Hyper-Threading, 19 Network Setup...
... Dell, 105 support.dell.com, 10 system board, 56 System Restore, 43 system setup, 95 entering, 96 options, 97 screens, 96 T troubleshooting diagnostic lights, 37 Hardware Troubleshooter, 46 Help and Support Center, 10 restore to previous state, 43 tips, 21 TV connect to computer, 13-14, 53 V video connector, 52-53 problems, 34 voltage selection switch, 53 volume adjusting, 33 W warranty information, 9 Windows XP Device Driver Rollback, 43 Hardware Troubleshooter, 46 Help and Support Center, 10 Hyper-Threading, 19 Network Setup...


