Dell Dimension 4400 Systems Owner's Manual
Page 4
... to a parallel port printer 31 If you cannot print to a USB printer 32 Scanner Problems 33 Modem Problems 34 Mouse Problems 36 Keyboard Problems 37 Drive Problems 37 If you cannot save a file to a floppy disk 37 If you cannot play a music CD or install a program from a CD 38 ...If you cannot play a DVD movie 39 If the CD-RW drive stops writing 39 If you have a hard drive problem 40 Network Problems 40 Microsoft® Windows® Error Messages 41 General Program Problems 43 A program crashes 43 A program stops responding...
... to a parallel port printer 31 If you cannot print to a USB printer 32 Scanner Problems 33 Modem Problems 34 Mouse Problems 36 Keyboard Problems 37 Drive Problems 37 If you cannot save a file to a floppy disk 37 If you cannot play a music CD or install a program from a CD 38 ...If you cannot play a DVD movie 39 If the CD-RW drive stops writing 39 If you have a hard drive problem 40 Network Problems 40 Microsoft® Windows® Error Messages 41 General Program Problems 43 A program crashes 43 A program stops responding...
Dell Dimension 4400 Systems Owner's Manual
Page 6
...a Second Hard Drive 78 Adding Other Drives 81 5.25-Inch Devices 81 3.5-Inch Devices 84 Closing the Computer Cover 87 4 Appendix Specifications 90 Standard Settings 94 Viewing Settings 94 System Setup Screens 95 Clearing Forgotten Passwords 96 Replacing the Battery 97 Dell Technical Support...6 Contents Only 127 Four-Year Limited Warranty (U.S. Only 98 Definition of "Dell-Installed" Software and Peripherals . . . . . 99 Definition of "Third-Party" Software and Peripherals 99 Contacting Dell 100 Contact Numbers and Addresses 100 Returning Items for Warranty Repair or Credit ...
...a Second Hard Drive 78 Adding Other Drives 81 5.25-Inch Devices 81 3.5-Inch Devices 84 Closing the Computer Cover 87 4 Appendix Specifications 90 Standard Settings 94 Viewing Settings 94 System Setup Screens 95 Clearing Forgotten Passwords 96 Replacing the Battery 97 Dell Technical Support...6 Contents Only 127 Four-Year Limited Warranty (U.S. Only 98 Definition of "Dell-Installed" Software and Peripherals . . . . . 99 Definition of "Third-Party" Software and Peripherals 99 Contacting Dell 100 Contact Numbers and Addresses 100 Returning Items for Warranty Repair or Credit ...
Dell Dimension 4400 Systems Owner's Manual
Page 40
... K C A B L E C O N N E C T O R - The light blinks amber when there is dark, try replacing the network cable. RE S T A R T T H E C O M P U T E R - www.dell.com | support.dell.com C H A N G E T H E W R I C T S - See page 49. The CD-RW drive must receive a steady stream of data when writing. C O N T A C T Y O U R N E T W O R K A D M I N I S T R A T O R - If the stream is functioning. 40 Solving .... 4 Under Error-checking, click Check Now. 5 Click Start. Ensure that you have a hard drive problem RUN CHECK DISK 1 In Windows XP click the Start button, and then click My Computer...
... K C A B L E C O N N E C T O R - The light blinks amber when there is dark, try replacing the network cable. RE S T A R T T H E C O M P U T E R - www.dell.com | support.dell.com C H A N G E T H E W R I C T S - See page 49. The CD-RW drive must receive a steady stream of data when writing. C O N T A C T Y O U R N E T W O R K A D M I N I S T R A T O R - If the stream is functioning. 40 Solving .... 4 Under Error-checking, click Check Now. 5 Click Start. Ensure that you have a hard drive problem RUN CHECK DISK 1 In Windows XP click the Start button, and then click My Computer...

Dell Dimension 4400 Systems Owner's Manual
Page 54
Before reinstalling the Windows XP operating system to correct a problem, try correcting the problem by Dell and possibly affect programs installed on your hard drive. NOTICE: To prevent conflicts with Windows XP, you must disable any virus protection software installed on again. 54 Solving Pr... oblems HINT: The CD that you need to place in your operating system unless instructed to do so by a Dell technical support representative...
Before reinstalling the Windows XP operating system to correct a problem, try correcting the problem by Dell and possibly affect programs installed on your hard drive. NOTICE: To prevent conflicts with Windows XP, you must disable any virus protection software installed on again. 54 Solving Pr... oblems HINT: The CD that you need to place in your operating system unless instructed to do so by a Dell technical support representative...

Dell Dimension 4400 Systems Owner's Manual
Page 56
... system unless instructed to finish. 17 Remove the CD from the drive. 18 Reinstall the appropriate drivers (see page 47). 19 Reinstall your virus protection software. The options can potentially overwrite files installed by Dell and possibly affect programs installed on -screen directions to do not... and try again. 4 Use the arrow keys to continue. Follow the on your Windows 2000 operating system. Therefore, Dell does not recommend that may start to install its components and configure the computer. NOTICE: The Operating System CD provides options for reinstalling your hard drive.
... system unless instructed to finish. 17 Remove the CD from the drive. 18 Reinstall the appropriate drivers (see page 47). 19 Reinstall your virus protection software. The options can potentially overwrite files installed by Dell and possibly affect programs installed on -screen directions to do not... and try again. 4 Use the arrow keys to continue. Follow the on your Windows 2000 operating system. Therefore, Dell does not recommend that may start to install its components and configure the computer. NOTICE: The Operating System CD provides options for reinstalling your hard drive.

Dell Dimension 4400 Systems Owner's Manual
Page 59
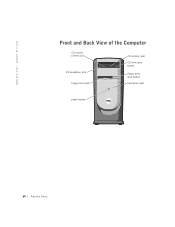
SECTION 3 Front and Back View of the Computer Reattaching the Front Door and Hinge Arms Opening the Computer Cover Looking Inside Your Computer Adding Cards Removing Cards Adding Memory Replacing the AGP Card Adding a Second Hard Drive Adding Other Drives Closing the Computer Cover www.dell.com | support.dell.com
SECTION 3 Front and Back View of the Computer Reattaching the Front Door and Hinge Arms Opening the Computer Cover Looking Inside Your Computer Adding Cards Removing Cards Adding Memory Replacing the AGP Card Adding a Second Hard Drive Adding Other Drives Closing the Computer Cover www.dell.com | support.dell.com
Dell Dimension 4400 Systems Owner's Manual
Page 60
www.dell.com | support.dell.com CD volume control dial CD headphone jack floppy drive light power button CD activity light CD drive eject button floppy drive eject button hard drive light 60 Adding Parts
www.dell.com | support.dell.com CD volume control dial CD headphone jack floppy drive light power button CD activity light CD drive eject button floppy drive eject button hard drive light 60 Adding Parts

Dell Dimension 4400 Systems Owner's Manual
Page 67
... may not open as widely as shown in "When Working Inside Your Computer" on page 12. computer cover* (page 65 and page 87) power supply hard drive (page 78) back of computer filler brackets for empty card slots (4) (page 69 and page 72) system board (page 68) * Depending on the... types of drives installed in your computer. Adding Parts 67 CAUTION: Before you do not inadvertently disconnect cables from the following illustration to ensure that you begin any ...
... may not open as widely as shown in "When Working Inside Your Computer" on page 12. computer cover* (page 65 and page 87) power supply hard drive (page 78) back of computer filler brackets for empty card slots (4) (page 69 and page 72) system board (page 68) * Depending on the... types of drives installed in your computer. Adding Parts 67 CAUTION: Before you do not inadvertently disconnect cables from the following illustration to ensure that you begin any ...
Dell Dimension 4400 Systems Owner's Manual
Page 68
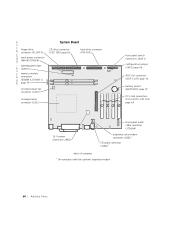
www.dell.com | support.dell.com System Board floppy drive connector (FLOPPY) main power connector (MAIN POWER) standby power light (CR3F1) memory module connectors (DIMM 0, DIMM 1) page 74 microprocessor fan connector (J1D2) CD drive connector (SEC IDE) page 81 hard drive connector (PRI IDE) microprocessor connector (J1D1) front panel switch connector (J60H1) configuration jumper (J6F2) page 96...
www.dell.com | support.dell.com System Board floppy drive connector (FLOPPY) main power connector (MAIN POWER) standby power light (CR3F1) memory module connectors (DIMM 0, DIMM 1) page 74 microprocessor fan connector (J1D2) CD drive connector (SEC IDE) page 81 hard drive connector (PRI IDE) microprocessor connector (J1D1) front panel switch connector (J60H1) configuration jumper (J6F2) page 96...
Dell Dimension 4400 Systems Owner's Manual
Page 78
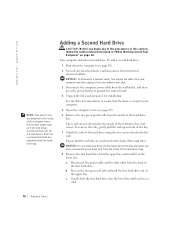
... rails, gently pull the rails up for your computer and then unplug it for 3.5-inch drives. c Gently slide the first hard drive into the lower hard-drive bay until you hear a click. 78 Adding Parts To add a second hard drive: 1 Shut down the computer (see page 65). 6 Remove the two green plastic rails... Before you have removed the green drive rails from the inside of the hard-drive cage. 8 Remove the first hard drive from the upper bay and install it in the two green rail tabs and pull the first hard drive out of the upper bay. www.dell.com | support.dell.com HINT: Two sets of rails ...
... rails, gently pull the rails up for your computer and then unplug it for 3.5-inch drives. c Gently slide the first hard drive into the lower hard-drive bay until you hear a click. 78 Adding Parts To add a second hard drive: 1 Shut down the computer (see page 65). 6 Remove the two green plastic rails... Before you have removed the green drive rails from the inside of the hard-drive cage. 8 Remove the first hard drive from the upper bay and install it in the two green rail tabs and pull the first hard drive out of the upper bay. www.dell.com | support.dell.com HINT: Two sets of rails ...
Dell Dimension 4400 Systems Owner's Manual
Page 79
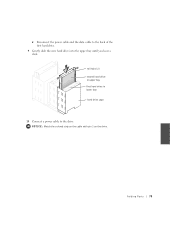
NOTICE: Match the colored strip on the cable with pin 1 on the drive. Adding Parts 79 d Reconnect the power cable and the data cable to the drive. rail tabs (2) second hard drive in upper bay first hard drive in lower bay hard drive cage 10 Connect a power cable to the back of the first hard drive. 9 Gently slide the new hard drive into the upper bay until you hear a click.
NOTICE: Match the colored strip on the cable with pin 1 on the drive. Adding Parts 79 d Reconnect the power cable and the data cable to the drive. rail tabs (2) second hard drive in upper bay first hard drive in lower bay hard drive cage 10 Connect a power cable to the back of the first hard drive. 9 Gently slide the new hard drive into the upper bay until you hear a click.
Dell Dimension 4400 Systems Owner's Manual
Page 80
... wall jack and then plug it in to the computer. 14 See the documentation that is set for drive operation. 80 Adding Parts power cable second hard-drive cable (secondary drive) first hard-drive cable (primary boot drive) 12 Close the computer cover (see the documentation that came with the...Connect your first hard drive and attach the connector to the middle connector is the master device and the device connected to the second hard drive. This means that the device connected to the end connector of the drive cable is the slave device. www.dell.com | support.dell.com HINT: ...
... wall jack and then plug it in to the computer. 14 See the documentation that is set for drive operation. 80 Adding Parts power cable second hard-drive cable (secondary drive) first hard-drive cable (primary boot drive) 12 Close the computer cover (see the documentation that came with the...Connect your first hard drive and attach the connector to the middle connector is the master device and the device connected to the second hard drive. This means that the device connected to the end connector of the drive cable is the slave device. www.dell.com | support.dell.com HINT: ...
Dell Dimension 4400 Systems Owner's Manual
Page 81
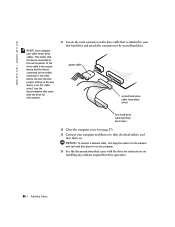
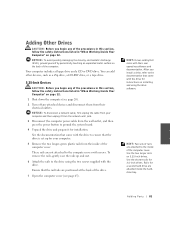
Rails for a second hard drive are attached to the documentation that came with the drive to ensure that the rail tabs are not attached to the computer cover with the drive for your computer and then unplug it from the network wall jack. 3 Disconnect the computer power cable from...cover. Ensure that the drive is set up and out. 6 Attach the rails to ground the system board. 4 Unpack the drive and prepare it for 3.5-inch drives. NOTICE: To avoid possibly damaging the drive by electrostatic discharge (ESD), ground yourself by Dell come with the drive. See the documentation ...
Rails for a second hard drive are attached to the documentation that came with the drive to ensure that the rail tabs are not attached to the computer cover with the drive for your computer and then unplug it from the network wall jack. 3 Disconnect the computer power cable from...cover. Ensure that the drive is set up and out. 6 Attach the rails to ground the system board. 4 Unpack the drive and prepare it for 3.5-inch drives. NOTICE: To avoid possibly damaging the drive by electrostatic discharge (ESD), ground yourself by Dell come with the drive. See the documentation ...
Dell Dimension 4400 Systems Owner's Manual
Page 85
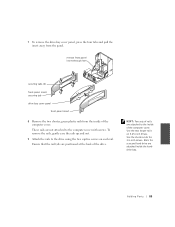
... tabs and pull the insert away from the inside the harddrive bay. remove front panel insert through here securing tabs (4) front-panel insert securing tab drive-bay cover panel front panel insert 8 Remove the two shorter, green plastic rails from the panel. To remove the rails, gently ease the rails up... out. 9 Attach the rails to the computer cover with screws. Use the two longer rails on each rail. These rails are attached inside of the drive. Use the shorter rails for a second hard drive are not attached to the drive using the two captive screws on 5.25-inch...
... tabs and pull the insert away from the inside the harddrive bay. remove front panel insert through here securing tabs (4) front-panel insert securing tab drive-bay cover panel front panel insert 8 Remove the two shorter, green plastic rails from the panel. To remove the rails, gently ease the rails up... out. 9 Attach the rails to the computer cover with screws. Use the two longer rails on each rail. These rails are attached inside of the drive. Use the shorter rails for a second hard drive are not attached to the drive using the two captive screws on 5.25-inch...
Dell Dimension 4400 Systems Owner's Manual
Page 91
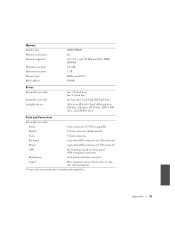
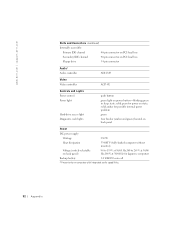
... accessible Internally accessible Available devices two 5.25-inch bays two 3.5-inch bays two bays for 1-inch-high IDE hard drives ATA-66 or ATA-100 Ultra DMA hard drive, CD drive, Zip drive, DVD drive, DVD+RW drive, and CD-RW drive Ports and Connectors Externally accessible: Serial 9-pin connector; 16550C-compatible Parallel 25-hole connector (bidirectional) Video 15...
... accessible Internally accessible Available devices two 5.25-inch bays two 3.5-inch bays two bays for 1-inch-high IDE hard drives ATA-66 or ATA-100 Ultra DMA hard drive, CD drive, Zip drive, DVD drive, DVD+RW drive, and CD-RW drive Ports and Connectors Externally accessible: Serial 9-pin connector; 16550C-compatible Parallel 25-hole connector (bidirectional) Video 15...
Dell Dimension 4400 Systems Owner's Manual
Page 92
....dell.com | support.dell.com Ports and Connectors (continued) Internally accessible: Primary IDE channel 40-pin connector on PCI local bus Secondary IDE channel 40-pin connector on PCI local bus Floppy drive 34-pin connector Audio2 Audio controller ADI 1885 Video Video controller AGP 4X Controls and Lights Power control Power light Hard-drive...
....dell.com | support.dell.com Ports and Connectors (continued) Internally accessible: Primary IDE channel 40-pin connector on PCI local bus Secondary IDE channel 40-pin connector on PCI local bus Floppy drive 34-pin connector Audio2 Audio controller ADI 1885 Video Video controller AGP 4X Controls and Lights Power control Power light Hard-drive...
Dell Dimension 4400 Systems Owner's Manual
Page 122
See "Contacting Dell" on the hard drive(s) and any removable media, such as floppy disks, CDs, or PC Cards. Dell will be made by various manufacturers in the continental U.S., where applicable. Dell does not accept liability for obtaining customer assistance. Dell owns all parts removed from repaired products....HARDWARE IS LIMITED TO REPAIR AND REPLACEMENT AS SET FORTH IN THIS LIMITED WARRANTY STATEMENT. If Dell repairs or replaces a product, its warranty term is required, Dell will repair or replace products covered under this limited warranty that are returned to you (freight ...
See "Contacting Dell" on the hard drive(s) and any removable media, such as floppy disks, CDs, or PC Cards. Dell will be made by various manufacturers in the continental U.S., where applicable. Dell does not accept liability for obtaining customer assistance. Dell owns all parts removed from repaired products....HARDWARE IS LIMITED TO REPAIR AND REPLACEMENT AS SET FORTH IN THIS LIMITED WARRANTY STATEMENT. If Dell repairs or replaces a product, its warranty term is required, Dell will repair or replace products covered under this limited warranty that are returned to you (freight ...

Dell Dimension 4400 Systems Owner's Manual
Page 124
... shipping charges, and insure the shipment or accept the risk of the following categories: software; Monitors, keyboards, and mice that are Dell-branded or that are included on the hard drive(s) and any removable media, such as specifically noted); Remove any other locations will ship the repaired or replacement products to you freight...
... shipping charges, and insure the shipment or accept the risk of the following categories: software; Monitors, keyboards, and mice that are Dell-branded or that are included on the hard drive(s) and any removable media, such as specifically noted); Remove any other locations will ship the repaired or replacement products to you freight...
Dell Dimension 4400 Systems Owner's Manual
Page 128
... Technical Support within the warranty period. Shipments to Dell, back up the data on the hard drive(s) and any removable media, such as floppy disks, CDs, or PC Cards. Dell owns all parts removed from repaired products. If Dell repairs or replaces a product, its warranty term is required, Dell will issue a Return Material Authorization Number. Limited...
... Technical Support within the warranty period. Shipments to Dell, back up the data on the hard drive(s) and any removable media, such as floppy disks, CDs, or PC Cards. Dell owns all parts removed from repaired products. If Dell repairs or replaces a product, its warranty term is required, Dell will issue a Return Material Authorization Number. Limited...
Dell Dimension 4400 Systems Owner's Manual
Page 131
... in the continental U.S., where applicable. Remove any other locations will be made by various manufacturers when supplying parts to Dell, back up the data on the hard drive(s) and any removable media, such as floppy disks, CDs, or PC Cards. Limited Warranty Coverage During Years Two,... a prepaid shipping container with each instance of the exchange, replacement parts for a replacement part is not extended. Dell will be replaced and to Dell. Dell may provide replacement parts made freight collect. Limited Warranty Coverage During Year One During the one-year period beginning on...
... in the continental U.S., where applicable. Remove any other locations will be made by various manufacturers when supplying parts to Dell, back up the data on the hard drive(s) and any removable media, such as floppy disks, CDs, or PC Cards. Limited Warranty Coverage During Years Two,... a prepaid shipping container with each instance of the exchange, replacement parts for a replacement part is not extended. Dell will be replaced and to Dell. Dell may provide replacement parts made freight collect. Limited Warranty Coverage During Year One During the one-year period beginning on...


