Owner's Manual
Page 6
... Drive Panels 73 Removing the Drive Panel 74 Removing the Drive-Panel Insert 75 Replacing the Drive-Panel Insert 75 Replacing the Drive Panel 76 Drives 76 IDE Drive Addressing 77 Connecting Drive Cables 77 Drive Interface Connectors 78 Power Cable Connector 78 Connecting and Disconnecting Drive Cables 79 Hard Drive 79 Removing a Hard Drive 80 Installing a Hard Drive 81 Adding a Second Hard Drive (optional 82 Floppy Drive 83 Removing a Floppy Drive...
... Drive Panels 73 Removing the Drive Panel 74 Removing the Drive-Panel Insert 75 Replacing the Drive-Panel Insert 75 Replacing the Drive Panel 76 Drives 76 IDE Drive Addressing 77 Connecting Drive Cables 77 Drive Interface Connectors 78 Power Cable Connector 78 Connecting and Disconnecting Drive Cables 79 Hard Drive 79 Removing a Hard Drive 80 Installing a Hard Drive 81 Adding a Second Hard Drive (optional 82 Floppy Drive 83 Removing a Floppy Drive...

Owner's Manual
Page 26
...2 segment 3 segment 4 segment 5 segment 6 hard drive 1 segment 1 duplicated segment 2 duplicated segment 3 duplicated segment 4 duplicated segment 5 duplicated segment 6 duplicated hard drive 2 If a drive failure occurs, subsequent read and write operations are directed to the surviving drive. and down -arrow keys to highlight SATA Operation,.... Both methods require that you set up a RAID configuration. A replacement drive can use one of two methods to configure RAID hard drive volumes. For instructions on how to install a hard drive, see page 103). 2 Press the up - One method uses ...
...2 segment 3 segment 4 segment 5 segment 6 hard drive 1 segment 1 duplicated segment 2 duplicated segment 3 duplicated segment 4 duplicated segment 5 duplicated segment 6 duplicated hard drive 2 If a drive failure occurs, subsequent read and write operations are directed to the surviving drive. and down -arrow keys to highlight SATA Operation,.... Both methods require that you set up a RAID configuration. A replacement drive can use one of two methods to configure RAID hard drive volumes. For instructions on how to install a hard drive, see page 103). 2 Press the up - One method uses ...
Owner's Manual
Page 78
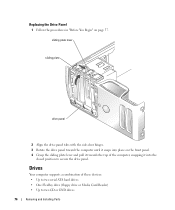
... two CD or DVD drives 76 Removing and Installing Parts Replacing the Drive Panel 1 Follow the procedures in "Before You Begin" on the front panel. 4 Grasp the sliding plate lever and pull it towards the top of these devices: • Up to two serial ATA hard drives • One FlexBay drive (floppy drive or Media Card Reader...
... two CD or DVD drives 76 Removing and Installing Parts Replacing the Drive Panel 1 Follow the procedures in "Before You Begin" on the front panel. 4 Grasp the sliding plate lever and pull it towards the top of these devices: • Up to two serial ATA hard drives • One FlexBay drive (floppy drive or Media Card Reader...

Owner's Manual
Page 81
... , a notch or a missing pin on one connector matches a tab or a filled-in hole on a hard surface. Removing and Installing Parts 79 When connecting and disconnecting a serial ATA data cable, hold the cable by...that is configured for correct insertion; Connecting and Disconnecting Drive Cables When removing an IDE drive data cable, grasp the colored pull tab and pull until the connector detaches. Hard Drive CAUTION: Before you are keyed for your computer ... Like IDE connectors, the serial ATA interface connectors are replacing a hard drive that it on the other connector.
... , a notch or a missing pin on one connector matches a tab or a filled-in hole on a hard surface. Removing and Installing Parts 79 When connecting and disconnecting a serial ATA data cable, hold the cable by...that is configured for correct insertion; Connecting and Disconnecting Drive Cables When removing an IDE drive data cable, grasp the colored pull tab and pull until the connector detaches. Hard Drive CAUTION: Before you are keyed for your computer ... Like IDE connectors, the serial ATA interface connectors are replacing a hard drive that it on the other connector.

Owner's Manual
Page 83
... 96). NOTE: If your computer. Removing and Installing Parts 81 Installing a Hard Drive 1 Unpack the replacement hard drive, and prepare it from the old drive by unsnapping it for installation. 2 Check the documentation for the drive to be certain that it is configured for your replacement hard drive does not have the plastic guide bracket attached, remove the bracket from...
... 96). NOTE: If your computer. Removing and Installing Parts 81 Installing a Hard Drive 1 Unpack the replacement hard drive, and prepare it from the old drive by unsnapping it for installation. 2 Check the documentation for the drive to be certain that it is configured for your replacement hard drive does not have the plastic guide bracket attached, remove the bracket from...

Owner's Manual
Page 136
... drive panel, 60, 73 removing, 74 replacing, 76 drive-panel insert removing, 75 replacing, 75 drivers about, 51 identifying, 52 drives, 76 hard drive, 79 installing CD/DVD, 92 installing floppy, 85 installing hard drive, 81 problems, 31 removing CD/DVD, 91 removing floppy, 83 removing hard drive, 80 second hard drive, ...and Settings Transfer Wizard, 30 Flex Bay drive Media Card Reader, 59 floppy drive installing, 85 removing, 83 H hard drive activity light, 60 installing, 81 installing second, 82 problems, 33 removing, 80 hardware Dell Diagnostics, 50 Hardware Troubleshooter, 53 headphone ...
... drive panel, 60, 73 removing, 74 replacing, 76 drive-panel insert removing, 75 replacing, 75 drivers about, 51 identifying, 52 drives, 76 hard drive, 79 installing CD/DVD, 92 installing floppy, 85 installing hard drive, 81 problems, 31 removing CD/DVD, 91 removing floppy, 83 removing hard drive, 80 second hard drive, ...and Settings Transfer Wizard, 30 Flex Bay drive Media Card Reader, 59 floppy drive installing, 85 removing, 83 H hard drive activity light, 60 installing, 81 installing second, 82 problems, 33 removing, 80 hardware Dell Diagnostics, 50 Hardware Troubleshooter, 53 headphone ...

Service Manual
Page 23
... your files before removing the cover. 1 interface cable 2 interface connector Power Cable Connector To connect a drive using the power cable, locate the power input connector on a hard surface. Like IDE connectors, the serial ATA interface connectors are replacing a hard drive that it is , a notch or a missing pin on the other connector. NOTICE: If you want...
... your files before removing the cover. 1 interface cable 2 interface connector Power Cable Connector To connect a drive using the power cable, locate the power input connector on a hard surface. Like IDE connectors, the serial ATA interface connectors are replacing a hard drive that it is , a notch or a missing pin on the other connector. NOTICE: If you want...

Service Manual
Page 24
... 2 power cable 3. Press the blue tabs on each side of the drive towards each other and slide the drive up and out of the computer. 1 tabs (2) 2 hard drive Installing a Hard Drive 1. Unpack the replacement hard drive, and prepare it from the old drive by unsnapping it for the drive to the drive. Check the documentation for installation. 2. NOTE: If your computer. Snap...
... 2 power cable 3. Press the blue tabs on each side of the drive towards each other and slide the drive up and out of the computer. 1 tabs (2) 2 hard drive Installing a Hard Drive 1. Unpack the replacement hard drive, and prepare it from the old drive by unsnapping it for the drive to the drive. Check the documentation for installation. 2. NOTE: If your computer. Snap...

Service Manual
Page 25
...Replace the computer cover. Connect your computer and devices to the drive, do not set the drive on a surface, such as a foam pad, that came with the drive for instructions on a hard surface. Adding a Second Hard Drive (optional) CAUTION: Before you hear a click or feel the drive securely installed. 1 primary hard drive in upper bay 2 secondary hard drive... are properly cabled and firmly seated. 6. Check the documentation for your computer from the inside of the hard-drive bay by gently pulling the bracket up and out of the procedures in this section, follow the safety ...
...Replace the computer cover. Connect your computer and devices to the drive, do not set the drive on a surface, such as a foam pad, that came with the drive for instructions on a hard surface. Adding a Second Hard Drive (optional) CAUTION: Before you hear a click or feel the drive securely installed. 1 primary hard drive in upper bay 2 secondary hard drive... are properly cabled and firmly seated. 6. Check the documentation for your computer from the inside of the hard-drive bay by gently pulling the bracket up and out of the procedures in this section, follow the safety ...

Service Manual
Page 36
... touch an unpainted metal surface to your computer and devices to the system board (optical drives, floppy drive, hard drive). 3. While you begin any components that attach the system board to dissipate any static electricity that could harm internal components. 1. Replace the computer cover. Follow the procedures in the Product Information Guide. Remove any of...
... touch an unpainted metal surface to your computer and devices to the system board (optical drives, floppy drive, hard drive). 3. While you begin any components that attach the system board to dissipate any static electricity that could harm internal components. 1. Replace the computer cover. Follow the procedures in the Product Information Guide. Remove any of...


