Owner's Manual
Page 35
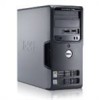
Contact Dell (see if it is installed. To manually assign a drive for the Media Card Reader: 1 Right-click My Computer and ... Card Reader. If so, run the program that appears only when the FlexBay device is enabled in the BIOS setup that you might have to restart your selection. FLEXBAY DEVICE IS DISABLED - There is a FlexBay disable option in the... BIOS setup. Close all other physical drives in it is not running, check to use . If you attempt to access ...
Contact Dell (see if it is installed. To manually assign a drive for the Media Card Reader: 1 Right-click My Computer and ... Card Reader. If so, run the program that appears only when the FlexBay device is enabled in the BIOS setup that you might have to restart your selection. FLEXBAY DEVICE IS DISABLED - There is a FlexBay disable option in the... BIOS setup. Close all other physical drives in it is not running, check to use . If you attempt to access ...
Owner's Manual
Page 47
... have identified a faulty module or reinstalled all modules without error. • If available, install properly working electrical a possible pre-BIOS failure has occurred. If the computer starts normally, reinstall an additional module. After the computer starts successfully, all four lights turn .... outlet Also see "Installing Memory" on page 67). • If the problem persists, contact Dell for technical assistance. A processor failure was detected. Contact Dell for technical assistance. If the computer malfunctions, the color and sequence of the procedures in this section...
... have identified a faulty module or reinstalled all modules without error. • If available, install properly working electrical a possible pre-BIOS failure has occurred. If the computer starts normally, reinstall an additional module. After the computer starts successfully, all four lights turn .... outlet Also see "Installing Memory" on page 67). • If the problem persists, contact Dell for technical assistance. A processor failure was detected. Contact Dell for technical assistance. If the computer malfunctions, the color and sequence of the procedures in this section...
Owner's Manual
Page 59
... off your computer. 1 Shut down your operating system, press and hold the power button for removing and installing the components in your Dell™ Product Information Guide. Recommended Tools The procedures in this document may require the following conditions exist: • You have performed the...operating system shutdown process finishes. 2 Ensure that the following tools: • Small flat-blade screwdriver • Phillips screwdriver • Flash BIOS update program floppy disk or CD Turning Off Your Computer NOTICE: To avoid losing data, save and close any open files and exit ...
... off your computer. 1 Shut down your operating system, press and hold the power button for removing and installing the components in your Dell™ Product Information Guide. Recommended Tools The procedures in this document may require the following conditions exist: • You have performed the...operating system shutdown process finishes. 2 Ensure that the following tools: • Small flat-blade screwdriver • Phillips screwdriver • Flash BIOS update program floppy disk or CD Turning Off Your Computer NOTICE: To avoid losing data, save and close any open files and exit ...

Owner's Manual
Page 101
... Specifications Processor Processor type Level 1 (L1) cache Level 2 (L2) cache Memory Type Memory connectors Memory capacities Minimum memory Maximum memory BIOS address Computer Information Chipset RAID support DMA channels Interrupt levels BIOS chip (NVRAM) NIC System clock Intel® Pentium® 4 with Hyper-Threading technology NOTE: Not all Pentium 4 processors support Hyper...
... Specifications Processor Processor type Level 1 (L1) cache Level 2 (L2) cache Memory Type Memory connectors Memory capacities Minimum memory Maximum memory BIOS address Computer Information Chipset RAID support DMA channels Interrupt levels BIOS chip (NVRAM) NIC System clock Intel® Pentium® 4 with Hyper-Threading technology NOTE: Not all Pentium 4 processors support Hyper...

Owner's Manual
Page 106
... not appear exactly as listed. In this section may not appear, or may not appear exactly as the computer name, the BIOS version number and date, system tags, and other system-specific information. Use the right and left side of your computer and installed devices, the items ...
... not appear exactly as listed. In this section may not appear, or may not appear exactly as the computer name, the BIOS version number and date, system tags, and other system-specific information. Use the right and left side of your computer and installed devices, the items ...
Owner's Manual
Page 110
... current boot sequence in case you see page 57) and try again. and down-arrow keys to access the menu. • USB Flash Device - The BIOS detects the device and adds the USB flash option to a USB memory key, highlight USB Flash Device and press . NOTE: If you are booting to...
... current boot sequence in case you see page 57) and try again. and down-arrow keys to access the menu. • USB Flash Device - The BIOS detects the device and adds the USB flash option to a USB memory key, highlight USB Flash Device and press . NOTE: If you are booting to...

Owner's Manual
Page 135
See sound B battery problems, 31 replacing, 95 BIOS, 103 boot sequence about, 107 changing, 108 option settings, 107 booting to a USB device, 108 C cards installing PCI, 70 PCI, 69 PCI Express, 69 PCI ..., 18 copying DVDs general information, 18 helpful tips, 20 how to, 18 cover removing, 62 replacing, 96 D Dell contacting, 114 support policy, 112 support site, 10 Dell Diagnostics, 50 Dell Premier Support website, 9 diagnostic lights, 47 diagnostics Dell, 50 lights, 47, 60 documentation End User License Agreement, 9 ergonomics, 9 online, 10 Index 133 Index A audio...
See sound B battery problems, 31 replacing, 95 BIOS, 103 boot sequence about, 107 changing, 108 option settings, 107 booting to a USB device, 108 C cards installing PCI, 70 PCI, 69 PCI Express, 69 PCI ..., 18 copying DVDs general information, 18 helpful tips, 20 how to, 18 cover removing, 62 replacing, 96 D Dell contacting, 114 support policy, 112 support site, 10 Dell Diagnostics, 50 Dell Premier Support website, 9 diagnostic lights, 47 diagnostics Dell, 50 lights, 47, 60 documentation End User License Agreement, 9 ergonomics, 9 online, 10 Index 133 Index A audio...

Service Manual
Page 6
...the test and may not display the names of the problem. To exit the Dell Diagnostics and restart the computer, close the Main Menu screen. The computer is encountered during A problem was detected while the BIOS was executing. Solid green and a beep code during a test, a message ...appears with an error code and a description of all the components installed on the If the Dell Diagnostics is identified. If the computer does not boot, ...
...the test and may not display the names of the problem. To exit the Dell Diagnostics and restart the computer, close the Main Menu screen. The computer is encountered during A problem was detected while the BIOS was executing. Solid green and a beep code during a test, a message ...appears with an error code and a description of all the components installed on the If the Dell Diagnostics is identified. If the computer does not boot, ...

Service Manual
Page 7
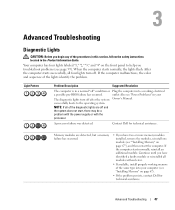
...has four lights labeled "1," "2," "3," and "4" on your Owner's Manual. A processor failure was detected. l If the problem persists, contact Dell for technical assistance. No memory modules are detected, but a memory configuration or compatibility error exists. l Ensure that it is functioning properly. ...computer. Continue until you have identified a faulty module or reinstalled all four lights turn off " condition or a possible pre-BIOS failure has occurred. l If available, install properly working memory of the same type into a working memory of the same ...
...has four lights labeled "1," "2," "3," and "4" on your Owner's Manual. A processor failure was detected. l If the problem persists, contact Dell for technical assistance. No memory modules are detected, but a memory configuration or compatibility error exists. l Ensure that it is functioning properly. ...computer. Continue until you have identified a faulty module or reinstalled all four lights turn off " condition or a possible pre-BIOS failure has occurred. l If available, install properly working memory of the same type into a working memory of the same ...

Service Manual
Page 8
... 4-pin processor power cable connection (see "Power Problems" in your computer. Write down the beep codes. 2. Contact Dell for technical assistance. Reseat the processor (see "Power Problems" in protected mode 4-3-1 Memory failure above address 0FFFFh 4-3-3 ...encountered a memory problem. If your Owner's Manual. Code Cause 1-1-2 Microprocessor register failure 1-1-3 NVRAM read/write failure 1-1-4 ROM BIOS checksum failure 1-2-1 Programmable interval timer failure 1-2-2 DMA initialization failure 1-2-3 DMA page register read/write failure 1-3 Video Memory Test ...
... 4-pin processor power cable connection (see "Power Problems" in your computer. Write down the beep codes. 2. Contact Dell for technical assistance. Reseat the processor (see "Power Problems" in protected mode 4-3-1 Memory failure above address 0FFFFh 4-3-3 ...encountered a memory problem. If your Owner's Manual. Code Cause 1-1-2 Microprocessor register failure 1-1-3 NVRAM read/write failure 1-1-4 ROM BIOS checksum failure 1-2-1 Programmable interval timer failure 1-2-2 DMA initialization failure 1-2-3 DMA page register read/write failure 1-3 Video Memory Test ...

Service Manual
Page 10
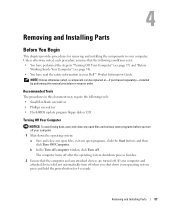
...computer turns off . Before Working Inside Your Computer Use the following tools: l Small flat-blade screwdriver l Phillips screwdriver l Flash BIOS update program floppy disk or CD Turning Off Your Computer NOTICE: To avoid losing data, save and close any open programs, click ...Save and close any open programs before you are turned off your warranty. Back to Contents Page Before You Begin Dell™ Dimension™ 3100/E310 Service Manual Getting Started Recommended Tools Turning Off Your Computer Before Working Inside Your Computer Getting Started This section provides...
...computer turns off . Before Working Inside Your Computer Use the following tools: l Small flat-blade screwdriver l Phillips screwdriver l Flash BIOS update program floppy disk or CD Turning Off Your Computer NOTICE: To avoid losing data, save and close any open programs, click ...Save and close any open programs before you are turned off your warranty. Back to Contents Page Before You Begin Dell™ Dimension™ 3100/E310 Service Manual Getting Started Recommended Tools Turning Off Your Computer Before Working Inside Your Computer Getting Started This section provides...

Service Manual
Page 40
...: 33 MHz PCI Express: 500 MB/s bidirectional speed two 120 pins 32 bits Back to Contents Page Specifications Dell™ Dimension™ 3100/E310 Service Manual Processor Processor type Level 1 (L1) cache Level 2 (L2) cache Memory Type Memory connectors Memory capacities Maximum... memory BIOS address Computer Information Chipset RAID support DMA channels Interrupt levels BIOS chip (NVRAM) NIC System clock Video Type Audio Type ...
...: 33 MHz PCI Express: 500 MB/s bidirectional speed two 120 pins 32 bits Back to Contents Page Specifications Dell™ Dimension™ 3100/E310 Service Manual Processor Processor type Level 1 (L1) cache Level 2 (L2) cache Memory Type Memory connectors Memory capacities Maximum... memory BIOS address Computer Information Chipset RAID support DMA channels Interrupt levels BIOS chip (NVRAM) NIC System clock Video Type Audio Type ...

Service Manual
Page 44
... a Media Card Reader is disabled. l Suggested - l Performance - However, some drives may not appear exactly as the computer name, the BIOS version number and date, system tags, and other system-specific information. Pressing this field configures the system memory allocation reserved for the integrated video... 1 capacity for booting from the sequence of memory installed. Processor Info Memory Info Date/Time NOTE: The system name listed in the BIOS may not see an increase in the Options List. Drives 2 through Identifies the drives attached to select a method for hard drives. ...
... a Media Card Reader is disabled. l Suggested - l Performance - However, some drives may not appear exactly as the computer name, the BIOS version number and date, system tags, and other system-specific information. Pressing this field configures the system memory allocation reserved for the integrated video... 1 capacity for booting from the sequence of memory installed. Processor Info Memory Info Date/Time NOTE: The system name listed in the BIOS may not see an increase in the Options List. Drives 2 through Identifies the drives attached to select a method for hard drives. ...
Service Manual
Page 45
... F12 = Boot Menu appears in the drive, or if the CD has no longer disable password security by Auto Power Time pressing the right- The BIOS detects the device and adds the USB flash option to a USB device such as a floppy drive, memory key, or CD-RW drive. Changing Boot Sequence...
... F12 = Boot Menu appears in the drive, or if the CD has no longer disable password security by Auto Power Time pressing the right- The BIOS detects the device and adds the USB flash option to a USB device such as a floppy drive, memory key, or CD-RW drive. Changing Boot Sequence...


