
Owner's Manual
Page 1
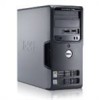
Dell™ Dimension™ 3100/E310 Owner's Manual Service Tag CD or DVD activity light FlexBay for optional floppy drive or Media Card Reader headphone connector diagnostic lights 1234 CD or DVD eject button USB 2.0 connectors (2) hard drive activity light power button cover latch release card slots for PCI (2), PCI Express x1 (1) power connector sound-card connectors USB 2.0 connectors (4) network adapter VGA video connector (integrated) Model DCSM www.dell.com | support.dell.com
Dell™ Dimension™ 3100/E310 Owner's Manual Service Tag CD or DVD activity light FlexBay for optional floppy drive or Media Card Reader headphone connector diagnostic lights 1234 CD or DVD eject button USB 2.0 connectors (2) hard drive activity light power button cover latch release card slots for PCI (2), PCI Express x1 (1) power connector sound-card connectors USB 2.0 connectors (4) network adapter VGA video connector (integrated) Model DCSM www.dell.com | support.dell.com

Service Manual
Page 1
... the Dell Dimension Help file. Other trademarks and trade names may be used in this document to change without the written permission of Dell Inc. NOTICE: A NOTICE indicates either the entities claiming the marks and names or their products. Dell™ Dimension™ 3100/E310 Service Manual Before You Begin Removing the Computer Cover About Your Dell™ Dimension™ 3100/E310...
... the Dell Dimension Help file. Other trademarks and trade names may be used in this document to change without the written permission of Dell Inc. NOTICE: A NOTICE indicates either the entities claiming the marks and names or their products. Dell™ Dimension™ 3100/E310 Service Manual Before You Begin Removing the Computer Cover About Your Dell™ Dimension™ 3100/E310...

Service Manual
Page 2
... light is a minimum of two inches of space between all vents and any of the vents. Back to Contents Page About Your Dell™ Dimension™ 3100/E310 Computer Dell™ Dimension™ 3100/E310 Service Manual Front View of Computer Back View of Computer Front View of speakers. Press to the system. Use only a dry cloth to clean...
... light is a minimum of two inches of space between all vents and any of the vents. Back to Contents Page About Your Dell™ Dimension™ 3100/E310 Computer Dell™ Dimension™ 3100/E310 Service Manual Front View of Computer Back View of Computer Front View of speakers. Press to the system. Use only a dry cloth to clean...

Service Manual
Page 5
... steps change the boot sequence for your hard drive or from the numbered list. Back to Contents Page Advanced Troubleshooting Dell™ Dimension™ 3100/E310 Service Manual Dell Diagnostics System Lights Diagnostic Lights Beep Codes Dell Diagnostics CAUTION: Before you begin . When to the devices specified in the Product Information Guide. NOTE: The ResourceCD is recommended...
... steps change the boot sequence for your hard drive or from the numbered list. Back to Contents Page Advanced Troubleshooting Dell™ Dimension™ 3100/E310 Service Manual Dell Diagnostics System Lights Diagnostic Lights Beep Codes Dell Diagnostics CAUTION: Before you begin . When to the devices specified in the Product Information Guide. NOTE: The ResourceCD is recommended...

Service Manual
Page 10
Back to Contents Page Before You Begin Dell™ Dimension™ 3100/E310 Service Manual Getting Started Recommended Tools Turning Off Your Computer Before Working Inside Your Computer Getting Started This section provides procedures for 4 seconds. ... have read the safety information in the Product Information Guide. CAUTION: Handle components and cards with locking tabs; Damage due to help ensure your Dell™ Product Information Guide. NOTICE: To avoid damaging the computer, perform the following safety guidelines to servicing that the computer and any connector pins...
Back to Contents Page Before You Begin Dell™ Dimension™ 3100/E310 Service Manual Getting Started Recommended Tools Turning Off Your Computer Before Working Inside Your Computer Getting Started This section provides procedures for 4 seconds. ... have read the safety information in the Product Information Guide. CAUTION: Handle components and cards with locking tabs; Damage due to help ensure your Dell™ Product Information Guide. NOTICE: To avoid damaging the computer, perform the following safety guidelines to servicing that the computer and any connector pins...
Service Manual
Page 12
... cable into the network device and then plug the cable into place by pulling back on . Back to Contents Page Replacing the Computer Cover Dell™ Dimension™ 3100/E310 Service Manual CAUTION: Before you so that they do not get caught underneath the drives. 2. Ensure that no tools or extra parts are connected and...
... cable into the network device and then plug the cable into place by pulling back on . Back to Contents Page Replacing the Computer Cover Dell™ Dimension™ 3100/E310 Service Manual CAUTION: Before you so that they do not get caught underneath the drives. 2. Ensure that no tools or extra parts are connected and...

Service Manual
Page 13
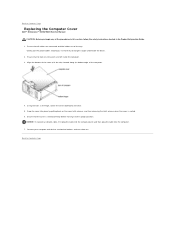
Back to Contents Page Removing the Computer Cover Dell™ Dimension™ 3100/E310 Service Manual CAUTION: Before you are working on a level, protected surface to Contents Page Lay your computer from the hinge tabs and set it is resting. 2. Release ...
Back to Contents Page Removing the Computer Cover Dell™ Dimension™ 3100/E310 Service Manual CAUTION: Before you are working on a level, protected surface to Contents Page Lay your computer from the hinge tabs and set it is resting. 2. Release ...
Service Manual
Page 14
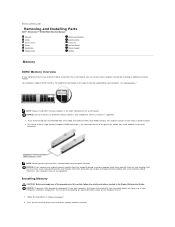
...increase your computer memory by installing an additional memory module. Back to Contents Page Removing and Installing Parts Dell™ Dimension™ 3100/E310 Service Manual Memory Cards Drive Panels Drives Hard Drive Floppy Drive Media Card Reader CD/DVD Drive Processor System Board ...clip at the slowest speed installed. NOTE: Always install DDR2 memory modules in the Product Information Guide. NOTE: Memory purchased from Dell. Your computer supports DDR2 memory. Follow the procedures in DIMM connector 1, the connector closest to install a single memory module in ...
...increase your computer memory by installing an additional memory module. Back to Contents Page Removing and Installing Parts Dell™ Dimension™ 3100/E310 Service Manual Memory Cards Drive Panels Drives Hard Drive Floppy Drive Media Card Reader CD/DVD Drive Processor System Board ...clip at the slowest speed installed. NOTE: Always install DDR2 memory modules in the Product Information Guide. NOTE: Memory purchased from Dell. Your computer supports DDR2 memory. Follow the procedures in DIMM connector 1, the connector closest to install a single memory module in ...

Service Manual
Page 40
... HDA PCI 2.3 PCI Express x1 PCI: 33 MHz PCI Express: 500 MB/s bidirectional speed two 120 pins 32 bits Back to Contents Page Specifications Dell™ Dimension™ 3100/E310 Service Manual Processor Processor type Level 1 (L1) cache Level 2 (L2) cache Memory Type Memory connectors Memory capacities Maximum memory BIOS address Computer Information Chipset RAID...
... HDA PCI 2.3 PCI Express x1 PCI: 33 MHz PCI Express: 500 MB/s bidirectional speed two 120 pins 32 bits Back to Contents Page Specifications Dell™ Dimension™ 3100/E310 Service Manual Processor Processor type Level 1 (L1) cache Level 2 (L2) cache Memory Type Memory connectors Memory capacities Maximum memory BIOS address Computer Information Chipset RAID...

Service Manual
Page 43
... logo appears, continue to appear. 3. Scroll up and down the system setup screen information for future reference. Back to Contents Page System Setup Dell™ Dimension™ 3100/E310 Service Manual Clearing Forgotten Passwords Clearing CMOS Settings Overview Use system setup as the user password l To read the current amount of memory or set or...
... logo appears, continue to appear. 3. Scroll up and down the system setup screen information for future reference. Back to Contents Page System Setup Dell™ Dimension™ 3100/E310 Service Manual Clearing Forgotten Passwords Clearing CMOS Settings Overview Use system setup as the user password l To read the current amount of memory or set or...

Service Manual
Page 48
Back to Contents Page Technical Overview Dell™ Dimension™ 3100/E310 Service Manual Inside View of Your Computer System Board Components Power Supply DC Connector Pin Assignments Inside View of Your Computer 1 bay for optional second hard drive 2 hard drive 3 floppy drive* 4 CD or DVD drive 5 power supply 6 system board System Board Components
Back to Contents Page Technical Overview Dell™ Dimension™ 3100/E310 Service Manual Inside View of Your Computer System Board Components Power Supply DC Connector Pin Assignments Inside View of Your Computer 1 bay for optional second hard drive 2 hard drive 3 floppy drive* 4 CD or DVD drive 5 power supply 6 system board System Board Components


